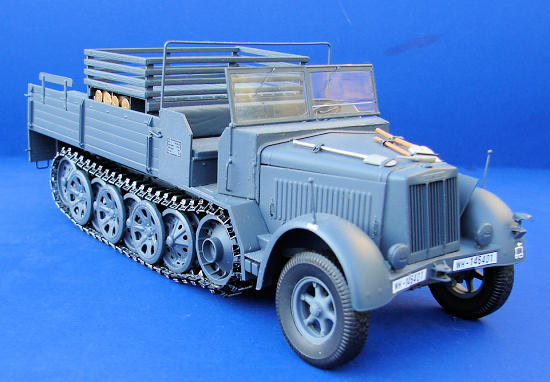
Dragon 1/35 Sd.Kfz.7 Late Production
| KIT #: | 6562 |
| PRICE: | $16.98 |
| DECALS: | Three options |
| REVIEWER: | Mark Hiott |
| NOTES: | Griffon Models P.E. set used |
| HISTORY |
Development of
the Sd.Kfz. 7 can be traced back to a 1934 requirement for an eight-tonne (7.87
tons) half-track. The vehicle first appeared in 1938 and was destined to be used
mainly as the tractor for the 8.8 cm FlaK gun and the 15 cm sFH 18 150 mm
howitzer. The Sd.Kfz. 7 also became the basis of a number of self-propelled
anti-aircraft variants based on 20 mm and 37 mm flak types in use. Further
because of its heavy power it often found use as a recovery vehicle.
 The running
gear consisted of two front wheels with hydro-pneumatic tires for steering and a
track each side with 14 road wheels (7 overlapping on each side of the vehicle);
a drive sprocket was located at the front of each track system. Minor variations
on the track and road wheel design and manufacture took place throughout the
course of service, some being combined in the field as repairs took place.
The running
gear consisted of two front wheels with hydro-pneumatic tires for steering and a
track each side with 14 road wheels (7 overlapping on each side of the vehicle);
a drive sprocket was located at the front of each track system. Minor variations
on the track and road wheel design and manufacture took place throughout the
course of service, some being combined in the field as repairs took place.
The iconic
Sd.Kfz.7 was used throughout the war. Sd.Kfz. 7 were seen during the 1940 Paris
victory parade and the Sd.Kfz. 7 features in much German wartime propaganda
footage, contributing to the myth of the mechanized Blitzkrieg. In fact while
produced in large numbers there were never enough to fully equip the German
forces. Typically like many other types, the artillery elements of Panzer and
mechanized units (Panzer grenadier) received them, while others continued to
rely on horses to draw their guns.
Some Sd.Kfz. 7 were pressed into service by the Allies during and after the Second World War. An Italian-manufactured variant was also built, and is easily recognized by its longer hood and right-hand-drive steering.
| THE KIT |
 For
a good look in the box, see Scott's preview. The kit is very nicely molded with
a high degree of detail on the various parts. And a
For
a good look in the box, see Scott's preview. The kit is very nicely molded with
a high degree of detail on the various parts. And a
The
kit appears to be the standard Dragon Sd.Kfz.7 kit, as there are many parts not
used. Some of those parts include a complete armored cabin for a different
version. I suppose if one knew enough about the Sd.Kfz.7 family, they could use
the extra parts to build a whole different kit!
The
instructions are very well done and include a parts layout. A paint chart for
Aqueous, Mr. Color and MM paints is also provided. Even though the instructions
show 3 paint schemes, enough decals are provided to do most any vehicle desired.
A small set of p/e parts is also included.
I used part of the Griffon p/e set for the Dragon Sd.Kfz.7/1 Flak-Vierling. Most of the set cannot be used on this version, but all the engine parts and some of the chassis parts can be. I will use the Flak gun parts on a later build of the Tamiya Sd.Kfz 7/1.
| CONSTRUCTION |
I
basically followed the instruction steps. The good thing about
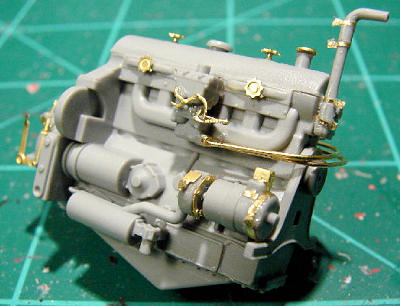 In
step 3 & 4, the engine goes together. I left off part #D56 (intake tube) and
installed it in step 12 with the rest of the air cleaner parts. The instructions
call for painting the engine Steel. I don't know much about armor, so I went
with the color callouts, but steel just doesn't seem right to me. There are
several decals for the engine, make sure you apply them now, as you will have
trouble doing so later.
In
step 3 & 4, the engine goes together. I left off part #D56 (intake tube) and
installed it in step 12 with the rest of the air cleaner parts. The instructions
call for painting the engine Steel. I don't know much about armor, so I went
with the color callouts, but steel just doesn't seem right to me. There are
several decals for the engine, make sure you apply them now, as you will have
trouble doing so later.
The
Griffon p/e parts fit quite nicely. However they are very small and will take
patience to apply. Go slowly and take your time. Griffon also gives you wire
that will need to be bent for certain details. Bending guides are included on
the edges of the p/e frets to bend some of these parts. Griffon also includes a
very nice radiator that you assemble out of a half dozen parts. None of this can
be seen after assembly, so all I did was attach one of
the mesh parts to the inside of the radiator housing. I suppose if the
housing louvers were open, then the p/e parts would make sense. While they were
a bit of work to install, the p/e parts make a big difference.
 Steps 5, 6, 7, 8 and 9 bring the chassis, engine and running gear together. In
step 6 insert the transmission from the bottom, NOT from the top as shown. The
front tire mountings are VERY small and have little area for attachment. Mine
ended up coming loose several times and I finally had to attach then with
superglue.
Steps 5, 6, 7, 8 and 9 bring the chassis, engine and running gear together. In
step 6 insert the transmission from the bottom, NOT from the top as shown. The
front tire mountings are VERY small and have little area for attachment. Mine
ended up coming loose several times and I finally had to attach then with
superglue.
In
step 7 I could not identify nor install part B1. It has something to do with the
winch drive, but I ended up leaving it off.
Step
8 is the road wheels. There are a lot of parts to install at one time and you
have to be careful to make sure all the wheels are level. I used slow setting
glue and did one side at a time. I still ended up with a couple wheels out of
alignment and had to snap them off and reattach them.
 In
step 9 cut the rear mounting pins off the engine. You will have to spread the
chassis to get them in place and it not worth the chance of breaking something.
Apply glue to the front mounts and to the drive shaft where it goes into the
transmission, insert the shaft first and then set the engine down on its front
mounts. The shaft will hold the engine in place without the rear mounting pins.
I left off parts D7 and D46 (air cleaner) for installation in step 12.
In
step 9 cut the rear mounting pins off the engine. You will have to spread the
chassis to get them in place and it not worth the chance of breaking something.
Apply glue to the front mounts and to the drive shaft where it goes into the
transmission, insert the shaft first and then set the engine down on its front
mounts. The shaft will hold the engine in place without the rear mounting pins.
I left off parts D7 and D46 (air cleaner) for installation in step 12.
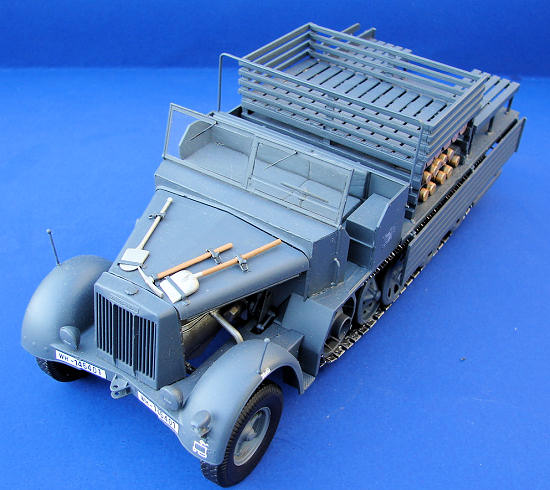
Steps 10 and 11 are the cab assembly. This is the only part of the kit that has
fit problems. The cab is divided into separate front, side and back walls and
they don't really fit together that well. The dash installation is also bit
tricky. The mounting for the steering column is particularly fragile. Attach
this part good, as you
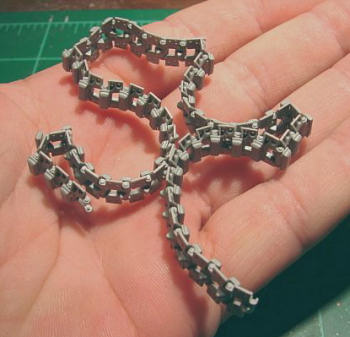 Step
12 was my least favorite step. The chassis and cab come together, but you also
have to assemble the infernal "Magic Track" pieces. They do give a very nice
rendition of the tracks, but damn, they are small. And there is a LOT of them
do... 54 per side!!! I did them in 3 sets of 18 and I could only do one or two
sets a night. In this step I also installed parts D7, D46 and D56, along with
D32. I did this to make sure that the air cleaner assembly parts all lined up. I
had to remove the mounting pin on the engine for part #56, not sure if that was
my fault or what.
Step
12 was my least favorite step. The chassis and cab come together, but you also
have to assemble the infernal "Magic Track" pieces. They do give a very nice
rendition of the tracks, but damn, they are small. And there is a LOT of them
do... 54 per side!!! I did them in 3 sets of 18 and I could only do one or two
sets a night. In this step I also installed parts D7, D46 and D56, along with
D32. I did this to make sure that the air cleaner assembly parts all lined up. I
had to remove the mounting pin on the engine for part #56, not sure if that was
my fault or what.
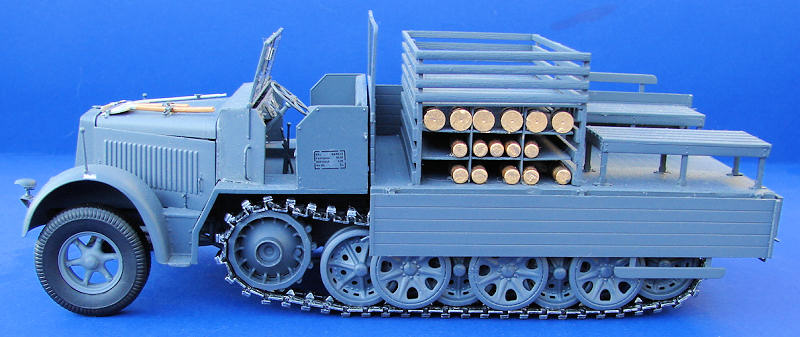
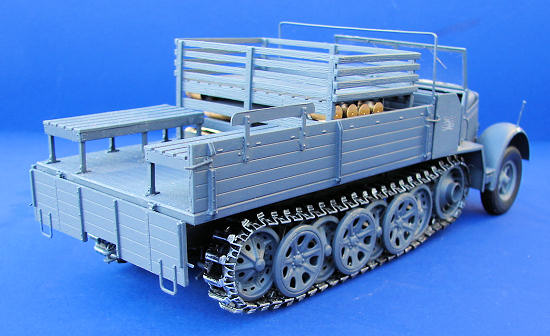
Steps 13, 14 and 15 are for the bed. There are optional positions for the bed
sides an d I chose to leave one side up and the other side and tailgate down. The
only parts I had trouble with here were the parts for the upper frame. I suppose
on the real thing it was for some kind of canvas cover or something. The parts
are very fine and easily broken. Part A1 had a half dozen of those little tiny
plastic balls attached to it and I broke one of the parts removing them. In the
end, however, I ended up knocking the bed assembly off the workbench and broke
the framework. It could not be repaired, so I had to end up leaving it off.
d I chose to leave one side up and the other side and tailgate down. The
only parts I had trouble with here were the parts for the upper frame. I suppose
on the real thing it was for some kind of canvas cover or something. The parts
are very fine and easily broken. Part A1 had a half dozen of those little tiny
plastic balls attached to it and I broke one of the parts removing them. In the
end, however, I ended up knocking the bed assembly off the workbench and broke
the framework. It could not be repaired, so I had to end up leaving it off.
| COLORS & MARKINGS |
There
are 3 options as far as painting goes. One in Field Gray, one in Dark Yellow and
one in Dark Yellow with Khaki Green camo. Not being a big armor builder, I chose
the easy way out... all gray. I painted the model MM Panzer Gray. While that may
not be the 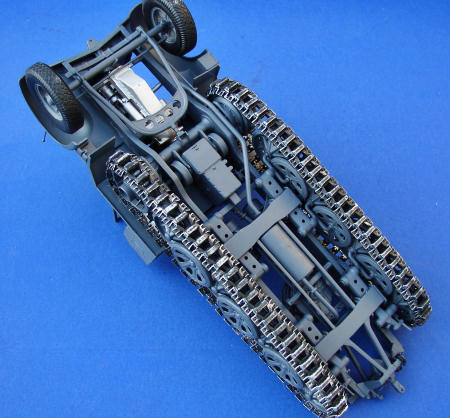 exact color, I couldn't find Field Gray at my LHS.
The
engine was painted steel and was installed after the chassis was painted gray.
The instructions call for the tracks to be painted Steel, I instead painted them
Floquil Grimy Black and did some dry-brushing with steel. The chassis, cab and
bed were all painted as assemblies. The assemblies were then glued together and
touch up was done. The included painting mask for the windshield is a nice
touch. It was at this point that I discovered the MM Panzer Gray in a spray can
is not quite the same shade as MM Panzer Gray in the bottle. Live and learn...
Decals are minimal and consist of truck numbers for the front and rear plus a spec decal for the side of the cab. There are no unit decals provided.
| CONCLUSIONS |
As a
part-time armor builder, I have to say I did not enjoy this kit. It has great
detail and goes together ok, but it just has too many tiny parts and a lot of
those could have be molded as a part of a larger whole. A good portion of the
detail is lost in building the kit and can't be seen. The Magic Track parts
turned me off big time. There are so many and they are so finicky, that it was
more like work then a hobby. Plus there is all those darn plastic blobs on
everything...
On
the other hand the Griffon Models p/e set (even t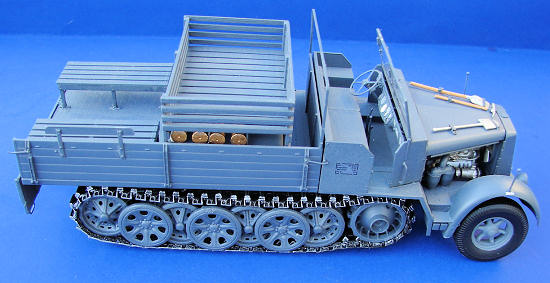 hough not made for this
particular kit) is a joy to behold.
Most of the parts are direct replacements for the kit parts. The parts fit just
like they are suppose to and look great. The p/e frets even include bending
templates for the various handles.
hough not made for this
particular kit) is a joy to behold.
Most of the parts are direct replacements for the kit parts. The parts fit just
like they are suppose to and look great. The p/e frets even include bending
templates for the various handles.
I
have discovered that Voyager Models is releasing some detail sets for this kit.
(upgrade set PE 35335 and cargo bay PE 35336) While I have not seen them
personally, they look good and should go a long way it making a nice kit even
better.
I
can say if you are a big armor fan, you will love this kit. It has incredible
detail and looks great when done. It was just not my cup 'o tea...
| REFERENCES |
Wikipedia
for the history
Some photos off the internet
August 2010 Thanks to
www.dragonmodelsusa via your editor for
the review kit. Get yours at your local shop. If you would like your product reviewed fairly and quickly, please
contact
me or see other details in the
Note to
Contributors.