Academy 1/35 Tiger 1 (Early)
| KIT #: | ? |
| PRICE: | $ |
| DECALS: | Five options |
| REVIEWER: | Mark Hiott |
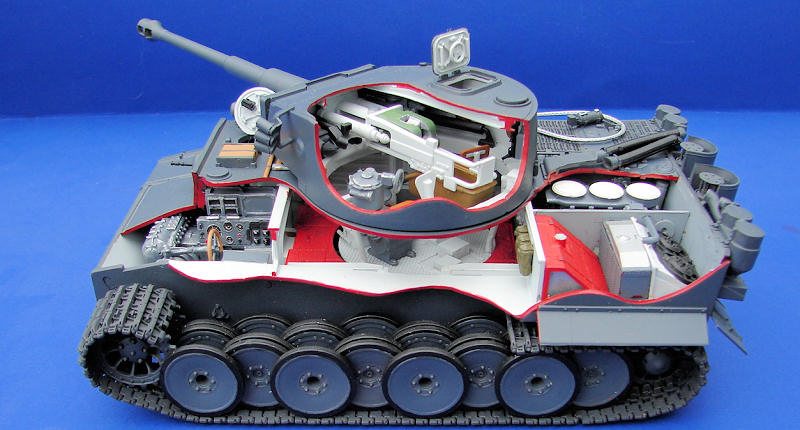
| NOTES: | Full interior, includes small p/e fret. Modified as a cutaway. Eduard exterior p/e, Rubio turned aluminum barrel used. |
| HISTORY |
The
Tiger 1 was a German Heavy Tank used in WW2, produced from late 1942 as an
answer to the unexpectedly formidable Russisn armour encountered in the initial
months of Operation Barbarossa, particularly the T-34 and the KV-1. The Tiger I
design gave the German Army its first tank mounting the 88mm gun, which had
previously demonstrated its effectiveness against both aircraft and tanks.
During the course of the war, the Tiger I saw combat on all German battlefronts.
It was usually deployed in independent tank battalions, which proved to be quite
formidable.
 While
the Tiger I was feared by many of its opponents, it was over-engineered,
expensive and time-consuming to produce. Only 1,347 were built between August
1942 and August 1944. The Tiger was prone to mechanical breakdowns and in 1944,
production was phased out in favour of the Tiger II.
While
the Tiger I was feared by many of its opponents, it was over-engineered,
expensive and time-consuming to produce. Only 1,347 were built between August
1942 and August 1944. The Tiger was prone to mechanical breakdowns and in 1944,
production was phased out in favour of the Tiger II.
The tank
was given its nickname
Tiger
and
the Roman numeral was added after the later Tiger II entered production. The
initial official German designation was
Panzerkampfwagen VI Ausführung H
(‘Panzer VI version H’, abbreviated
PzKpfw VI Ausf. H), but the
tank was redesignated as PzKpfw VI
Ausf. E in March 1943. It also had
the ordnance inventory designation Sd.Kfz 181.
The
Tiger I had frontal hull armour 100 mm (3.9 in) thick and frontal turret armour
of 120 mm (4.7 in), as opposed to the 80 mm (3.1 in) frontal hull and 50 mm
(2 in) frontal turret armour of contemporary models of the Panzer IV. It also
had 60 mm (2.4 in) thick hull side plates and 80 mm armour on the side
superstructure and rear, turret sides and rear was 80 mm. The top and bottom
armour was 25 mm (1 in) thick; from March 1944 the turret roof was thickened to
40 mm (1.6 in). Armour plates were mostly flat, with interlocking construction.
The armour joints were of high quality, being stepped and welded rather than
riveted.
The
gun's breech and firing mechanism were derived from the famous German "88" dual
purpose flak gun. The 88mm Kwk 36 L/56 gun was the variant chosen for the Tiger
and was one of the most effective and feared tank guns of World War II. The
Tiger's 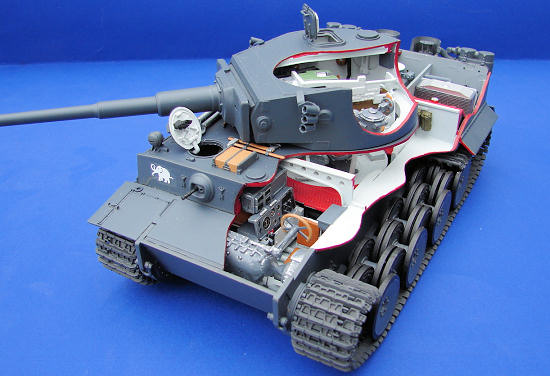 gun
had a very flat trajectory and extremely accurate Zeiss Turmzielfernrohr TZF 9b
sights (later replaced by the monocular TZF 9c). In British wartime firing
trials, five successive hits were scored on a 16 by 18 in (410 by 460 mm) target
at a range of 1,200 yards (1,100 m). Tigers were reported to have knocked out
enemy tanks at ranges greater than 2.5 miles (4,000 m), although most World War
II engagements were fought at much shorter ranges. Triangulation (Range Finding)
equipment was not yet available so tank crews had a vested interest to approach
the enemy as much as possible.
gun
had a very flat trajectory and extremely accurate Zeiss Turmzielfernrohr TZF 9b
sights (later replaced by the monocular TZF 9c). In British wartime firing
trials, five successive hits were scored on a 16 by 18 in (410 by 460 mm) target
at a range of 1,200 yards (1,100 m). Tigers were reported to have knocked out
enemy tanks at ranges greater than 2.5 miles (4,000 m), although most World War
II engagements were fought at much shorter ranges. Triangulation (Range Finding)
equipment was not yet available so tank crews had a vested interest to approach
the enemy as much as possible.
1,347
Tiger 1 were produced. When the improved Tiger II began production in January
1944, the Tiger I was soon phased out.
Today only a handful of Tiger Is survive in museums and exhibitions worldwide. Perhaps the most notable specimen is the Bovington Tank Museum's Tiger 131, currently the only one restored to running order.
| THE KIT |
The kit is Academy's standard Tiger 1 but with the parts needed to add the interior. The basic tank kit is molded in tan, the new interior parts in gray and the tracks are molded in a dark gray. The parts are nicely molded with no flash or ejector marks found. There are a lot of parts in the box, and unusually, you will use most of them. A small p/e fret contains grills for the engine cover. The intake tubes running from the filters to the engine are a rubber like material.
Decals are included for 5 versions in 4 camo schemes. Included is the famous Wittmann Tiger 1.
| CONSTRUCTION |
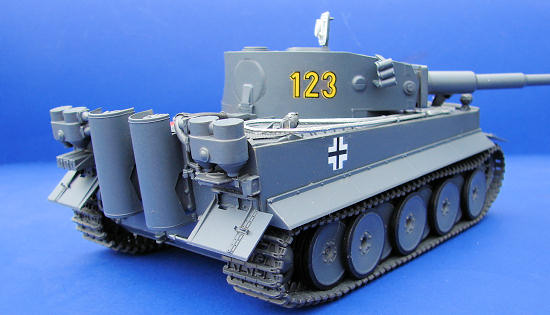
I picked this kit up at a swap meet and in the box was a Rubio barrel and 1 complete Eduard p/e exterior set and another partial set. The Eduard p/e sets are mostly brackets, tie-downs and such. Most of it was used on the rear plate and mufflers.
 I wanted
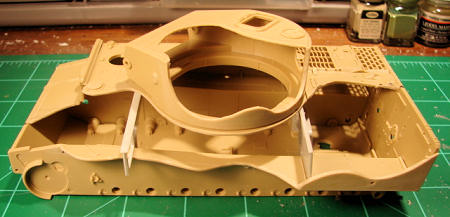
to display the model to show the interior but I also wanted it to be whole.
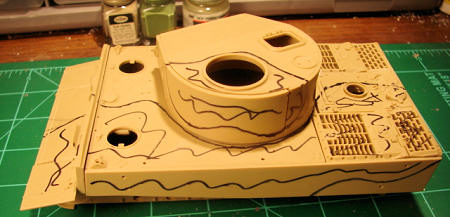
Instead of an "exploded" display, I chose to do a cutaway display. First I had
to figure out how. I taped the Tiger together and with a black Sharpie, laid out
the sections I wanted to remove. I went around the turret ring to maintain the
upper hull decks integrity. I then used a pair of snips to remove the majority
of the plastic and then used a Dremel and sandpaper to smooth the edges. Once
that was done, I looked through the instructions to see if any parts needed to
be trimmed. The front crossbeam needed trimmed, but the rear crossbeam provides
the mounting for other parts, so I left it alone.
I wanted
to display the model to show the interior but I also wanted it to be whole.
Instead of an "exploded" display, I chose to do a cutaway display. First I had
to figure out how. I taped the Tiger together and with a black Sharpie, laid out
the sections I wanted to remove. I went around the turret ring to maintain the
upper hull decks integrity. I then used a pair of snips to remove the majority
of the plastic and then used a Dremel and sandpaper to smooth the edges. Once
that was done, I looked through the instructions to see if any parts needed to
be trimmed. The front crossbeam needed trimmed, but the rear crossbeam provides
the mounting for other parts, so I left it alone.
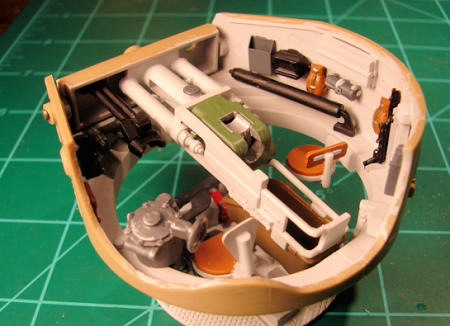
 The
hull of the model was build pretty much OOB. The torsion bars fit into the lower
hull perfectly. Most of this detail will be unseen after completion. The front
transmission assembly is a tight fit and required a bit of modification to get
into place. There are also a couple parts in the engine bay that are a bit of a
pain to get into place. I left out the right side fuel tank and radiator, as
with my cutaway, you can't see them. Also as a result of the cutaway, I had to
leave the left side shell storage off and after attaching the hull top, you
can't see the right side stowage either!
The
hull of the model was build pretty much OOB. The torsion bars fit into the lower
hull perfectly. Most of this detail will be unseen after completion. The front
transmission assembly is a tight fit and required a bit of modification to get
into place. There are also a couple parts in the engine bay that are a bit of a
pain to get into place. I left out the right side fuel tank and radiator, as
with my cutaway, you can't see them. Also as a result of the cutaway, I had to
leave the left side shell storage off and after attaching the hull top, you
can't see the right side stowage either!
 The
transmission needed a little trimming done to the top in order to clear the
glacis plate.
The
transmission needed a little trimming done to the top in order to clear the
glacis plate.
The turret the made up of 2 side halves and the top. Doing it as a cutaway posed a particular problem when it came to painting. I had to trim the cross members on the turret roof to clear the cutaway section.
I left the road wheels complete, but cut the track short on the left side to show off the overlapping wheels.
| COLORS & MARKINGS |
As I'm no armor expert, I followed most of the
color callouts in the instructions. I wanted to highlight the cutaway so I used
a light gray for the interior. The cutaway idea made for a difficult paint job
which was s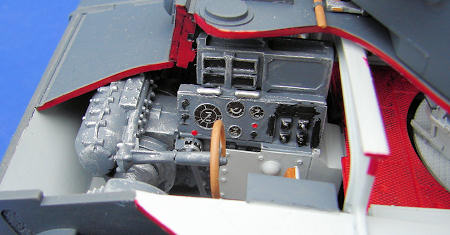 omething
I didn't think through when I started this!
omething
I didn't think through when I started this!
The hull was assembled and then painted gray. I then masked off the outside and sprayed the interior light gray. The turret posed an especially difficult problem. I ended up painting the interior parts and assembling the turret completely. I then taped off the lower section and stuffed the cutaway section with cotton balls. The outside was then painted gray. Once everything was together, I painted the edges of the cutaway sections with red paint. The last parts installed where the road wheels and tracks.
I chose one of the gray Russian front tanks, and since it was a cutaway, I just picked one at random.
| CONCLUSIONS |
 I have
been told that Academy makes the best Tiger 1 kit on the market, and after
building one, I agree. Doing this kit OOB will give you a beautiful early Tiger
1. That said, my idea of a cutaway was not quite as well executed as it could
have been. I had to leave off a lot of the kits detail, as some of the parts had
nowhere to go. I think it looks nice, but I should have given more thought to
which sections were removed.
I have
been told that Academy makes the best Tiger 1 kit on the market, and after
building one, I agree. Doing this kit OOB will give you a beautiful early Tiger
1. That said, my idea of a cutaway was not quite as well executed as it could
have been. I had to leave off a lot of the kits detail, as some of the parts had
nowhere to go. I think it looks nice, but I should have given more thought to
which sections were removed.
What can I say? This was a fun kit to build, I think even a beginner will have little trouble with this kit. It has a few fit problems, but nothing major. I have also been told that the interior is not quite accurate, but if you like the Tiger 1, this kit is a must have!
| REFERENCES |
Wikipedia for the history
September 2010
If you would like your product reviewed fairly and quickly, please contact me or see other details in the Note to Contributors.