Cyber-Hobby 1/35 Panzer II ausf F
| KIT #: | 6263 |
| PRICE: | around $50.00 on the streets |
| DECALS: | Several options |
| REVIEWER: | Scott Lyle |
| NOTES: |
| HISTORY |
By the mid 1930s the Panzer I was in production and the German Army was looking forward to the Panzer III and Panzer IV main battle tanks. Numerous delays and design problems with those vehicles however meant that they wouldn’t be ready until 1939, so the Wehrmacht decided to produce a stop-gap vehicle, if for no other reason but to keep the various tank factories busy. Thus the Panzer II was born, weighing around 7.5 tons and armed with a 20mm KwK 30 cannon and a co-axial 7.92mm MG.34 machine gun.
Initially built
by the firm of MAN, the tank was operated by a crew of three; the
commander/gunner, a loader/radio operator and a driver. Operations during the
early battles of the war showed that the vehicle was easily penetrated by enemy
anti-tank guns, thus progressive variants of the tan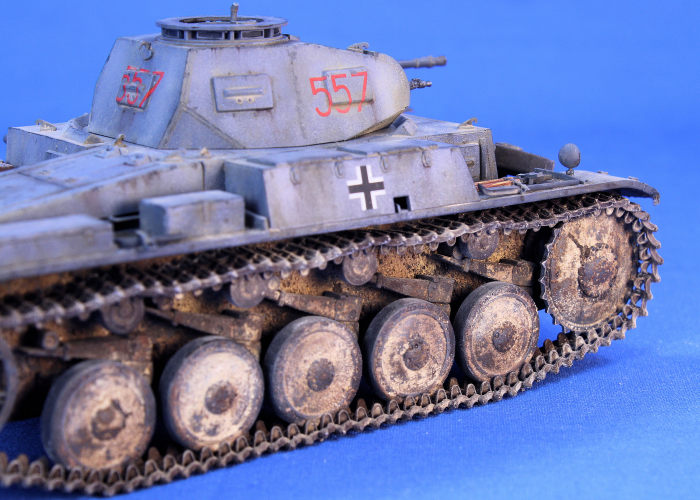 k
featured thicker and thicker armor. The Ausf. F, arriving in the spring of 1941,
not only had thicker armor on the hull, turret, and superstructure, but a new
commander’s cupola as well.
k
featured thicker and thicker armor. The Ausf. F, arriving in the spring of 1941,
not only had thicker armor on the hull, turret, and superstructure, but a new
commander’s cupola as well.
Some 1,850 Panzer IIs of all versions were built and along with the Panzer I, formed the backbone of the Panzer units during the battles of Poland and France. Though obsolete by the end of the French campaign, it was still used in large numbers well into 1942 before finally being retired from front-line units. Its chassis would soldier on until the end of the war however, being repurposed to construct self-propelled anti-tank guns, artillery pieces, flamethrowers, and other such vehicles.
While not a particularly impressive vehicle, the Panzer II was the most numerous tank in the German Army during their headiest victories early in the war.
| THE KIT |
Early war light tanks will probably never be as popular as the later war medium and heavy tanks, but the mainstream manufacturers have been busy issuing new kits of them nonetheless. The Panzer II family has received excellent treatment lately, and this Cyber Hobby version of the Panzer II Ausf. F features separate track links, a full suite of transparent parts for the tank’s viewports, a photo etch fret of small details, decals for seven different versions, and the piece de resistance - a fully detailed interior.
 Opening
the box, you are greeted by a virtual orgy of gray plastic sprues, 11 to be
exact not including the turret and hull tub. The separate track links come in
two bags, “handed” left and right. A piece of gray cardboard holds 4 more sprues
of tiny transparent parts, a photo etch fret of tiny parts and another bag of
even more tiny metal parts. The only thing Dragon forgot to include was the
optivisor.
Opening
the box, you are greeted by a virtual orgy of gray plastic sprues, 11 to be
exact not including the turret and hull tub. The separate track links come in
two bags, “handed” left and right. A piece of gray cardboard holds 4 more sprues
of tiny transparent parts, a photo etch fret of tiny parts and another bag of
even more tiny metal parts. The only thing Dragon forgot to include was the
optivisor.
The level of detail in the kit is fantastic, and the parts pop with beautifully molded weld seams and other surface features. Different types of idler wheels and drive sprockets are included, so if you care about that sort of thing you need to have some references on hand. Me, I like to think I strike a healthy balance between “just build it” and “counting rivets”, so I’ll go scour my 17 references for the exact tank I want to build, not find it, get all grumpy about it, and then go sullenly eat a half a bag of Doritos before finally sitting down to “just build it.”
| CONSTRUCTION |
I began “just building it” with the suspension, per usual with tanks. Dragon wants you to select which style of idler wheel and drive sprocket you will go for right off the bat, but I generally like to assemble the whole model without the wheels and tracks to make the weathering process easier down the road. With that in mind I skipped over the wheels and started assembling the Panzer II’s distinctive leaf spring assemblies.
Consisting of a
lower arm, an upper bundle of leaf springs and an end cap, the leaf spring parts
had seams that took some time to remove, but the detail on the parts is very
crisp. Once they were glu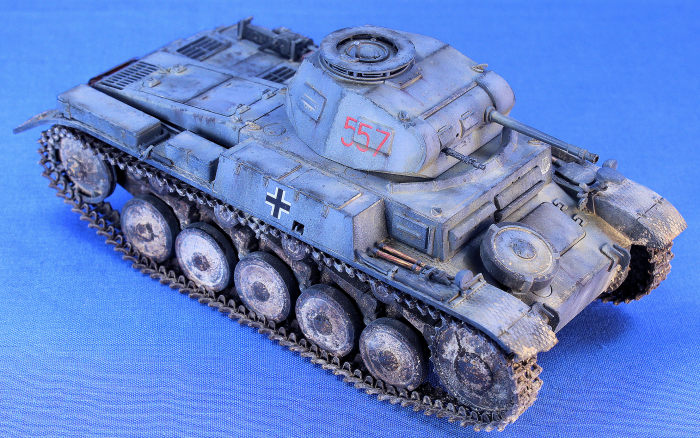 ed
together I glued them to the hull tub and then attached the drive housings,
which were also nicely detailed with fine welds and four small bolt heads for
added detail.
ed
together I glued them to the hull tub and then attached the drive housings,
which were also nicely detailed with fine welds and four small bolt heads for
added detail.
Continuing to the back hull plate you assemble the tow hitch, smoke candle rack, tail lights and muffler, which includes a perforated photo etch guard. Test fit the plate carefully to the hull tub however – if you glue it too low you’ll have a gap when you attach the upper hull. Ask me how I know!
With the lower hull now complete the instructions would have you start the interior, which is a beauty. I’m no expert on tank interiors, but it looks to me like Dragon has included everything you could want - a complete driver’s station, turret interior, viewport bracketry, and the area under the turret – known in tank circles as the “under-turret” (work with me). While no engine compartment detail is provided (as seems customary), what is included is impressive and far more complete than I’ve seen in comparable aftermarket resin interiors. And to think I left it all on the sprues.
Yup, couldn’t summon the desire to build and paint an interior for this build. It’s not that I don’t like tank interiors – I can’t wait to build up a Tiger, Sherman or Panther with a full interior someday. It’s just that my level of interest in the Panzer II doesn’t justify the additional work. This is one for the collection, not a passion project. Not to worry however, all of those nice interior parts won’t go to waste. I’ll use them later on another build I’m planning, so for now it was on to the next step, the upper hull.
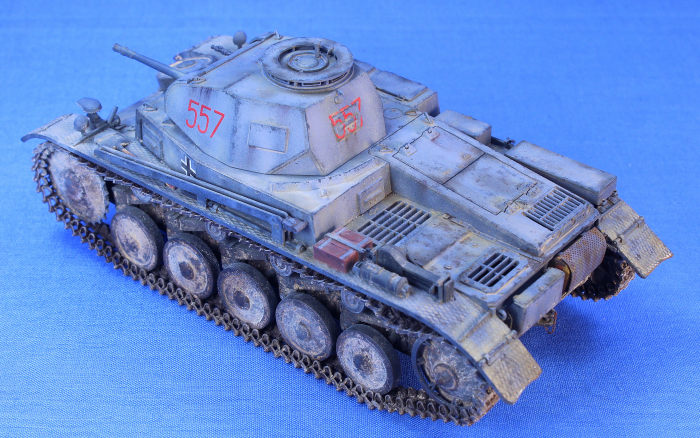
 In keeping
with the rest of the kit the superstructure plates have very nice weld detail,
and assembly went smoothly. You attach the various side and front plates as well
as engine deck hatch covers and grilles before moving on to the fenders, which
hold the typical tools as well as some storage bins.
In keeping
with the rest of the kit the superstructure plates have very nice weld detail,
and assembly went smoothly. You attach the various side and front plates as well
as engine deck hatch covers and grilles before moving on to the fenders, which
hold the typical tools as well as some storage bins.
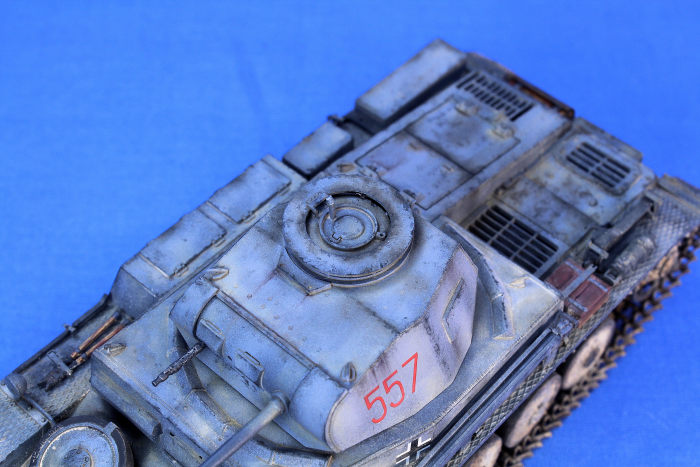
I added the head lights and spare wheel to the front of the tank and then assembled the turret. Consisting of just a single piece upper molding to which you glue the floor section, there wasn’t much to assemble. The gun mantlet is the busiest part of the assembly; it holds the 2cm and coaxial machine guns, both of which can be left free to pivot up and down if you wish. The commander’s cupola consists of seven transparent periscopes and is just as detailed inside and out as the rest of the kit.
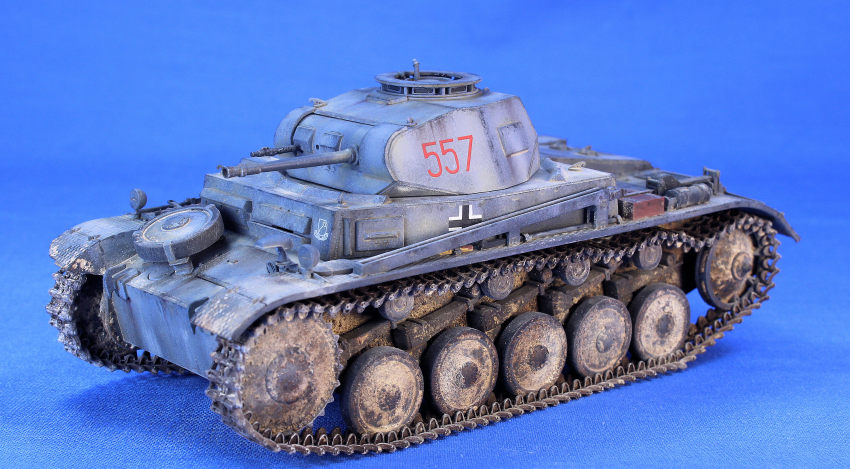
With assembly complete save for the wheels and tracks, I tried my hand at depicting some wear and tear to the front and rear mud guards by trimming a little off of each and then twisting them (carefully) with pliers. Once I was satisfied with the effect (and relieved that I didn’t break anything), I headed for the paint booth.
| COLORS & MARKINGS |
Following my usual painting procedure I first cleaned the surfaces with Polly S’s “Plastic Prep” and followed that with a primer coat of Tamiya’s Liquid Surface Primer. For the panzer gray base coat I made mixture of Tamiya XF-69 NATO Black lightened with a small amount of Tamiya XF-2 Flat White. I lightened the mix a little more and then sprayed the so-called “cloud pattern” onto the tank, concentrating on the upper surfaces and leaving the suspension areas darker. I picked out the tools by hand using Vallejo paints, and then applied the kit’s decals for the “LSSAH” vehicle. I then gave the whole model a coat of Vallejo’s Model Air Satin varnish.
The first
weathering step was paint chipping, which I did by using a very small brush to
add some dark gray paint to the high points of the vehicle; around the crew
hatches, the rear engine deck, and the edge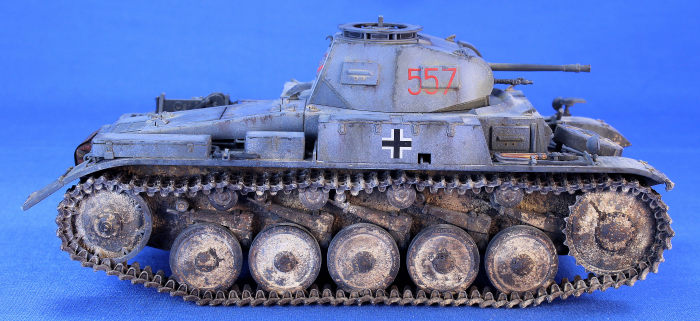 s
of the turret. The dark gray contrasts nicely with the lighter gray of the cloud
pattern, giving the impression of crew-induced wear and tear.
s
of the turret. The dark gray contrasts nicely with the lighter gray of the cloud
pattern, giving the impression of crew-induced wear and tear.
A detail wash of medium brown paint was added next – I mixed the wash using some Testors enamel brown shades and thinner. Lightening the wash with Testors White and diluting it further by adding even more thinner, I then coated the whole tank with the mixture to act as a filter.
The always fun and gratifying pigments step was next. I added small amounts of MIG Dark Mud, AK Interactive Dark Earth and MIG Europe Dust to the suspension, wheels and undersides of the fenders, holding them in place by applying MIG Pigment Fixer with an eyedropper. Once they had set I added some dark washes over them to add a little more flavor, and then went in for a second round of pigments. Like most of these weathering processes, I try to keep each one subtle. Always remember Confucius’ famous saying - “He who weathers too much, ruins the model.” 100% sure it was him.
With the
suspension now nicely pigmented, I attached all of the wheels. It was now time
to tackle the individual track links, so I began by gluing together two long
runs to form the lower lengths the tank sits on. I then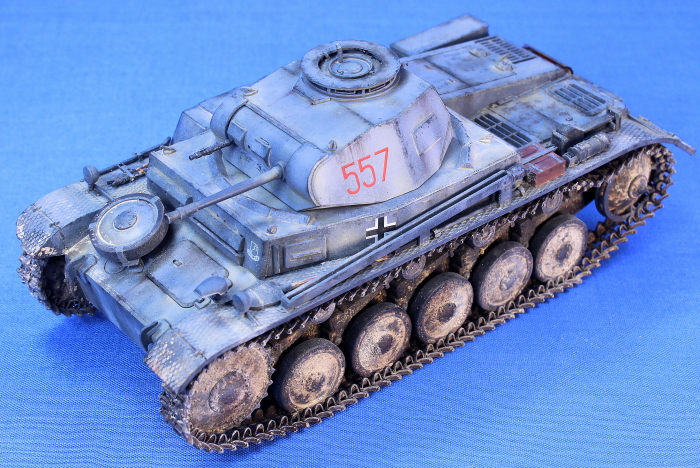 glued together much smaller runs and formed them around the drive sprockets and
idler wheels, making sure not to glue them to the actual wheels so they could be
removed for painting. All of the tracks were painted with Vallejo’s Panzer Aces
Track Primer followed by a wash of AK Interactive’s Track Rust.
glued together much smaller runs and formed them around the drive sprockets and
idler wheels, making sure not to glue them to the actual wheels so they could be
removed for painting. All of the tracks were painted with Vallejo’s Panzer Aces
Track Primer followed by a wash of AK Interactive’s Track Rust.
With the lower and “side” runs in place I started on the upper runs that span between the sprockets and idlers. I first figured out how many links I needed and then glued them together. With the liquid cement not yet dry, I put each run in place and wedged balls of tissue paper between them and the fenders to create some “sag”. Once the upper runs were set I carefully painted them in place. A dry-brushing of Testors Steel and some more pigments brought the tracks up to par with the rest of the suspension.
A few more streaks and pigments were added to finish up the tank before I added the fragile photo etch chain to the rear tow hitch. With that it was done.
| CONCLUSIONS |
Dragon’s Panzer II Ausf. F is a great little kit with the highlight easily being
the very complete interior. With a great level of detail and plenty of options
in the box, I highly recommend this kit to armor modelers everywhere.
| REFERENCES |
- Osprey Publications, New Vanguard #26, “German Light Panzers 1932-42”
21 March 2017
Copyright ModelingMadness.com.
If you would like your product reviewed fairly and fairly
quickly, please
contact
the editor or see other details in the
Note to
Contributors. Back to the Main Page
Back to the Review Index Page
Back to the Previews Index Page