Dragon 1/35 Panzer III ausf H
| KIT #: | 6642 |
| PRICE: | $60 or so |
| DECALS: | Several options |
| REVIEWER: | Scott Lyle |
| NOTES: | Africa 1941 diorama |
| HISTORY |
The conquest of France in June 1940 left
Germany the supreme ruler of Europe.
With Britain in no position to strike back and the
Soviet Union still a non-combatant, Hitler had the luxury of deciding where to
strike next – until his hand was forced by one of his allies.
Benito Mussolini, the dictator of Italy, had been harboring illusions of
creating a second Roman Empire.
Entering the war during the summer of 1940, Mussolini
first struck into Greece from Italian-held Albania in the fall of 1940.
Thoroughly repulsed there, he decided to invade Egypt
from his colony in Libya.
In December 1940 weak, poorly led Italian forces met
British forces on the Egyptian border and were quickly routed.
Major-General Richard O’Connor not only destroyed the
Italian Army but rolled some 480 miles west through Libya almost to Tripoli.
By January 1941 the Axis situation there had become so
dire, Hitler had to act.
One of the few quality ports in North Africa, Tripoli
had to remain in Axis hands if any victory in North Africa was to be had.
The Wehrmacht drew up Operation Sonnenblume (Sunflower);
the landing of two German divisions in Tripoli to assist the remaining Italian
forces and maintain a solid footing in the region.
On February 6 Lieutenant-General Erwin Rommel, one of
the heroes of the French Campaign, was called to Berlin and informed that he
would lead the operation and the brand new Afrika Korps force.
 Theoretically under the command of
Italian Commander-in-Chief General Italo Gariboldi, Rommel’s orders were
basically to defend Tripoli and recapture Cyrenaica, the eastern coastal region
of Libya.
He arrived in Tripoli on February 12th
while his forces began arriving a few days later.
Reconnoitering the situation from the air, he
immediately disagreed with Gariboldi as to how to proceed; Gariboldi wanted to
defend Tripoli while Rommel, characteristically, wanted to go on the attack.
Letting his feelings known in both Rome and Berlin,
Rommel got his way, and with his
forces positioned near the front line at Sirte, he immediately began
preparations to attack the British.
His immediate goal was to retake Benghazi, a small but
important port east of Tripoli and the center of Cyrenaica.
Theoretically under the command of
Italian Commander-in-Chief General Italo Gariboldi, Rommel’s orders were
basically to defend Tripoli and recapture Cyrenaica, the eastern coastal region
of Libya.
He arrived in Tripoli on February 12th
while his forces began arriving a few days later.
Reconnoitering the situation from the air, he
immediately disagreed with Gariboldi as to how to proceed; Gariboldi wanted to
defend Tripoli while Rommel, characteristically, wanted to go on the attack.
Letting his feelings known in both Rome and Berlin,
Rommel got his way, and with his
forces positioned near the front line at Sirte, he immediately began
preparations to attack the British.
His immediate goal was to retake Benghazi, a small but
important port east of Tripoli and the center of Cyrenaica.
The first action came on February
24th as recce troops from both
sides clashed with minor casualties.
Rommel soon realized that the British were not as strong
in the theater as was once thought; in fact Churchill was removing manpower and
equipment from the area in preparation for action in Greece.
Still, Rommel’s constant pleas to Berlin for more men
and supplies fell on deaf ears.
Hitler and his war machine were busy planning the
invasion of the Soviet Union and were not willing to spare much of anything for
what they considered to be a minor sideshow (side note: the idea that a strongly
equipped Rommel could have rolled through North Africa and secured the Middle
Eastern oil fields and thus all the oil the Nazis would have needed for years to
come, for a tiny fraction of the price Hitler paid to invade Russia, has been a
hot debate since the war ended).
Told to basically do nothing until May, Rommel was
disappointed but in typical fashion, he launched his own attack.
On March 24th
the 5th Light Division rolled into
El Agheila and captured the town with very little effort.
One week later Rommel took Mersa el Brega, the next
large town to the east.
On April 3rd
he commanded a three-pronged attack into Cyrenaica and chased the retreating
British out of the region, often observing them from his Fiesler Storch
airplane.
On April 8th Mechili,
in the heart of Cyrenaica, fell, forcing the British to withdraw back to the
Egyptian border.
After a trio of attacks failed to dislodge the Australians at
Tobruk, Rommel decided to lay siege to the port and continue on to the Libyan -
Egyptian border.
Before long he was in possession of the critical Halfaya Pass;
perched on the dividing line between the two ancient lands.
 On May 15 Britain launched
“Operation Brevity” with the goal of retaking Halfaya Pass and then pushing on
to relieve the embattled forces at Tobruk.
While they achieved the first of those goals, their
success was short-lived.
By the end of May Rommel was back in control of Halfaya.
June saw Britain try again to repulse Rommel and relieve
Tobruk with “Operation Battleaxe”.
Despite being supplied with new tanks from home, the
results were largely the same.
The Brits made some early headway only to be turned
back, suffering heavy losses in the process.
“Battleaxe” was over on June 17 and no British forces
were in Libya.
Both sides settled in for a period of rest and refitting, and the
first phase of the Desert War was over.
Erwin Rommel had established himself as the preeminent
master of mobile warfare, and the legend of the Desert Fox was born.
On May 15 Britain launched
“Operation Brevity” with the goal of retaking Halfaya Pass and then pushing on
to relieve the embattled forces at Tobruk.
While they achieved the first of those goals, their
success was short-lived.
By the end of May Rommel was back in control of Halfaya.
June saw Britain try again to repulse Rommel and relieve
Tobruk with “Operation Battleaxe”.
Despite being supplied with new tanks from home, the
results were largely the same.
The Brits made some early headway only to be turned
back, suffering heavy losses in the process.
“Battleaxe” was over on June 17 and no British forces
were in Libya.
Both sides settled in for a period of rest and refitting, and the
first phase of the Desert War was over.
Erwin Rommel had established himself as the preeminent
master of mobile warfare, and the legend of the Desert Fox was born.
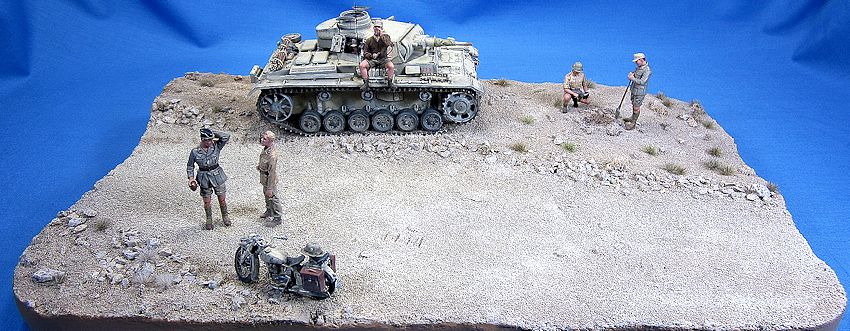
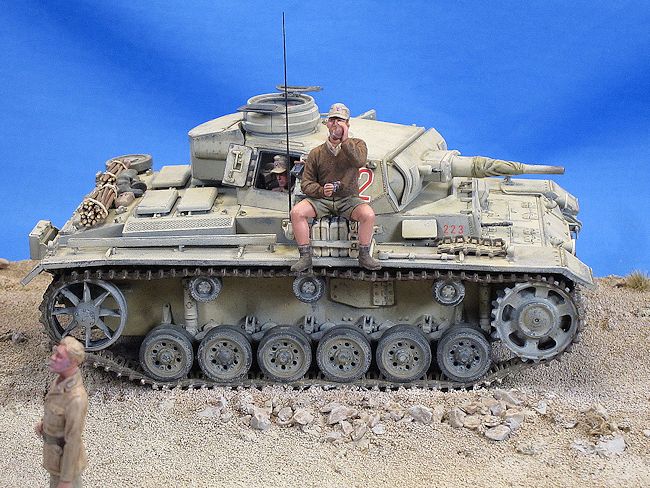
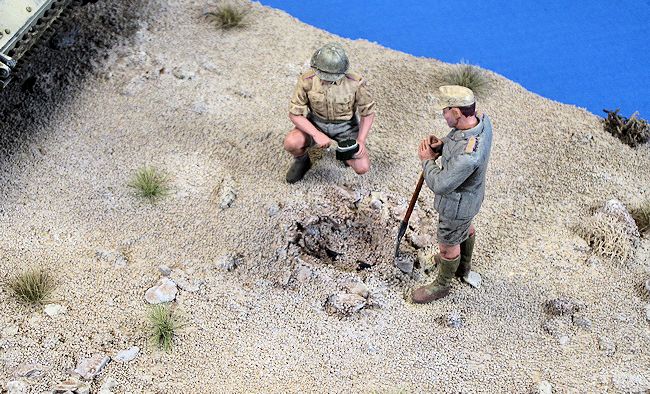
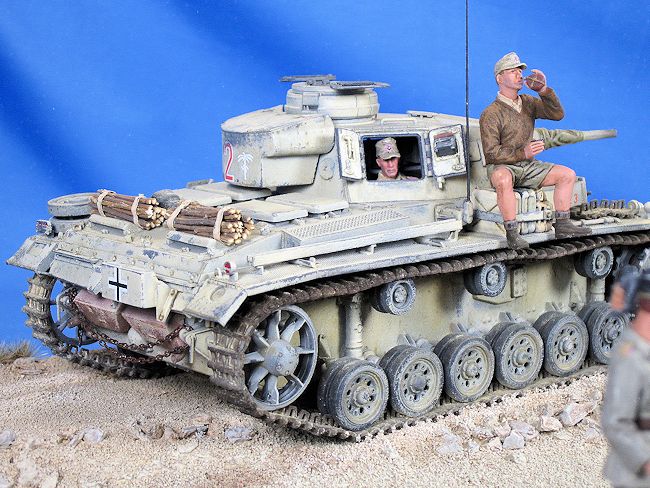
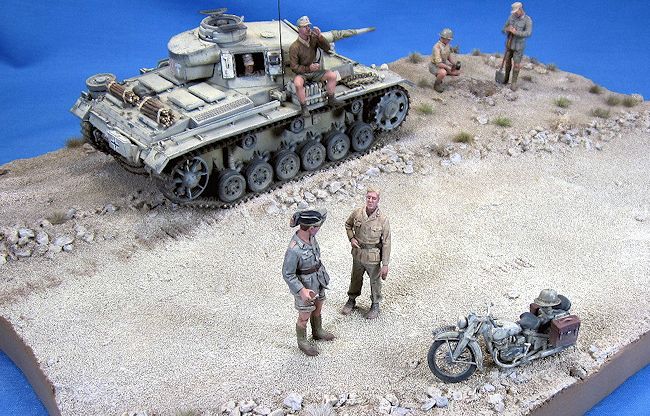
The purpose of this diorama is to
depict the crew of a Panzer III Ausf. H of Panzer-Regiment 8 of the 15th
Panzer Division sharing a light moment while their commander talks with a
motorcycle courier.
The crew is watching two scorpions battle in a makeshift
pit they dug.
The time is right after the British were repulsed from Halfaya by
Operation Scorpion in late May 1941.
The area is around Sollum, Libya, on the Mediterranean
coast.
| THE KITS |
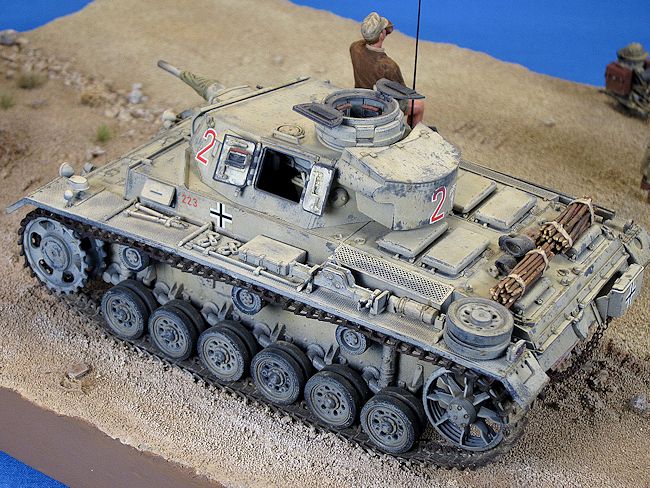
 The commander’s cupola is fully
detailed inside and out, and the turret interior features a nicely detailed main
gun breech as well as other interior details.
Billed as a “Late Production” Ausf. H, parts are
included for the vehicles that were first sent over to North Africa in the
spring of 1941 when Rommel arrived.
Such goodies as the storage bin on the rear of the
turret and the armored cowlings that were attached to the engine hatches on the
rear deck are in the box are included.
Definitely a tropical themed kit, decals are provided
for five different tanks; three of which served in the desert with
Panzer-Regiment 8 of the 15th
Panzer Division, one which served in Greece with the 2nd
Panzer Division, and a final tank which served in the Eastern Front with the 1st
Panzer Division. Another
detail worthy of note is a fully detailed suspension that includes the torsion
rods and fittings on the inside of the tank.
With so much in the box my usual need for further
indulgences was all but extinguished; I only replaced the kit’s main gun barrel
with a resin barrel from Tank Workshop that featured the canvas gaiter commonly
seen in photos of Panzer IIIs in the desert.
The commander’s cupola is fully
detailed inside and out, and the turret interior features a nicely detailed main
gun breech as well as other interior details.
Billed as a “Late Production” Ausf. H, parts are
included for the vehicles that were first sent over to North Africa in the
spring of 1941 when Rommel arrived.
Such goodies as the storage bin on the rear of the
turret and the armored cowlings that were attached to the engine hatches on the
rear deck are in the box are included.
Definitely a tropical themed kit, decals are provided
for five different tanks; three of which served in the desert with
Panzer-Regiment 8 of the 15th
Panzer Division, one which served in Greece with the 2nd
Panzer Division, and a final tank which served in the Eastern Front with the 1st
Panzer Division. Another
detail worthy of note is a fully detailed suspension that includes the torsion
rods and fittings on the inside of the tank.
With so much in the box my usual need for further
indulgences was all but extinguished; I only replaced the kit’s main gun barrel
with a resin barrel from Tank Workshop that featured the canvas gaiter commonly
seen in photos of Panzer IIIs in the desert.
| CONSTRUCTION |
Just as aircraft models always seem to start with
the cockpit, tank models always seem to start with the suspension, chiefly the
wheels.
To me assembling twelve or more wheels right off the bat always seems a
bit monotonous so I put those off and went straight to the suspension (as we’ll
see later, it’s important NOT to glue them on until the very end anyway).
The Panzer III was rather “busy down there” and there
are shocks, tensioners, brackets and bump stops to attach to the hull even
before you get to the
 suspension
arms. Once
that is accomplished you add plates to the front and rear of the hull, and then
busy up the rear plate with mufflers and other associated parts.
Dragon’s kit engineering is excellent and nowhere did I
use any filler or encounter any issues.
suspension
arms. Once
that is accomplished you add plates to the front and rear of the hull, and then
busy up the rear plate with mufflers and other associated parts.
Dragon’s kit engineering is excellent and nowhere did I
use any filler or encounter any issues.
Moving onto the upper hull, I next
built the two fender assemblies which are covered in tools.
Next you assemble the superstructure’s front and side
plates.
I left the various periscopes and ports posed in their open positions
thinking the crew would want to keep their tank aired out in the desert.
Dragon includes the arms that the ports swing back and
forth on – very nice. The
Ausf. H featured separate armor plates bolted onto the front of the tank so
these were added next, and then it was on to the turret.
The turret interior contains a
nicely detailed main gun breech as well as transparent periscopes for the turret
sides, doors, and cupola.
I left all the doors open to show the tank being “lived
in”.
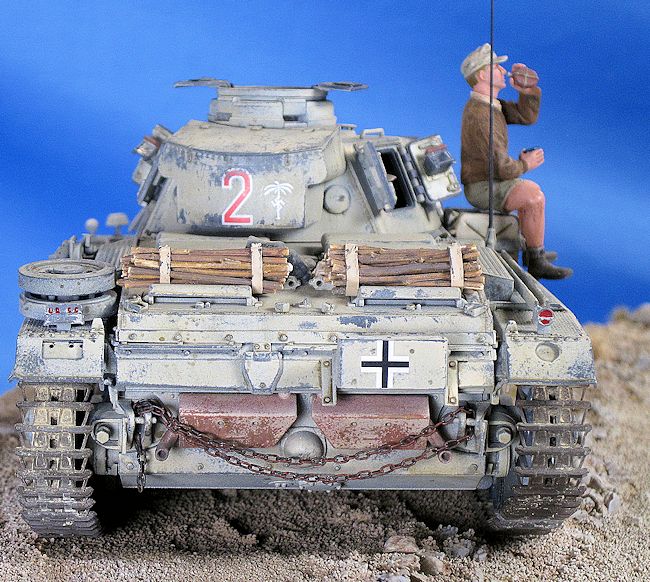
To complete the tank’s assembly I attached a spare road wheel to the rear fender and then scratch built a fuel/water can rack on the other fender. I used needle nose pliers to add some subtle twists to the fenders to replicate damage, and at that point declared it ready for paint.
| COLORS & MARKINGS |
All German vehicles initially shipped to the desert
in 1941 arrived in their traditional dark Panzer Gray colors, but they were soon
over-sprayed with a sand-colored paint from whatever supplies were on hand (so
the sources say…).
The sand-colored paint weathered quickly once exposed to
the sun, wind, combat, and the usual day-to-day activities of the crew.
Therefore, as better armor modelers than I have known
for a long time, North African-theater vehicles represent great opportunities
for advanced weathering techniques, especially the hairspray technique.
The hairspray technique essentially
consists of 4 steps: 1) Spray a basecoat of color onto the primered model, 2)
Spray hairspray all over the model, 3) Spray the top coat of color all over the
model, and 4) Use water and a slightly stiff brush to scrape away the top coat,
leaving behind a very realistically chipped paint surface.
The technique, when combined with
more traditional weathering techniques, allows modelers to achieve extraordinary
weathering effects.
It simply blows away all other ways to create a
paint-chipped surface.
If you’ve ever seen a tank model of a badly weathered
winter white-wash finish or desert sand finish and wondered “how did he do
that?”, there’s a good chance the hairspray technique was involved.
I’ve wanted to try the technique for a while, and this
project seemed like the perfect opportunity.
Beginning my odyssey into
weathering madness, I first applied a primer coat using Mr. Surfacer 1000.
That was followed by a basecoat of Testors Gunship Gray.
I then picked out the various tools by hand, and sprayed
a lightened mix of Tamiya Buff inside the turret to replicate the tank’s
interior color.
From this point on I relied heavily on a new reference book I
picked up, “Tankart 1” by Michael Rinaldi.
In this book the author builds several different Axis
vehicles and then gives very thorough step-by-step instructions detailing the
various weathering effects he applies to the models, including the hairspray
technique.
(The book is excellent and I highly recommend it to all modelers
interested in weathering – you will marvel at how good his models look.
Just as importantly, the author explains the techniques
and material in such a way that it inspires you to try them yourself).
One of his builds was a heavily weathered Panzer IV in
North Africa; thus it was a perfect reference for what I was doing.
Armed with a couple of old, stiff
brushes and a cup of water, I began by wetting an area I want chipped and then
gently rubbing it with the brush.
The process worked like magic; soon very small but
definite chips and scrapes begin to appear.
Like any technique practice is necessary.
The more water you apply and the harder you rub the
bigger the chips appear, but overall the process is very “controllable”, i.e.
the chips appear in a gradual way and not all of a sudden.
I continued working all over the tank, concentrating on
areas that would see heavy use by the crew.
It took a few nights but I was very pleased with the
effects.
When I was happy with the paint
chipping I tried my hand at another technique from the Rinaldi reference he
calls Lacquer Thinner Removal.
This is a technique used to simulate more of a general
wearing of a paint surface as opposed specific paint chips.
By gently rubbing lacquer thinner onto the
paint surface with another old brush you can “wear” away some of the top coat,
creating a very realistic looking worn surface.
I applied this technique around crew hatches and edges
of the vehicle to create even more wear and tear.
At this point my tank was looking
nicely weathered, but there were more steps to take.
Up next I applied a pin wash I made of medium brown
artist’s oil paint into all of the cracks, seams, and crevices.
After that I applied two filters randomly onto the tank;
one shade I made was a heavily diluted mix of the wash I had previously mixed up
while the other shade was AK Interactive’ s Afrika Korps Filter that I toned
down with a little light brown (it’s a little too orange right out of the jar).
Dragon’s Magic Tracks unfortunately
do not click together, so NOT gluing all of the wheels in place until the end
becomes a necessity.
This is because the best way to assemble the tracks is
to fit the links together in straight lines of about 30 links each (there are 89
links per side per the instructions) and apply some liquid cement to the links
and let them sit for about 15 minutes.
At that time fit the wheels and return rollers to the
hull, but don’t glue them.
Now drape the track sections over the wheels and mold
any sagging or other shapes you want into the still-flexible sections.
I found that small balls of rolled up Kleenex stuffed
between the top of the tracks and the undersides of the fenders created the
right amount of track “sag” that I was looking for.
Now walk away and let the sections harden completely.
The next day you can remove them along with the
still-removable wheels and then paint and weather the tracks.
Once set I painted the tracks
Tamiya XF-10 Flat Brown, and then weathered them and the wheels with some dark
washes and MIG pigments.
I then glued everything to the hull.
I scrubbed some more pigments here and there, sprayed on
some Testors Flat, and the Panzer was done.
| THE BASE & FIGURES |
As usually happens I used a mixture of figures from different kits, in this case Dragon’s #6063 “Deutsche Afrika Korps” and Verlinden. I made some minor adaptations to them so they would fit the scene, and then painted them with Vallejo Acrylics. The DKW motorcycle is a Tamiya kit that used to live in an old, now defunct diorama of mine. I applied the hairspray technique to it and gave it a weathered desert coat similar to the Panzer. Finally the tiny scorpions were sourced from an Eduard photoetch set that features rats, snakes, spiders – all sorts of creepy crawlies. Perfect for a haunted house diorama! Some day…
| CONCLUSIONS |
Well it took me about three months to build this
diorama, but that seems to be about my usual pace for a project this size.
Dragon’s newest armor kits are awesome; tremendously
detailed and fun to build.
With great references and new weathering products coming
out all the time, we truly live in a golden age of modeling.
| REFERENCES |
-
Panzer Tracts #3-2, “Panzerkampfwagen
III, Ausf. E, F, G, and H”
-
Rinaldi Press Studio, “Tankart
Vol. 1”
- Wikipedia, the Online Encyclopedia
December 2014
If you would like your product reviewed fairly and fairly quickly, please
contact
the editor or see other details in the
Note to
Contributors.