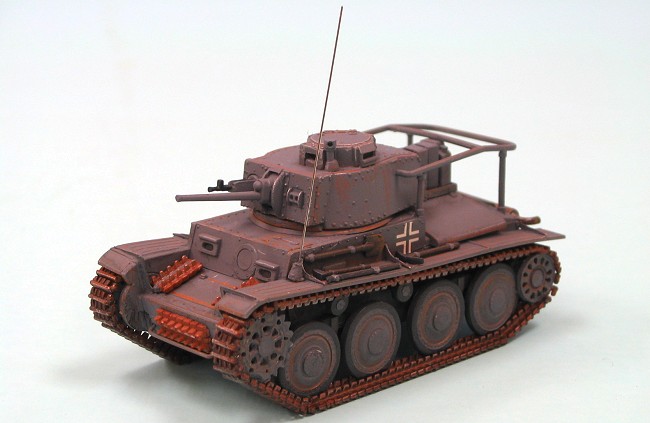
UM 1/72 PzBef 38(t) Commander's Tank
| KIT #: | 351 |
| PRICE: | $9.95 (8.96 at Squadron) |
| DECALS: | Several options |
| REVIEWER: | Bill Michaels |
| NOTES: |
| HISTORY |
After the German
annexation of Czech territory in 1938 and early 1939, the Germans took over
control of Czech arms factories. As a result, the Czech Pz38 tank began
appearing in the German Army in fall 1939. During the early years of the
war, the tank was used by front-line units. However, the tank was on the
light side, and by 1942, it was clearly obsolete.
 However, the factory was
in full production, and it would have taken a lot of work to convert the
factory to produce larger tanks. Also, while not suitable for frontline
combat, the Pz38 was a reliable vehicle, so the Germans looked for other
ways to use the Pz38 chassis. A number of variations appeared, including
self-propelled guns, tank destroyers, and support vehicles. One of the
conversions was into a Commander’s tank, the subject of this kit.
However, the factory was
in full production, and it would have taken a lot of work to convert the
factory to produce larger tanks. Also, while not suitable for frontline
combat, the Pz38 was a reliable vehicle, so the Germans looked for other
ways to use the Pz38 chassis. A number of variations appeared, including
self-propelled guns, tank destroyers, and support vehicles. One of the
conversions was into a Commander’s tank, the subject of this kit.
The Commander’s tank was created to provide an armored vehicle that could keep up with the other tanks in the unit, while providing extra radios for command and control and protection for the users. In this case, the main gun (and gunner) were removed, creating extra space for additional radios and a radio operator. Because a tank with no gun would be a pretty obvious target, the Command tank was fitted with a false wooden main gun barrel. (The tank did retain the coaxial machine gun.)
| THE KIT |
UM has released a number of kits based on their basic Pz38 kit. I’ve seen the Pz38 Ausf C, the Ausf G, the Marder Anti-Tank gun platform, an ammunition carrier, and now the Command Tank. The basic chassis and running gear are the foundation for this variety of kits. Rather than describe this one in detail, just click here to see Scott’s preview of the kit.
| CONSTRUCTION |
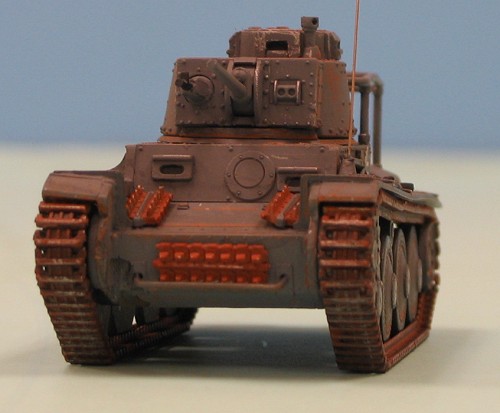
Things did not get off to a good start—the first thing I did was lose a part. The very first part I cut off the sprue was one of the small hooks that are mounted on the front lower hull to form the rack for the extra track section. I snipped the first part from the sprue and then managed to launch it into the great unknown while trying to trim the sprue nub off of it. I never did find it, and ended up making the spare track holder from a piece of brass wire.
 I was wondering how well this kit would go
together. Unlike newer kits from other Dragon, Revell, or Italeri, which
generally feature the upper and lower hulls molded in one or two pieces
(like a scaled-down 1/35 scale kit.) The hull of this kit is molded as a
series of what are basically flat plates—bottom, sides, front, rear, etc.,
that are assembled to make the basic hull. So, I started off by doing some
test fitting- looking for possible problem areas.
I was wondering how well this kit would go
together. Unlike newer kits from other Dragon, Revell, or Italeri, which
generally feature the upper and lower hulls molded in one or two pieces
(like a scaled-down 1/35 scale kit.) The hull of this kit is molded as a
series of what are basically flat plates—bottom, sides, front, rear, etc.,
that are assembled to make the basic hull. So, I started off by doing some
test fitting- looking for possible problem areas.
Things looked OK, so I jumped in and started gluing parts together. I needn’t have worried—the parts all fit together very well, with no gaps that needed filling. In a few minutes, I had the most of the hull assembled.
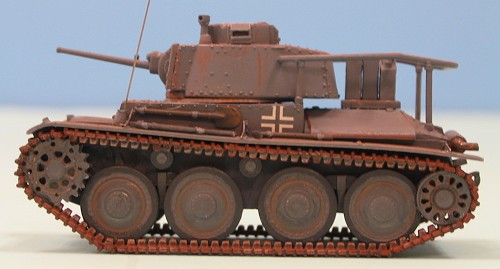
Tracks and Running Gear
Before starting on the running gear, it is a good idea to so some painting. When working with link and length tracks, I like to airbrush the parts with a base color of rust before removing anything from the sprue. I also airbrushed the road wheels in Panzer Gray. I also airbrushed the lower hull of the vehicle- it is easier to paint before the wheels go on.
The surface detail of the road wheels looks good- decent bolt and hub detail. The back sides of the road wheels are just flat disks- no detail at all. But I don’t really see that as a drawback- nobody is going to see that once the model is assembled. Once the wheels were dry, I removed them from the sprue, cleaned up the sprue attachment point, and brush painted the tires with Pollyscale “scale black”, a very dark gray that looks right for tires.
The instructions tell you to install all of the wheels before mounting the tracks. I find that it is easier to mount all of the running gear except for the front sprocket— I add it later, after I’ve started to install the tracks. I find it easier to do the test fitting of the track with the drive sprocket removable.
 The tracks are injected molded plastic,
link and length style. (Personally, this is my favorite style for small
scale armor.) The long runs are molded as single pieces, while individual
links are provided to go around the drive sprocket and return wheels. The
sections of the track are all well molded, and fit together well.
The tracks are injected molded plastic,
link and length style. (Personally, this is my favorite style for small
scale armor.) The long runs are molded as single pieces, while individual
links are provided to go around the drive sprocket and return wheels. The
sections of the track are all well molded, and fit together well.
I’ve built a couple of larger tanks in 1/72 with link and length tracks, but never something this small. The tracks on the Pz38 are small—about half the width of the tracks on my last 1/72 scale tank- the Tiger I. The single links are really too small to handle by hand- tweezers will come in handy to get them into place. I wouldn’t want to deal with tracks any smaller!
Here’s my method for working with link and length tracks. As already mentioned, the first thing I do is to paint the tracks while they are still on the sprue. I airbrushed them with Model Master’s rust color. I also highlighted some wear points on the guide teeth using my silver artist’s pencil—it is a lot easier to do that before the tracks are installed. I did some additional weathering to the tracks, but that can wait until after assembly. Airbrushing the tracks before assembly ensures that I won’t have unpainted spots later, in the hard to reach areas.
I always start with the front sprocket- it is the spot where the fit of the tracks is the most visible. First, test fitting is always a good idea- to get an idea of how the tracks will fit, and where the joints fall. So, the first thing I did was to mount eight of the individual tracks to the drive sprocket. I used medium thickness super glue- it gave me the necessary time to adjust the track link before it set. Using super glue also saved me from having to scrape the paint off of all the join spots- a task I would have to do if using regular model cement. I then added the piece of straight track that goes down to the ground. I now had a sprocket with eight links in the teeth of the sprocket, and a length of track coming off the sprocket at an angle. I then could use that piece to determine how the sprocket would fit- I installed the front sprocket with the straight section properly aligned with the front roadwheel.
I worked my way back along the bottom of the wheels, around the rear wheel, and put the section of track on the top in place last. I do this because any problems with alignment or connections will be less noticeable in the section of track up high under the fenders.
I did have to so some fiddling to get the
track to fit properly in places. The rear wheel is small, so the track has
to make a pretty tight turn around it. In order to get the individual
links to join at the sharp angles on the wheel, I had to trim some of the
interlocking tabs off. Also, the rear wheels were a little thick, and
they had to be sanded a bit to allow the guide teeth to fit between the
inner and outer disks.
Once the tracks are finished, the rest of the upper hull parts can be installed. The fenders and rear engine deck pieces can now be installed. Some of the upper hull parts were attached now, the ones that would be painted the hull color. I left the tools off until after the model was painted.
The kit includes a small PE fret of parts. There are mounting brackets for the fenders, and a small box-like structure with holes in it that goes on the right fender. The PE parts are thick enough to be easy to handle, and look like they’re made from a copper-colored alloy. The PE parts were easy to attach, and fit well.
Turret Assembly
The turret goes together in a manner similar to the hull— front, sides, back, top, etc. Again, the parts fit very well, and no filler was needed. The dummy gun is designed to be moveable in elevation, but I just cemented mine in place to be sure the alignment was right and stayed that way. Because the main gun was a wooden dummy on the real tank, I did not drill out the muzzle at all.
| COLORS & MARKINGS |
The only real option the builder has is color scheme—Panzer Gray or Panzer Dark Yellow? The kit is molded in light gray plastic, so either paint scheme is easy to do. (I don’t like putting yellow paint over the dark gray plastic used in older Tamiya kits.) The two choices are an all gray vehicle form the Eastern Front in 1943, or an all dark yellow tank from the Balkans in 1943. I thought about doing the Balkans vehicle just for a change of pace, but then decided against it. With the pace of releases from UM and Roden being what it is, I figure it is likely I’ll be doing some more small scale German and Russian armor, so I decided to stay with the Eastern Front color schemes for my burgeoning collection. So, dark gray it was!
 With the model basically complete, I
started by airbrushing the rest of the tank with PollyScale Panzer dark
grey, masking the tracks to keep overspray off of them. I painted the hull
and turret separately, so that I could get good coverage under the turret
overhang. I now had a nice grey tank, with rusty red-orange tracks.
With the model basically complete, I
started by airbrushing the rest of the tank with PollyScale Panzer dark
grey, masking the tracks to keep overspray off of them. I painted the hull
and turret separately, so that I could get good coverage under the turret
overhang. I now had a nice grey tank, with rusty red-orange tracks.
I then added the tools and a few other details. The radio antenna structure is attached to the hull and the turret, so the turret has to be fixed in place, pointing straight ahead. The antenna structure parts were carefully cleaned up and then attached and brush painted.
I let everything cure for a day or so, and then applied the decals. This is the one area where the instructions let you down. The decal sheet is pretty nice, with a number of markings, but only about half of them are shown as used on the two options of the kit. I only used two decals- the crosses on the sides of the hull. I dabbed a little Future on the spot the decals were going, and then applied them. The decals have a fair amount of excess carrier film, but if you trim that away, you’re left with nice, thin decals. Once the decals had cured for a day or so, I brushed on a little more future to help hide the edges. After that dried, some Pollyscale flat clear took care of the gloss of the future.
Weathering:
 First step was to apply a dark wash to the
model. I used a light touch on the upper hull and turret, but used more on
the tracks- I wanted them darker, especially in the crevices.
First step was to apply a dark wash to the
model. I used a light touch on the upper hull and turret, but used more on
the tracks- I wanted them darker, especially in the crevices.
After that had cured, I used my silver artist’s pencil to give that slight metallic sheen along the edges and corners of the hull and turret. I then used my two shades of orange/red-brown pencils- basically rust colors. I used them to add subtle streaks of rust along the edges of the fenders and on highlights on the hull and turret.
To further weather the tracks, I hit them pretty heavily with my “rust” pencils. I ended up with a blending of three different rust hues, which was the effect I was after. The tracks were them finished off with a light highlighting in silver- tracks in use have wear points of bare metal where the rust gets worn off.
The last step was to glue the turret machine gun and antenna in place. I used a piece of .010 steel wire for the antenna.
| CONCLUSIONS |
Highly recommended. These small armor kits are nice models. Inexpensive, nice detail, and excellent fit combine to make an enjoyable build. A nice model can be built out of the box, and you could even leave the PE parts off if you wanted to. I can see why these new UM kits are getting such good reviews…..
| REFERENCES |
None—all I had is the kit instructions and box art
Special thanks to Pip Moss, who took all the pictures of the finished model.
December 2005
You can find this kit and many others at

If you would like your product reviewed fairly and fairly quickly, please contact the editor or see other details in the Note to Contributors.