Amusing Hobby 1/35 VK30.02DB
| KIT #: | 35A002 |
| PRICE: | $48.00 |
| DECALS: | |
| REVIEWER: | Dale Rannals |
| NOTES: |
| HISTORY |
The French B1
and British Matilda tanks had come as a surprise to the German forces during the
Battle of France in 1940. Their
heavy armor was almost impervious to the cannons fielded by the panzers of the
time. Superior German tactics and
mobility were the answer, and thus no real impetus was put on the development of
replacements. MAN was working on
their VK2401 design and this was deemed sufficient.
The start of Operation Barbarossa, the invasion of Russia, saw the first
appearance of the Soviet T-34 and KV-1 tanks.
These came as a complete shock to the German forces
....... the KV with it's all but impenetrable armor and the T-34 with its
sloped armor and great mobility. As
a result new importance was
 given to a new medium tank design.
Officials from Daimler-Benz, Krupp, and MAN investigated several captured
soviet tanks and listened to the concerns of General Guderian, who demanded
improved armor protection, greater mobility, and heavier armament.
given to a new medium tank design.
Officials from Daimler-Benz, Krupp, and MAN investigated several captured
soviet tanks and listened to the concerns of General Guderian, who demanded
improved armor protection, greater mobility, and heavier armament.
The new
design, designated VK3002, was at first set at 32.5 tons, but this limit was
soon raised to 36 tons. MAN, who
had produced the PzI and PzII light tanks, had very little experience in
designing a larger medium tank.
They chose torsion bar suspension and front wheel drive, and added completely
unnecessary features such as a rubber-lined engine compartment to make it
amphibious. Daimler-Benz, who had
produced the respected PzIII, opted for a conservative, reliable design.
It incorporated leaf spring suspension (though later designed a torsion
bar version), a diesel engine, and rear wheel drive.
With it's sloped armor and forward mounted turret, it took it's cues
from, and looked very similar to, the T-34.
Between the two designs, the Daimler-Benz proposal looked by far the
better. Hitler thought so too, and
in March 1942 selected the DB for series production.
Enter
Hienrich Kniepkamp and Karl-Otto Saur.
Kniepkamp was the person in charge of new tank development at
Waffenprufamter 6. He had also
worked as an engineer at MAN for three years. He obviously favored the MAN
design and personally wanted the new tank to have torsion bar suspension, which
it had, and the DB did not (yet).
He started a whisper campaign claiming the DB looked "too Russian" and the MAN
was much more "German." Saur, a
deputy of Albert Speer, wanted to gain Hitler's favor by fielding a new German
tank as soon as possible. He set a
deadline for production at December 1942, almost arbitrarily it seems, as it was
based on no strategic needs. As
Daimler-Benz could not meet t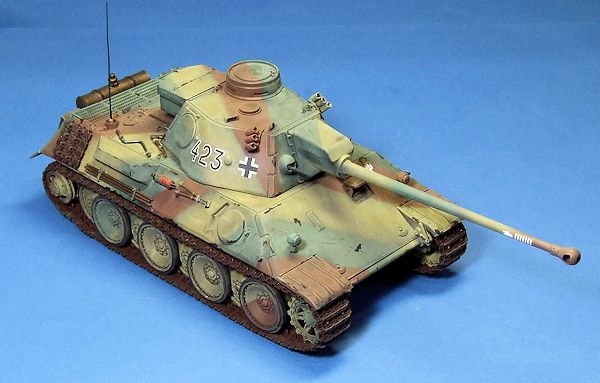 his deadline (neither the turret nor the air-cooled
diesel would be ready in time), Hitler was persuaded to select the MAN design
and order work discontinued on the DB.
And there ended development of a very promising vehicle.
So, thankfully for the allies, the German Army didn't get the best tank
possible, but instead a tank as soon as possible.
his deadline (neither the turret nor the air-cooled
diesel would be ready in time), Hitler was persuaded to select the MAN design
and order work discontinued on the DB.
And there ended development of a very promising vehicle.
So, thankfully for the allies, the German Army didn't get the best tank
possible, but instead a tank as soon as possible.
What the German army got instead was a tank that was rushed into production before it was remotely ready. It was a 45 ton tank that had running gear designed for a 30 ton tank ...... The transmission was not strengthened even as more weight was piled on. Panthers routinely sheared sprocket teeth well into 1943. And turning while backing up was frowned upon for similar reasons. In all fairness to the Panther, the details were eventually worked out, and it became a formidable vehicle, as it's operational rate record shows. It went from a completely abhorrent 16 - 20% in mid 1943 to about 80% by mid 1944.
| THE KIT |
Amusing
Hobby is new to the modeling community, I believe they have four kits in their
line-up right now. First up
is a Neubaufahrzeug, a prewar
German design. The other three are
“Paper Panzers” …. designs that were not put into production.
With the DB are a Pz VII Lowe (kit #35A005), a heavy tank, and a VK1602
Leopard (#35A002), a light recon tank.
What's in the
box? About 20
sprues of gray plastic, 2 of clear, 1 of tan containing pioneer tools, 4
sprues of light tan track link pins, and a bag whole bunch of dark brown
individual track links connected two to a
 small sprue.
One fret of brass PE containing intake grilles, one decal sheet and one
set of instructions round out the mix.
small sprue.
One fret of brass PE containing intake grilles, one decal sheet and one
set of instructions round out the mix.
The plastic
itself looks good. No discernible
flash on any of the parts. The
plastic seemed a bit harder with a bit softer detail than a current offering
from say Dragon. This is not to
detract it any, as the included detail is very well done.
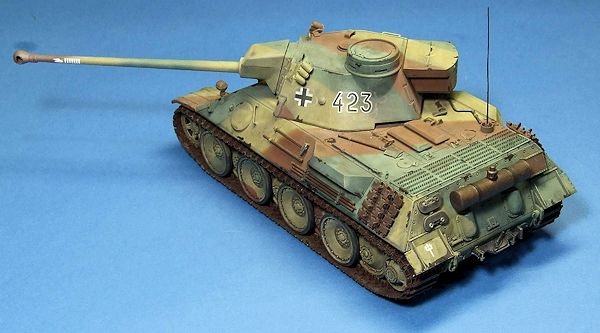
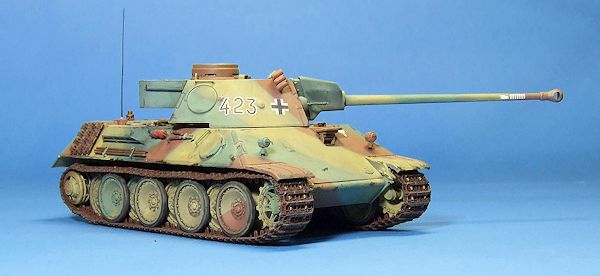
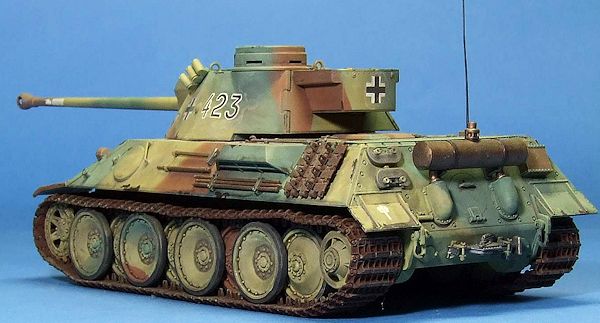
Extra parts on the sprue, labeled "not for use", fore-shadow other possible releases but also give the builder some options here. Two different commanders copulas are included, and one can decide on two styles of turret rear armor. The one denoted for use has a loading hatch, the other has mounting points for a storage bin, which is also included. Hatches on the turret and hull can posed open, though no interior detail is included. Two different muzzle brakes are options for the main cannon. Two styles of engine intakes are given, one with the intake on top, the other on the bottom. Two different styles of upper front plates are in the box, but only one can be used as the other lacks the ball machine gun parts to complete it. Of course, if you have those parts in the spares bin..........
| CONSTRUCTION |
Construction starts off with, oddly for an armor kit, the turret.
Not that it makes any difference mind you, but most armor kits have you
assemble the turret last. Maybe
they just want to be different.
Works for me.
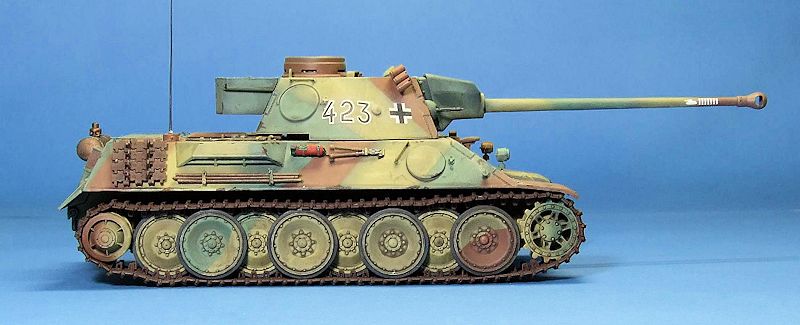
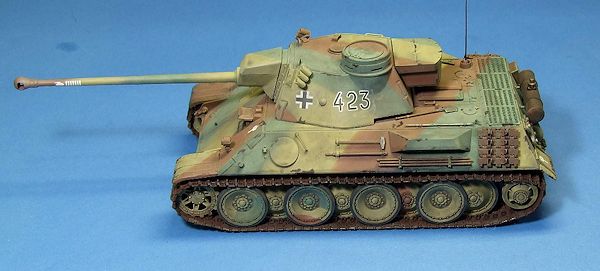
There are two styles of muzzle brakes.
The first is typical German style but is denoted "not for use" here.
In the event I chose the second option.
It looks
decidedly un-German ...... more like the "baseball" on the end of a British
17pounder. This gives it a unique
look. I also opted to use the
storage bin aft of the
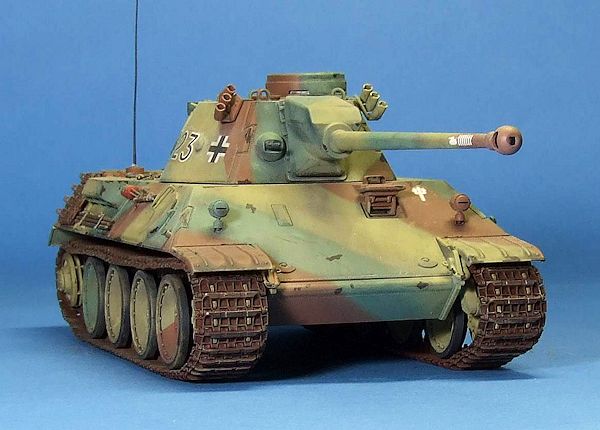 turret so I used the appropriate rear plate.
As for the commanders copula, I chose the early style just for the fact
that most of ,my other German armor has the later style ..... so this just adds
variety. I have mentioned the
plastic is somewhat hard, but everything fits very well and glues easily.
turret so I used the appropriate rear plate.
As for the commanders copula, I chose the early style just for the fact
that most of ,my other German armor has the later style ..... so this just adds
variety. I have mentioned the
plastic is somewhat hard, but everything fits very well and glues easily.
Moving on to the hull, I added the torsion bar/arms.
These go thru the hull and attach to the opposite side, so the suspension
is workable if one just glues the opposite hull portion.
This would come in very handy if placed in a diorama on an irregular
surface. I glued everything solid,
as my shelves are fairly flat.
I added the front plate to the upper hull, attaching the drivers view-port in
the open position. The hatches
here, and on the turret, were all glued shut, but the option is there to have
them open (and even workable if one is careful with the linkages and the glue).
There is no internal detail at all, so if you desire open hatches some
scratch-building will be in order.
This is a pretty clean design for a tank, so upper hull additions are minimal.
A couple of headlamps, some lifting hooks, towing shackles, and a few
brackets here and there sum it up.
A very nice addition is the PE screen for the rear deck intake. There are also
screens for the two engine intakes (but since the intakes I chose face down and
the screens won't be seen, I didn't bother).
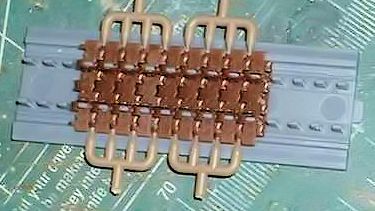 The tracks are individual link type, which normally would decrease my enthusiasm
level by a factor of about 1000000.
These tracks, however, are pretty darn cool.
First off, the tracks are connected, in pairs, to a small sprue.
Snipping them off close to the attachment points leaves nothing to clean
up, as what's left will be hidden by the next link. Next in the way-awesome
department is the fact that AH gives you a jig to place said links in for
assembly. About 12 links can be placed at a time.
Finally link pins, very tiny link pins, are attached to sprue in
groupings of 4 and 2 and singles, and the spacing is correct for the track link
pin holes. What all this means is
that you snip a dozen track links from the sprue, place them in the jig, and
press the link pins into their holes and you have an assembled, fully workable
section of track. Oh, and it's all
a press fit, so nothing to glue.
Really well done AH!!! In no time
at all I had two complete sections of track ready to paint.
The tracks are individual link type, which normally would decrease my enthusiasm
level by a factor of about 1000000.
These tracks, however, are pretty darn cool.
First off, the tracks are connected, in pairs, to a small sprue.
Snipping them off close to the attachment points leaves nothing to clean
up, as what's left will be hidden by the next link. Next in the way-awesome
department is the fact that AH gives you a jig to place said links in for
assembly. About 12 links can be placed at a time.
Finally link pins, very tiny link pins, are attached to sprue in
groupings of 4 and 2 and singles, and the spacing is correct for the track link
pin holes. What all this means is
that you snip a dozen track links from the sprue, place them in the jig, and
press the link pins into their holes and you have an assembled, fully workable
section of track. Oh, and it's all
a press fit, so nothing to glue.
Really well done AH!!! In no time
at all I had two complete sections of track ready to paint.
| COLORS & MARKINGS |
Previously for German tracks I had used Testors Rust (little bottle) and then
tried to weather it with black and brown washes.
While it worked okay for the most part, the result is still just a bit
too red. So here I mixed up some
Italian Brown with some Rust (about 80\20) and tried that.
It just looked better from the start.
For the tank itself I would normally give everything a coat of panzer yellow to
start, but I wanted to try a few new things (for me anyway).
I decided to pre-shade the edges with black, but was too lazy to mix some
up for the airbrush. I found some
dark sea blue that I had mixed up a while back and used that
 instead .... close
enough for my purposes here. So I
sprayed this along armor edges and panel lines and what-not.
Then I grabbed some trusty panzer yellow and sprayed the general areas I
needed. I was going for the 3 color
striped scheme which I thought would look good with the angles of the tank.
I tried varying the coverage, and keeping it light around the edges
letting the pre-shading show thru ..... hoping for a worn appearance.
instead .... close
enough for my purposes here. So I
sprayed this along armor edges and panel lines and what-not.
Then I grabbed some trusty panzer yellow and sprayed the general areas I
needed. I was going for the 3 color
striped scheme which I thought would look good with the angles of the tank.
I tried varying the coverage, and keeping it light around the edges
letting the pre-shading show thru ..... hoping for a worn appearance.
Letting this dry thoroughly, I formed silly putty in long rolls about 1/4"
diameter and placed these on the tank where I wanted the edges of the yellow
stripe to be. I then masked over the majority of the yellow stripe with tape.
I used the silly putty rolls because I wanted a soft edge on the stripes.
Panzer green came next, sprayed the same way as the yellow.
The whole procedure was then repeated with the panzer red.
After this came the inevitable touch-ups, these I just carefully sprayed
free-handed.
A thin black oil wash, used to pop out the details, was liberally applied next.
Then decals were applied.
Since there are so few, I did not bother to gloss coat the model.
Instead I applied a drop of Future where the decal was going to reside.
This worked just fine, but I still had just a tad of silvering under the
clear portion that connects the numbers.
I poked several holes in it with a pin and applied a bit more Future on
it. With a little coaxing with a
brush, I got the Future worked into the bad areas.
Another black wash was applied to dirty
up and match the decals to the tank.
Then I grabbed a small brush and a bottle of Testors rubber and proceeded
to "ding" up some of the edges.
Rubber gives a good representation of the dark
 color rusted metal turns and to
me just gives the tank a better used, rugged look.
I applied a heavier black wash to the tracks, dry-brushed some Testors
Steel on them, and then rubbed the (visible) track teeth with a good ole #2
pencil. This is one of the easiest
ways I have found to duplicate shiny metal on tracks.
color rusted metal turns and to
me just gives the tank a better used, rugged look.
I applied a heavier black wash to the tracks, dry-brushed some Testors
Steel on them, and then rubbed the (visible) track teeth with a good ole #2
pencil. This is one of the easiest
ways I have found to duplicate shiny metal on tracks.
I attached the road-wheels, sprockets and tracks at this time. Adding the last little track pin was easier than I thought it would be. Pioneer tools and exhaust parts were the final bits attached. These are well represented in plastic. I mixed up a dark-ish metallic color for the exhaust bits, though I'm not sure I like the final look. A dark brown/rust color would probably be better. As a final step, I misted on some dull coat (Future mixed with Tamiya flat base - works great) and called it done.
| CONCLUSIONS |
I
was very happy to hear about this kit coming out.
I have always loved the look of the DB, the "German T-34".
I was a bit apprehensive about it being from a newcomer to the industry,
but my fears have been vanquished.
Amusing Hobby did a bang up job here.
Very nice detail and a fantastic way to do individual link tracks.
And for the fact that it was never put into production, you can have a
blast in the "what if" department.
Camo, equipment, .... No-one can say you're wrong.
| REFERENCES |
Osprey Duel: Panther vs T-34
Internet
July 2013
If you would like your product reviewed fairly and fairly quickly, please contact the editor or see other details in the Note to Contributors.