Tamiya 1/48 SdKfz 2 'Kettenkraftkrad'
| KIT: | Tamiya 1/48 SdKfz 2 'Kettenkraftkrad' |
| KIT #: | 32502 |
| PRICE: | € 15.95 |
| DECALS: | Multiple options |
| REVIEWER: | Sjon van der Heiden |
| NOTES: | Includes Infantry cart and Goliath demolition vehicle |
| HISTORY |
 Originally intended for use by German airborne troops, the Kettenkraftrad came
to be used in several other roles. With its powerful Opel Olympia engine and six
gear clutch, it could pull up to 4 tons. It was used for towing light artillery
and trailers, or to pull aeroplanes to and fro the runway. One version was
specifically used for laying (communication) cables. Its unusual configuration
of a single front wheel and two narrow tracks gave the vehicle excellent
off-road capabilities. Wide turn steering was accomplished using the
motorcycle-like front wheel. In narrow turns the vehicle would pivot around its
tracks. When going over very rough terrain, the front wheel could even be
removed all together. Over 8000 units were produced during wartime by NSU and
Stoewer, and several hundreds were produced after the war for agricultural use.
Originally intended for use by German airborne troops, the Kettenkraftrad came
to be used in several other roles. With its powerful Opel Olympia engine and six
gear clutch, it could pull up to 4 tons. It was used for towing light artillery
and trailers, or to pull aeroplanes to and fro the runway. One version was
specifically used for laying (communication) cables. Its unusual configuration
of a single front wheel and two narrow tracks gave the vehicle excellent
off-road capabilities. Wide turn steering was accomplished using the
motorcycle-like front wheel. In narrow turns the vehicle would pivot around its
tracks. When going over very rough terrain, the front wheel could even be
removed all together. Over 8000 units were produced during wartime by NSU and
Stoewer, and several hundreds were produced after the war for agricultural use.
| THE KIT |
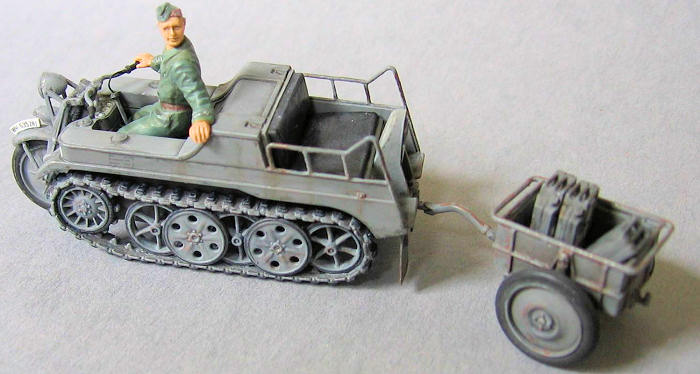
Inside the side-opening
box are two sprues. One is for the actual Kettenkraftrad, while also containing
a driver and pilot (this sprue was originally offered in combination with
Tamiya’s Me 262). The other sprue contains parts for the infantry cart, the
Goliath remote controlled demolition vehicle, some accessories (mainly to fill
the infantry cart), and an additional driver. This last one is facing forward,
while the aforementioned driver is looking
 over his shoulder, curious to know
what’s going on behind him. All is moulded in tan coloured plastic. The quality
of the moulding is top rank. There is no flash, no sinkholes, and the only
visible ejector pin marks are on the inside of the infantry cart. Though I
should mention they’re very shallow indeed and can be left as is without anyone
taking offence. The detail on this little kit is fantastic, even though the
engineering is very simple. The kettenkraftrad consists of “only” 28 parts. The
tracks for instance are moulded as one piece, onto which only four additional
road wheels will have to be added. But this simplicity has in no way compromised
the level of detail of the vehicle.
over his shoulder, curious to know
what’s going on behind him. All is moulded in tan coloured plastic. The quality
of the moulding is top rank. There is no flash, no sinkholes, and the only
visible ejector pin marks are on the inside of the infantry cart. Though I
should mention they’re very shallow indeed and can be left as is without anyone
taking offence. The detail on this little kit is fantastic, even though the
engineering is very simple. The kettenkraftrad consists of “only” 28 parts. The
tracks for instance are moulded as one piece, onto which only four additional
road wheels will have to be added. But this simplicity has in no way compromised
the level of detail of the vehicle.
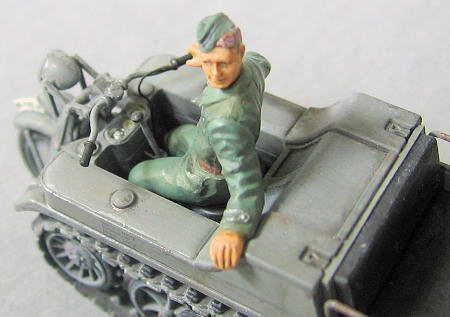
The poses of all three figures are very life like and their uniforms look very
smart. But their faces are rendered rather poorly. One of them has only one ear
for instance. Do not get me wrong. These figures are quite acceptable, just not
the best I’ve seen.
All in all there are 84 parts to this kit. There are decal options for seven
vehicles, though most will look very similar. The instructions are superb and
colour call-outs are generic and for Tamiya paints.
I know Hauler makes a photo etched detail set for this kit. But unless you’re
planning to mount the two rifles on the back railing in a more realistic way,
you really don’t need it. All the other extras in this set can be simply
omitted, or easily scratch-build.
| CONSTRUCTION |
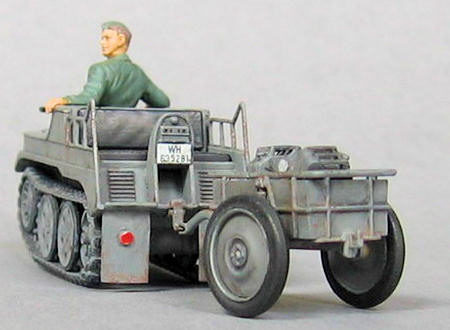
Construction starts with
the lower hull. And the lower hull is the only part which could use a little
extra attention. Tamiya has chosen to depict this sd.kfz. 2 with the welded
steel plating in between the railing at the back of the vehicle. As mentioned
earlier t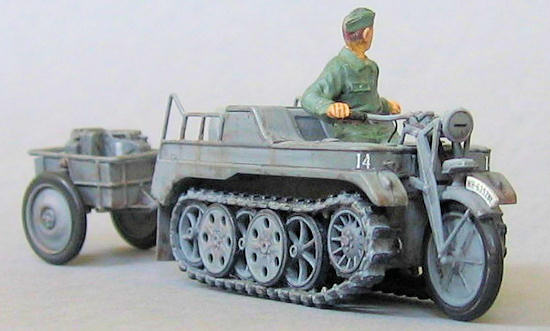 he mouldings are really superior, but there are limits to what even
Tamiya can achieve. In real life this plating would be a mere 5mm thick. Because
this thickness cannot be replicated by polystyrene mouldings, on the inside of
the vehicle the plating actually stands proud of the railing, instead of the
other way round. So I decided to remove all the plating with a new X-acto no. 11
blade to end up with just the railing and a far more realistic look. Reference
photos show vehicles with and without these plating so you’re safe any which
way. Furthermore, the driver’s compartment could use some extra detailing such
as clutch levers and gas cables. These were made out of stretched sprue and very
fine brass wire. On the front of the vehicle two big towing hooks are moulded as
rather featureless lumps. These were carved into a somewhat better shape while
two smaller eyelets, which are missing all together, were made out of fine brass
wire. The only real problem I encountered was a rather bad fit of the upper deck
to the lower hull. I had to do some trimming to the underside of the dashboard
to get everything in place. This problem may have been my own doing, but I don’t
see how. Finally I replaced the mudguards for ones made out of Evergreen sheet,
as the ones in the kit are a bit thick.
he mouldings are really superior, but there are limits to what even
Tamiya can achieve. In real life this plating would be a mere 5mm thick. Because
this thickness cannot be replicated by polystyrene mouldings, on the inside of
the vehicle the plating actually stands proud of the railing, instead of the
other way round. So I decided to remove all the plating with a new X-acto no. 11
blade to end up with just the railing and a far more realistic look. Reference
photos show vehicles with and without these plating so you’re safe any which
way. Furthermore, the driver’s compartment could use some extra detailing such
as clutch levers and gas cables. These were made out of stretched sprue and very
fine brass wire. On the front of the vehicle two big towing hooks are moulded as
rather featureless lumps. These were carved into a somewhat better shape while
two smaller eyelets, which are missing all together, were made out of fine brass
wire. The only real problem I encountered was a rather bad fit of the upper deck
to the lower hull. I had to do some trimming to the underside of the dashboard
to get everything in place. This problem may have been my own doing, but I don’t
see how. Finally I replaced the mudguards for ones made out of Evergreen sheet,
as the ones in the kit are a bit thick.
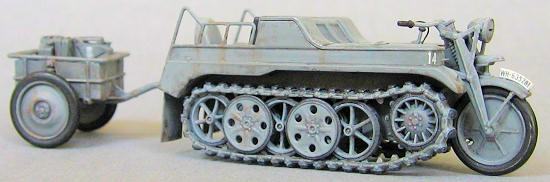
| COLORS & MARKINGS |
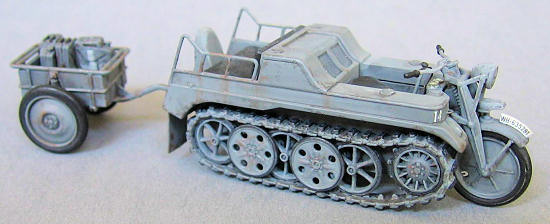
 The model is hand painted
with Humbrol enamel paint. I opted to paint it panzergrau and to just use the
number plates, the manufacturer stenciling and two white generic “fourteens”
from the kits decals. They reacted well to Microsol and went down beautifully
without silvering. The rubber rims of all wheels where washed with flat black,
rather then painted. It takes several washes to get them as black as you would
like them to be, but it gives a very good looking result and it’s much easier
than painting. The kits instructions have you paint the tracks a steel sort of colour, but all restored ones I’ve seen on photographs have the tracks in the
colour of the vehicle itself. So, panzergrau they went, after which they were
weathered quite a bit with a mixture of steel and rust.
The model is hand painted
with Humbrol enamel paint. I opted to paint it panzergrau and to just use the
number plates, the manufacturer stenciling and two white generic “fourteens”
from the kits decals. They reacted well to Microsol and went down beautifully
without silvering. The rubber rims of all wheels where washed with flat black,
rather then painted. It takes several washes to get them as black as you would
like them to be, but it gives a very good looking result and it’s much easier
than painting. The kits instructions have you paint the tracks a steel sort of colour, but all restored ones I’ve seen on photographs have the tracks in the
colour of the vehicle itself. So, panzergrau they went, after which they were
weathered quite a bit with a mixture of steel and rust.
I wanted to give this vehicle a really weathered and worn down look. Now I know
the Germans are renowned for their gründlichkeit, but as I understand it, at
least some of them had more pressing things at hand than maintenance. First I
washed the entire vehicle with highly diluted black paint. After that, I dry
brushed the vehicle with panzergrau to bring out the detail and dusted some
white pigment on the horizontal planes to simulate sun fading. Then I painted
the usual places with a mixture of steel and rust, which were given a few
minutes to cure. Then I washed most of the rust stains with white spirit to get
that streaky look only the rain can create. Some chipping was done with a 2B
pencil and some fuel stains around the filler caps completed the look I was
after. That is to say, I still have to dirty it up a bit, but since this vehicle
will be adorning a diorama I hope to finish some day soon, that will have to
wait till later.
| CONCLUSIONS |
 This is a wonderful little
kit. It will look excellent straight out of the box, and even better with a
minimum of extra detailing. The engineering is so that failure is not an option.
I had a really good time building it and will definitely be doing more of these.
Perhaps Tamiya item no. 32533 is more appealing to the average aeroplane
modeller, as that Kettenkraftrad comes with an aircraft power supply unit.
Undoubtedly that will be as pleasant a build as this was.
This is a wonderful little
kit. It will look excellent straight out of the box, and even better with a
minimum of extra detailing. The engineering is so that failure is not an option.
I had a really good time building it and will definitely be doing more of these.
Perhaps Tamiya item no. 32533 is more appealing to the average aeroplane
modeller, as that Kettenkraftrad comes with an aircraft power supply unit.
Undoubtedly that will be as pleasant a build as this was.
| REFERENCES |
All the internet has to offer.
April 2008
If you would like your product reviewed fairly and quickly, please contact me or see other details in the Note to Contributors.