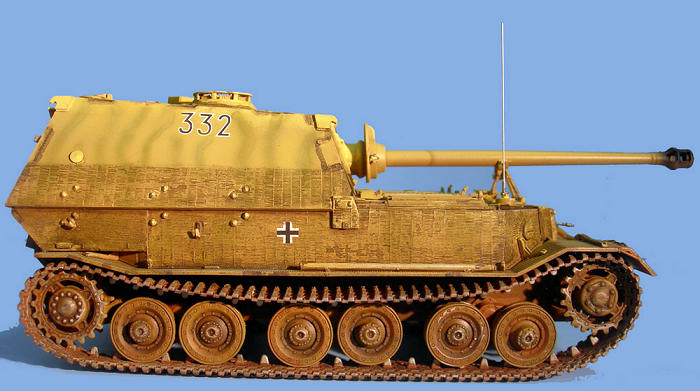
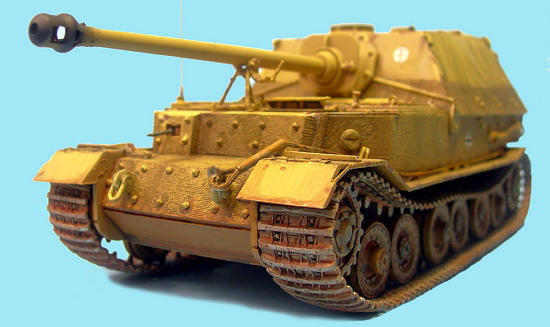
Dragon 1/35
Sd.Kfz.184 Elefant with Zimmerit
|
|
6465 |
|
PRICE: |
$62.00 |
|
DECALS: |
5 options |
|
REVIEWER: |
|
|
NOTES: |
|
|
HISTORY |
The
Elefant was a German tank hunter originally built as the “Ferdinand” in honor of
its designer, Ferdinand Porsche.
The design evolved from cruder, improvised designs of
1941-42, as well as the later, but problem-ridden Marder designs. Porsche
created the chassis from the 90 Porsche Tiger I models already built with new
tracks and an all-steel wheel arrangement. Since the competing Henschel Tiger I
design was chosen for production, the Porsche chassis were no longer required
for tank production. The Germans therefore decided that the Porsche chassis were
to be used as the basis of a new heavy tank destroyer, mounting Krupp's newly
developed 88 mm Pak 43/2 L/71 anti-tank gun. This long-range weapon was supposed
to take out enemy tanks before they reached their own range of effective fire.
Krupp originally developed the L/71 as a replacement for the
88 mm
anti- aircraft gun that had been successfully used as an anti-tank weapon in the
North African campaign. The L/71 had a much longer barrel than the L/56 Flak 18
and Flak 36 guns, which gave it a higher muzzle velocity. It also fired a
different, longer round. These improvements gave the L/71 significantly improved
armor penetration over the earlier 88 mm. In the Elefant, the gun was capable of
only a 25° traverse and a similarly limited elevation.
aircraft gun that had been successfully used as an anti-tank weapon in the
North African campaign. The L/71 had a much longer barrel than the L/56 Flak 18
and Flak 36 guns, which gave it a higher muzzle velocity. It also fired a
different, longer round. These improvements gave the L/71 significantly improved
armor penetration over the earlier 88 mm. In the Elefant, the gun was capable of
only a 25° traverse and a similarly limited elevation.
The
Ferdinand’s suspension consisted of six twin bogies with longitudinal torsion
bars. Porsche placed the engines in the middle of the hull to make room for the
rear fighting compartment, which was a simple, casemate-style box structure,
with slightly sloped sides, and placed on top of the chassis. The engines drove
electric generators, which in turn powered electric motors connected to the rear
sprockets. The chasis’ "slack track" setup used two drive sprockets per track,
with the frontmost wheel sprocketed just like the rear drive sprocket. The
driver and radio operator rode in a separate compartment at the front. Since the
engines were in the middle of the vehicle, the crews in the two separated
compartments had to communicate over a radio system.
The
vehicle’s two Porsche air cooled engines were replaced by two 300 hp Maybach HL
120 TRM engines powering two generators. The generators drove two electric
motors which, in turn, powered the drive sprockets. The electric motors also
acted as the vehicle's steering unit. This so called "petro-electrical" drive
propelled the vehicle to a maximum speed of 10 km/h off-road and 30 km/h
on-road. Unfortunately, this drive system had a high fuel consumption and
required intensive maintenance (for example, the sprockets had to be changed
every 500 km).
The
vehicle’s armor consisted of a 200 millimeter front plate that added another 5
tons to the vehicle’s weight.
Ferdinands were first used in the Battle of Kursk, where they experienced
numerous problems. In fact, 38 of the 90 vehicles were
lost due to mechanical breakdowns or anti-tank mines. More troubling, however,
was the fact that each disabled Ferdinand had to be towed away by three un-armoured
FAMO heavy half-tracks, an extremely difficult and intensive task under
battlefield conditions that forced the Germans to abandon or destroy almost all
of the damaged vehicles.
After
Kursk, all surviving Ferdinands were recalled for modification. During October
and November 1943 forty-eight of the surviving vehicles were modified by the
addition of a ball-mounted MG 34 in the hull front (to improve anti-infantry
capability), a
 commander's cupola (modified from the standard StuG
In 1944
Elefants served on the Italian front but were relatively ineffective, as their
70 ton weight did not allow them to use most Italian roads and bridges. Due to a
permanent lack of spare parts most of the units were not destroyed in battle,
but abandoned and blown up by their own crews. One company of Elefants saw
action during the Soviets' January 1945 Vistula-Oder Offensive in Poland, and
the very last surviving vehicles were in combat at Zossen during the Battle of
Berlin.
When functioning
correctly and used under the conditions for which it had been designed, the
Ferdinand/Elefant proved a formidable weapon, able to punch holes through most
anything within a range of 1500 meters with tremendous accuracy. Further, its
thick armor provided exceptional protection for its crew, with the result that
crew losses in Ferdinand/Elefant units were rather low. In the end, this
much-maligned vehicle stands out as one of the war’s best tank hunters, with a
kill/loss ratio of 10.5 to 1. At
|
THE
|
|
CONSTRUCTION |
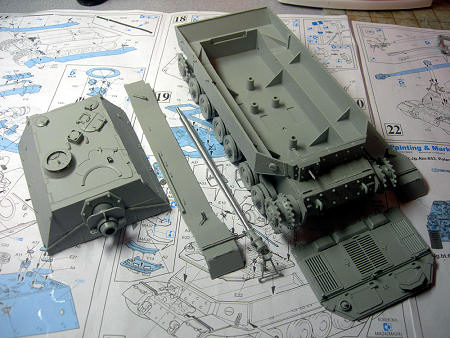
Grabbing my trusty pencil (to
mark off each completed step) I followed the step-by-step assembly sequences in
the Dragon instructions. Per all Dragon kits of late, one must remain focused on
the “version” or options you are including in your particular model, as the
numerous parts can throw you if you don’t do this.
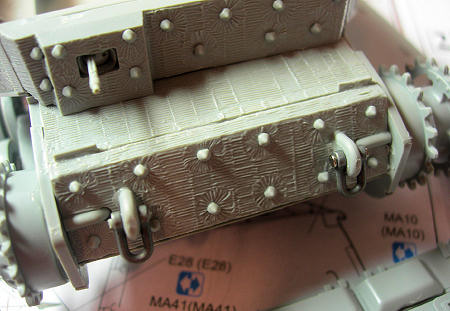 As with most armor
kits, I finished the lower hull, the suspension and all the running gear first.
I then moved to the rear hull and fighting compartment. The rear engine exhaust
contains nicely done, photo-etched screens, but these are hard to see once the
vehicle is fully assembled. I used superglue to secure them to the vehicle. As
usual, Dragon supplies PE mounting hardware for the externally mounted equipment
(such as the shovel and jack); but, in my opinion, given Dragon’s excellent
molding technology, one can opt to not use these PE parts and achieve just as
stunning results.
As with most armor
kits, I finished the lower hull, the suspension and all the running gear first.
I then moved to the rear hull and fighting compartment. The rear engine exhaust
contains nicely done, photo-etched screens, but these are hard to see once the
vehicle is fully assembled. I used superglue to secure them to the vehicle. As
usual, Dragon supplies PE mounting hardware for the externally mounted equipment
(such as the shovel and jack); but, in my opinion, given Dragon’s excellent
molding technology, one can opt to not use these PE parts and achieve just as
stunning results.
I then started
assembling the front of the lower hull, and here I encountered a problem: the
instructions show parts M9 and M3 joined together, but it is not clear HOW these
parts should be joined (i.e., butted together, overlapped, and at what angle?).
It took me several dry fittings of the two parts onto the hull before I was
satisfied, and once I decided to apply glue, I still was not sure I had chosen
the correct, intended installation. After this, I used superglue to install the
two metal tow hooks on the vehicle’s lower front.
 Although both the
main gun and hull-mounted machine gun are rather intricate, there is no other
detail in either the fighting compartment or the driver’s compartment, so if you
opt to model the vehicles with closed hatches as I did, you won’t see any of the
detail associated with these weapons.
Although both the
main gun and hull-mounted machine gun are rather intricate, there is no other
detail in either the fighting compartment or the driver’s compartment, so if you
opt to model the vehicles with closed hatches as I did, you won’t see any of the
detail associated with these weapons.
I then moved to the
commander’s cupola, which is a kit within the kit. The cupola consists of 7 gray
and 7 clear plastic parts, and is extremely detailed. I then attached the
numerous detail parts such as hatches, hinges, and lifting hooks to the fighting
compartment.
The aluminum main
gun barrel is a beautiful piece, and I used superglue to attach the muzzle brake
to it, and then superglue to secure the barrel to the breech mechanism and gun
mount. The kit includes wire to make a tow cable, and this looks very realistic
when combined with the plastic ends. I made up one long metal cable and attached
one end to the front tow cable hook, and then draped the cable around the hull.
Again, I used superglue to hold the tow cable down and close to the model for a
more realistic look.
|
COLORS & MARKINGS |
Once everything
was assembled, I headed to my basement paint booth. After reading Mike Rinaldi’s
great
missing-lynx.com article describing Adam Wilder’s “Color Modulation”
painting technique, I decided to try this intricate methodology on this kit.
Fortunately, Mike used the Dragon Ferdinand kit as his example for the article,
so I could get some idea of how mine might turn out. Since Mike suggests using
Tamiya acrylics for the initial steps, I was somewhat terrified, as I have been
using lacquer/enamel-based paints for the past 50 years (this is especially
difficult since old dogs cannot be taught new tricks!). But once I discovered
that Mike recommends cutting Tamiya acrylics 50-50 with lacquer thinner, I was
immediately returned to familiar territory, so I decided to make the plunge.
Since all of the versions represented by the kit have the Panzer Yellow base, I
opted for this paint scheme, with some minor dark green camo.
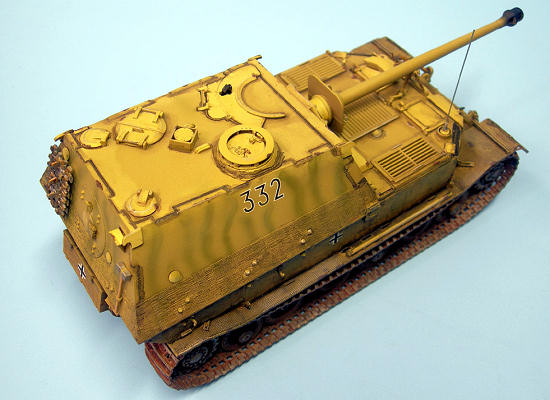
The color
modulation approach requires three main levels of color - light, medium, and
dark – to provide gradation in the vehicle’s color. Per the article, I applied
an overall coat of Tamiya XF-64 Red Brown lightened with a few drops of XF-60
Dark Yellow. Once this dried, I airbrushed a coat of XF-60, making sure to limit
the amount of this paint on the darker, lower areas. I then added XF-55
 Deck Tan
to XF-60 to further lighten the color, and tried to again limit the spray to the
upper areas of the model. The contrasts between the dark and lighter areas were
now starting to become noticeable. For the final stage, I mixed X-2 White to
that mixture, and then sprayed the upper half of the model again.
Deck Tan
to XF-60 to further lighten the color, and tried to again limit the spray to the
upper areas of the model. The contrasts between the dark and lighter areas were
now starting to become noticeable. For the final stage, I mixed X-2 White to
that mixture, and then sprayed the upper half of the model again.
The next phase
involved painting all of the smaller details (e.g., hatches, covers, vents,
grills) with lighter yellow and tan shades to make these details “pop.” For this
stage, I used inexpensive acrylic craft paints, purchased from a local crafts
store, and a relatively wide modeling brush to get smooth coats on the model.
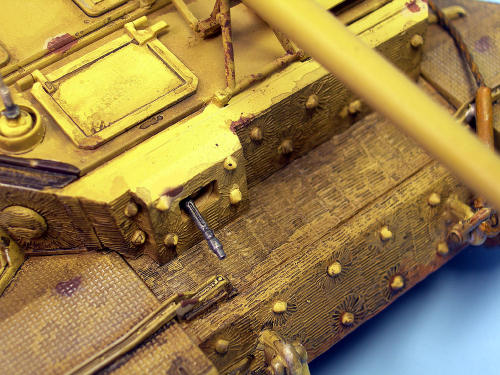
The next phase uses oil paints
on the light and dark areas to provide additional gradation and further break up
the surface. Mike suggests using a cardboard pallet to blend your oil paints as
well as to soak up the linseed oil in the paints so they will dry with a matte
finish). I mainly used the oils around the upper edges of the hull and external
boxes. Once applied, I blended these with a flat brush dipped in a small amount
of thinner. (The caution here is to not use too much thinner so that you avoid
turning your carefully applied oil paint into a wash). I also used this
technique on the shadows and darker areas of the model, and added dark shadows
to the very prominent weld joints on the Elefant. Mike says to let the oil
paints thoroughly dry over several days, but since I live in “dry”
 Next, I sprayed a
very light coat of Tamiya X-24 Clear Yellow over the model. This is done to
provide the correct yellow hue to the model. I then moved to “chipping,” which,
I must admit, I have yet to master. Mike’s approach is to lay down small areas
of light tan to sharp edges on the model and areas that would receive such wear.
Mike recommends a small sponge, but I opted for a detail brush for this step. I
then used the same brush to apply dark brown in the center of each chip area to
try and replicate exposed metal. I am not sure my results are very convincing,
but I hope with much practice, Mike’s approach will eventually help me produce
convincing chips on my future models.
Next, I sprayed a
very light coat of Tamiya X-24 Clear Yellow over the model. This is done to
provide the correct yellow hue to the model. I then moved to “chipping,” which,
I must admit, I have yet to master. Mike’s approach is to lay down small areas
of light tan to sharp edges on the model and areas that would receive such wear.
Mike recommends a small sponge, but I opted for a detail brush for this step. I
then used the same brush to apply dark brown in the center of each chip area to
try and replicate exposed metal. I am not sure my results are very convincing,
but I hope with much practice, Mike’s approach will eventually help me produce
convincing chips on my future models.
Here, I deviated
slightly from Mike’s technique. I coated the entire model with Testors Glosscote,
and then applied both dark brown and black washes to the entire vehicle,
including the tracks (which I had sprayed with Testors Steel). I keep a Q-tip
handy to quickly wipe away any excess wash that gets on the model (this is much
easier than waiting until it dries!).
I then applied the kit decals with Solvaset and let them dry. At this stage, I was ready to restore the model’s matte finish, so I shot the entire model with Testors Dullcote. Next, I applied the camo: a step that is out of sequence for me. I used a very light air pressure setting to add small stripes of dark green to the vehicle’s sides. I must say that I think the technique worked quite nicely, as the camo is very subtle, and actually adds to the battle-worn look of the finished model.
 Since
the marking options are all for late war Panthers with a base Panzer Yellow
finish, I covered the entire tank with Model Masters Sand Gelb (close enough for
me to Dunkelgelb), and when this was dry, I began to create the camo pattern
using light (15 psi) air pressure and a very low nozzle opening on my airbrush.
I used Model Masters Dark Green and Testors Dark Brown
for the camo pattern.
Since
the marking options are all for late war Panthers with a base Panzer Yellow
finish, I covered the entire tank with Model Masters Sand Gelb (close enough for
me to Dunkelgelb), and when this was dry, I began to create the camo pattern
using light (15 psi) air pressure and a very low nozzle opening on my airbrush.
I used Model Masters Dark Green and Testors Dark Brown
for the camo pattern.
Once again, one of
the minor drawbacks of the DS flex tracks is simulating the sag in German tank
tracks, particularly Tigers and Panthers. Surprisingly, the track teeth fit
snugly in the gap between the road wheels, and pushing the teeth into this gap
produces realistic looking track sag.
The final step in
painting the model was to brush paint the sledgehammer on the vehicle’s rear and
its wooden handle. Since I had already mounted them to the turret, I also opted
to hand-paint the spare track links. I then highlighted prominent edges on the
model with a silver artist’s pencil to simulate worn metal.
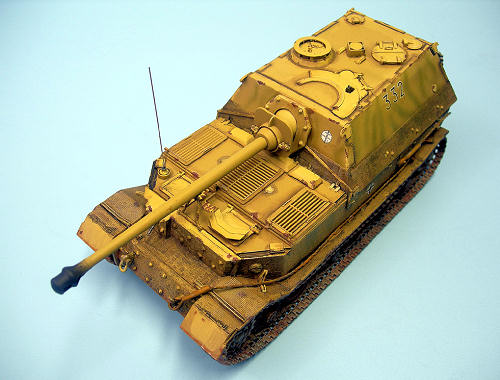
The final touch
was to cut a length of guitar string for a radio antenna and superglue it to the
antenna mount on the front deck.
|
CONCLUSIONS |
Call me a concrete nut, but these zimmerit coated Dragon kits are the cat’s meow! The Elefant is an unusual subject and a great addition to one’s armor collection. I highly recommend this kit to anyone with a concrete addiction!
|
REFERENCES |
1.
Boillat, Pierre-Andre, “Dragon
1/35 Sd.Kfz 184 'Ferdinand',”
Modeling Madness, June 2009.
2.
“Elefant,”
Wikipedia,
2009.
3.
Rinaldi, Mike, “Ferdinand
Painting, Color Modulation Style,”
missing-lynx.com,
July 2009
Thanks to www.dragonmodelsusa.com for the review kit. You can get yours at your local shop or on-line retailer.
If you would like your product reviewed fairly and quickly, please contact me or see other details in the Note to Contributors.