Italeri 1/35 SdKfz 173 Jagdpanther
| KIT #: | 6275 |
| PRICE: | $35.00 MSRP |
| DECALS: | Several options |
| REVIEWER: | Blair Stewart |
| NOTES: |
| HISTORY |
 Expanding
on the history presented in the
Boss' in the box preview, the Jagdpanther tank destroyer was originally
scheduled to enter service in 1943, but due to changes in where and who would
build the vehicle, Jagdpanther production did not start until January, 1944, and
only 226 were produced that year. 1945’s production of 198 brought the final
total up to only 425 (compare this with over 49,000 Shermans produced during the
war).
Expanding
on the history presented in the
Boss' in the box preview, the Jagdpanther tank destroyer was originally
scheduled to enter service in 1943, but due to changes in where and who would
build the vehicle, Jagdpanther production did not start until January, 1944, and
only 226 were produced that year. 1945’s production of 198 brought the final
total up to only 425 (compare this with over 49,000 Shermans produced during the
war).
The Jagdpanther was armed with the long-barreled 88mm Pak 43/3 L/71 gun (similar to that used on the Tiger II) and a single 7.92mm MG34 or MG42 machine gun mounted in the same ball mount that was used on the Panther A. The 88mm gun was capable of destroying enemy tanks at ranges of 3000 meters. Both weapons were mounted in a well-sloped frontal plate (80mm thick and a slope of 55 degrees). The main 88mm gun was protected by a very large "saukopf" (pig's head) type mantlet. The limited traverse (11 degrees to the left and right) and elevation (-8 to +14 degrees) of the main gun was a severe disadvantage when it came to a mobile battle, since the crew was forced to orient the vehicle in order to face the target.
| THE KIT |
 Having built the Tamiya
Jagdpanther some 32 years ago, I wasn’t quite sure what to expect with this
newer Italeri version. You can read Scott’s preview to see what’s in the box,
but I can tell you that the level of detail is outstanding and, to me, rivals
even some of Tamiya’s latest endeavors.
Having built the Tamiya
Jagdpanther some 32 years ago, I wasn’t quite sure what to expect with this
newer Italeri version. You can read Scott’s preview to see what’s in the box,
but I can tell you that the level of detail is outstanding and, to me, rivals
even some of Tamiya’s latest endeavors.
The kit version is a later production vehicle, given the larger bolted mantlet casing that is included. This was adopted during production to save time and reduce costs. A number of different exhaust systems were used throughout the Jagdpanther’s production, and the kit contains the fully enclosed type, but it does not have the top elbow joint seen in some Jagdpanther pictures, nor does it contain the track skirts that are also often seen in pictures (I think these were left off the later versions, which would then be accurate for the kit’s timeframe).
| CONSTRUCTION |
Ah,
German WWII armor: the spice of life! The only problem with building these
models is deciding which of the myriad color schemes to use. Another
consideration on many of these vehicles is “zimmerit or no zimmerit.” I have
applied zimmerit before on some of my models, but it has been at least 25 years
since I tried this, and given the long time I was already taking to build this
kit, I 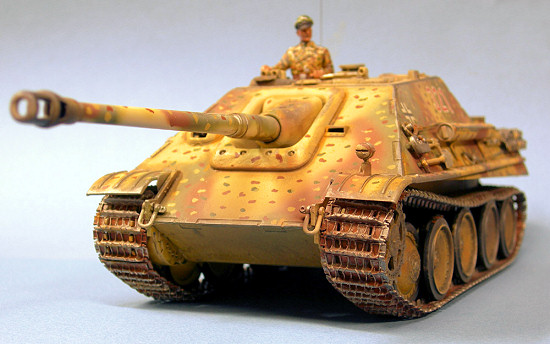 decided against
adorning this one with the anti-magnetic mine paste (and this probably was a
good decision since the Germans ceased applying zimmerit to their armored
vehicles toward the end of the war). So no zimmerit it was, and that meant I
would basically build this kit “OOB” (out of the box).
decided against
adorning this one with the anti-magnetic mine paste (and this probably was a
good decision since the Germans ceased applying zimmerit to their armored
vehicles toward the end of the war). So no zimmerit it was, and that meant I
would basically build this kit “OOB” (out of the box).
Construction began with the lower hull and all of the running gear. If you’ve never built a Panther or Tiger tank, you will soon discover that the Germans were obsessed with road wheels for these vehicles. I’m sure it added to the vehicle’s all terrain and overall ride capabilities, but it is a major pain for the modeler to assemble all of these road wheels, and then mount them to their torsion bars. Another maddening issue is that most of these road wheels had rubber on the outer rims: thus, you have the proverbial problem of how best to paint the steel wheel and the rubber.
I probably should have used a different method, but I opted to assemble the whole vehicle before painting anything. Additionally, I decided in advance that I would paint the rubber on the road wheels by hand instead of attempting to mask them (using circle templates).
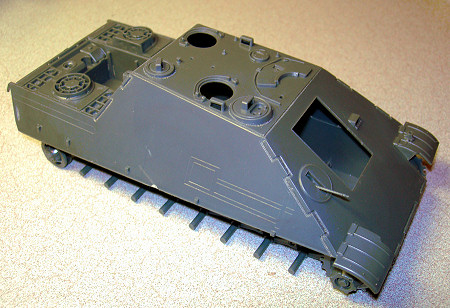
The next assembly I constructed
was the upper hull. Like most armor kits, the Italeri has a one-piece upper hull
to which one glues a myriad of small parts. In addition, parts 27B and 28B help
enclose the lower hull so that there is not that ever-present gap like in some
armor kits. At this time, it is wise to glue in the machine gun and its mount,
per the instructions. Even though I
 planned on displaying the
model with the engine deck lid closed, I went ahead and assembled the engine
into its compartment. Finally, I attached all of the small parts such as grab
handles, air intake covers, tow hooks, and the rear hatch (parts 68B and 69B).
The only item I used that didn’t come in the kit box was a length of .009 guitar
string for the radio aerial, which I superglued into the aerial mount after
drilling a hole for it. I used a combination of tube glue, liquid cement and
super glue for this assembly stage.
planned on displaying the
model with the engine deck lid closed, I went ahead and assembled the engine
into its compartment. Finally, I attached all of the small parts such as grab
handles, air intake covers, tow hooks, and the rear hatch (parts 68B and 69B).
The only item I used that didn’t come in the kit box was a length of .009 guitar
string for the radio aerial, which I superglued into the aerial mount after
drilling a hole for it. I used a combination of tube glue, liquid cement and
super glue for this assembly stage.
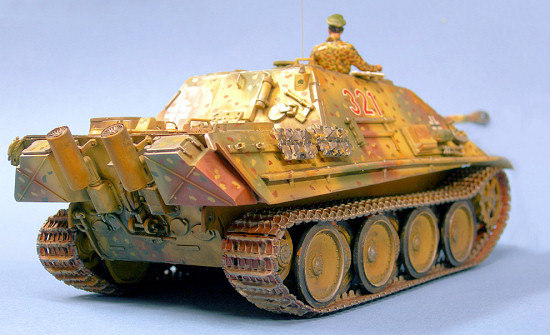
The next step was to assemble the rear stowage boxes and exhaust mufflers, and attach these along with the jack and its associated handles.
Once the hull was assembled, I turned to the main gun. The gun barrel halves line up fairly well, but like all plastic gun barrels that are cast in halves, the assembled barrel required some wet sanding to get rid of the inevitable seams that result from the gluing process.
The kit’s main gun is supposed to be movable so it can be posed in various elevations, but I had trouble making it stay in one place, so I opted to glue it in a horizontal position.
Once the basic hull was done, I then glued the various detail pieces to it, including all of the tools, gun cleaning kit, etc. I find it easier for armor kits to fix all of these items to the hull, paint the overall vehicle, and then hand paint the various tools and equipment.
The final items I assembled were the vinyl tracks. These are quite nicely detailed (compared to older vinyl tracks that had little or no detail, especially on the inside of the tracks), and are assembled by heating something like a thin screwdriver blade and then melting the connecting tabs to bind the tracks together.
| COLORS & MARKINGS |
Once everything was assembled, it was time to paint and
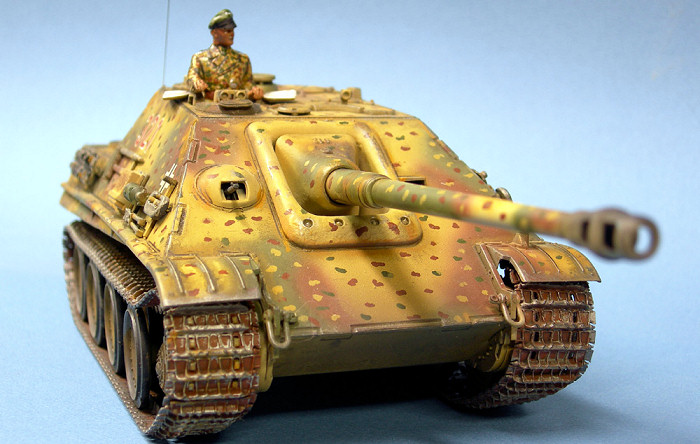
weather the vehicle. I chose one of my favorites: the ambush scheme, adopted by
the Germans in August of 1944. This consisted of a dark yellow (RAL 7028) base
coat with dark olive green (RAL 6003) and red brown (RAL 8017) sprayed over the
base coat in various camouflage patterns. In addition to those three main
colors, the ambush scheme inclu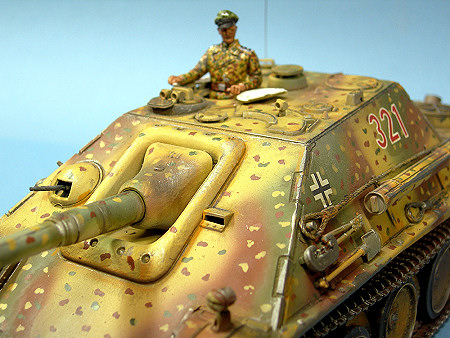 ded
small yellow, and olive green spots applied on the red brown areas, yellow and
red brown spots applied to the dark green areas, and small green and brown spots
applied on the dark yellow areas. This ambush scheme was very common on late war
panther and tiger tanks.
ded
small yellow, and olive green spots applied on the red brown areas, yellow and
red brown spots applied to the dark green areas, and small green and brown spots
applied on the dark yellow areas. This ambush scheme was very common on late war
panther and tiger tanks.
I used Model Masters Sandgelb RLM 79 for the dark yellow base coat, MM Dark Green FS34079 for the green camo, and Testors Flat Rust for the brown camo. I applied the camo pattern via freehand, using the kit instructions as a rough guide. Once the basic camo colors were dry, I then brush painted the yellow, green and brown spots that are the distinguishing feature of the ambush scheme. This takes a while, but I feel it’s well worth it once it’s finished.
Once the basic camo scheme was finished, I used a brush to dab on a pool of Future floor polish in the places where I needed to apply the decals, placed each decal in its respective pool, and set the model aside. I use this method for models that will essentially have a flat finish with very few decals (why shoot the whole model with a coat of Future when this works just as well?). Once the decals dried, I applied Testors Dullcote over the entire vehicle to give it a uniform flat finish.
For the road wheels, I opted for the lazy man’s approach: I used a Testors black paint pen to get as much of the wheels as I could (understanding that the areas I couldn’t get to would not be visible to the less than casual observer).
For weathering, I thinned some burnt umber oil paint I
bought at Hobby Lobby into a dark wash and generously applied it all over the
model with a fairly wide modeling brush. Don’t worry about overdoing this: you
can come back later with a cotton swab dipped in turpentine and remove any
amounts of this 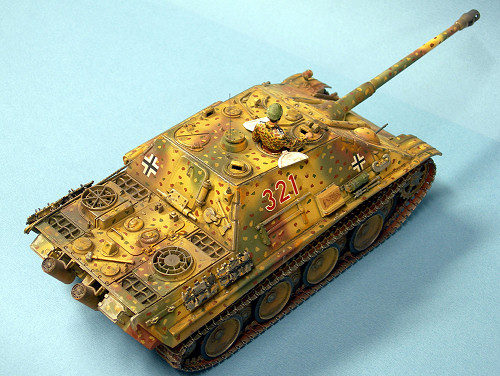 wash that you
need to if you mess up.
wash that you
need to if you mess up.
Once this wash dried, I dry-brushed some rust on the vehicle using Polly S Fantasy Goblin Flesh (how’s that for a paint?). This is acrylic, so it can be easily wiped up or toned down with water on a swab if needed. Finally, I dry brushed numerous raised areas on the kit with Pactra steel, then decided this didn’t look like I wanted to, so I used the side of a number 2 pencil to apply a worn look to various raised areas and hull seams.
As a final weathering step, I misted the yellow base color over the entire vehicle to lighten up the model.
Finally, I painted the tracks. I sprayed them initially with the Testors rust color to give them a dirty look, and then applied my black wash and a steel wash made from the Pactra steel. As a final touch, I dry brushed the tracks with steel to give them that worn look. After painting the tracks, I stretched them over the running gear and road wheels. To get that “sag” look, I depressed the tracks appropriately by wedging them with the end of some wooden pencils, and then superglued the tracks to the tops of the road wheels so they would stay in that position.
As a final touch, I added a tank commander figure from Dragon’s Tiger Aces (Normandy 1944) kit. I hand-painted the figure using MM Wood mixed with a little red for the skin tones, a slightly darker yellow for the overall uniform, and the same colors I used on the vehicle for the brown and green spots that make up the uniform’s camo.
| CONCLUSIONS |
 Overall,
this was an excellent and fun kit to build. I probably had a total of 12 or so
hours in this kit, including all of the painting and weathering, which isn’t
bad! I highly recommend this kit to anybody that has the yen for German armor.
Overall,
this was an excellent and fun kit to build. I probably had a total of 12 or so
hours in this kit, including all of the painting and weathering, which isn’t
bad! I highly recommend this kit to anybody that has the yen for German armor.
| REFERENCES |
1. “Panzerjäger V Jagdpanther Sd. Kfz. 173,” Achtung Panzer Website, 2006.
2. B. Culver, “Panther in Action,” Squadron Signal Publications, Inc., 1975.
July 2006
Copyright ModelingMadness.com
If you would like your product reviewed fairly and fairly quickly, please contact the editor or see other details in the Note to Contributors.