| KIT #: | 7022 |
| PRICE: | $11.00 MSRP |
| DECALS: | Four options |
| REVIEWER: | Bill Michaels |
| NOTES: | Includes parts for simple, robust drivetrain for wargaming, or more accurate scale drivetrain parts. |
| HISTORY |
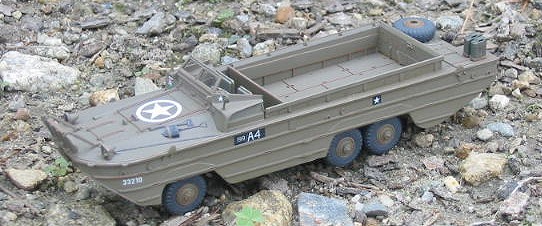
The DUKW was an amphibious truck used by Allied forces in WW2. It was used in landings and river crossings in both the European and Pacific theaters. See the preview for more on the history of the DUKW and the description of the kit contents.
“The Duck may not be the best looking boat on the highway, but it is the fastest truck on the water!”
Author’s Note: Writing this review has been a little bit of challenge—this is a truck and a boat. I’m a ship modeler, so I tend to use the marine version of terms— for example, I could call the main part of the vehicle either the “body” or the “hull”. I’ll try to clarify my terminology when there could be multiple meanings for a word….
| THE KIT |
Please visit the preview for a look at what comes in the box.
| CONSTRUCTION |
As mentioned in the
preview, the kit can be built one of two ways—as a simplified model for use
in wargaming, or as a more detailed scale model. The
construction of the two versions of the kit will each have some unique
parts. There’s not much risk of getting the steps or parts mixed up—
each version has its own set of assembly steps. This makes for an eas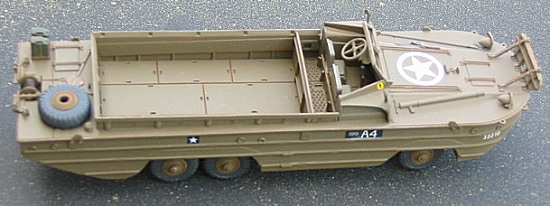 y
to follow assembly sequence, better than the type of instructions where
everything is documented at once, with options and version called out on
each step.
y
to follow assembly sequence, better than the type of instructions where
everything is documented at once, with options and version called out on
each step.
As I was building the kit as the more detailed model, I used the 5 step assembly sequence. (The four step sequence is for the wargaming version.) Overall, the model went together quite easily. I built my model OOB.
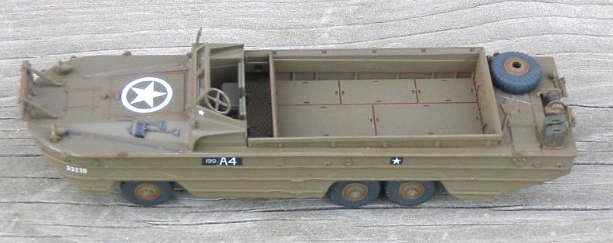
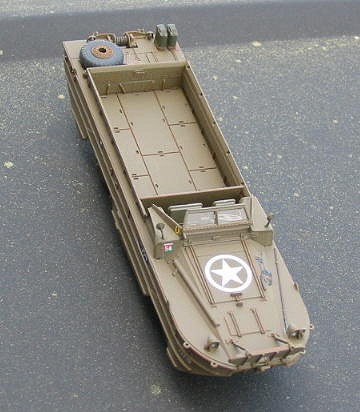
The basic hull is assembled from a top, bottom, and two sides. The basic hull parts fit well- there was only one small gap at the back that needed filling. (A small dab of superglue took care of it.) Right away, you can see the characteristic boat shape of the DUKW!
The next step is
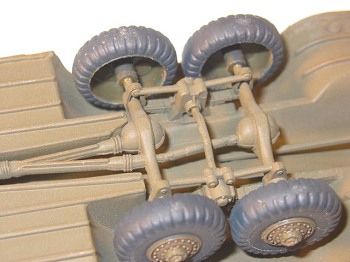
to attach the running gear to the bottom of the hull. (It seems more like
a hull than a chassis.) There are separate parts for the differentials,
driveshafts, and leaf springs. The instructions call for the wheels at
this point, but I recommend waiting until after the model is painted to
install them. Now, few trucks get a prop and propshaft, but this one
does!
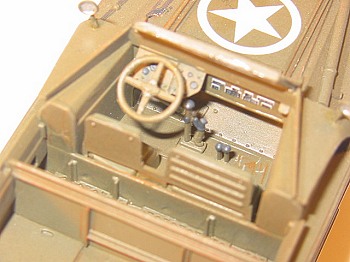
The model is then flipped over and the cab and topside details are added. In general everything fit well here, as well. There is one part I’d be careful about though—the steering wheel. I think the part is too tall- after my model was assembled and painted, I realized that if I was to slide a driver figure in place, that the wheel would hit him in the chin!
I deviated from the assembly sequence in a couple of areas. First, I did not add the windshield until after the model was complete—it made it easier to paint the model.
The woven rope fenders are the weakest part of the kit, in my opinion. (On boats, fenders are the temporary bumpers used to cushion the points where a boat rubs against a dock or another boat or ship.) On the real DUKW, these items are large woven lumps of rope, held in position with lengths of rope. (Like you’d see on a tugboat or other workboat.) On the kit, the fenders and the ropes are molded as one piece. The parts had prominent mold lines down the length of the pieces. When I tried to clean up the parts, I lost the molded rope detail on the fender. Also, the mold seams also ran the length of the very thin rope pieces- cleaning them up was very difficult, especially given the fragility of the parts.
 In my hands, at
any rate, I had two choices—live with prominent mold lines, or break the
pieces trying to clean them up. As a result, I left the fenders off, as I
just didn’t like the way the parts looked with the mold lines, and actually
broke a couple trying to clean them up. I felt OK with leaving them off,
though, as I found a number of photos of DUKWs without the fenders fitted.
In my hands, at
any rate, I had two choices—live with prominent mold lines, or break the
pieces trying to clean them up. As a result, I left the fenders off, as I
just didn’t like the way the parts looked with the mold lines, and actually
broke a couple trying to clean them up. I felt OK with leaving them off,
though, as I found a number of photos of DUKWs without the fenders fitted.
As mentioned in the preview, the wheels are molded in one piece, with hollow backs. I considered trying to fill them, but decided that it would be work that would not see the light of day. The only way you can see the openings in the wheels is if you turn the model over, which I don’t plan to do. Sitting there on the shelf, you can’t see it.
| COLORS & MARKINGS |
The model was easy to paint- overall Olive Drab. (I was tempted to try the US Marine three-tone scheme of green, sand, and brown, but I thought that masking that scheme in this small scale would be too hard to do.) I used PollyScale acrylics throughout.
 To paint the seat
cushions in the cab, I added a little white to some OD to give a lighter,
sort of scuffed look to the canvas material. For the tires, I used PollyScale’s scale black- I think it gives a convincing dark grey, just
right for rubber tires. (In some of the pictures, the lighting makes the
tires look grayer than they really are.)
To paint the seat
cushions in the cab, I added a little white to some OD to give a lighter,
sort of scuffed look to the canvas material. For the tires, I used PollyScale’s scale black- I think it gives a convincing dark grey, just
right for rubber tires. (In some of the pictures, the lighting makes the
tires look grayer than they really are.)
I was a little nervous about getting the big star decals to lay down over the raised detail on the side of the hull. So, I took the easy way out, and went with the British version. This truck had a big star on the hood, but none on the sides of the hull.
In preparation for decaling, I brushed on a light coat of Future on the hull. When it dried, I added the various decals. The decals all went on with no trouble, and settled down well. With this experience in mind, I think the big stars would have gone down just fine, had I tried them.
Once the decals had dried, I airbrushed a coat of Pollyscale flat clear over the model. I then glued the wheels on the model.
| FINAL BITS |
Now it was time to finish up the final details. The gas cans were painted a slightly greener shade, and then the base and retaining strap was painted in the same OD color as the base vehicle. The molded in deck features (boathook, shovel) were painted a slightly darker OD, with rust and metallic highlights.
 I gave my model a
little bit of weathering by lightly hitting the corners and edges with my
artist’s pencils. I used two shades of orange for rust, and silver for a
metallic sheen when needed.
I gave my model a
little bit of weathering by lightly hitting the corners and edges with my
artist’s pencils. I used two shades of orange for rust, and silver for a
metallic sheen when needed.
The kit includes a small sheet of clear acetate to make the windshields from. The instructions have a little diagram with measurements for making the windshield. Watch out, though, the diagram is not to scale. Use the dimensions given, not the diagram. After cutting out the windshields, I glued them in place using clear parts cement.
The rear-view mirrors were added last, as they are fragile, and are bound to get knocked off while handling the model during construction. The reflective surface of the mirror was painted with a dab of silver paint, and after it dried, followed by a drop of Future.
As mentioned in the preview, the kit includes decals and painting instructions to do one of four vehicles. They are:
(1) The DUKW featured on the box art, a US Army vehicle in Germany in 1945, in overall olive drab.
(2) Another US Army vehicle from 1945 in Germany, with slight differences in markings form the first one.
(3) A British Army vehicle from Normandy, 1944, also in overall olive drab. (This is the one I used.)
(4) A US Marines DUKW from the Iwo Jima landings in 1945. This vehicle is in an attractive scheme of green, sand, and brown camouflage.
The decal sheet is
a good one. All of the decals were printed in register, and the white
markings look good over the dark paint. In addition to the main markings,
the decal sheet also includes decals for placards, and independent serial
numerals. This would allow you to build several vehicles, each with unique
numbers. As mentioned in the preview, I only have one complaint about
the decals and markings-- Italeri doesn’t give any unit information with
the markings. The subjects are simply labeled “US Army, Germany 1945”,
for example. 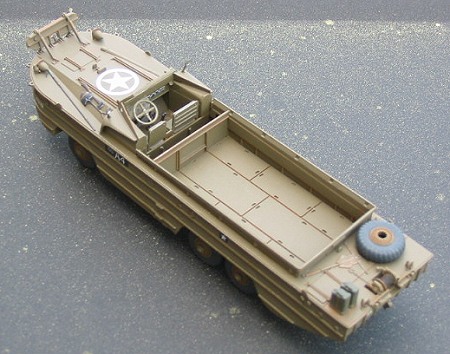
| CONCLUSIONS |
Highly Recommended. The model was a pleasure to build. At first, I thought the hollow tires would detract from the finished model, but that turned out not to be an issue. Once they are installed, you can’t tell that the tires don’t have backs.
Considering that this new kit only retails for $11, I think it is a great value.
| REFERENCES |
I didn’t use anything other than the kit instructions to build mine. There is lots of material out there; books, magazines, etc. There are also lots of great pictures of DUKWs on the web.
June 2005
Copyright ModelingMadness.com.
If you would like your product reviewed fairly and quickly, please contact me or see other details in the Note to Contributors.