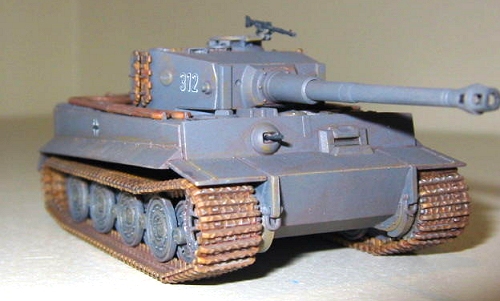
Revell AG 1/72 Tiger I (PzKw VI) ausf E
| KIT #: | 3016 |
| PRICE: | $10.00 MSRP |
| DECALS: | Two options |
| REVIEWER: | Bill Michaels |
| NOTES: |
| HISTORY |
None provided, but I'd think that a good Google would get you all the info you'd need. Ed
| THE KIT |
This is my second Revell of Germany 1/72 scale armor kit. I had heard good things about the newer RoG armor kits, and this one lives up to the reputation. Moldings are very nice, with very minimal flash or mold seams. Molded in light tan, there are 72 parts on 4 sprues. This kit of the Ausf. E is obviously based on another version of the Tiger—a number of parts are marked out in the sprue diagram in the instructions as not used on this version. The kit includes a separate sprue of road wheels with the rubber tire, which are the correct wheels for the Ausf. E. The main sprue includes the simpler steel wheels without the rubber tire, so you could use these to make another version of the tank, or add them to the spare parts bin.
| CONSTRUCTION |
Hull Construction
No surprises or difficulties were encountered. The hull parts all fit together very well, with no need for filler. The suspension parts are molded to the lower hull sides. After assembling the hull, I airbrushed the lower hull with Panzer grey- it is easier to paint these areas of the tank before the tracks and road wheels are in place.
Tracks and Running
Gear
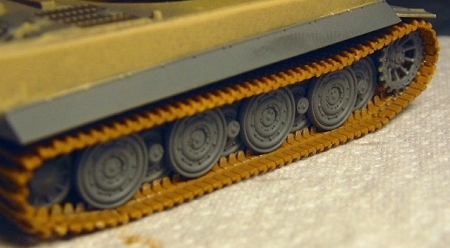
The surface detail of the road wheels looks good- decent bolt and ridge detail, and have detail both front and back. (I’ve seen a number of 1/35 scale armor kits where the backsides of the road wheels are molded as flat disks.) The only (minor) complaint I have about the road wheels is the middle units—the middle wheels should be a pair of wheels with a small gap between them. Revell molded them as one thick wheel, with a single, wide tire. The error is not very noticeable, however—once the outer wheels, tracks, mud skirts, etc. are in place, it is hard to see them.
Most of the road wheels had a mold seam around their circumference that needed to be cleaned up. Once that was done, I stuck them on toothpicks, stuck them in a block of foam, and airbrushed them Panzer Grey. After they dried, I flipped them over and airbrushed the other side. I didn’t bother to try to paint the tires a different color- I didn’t think it was worth the effort in this small scale, especially as I planned to “muddy up” the running gear later.
The instructions tell you to install all of the wheels before mounting the tracks. I find that it is easier to mount all of the running gear except for the front sprocket— I add it later, after I’ve started to install the tracks. I find it easier to do the test fitting of the track with the drive sprocket removable.
Tigers had two types of tracks- transport and combat. The transport tracks were narrow, basically the same width as the drive sprockets. The combat version of the tracks were wider, extending past the side of the hull. These wider tracks helped disperse the weight of the vehicle, allowing it to operate on softer ground. The tracks included with the kit are the wide version.
 The tracks are
injected molded plastic, link and length style. (Personally, this is
my favorite style for small scale armor.) The long runs are molded as
single pieces, while individual links are provided to go around the drive
sprocket and return wheels. The sections of the track are all well
molded, and fit together well. The long sections of track had a few
ejector pin marks on the interior surface. Filling these with
obscuring the detail would be a challenge, but fortunately it is not a
problem. After the tracks are assembled, the road wheels hide the
sink marks completely, so there’s no need to worry about filling them.
The tracks are
injected molded plastic, link and length style. (Personally, this is
my favorite style for small scale armor.) The long runs are molded as
single pieces, while individual links are provided to go around the drive
sprocket and return wheels. The sections of the track are all well
molded, and fit together well. The long sections of track had a few
ejector pin marks on the interior surface. Filling these with
obscuring the detail would be a challenge, but fortunately it is not a
problem. After the tracks are assembled, the road wheels hide the
sink marks completely, so there’s no need to worry about filling them.
If you’ve never worked with Revell’s link and length tracks, it may seem a little intimidating at first. Where do you start? How do you know the finished tracks will meet up correctly? Having built two of these kits now, I’ve come up with a method that seems to work pretty well.
The first thing I do is to paint the tracks while they are still on the sprue. I airbrushed them with PollyScale rust color. I also highlighted some wear points on the guide teeth using my silver artist’s pencil—it is a lot easier to do that before the tracks are installed. I did some additional weathering to the tracks, but that can wait until after assembly. Airbrushing the tracks before assembly ensures that I won’t have unpainted spots later, in the hard to reach areas.
I always start with the front sprocket- it is the spot where the fit of the tracks is the most visible. First, test fitting is always a good idea- to get an idea of how the tracks will fit, and where the joints fall I quickly found that the instructions were lacking here—they show six individual links used to go around the drive sprocket. Problem is, you need eight links in order to get the next two longer pieces to join at the correct angle. At first, I was concerned that if I used extra links here, I’d be short at the back end. A quick count of the parts on the sprue eased my worries—there are plenty of individual links- the kit includes extras, even after reserving some for the sides of the turret.
 So, the first
thing I did was to mount six of the individual tracks to the drive
sprocket. I used medium thickness super glue- it gave me the necessary
time to adjust the track link before it set. Using super glue also saved
me from having to scrape the paint off of all the join spots- a task I
would have to do if using regular model cement. I then added a piece of
straight track. I then could use the that piece to determine how the
sprocket would fit, and how many additional individual links I would need
to get the next “length” of track to come off of the sprocket at the
correct angle. (I needed two.) Once that was determined, the sprocket
could be glued in place.
So, the first
thing I did was to mount six of the individual tracks to the drive
sprocket. I used medium thickness super glue- it gave me the necessary
time to adjust the track link before it set. Using super glue also saved
me from having to scrape the paint off of all the join spots- a task I
would have to do if using regular model cement. I then added a piece of
straight track. I then could use the that piece to determine how the
sprocket would fit, and how many additional individual links I would need
to get the next “length” of track to come off of the sprocket at the
correct angle. (I needed two.) Once that was determined, the sprocket
could be glued in place.
The rest of the
track sections went on pretty quickly. Starting at the front sprocket, I
worked my way back on both the top and bottom. I aimed to have the final
join to be at the top of the return idler, just under the rear part of the
fender. I figured that if I had any fit problems, that would be the least
noticeable area. As it turned out, I needn’t have worried.
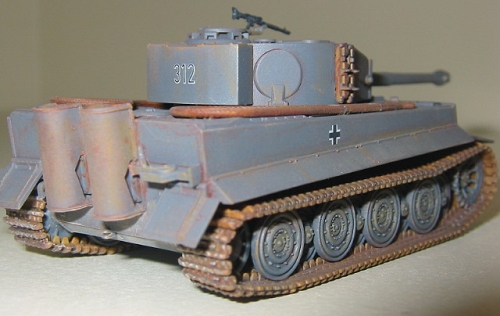
The rest of the hull of the tank went together well, with good fit all over. I did not install the tow cables yet- I don’t add them until the tank is almost finished. I did paint the interior of the hull flat black—you can see in to the model through the engine deck vents. If I wasn’t building OOB, I might have added something in there as a sight block.
Turret Assembly
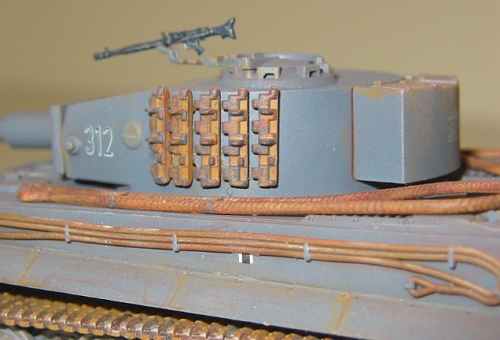
The basic parts of the turret went together well—fit was very good, with no filler needed. The gun mantlet is not moveable, so you need to decide on the elevation of the gun during construction. The gun barrel is molded as a single piece, and so there was no seam to deal with—just a very fine mold line to get rid of. The muzzle of the gun is molded solid—it should really be drilled out. Once drilled out, it looks pretty good, though.
The commander’s hatch and the side hatch are molded separately. Builders will not want to pose them open, as there is no interior detail in the turret, and no commander figure. The anti- aircraft machine gun and ring are nicely molded. Not all tanks carried them, so it is up to you to decide if you want to use them or not.
| COLORS & MARKINGS |
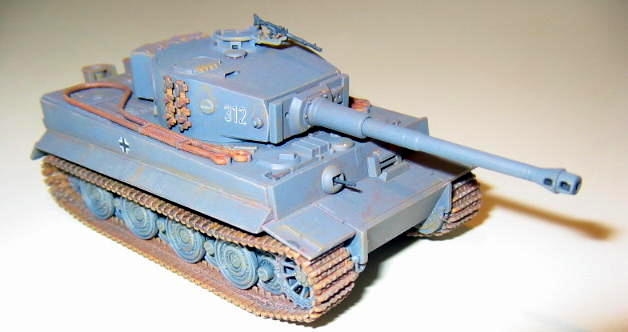
Once the model was complete, I started by airbrushing the rest of the tank in Panzer grey, masking the tracks to keep overspray off of them. I now had a nice grey tank, with rusty orange tracks. I let the paint cure for a day or so, and then applied the decals. My kit was missing the decals, but fortunately a club member, Rob Gronovius had an extra set from this very kit to donate to the cause. (Thanks again, Rob!) I prepared for decaling by brushing on small amounts of Future where the decals would be going- essentially gloss coating only under the decals. I let that cure overnight, and the applied the decals.
 The decals were a
little thicker than I had expected, based on other R-G kits I’ve built
recently. I used Future as the setting solution, and they settled down
nicely. Tip: the key to using Future as a decal setting solution is to be
sure that it is fresh. If you use old future, it will be a little thicker,
due to evaporation, and my cause the decal to wrinkle.
The decals were a
little thicker than I had expected, based on other R-G kits I’ve built
recently. I used Future as the setting solution, and they settled down
nicely. Tip: the key to using Future as a decal setting solution is to be
sure that it is fresh. If you use old future, it will be a little thicker,
due to evaporation, and my cause the decal to wrinkle.
Once the decals had cured for a day or so, I brushed on a little more future to help hide the edges. This helped, but you can still see the edges if you know where to look. Once that cured, it was time to start weathering.
Weathering:
First step was to apply a dark wash to the model. I used a light touch on the upper hull and turret, but used more on the tracks- I wanted them darker, especially in the crevices.
After that had cured, I used my silver artist’s pencil to give that slight metallic sheen along the edges and corners of the hull and turret.
I find that I use
my silver artist’s pencil almost exclusively now, instead of drybrus hing
with silver paint. I find I get better control with the pencil, and it
seems to work well over the PollyScale acrylic paint. For this model, I
went back to the store and bought two more pencils – two shades of
orange/red-brown- basically rust colors. I used them to add subtle
streaks of rust along the edges of the fenders and on highlights on the
hull and turret.
hing
with silver paint. I find I get better control with the pencil, and it
seems to work well over the PollyScale acrylic paint. For this model, I
went back to the store and bought two more pencils – two shades of
orange/red-brown- basically rust colors. I used them to add subtle
streaks of rust along the edges of the fenders and on highlights on the
hull and turret.
To further weather the tracks, I hit them pretty heavily with my “rust” pencils. I ended up with a blending of three different rust hues, which was the effect I was after. The tracks were them finished off with a light highlighting in silver- tracks in use have wear points of bare metal where the rust gets worn off.
I painted the two cables with a combo of rust colored paint—both PollyScale and Model Master make “rust” colors, and they are different. I painted the cables with one paint, and then drybrushed heavily with the other. I then hit the cables with my new pencils.
The model was dusted with some earth tone pastels, and then a flat clear coat was airbrushed on. I used my rust pencils to make rust stains under where the cables were to go- top replicate that rusty stain a piece of metal will leave when left in one place for any amount of time. I then glued the tow cables in place.
| FINAL CONSTRUCTION |
The final step was to “dust” the lower half of the model with some earth tone pastel powder. The last step was to glue the turret machine gun in place—the model was now finished!
| CONCLUSIONS |
Highly recommended. These small armor kits are nice models. Inexpensive, nice detail, and excellent fit combine to make an enjoyable build. A nice model can be built out oif the box, and there are also PE detail sets available if you want to use them. Built OOB, these Revell-Germany kits make for a nice diversion from the routine for an aircraft modeler.
Review courtesy of my ongoing efforts to personally keep my local hobby shop financially viable.
April 2005
| REFERENCES |
Tiger I, Schiffer Military History No. 44, by Horst Scheibert, Schiffer Publications, West Chester, PA
If you would like your product reviewed fairly and quickly, please contact me or see other details in the Note to Contributors.