| KIT #: | 82413 |
| PRICE: | $69.95 MSRP |
| DECALS: | One option |
| REVIEWER: | Daniel Attilio |
| NOTES: |
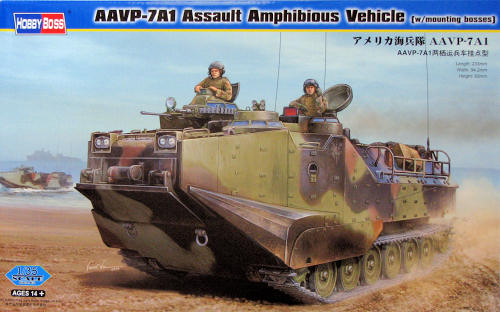
| HISTORY |
The Assault Amphibious Vehicle Family of Vehicles (AAVFOV [AAVP7A1, AAVC7A1 and
AAVR7A1]) is the currently fielded platform whose lineage dates to Donald
Roebling’s 1941 Alligator. The Alligator was mass produced by the Food Machinery
Corporation (
After proofing new concepts with the 1967 LVTPX12, the LVTP7’s 1973 fielding
debuted new armor and water propulsion system for what became solely the Marine
Corps’ LVT; the 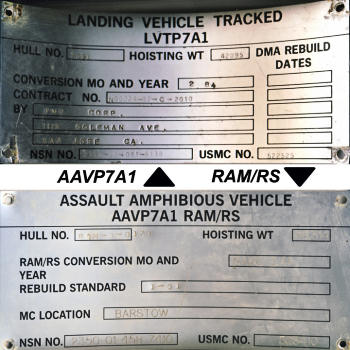 an LVTP6,
rendered the vehicle’s track as a secondary means of propelling the vehicle thru
water.
an LVTP6,
rendered the vehicle’s track as a secondary means of propelling the vehicle thru
water.
By 1985 the myriad modifications saw standardization of the LVT7A1 thru a
Service Life Extension Program (SLEP).The -7 FOV also received a modernization
in terminology, becoming the Assault Amphibious Vehicle, there is no physical
difference between the LVTP7A1 and AAVP7A1. But, until the
Throughout the 7A1’s service life, it has been subject to myriad modifications.
The Upgunned Weapons Station (UGWS), Enhanced Applique Armor Kit (EAAK), SINGle
Channel Ground Air Radio System (SINGCARS) modification, bow-plane and the
drop-in MK154 Linear Mine Clearance (LMC) kit significantly strained, burdened
and eroded the vehicle’s abilities. By the late 1990’s EAAK had been removed
from all AAV’s (except those on MPF vessels and platoons deploying with a MEU)
due to strain on the vehicle and excessive corrosion of the steel EAAK
panels/plates.
Necessity and finance proved the AAV7 FOV required an upgrade to remain
sustainable and viable on the modern battlefield. Commencing in 1999 the
Reliability Availability Maintainability / Rebuild to Standard (
The AAV7 FOV has proved itself in
The AAV7 will remain and continue as the Marine Corps’ forcible entry from the sea capability until the Expeditionary Fighting Vehicle (EFV) is fielded. Even with initial fielding of the EFV, the AAV is expected to remain in service until 2025.
| THE KIT |
 Upon
arrival the box was impressive, and peeling the lid off proved for even more
impressiveness. The amount of detail contained in and on the parts will no doubt
make for significant construction time. As I studied the parts I noticed several
inaccuracies I will have to remedy once the AAV rolls onto my hobby desk. The
photo-etch intake and exhaust grills provided with the kit do not replicate the
real woven and welded grills very well.
Upon
arrival the box was impressive, and peeling the lid off proved for even more
impressiveness. The amount of detail contained in and on the parts will no doubt
make for significant construction time. As I studied the parts I noticed several
inaccuracies I will have to remedy once the AAV rolls onto my hobby desk. The
photo-etch intake and exhaust grills provided with the kit do not replicate the
real woven and welded grills very well.
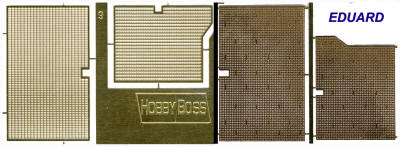 The grills
can be replaced with Eduard’s AAVP-7A1 exterior detail (Item# 36079). During
this time frame, there was a transition from the diamond pad track blocks to the
“big-foot” blocks,
The grills
can be replaced with Eduard’s AAVP-7A1 exterior detail (Item# 36079). During
this time frame, there was a transition from the diamond pad track blocks to the
“big-foot” blocks,
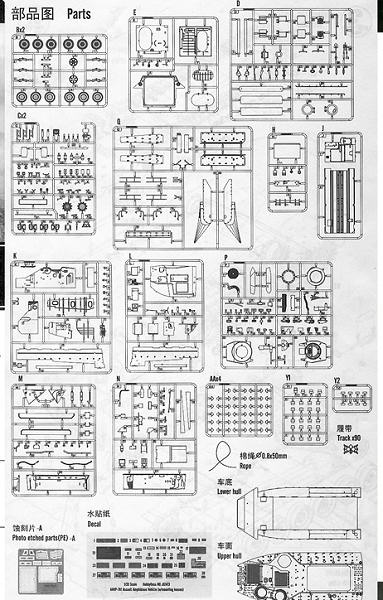
PARTS
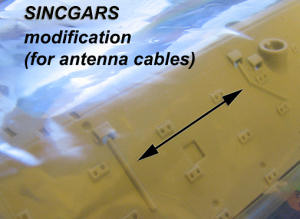
Specific surface detail narrow the service time of the AAV this kit represents
to between 1995 and 2003. The upper hull has SINCGARS modification (pictured)
but lacks the two additional bolt-on antenna mounts. Fortunately Hobby Boss
accurately captured the usage of EAAK external storage racks (commonly referred
to as gypsy racks) even when EAAK is not installed. When the AAV is on the ramp,
and occasionally on exercises, the weapons are not mounted meaning there will be
some hacking and carving to remove the molded in portions of the Mk19 and M2HB.
Also, rarely are the headlights mounted, they are expensive and tactically
compromising. The headlights were typically strapped atop the battery box (parts
L12/L13), bolted against hull above the battery box or bolted to overhead
directly behind aft engine compartment bulkhead.
Moving to the interior, aside from exercises or operations with embarked
infantry, center bench seats spend the majority of time mounted flush against
the fuel cell. When mounted, the forward center bench seat rarely gets erected
because it prohibits removal of the aft-lower engine panel. The generator, water
pump, associated belts and voltage regulator reside behind this engine panel,
along with the hoses and fixtures to conduct an emergency bypass of the cooling
system if the contact cooler is damaged, all these components require frequent
checks. When mounted though, there should be securing braces / buckles
 between each
of the seat mounts (parts C1). Correctly captured, the area behind the radio
cage (part K16) has empty radio mounts but, Hobby Boss did not include any
radios. The SINCGARS radios and amplifier belong immediately behind the troop
commander’s position (somewhat between parts C5 [rearmost] and N4/N7/N9). The
SINCGARS modification also did away with the assistant-driver’s position (seat
is part N23). As illustrated, two oil jugs (parts C39 and C40) are incorrectly
positioned. The radio remote boxes (part C19) appear to be representative of the
older radio system with a large switch instead of the digital toggle switched
newer version. The instructions also do not indicate, although illustrated, that
a remote box belongs in the troop commander’s station. The two cans closest to
the starboard bulkhead should have their tops against or pointed at the wall,
otherwise they do not fit against the slopping hull plate. The shackles are
typically only mounted when they are needed (parts C8). The deck of the turret
(part P1) should be mesh screen, not solid. The searchlight (part P15) is
another component rarely used or mounted and would not raise eyebrows if it were
missing. Unless operationally engaged or on the range 40mm ammunition chute
(part P2) is rarely mounted but, will take some surgery to remove the portion of
the part that is actually a piece of the turret. There are many .50cal
ammunition cans represented in the kit but, this only occurs operationally
(combat). If the full ammunition load was to be represented, Hobby Boss forgot
to include the 40mm ammunition cans, which would be the taller 48-count cans
which are stored beneath the port and starboard bench seats. The prominent
square mold on the interior of the ramp (part E7) should be removed as it does
not belong on the P7 variant, it is a vice mount on the R7 variant.
between each
of the seat mounts (parts C1). Correctly captured, the area behind the radio
cage (part K16) has empty radio mounts but, Hobby Boss did not include any
radios. The SINCGARS radios and amplifier belong immediately behind the troop
commander’s position (somewhat between parts C5 [rearmost] and N4/N7/N9). The
SINCGARS modification also did away with the assistant-driver’s position (seat
is part N23). As illustrated, two oil jugs (parts C39 and C40) are incorrectly
positioned. The radio remote boxes (part C19) appear to be representative of the
older radio system with a large switch instead of the digital toggle switched
newer version. The instructions also do not indicate, although illustrated, that
a remote box belongs in the troop commander’s station. The two cans closest to
the starboard bulkhead should have their tops against or pointed at the wall,
otherwise they do not fit against the slopping hull plate. The shackles are
typically only mounted when they are needed (parts C8). The deck of the turret
(part P1) should be mesh screen, not solid. The searchlight (part P15) is
another component rarely used or mounted and would not raise eyebrows if it were
missing. Unless operationally engaged or on the range 40mm ammunition chute
(part P2) is rarely mounted but, will take some surgery to remove the portion of
the part that is actually a piece of the turret. There are many .50cal
ammunition cans represented in the kit but, this only occurs operationally
(combat). If the full ammunition load was to be represented, Hobby Boss forgot
to include the 40mm ammunition cans, which would be the taller 48-count cans
which are stored beneath the port and starboard bench seats. The prominent
square mold on the interior of the ramp (part E7) should be removed as it does
not belong on the P7 variant, it is a vice mount on the R7 variant.
COLORS
Moving to colors, the Hobby Boss instructions is considerably lacking. The
exterior can be finished in the three basic finishes, overall green, overall tan
or the NATO green-brown-black camouflage but, for this time period the UGWS did
not undergo rebuild when the AAV did. The turrets were usually more worn and
either overall green or tan. The majority of the interior is commonly referred
to as sea foam green but, pale green is a better match, and is semi-gloss in
finish. The pyrotechnics can, which holds the red and white star clusters is
usually painted red (part N5). The various air and heater hoses are orange
(parts K1, M22, M24 and N1), even though the hose to the vehicle commander’s
position (turret) is missing. The fire extinguishers (parts C23, C24 and N20)
are in the standard bright red finish. The rubber fittings on the bilge pump
tubes are usually blue (parts M20, M21 and M23). The tool box comes in all sorts
of colors from green, red or blue (parts N8, N24). The personnel heater is dark
green (parts N4, N7 and N9) and its attached tubes (parts K1, M5 and N15) are
bare aluminum. The dome lights are usually white (parts C12) but, occasionally
is the same color as the interior, with one green light (smaller) and one white
light (larger) The Automatic Fire Sensing and Suppression Sensors (on parts M17)
and control box (on part M2) is gloss white. The fuel cell straps should be
chrome silver (on part K14) with flat-black edges. The 40mm ammunition cage
should be shinny aluminum (part P26). Along with the engine panel edges, the
myriad wires should be semi-gloss or flat black. The interior decks and inside
of hatches should also be dark green. I know I will find more colors to add here
and there as I build my AAV.
DECALS
The decals represent an AAV at the “school house,” Assault Amphibious School BN, indicated by the tactical number S6-6 (School, sixth platoon, sixth tractor). Modeling a different AmTrac would be easy, typically tactical numbers are painted on with six-inch stencils at 2D and 3D Assault Amphibian Battalions and is a five-digit alpha-numeric tactical number. Example: 3A309 would be “third tracks,” Alpha company, third platoon, ninth tractor. The decal representing what is an aluminum instruction plate on an AAV (decal 10) should be on the engine compartment bulkhead (directly above what is indicated), not on the engine compartment access panel.
| CONCLUSIONS |
Overall this appears to be an excellent kit and am real anxious to commence
construction on a representation of one of my previous “chariots.” I also plan
to acquire the various other variants of the LVT / AAV that Hobby Boss is
molding. Thank you Hobby Boss! Hopefully several of the many companies
specializing in after-market kits will lavish some attention on the AAV7 FOV and
produce the engine compartment, engine, transmission, cooling tower and several
special mission kits including a litter kit and Mk154 kit. And if I am not
asking too much, hopefully this spurs a kit of the LVT1 (in injection molding),
LVT3 (still absent in kit form) the AAV’s imminent replacement, the EFV along
with the Chinese ZBD.
The below link is to my Photobucket album of AmTracs from my personnel
collection:
http://s10.photobucket.com/albums/a150/deattilio/Amtracs/?albumview=slideshow
June 2010
If you would like your product reviewed fairly and quickly, please contact me or see other details in the Note to Contributors.