Roden 1/72 JS-3 'Stalin'
| KIT #: | 701 |
| PRICE: | NZ $15.00 |
| DECALS: | Four options |
| REVIEWER: | Mark Davies |
| NOTES: |
I’m new to armour modelling, after having last
built an AFV 36 years ago as a boy of 12. So my apologies in advance to
those more expert than me if a few of my facts are slightly off.
|
| HISTORY |
 The IS-3
was a the third in a line of development of the successful IS tanks which saw
successful service towards the end of WW2, These in turn could trace their
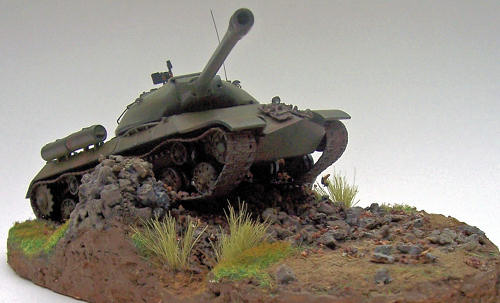
ancestry to the KV series of the earlier war years. Its more notable features
were the central location for the driver within the divided glacis and domed
cast turret. Despite its modern appearance it suffered for cramped crew
conditions, limited ammunition of 28 rounds for its huge 122mm main armament,
and some reliability problems.
The IS-3
was a the third in a line of development of the successful IS tanks which saw
successful service towards the end of WW2, These in turn could trace their
ancestry to the KV series of the earlier war years. Its more notable features
were the central location for the driver within the divided glacis and domed
cast turret. Despite its modern appearance it suffered for cramped crew
conditions, limited ammunition of 28 rounds for its huge 122mm main armament,
and some reliability problems.
The IS-3 arrived too late for service on the eastern front. Some are thought to
have been used in the Soviet Union’s invasion of Manchuria following their
declaration of war on
Three side stowage hatches were added once production got into full swing, and later the tank was updated and more widely exported as the IS-3M (reinforcing ridges on the front of the curved tracked guards being a quick recognition feature of this version).
| THE KIT |
I have
always thought that the IS-3 was an impressive looking tank, and I can remember
just enough of the old Airfix kit to see immediately that Roden’s kit was a hug
improvement over my childhood recollections.
 The kit
is nicely moulded on the whole, with several quite fine detail parts.
Like their aircraft kits with which I’m much more familiar, these
small parts are easily damaged when removed from their sprue gates. The only
criticisms I’d have is that the main gun barrel is not perfectly round, and
looks a bit flat in section. The external fuel tanks are over simplified, and
lack the characteristic circular flange at the ends as they are moulded flat,
plus the small handle is missing from the ends too.
The kit
is nicely moulded on the whole, with several quite fine detail parts.
Like their aircraft kits with which I’m much more familiar, these
small parts are easily damaged when removed from their sprue gates. The only
criticisms I’d have is that the main gun barrel is not perfectly round, and
looks a bit flat in section. The external fuel tanks are over simplified, and
lack the characteristic circular flange at the ends as they are moulded flat,
plus the small handle is missing from the ends too.
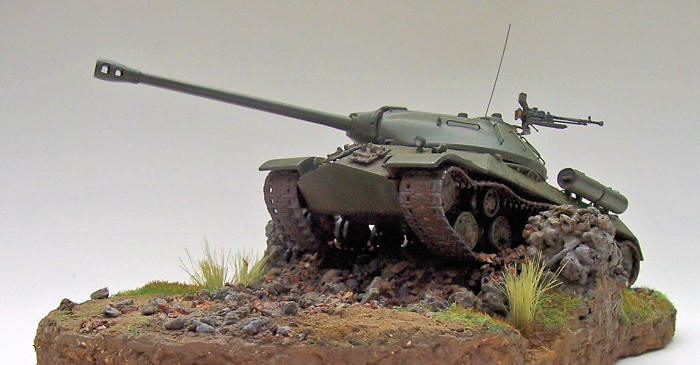
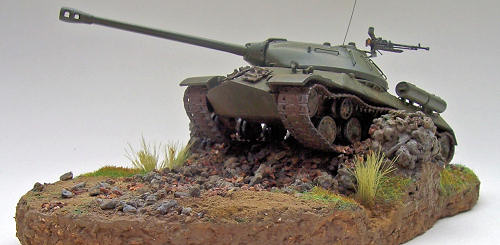
I quickly
realised that this kit would lend itself to having the suspension displaced as
it comes with a separate swing-arm for each pair of road wheels. All I needed to
do was remove the flat section in the mounting hole for each swing-arm to be
able to vary their positions. I committed myself to making a small base
incorporating a terrain feature to give reason for the suspension to be
displaced.
This is only my third tank, and so far I have chosen to display them on small bases as, unlike my 1/72 aircraft models, they look a bit “lost” sitting on glass shelves in my display cabinet. I wanted to keep the base small as the finished model would have to fit in amongst my aircraft models.
| CONSTRUCTION |
I found that
the kit generally built well with a good fit to most of the main parts. I did
have to shim the mantelet area where it fits in the turret due to some slight
gaps. The
suspension was adjusted for fit against contours of the display base.
I made the
missing external fuel tank flanges by adding a circle of fuse wire to the end of
each drum along with a lead foil handle (the handles are probably a bit oversize
now that I look at them again). I also made a representation of the shackles
that retain the
 tanks
against their mounts. This involved making a hook and eye arrangement from fuse
wire and, due my skill and patience limitations, a simplified block of plastic
strip was used to represent the bracket these shackles bolt into. I ran some
fuse wire from each shackle to the hull under the turret. On the real vehicle I
believe these operate the quick release mechanism of the tank. I don’t know if
it’s a mechanical cable or electrical wire to an explosive bolt.
tanks
against their mounts. This involved making a hook and eye arrangement from fuse
wire and, due my skill and patience limitations, a simplified block of plastic
strip was used to represent the bracket these shackles bolt into. I ran some
fuse wire from each shackle to the hull under the turret. On the real vehicle I
believe these operate the quick release mechanism of the tank. I don’t know if
it’s a mechanical cable or electrical wire to an explosive bolt.
I have seen
photos featuring two types of external fuel tank on the sides of the hull (plus
two small ones on the rear that Roden provides brackets for but no tanks). One
has two metal bands surrounding there circumference at each end of the tank, and
the other is the type provided by the kit with no bands and the single shackle.
Of this later type I saw photos and plans featuring some very fine piping looped
at each end and running along the tops of the tank. I could not determine where
these go or what they are for, and would love to hear from anyone who can tell
me. I did my best to make a simplified representation of these from fuse wire.
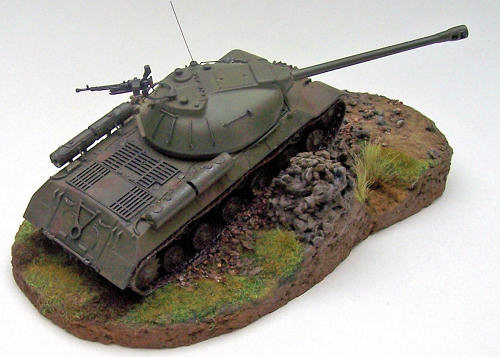
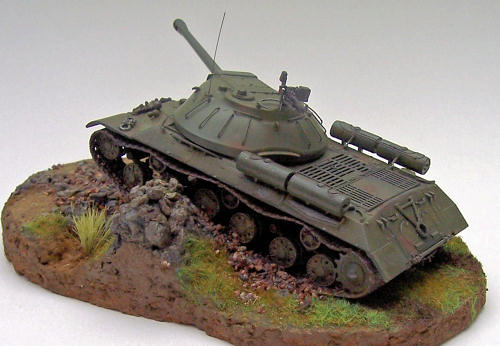
I made six
stowage hatches from 5 thou plastic card and fixed these with stretched sprue
hinges the to the hull sides to represent the main production version of the
IS-3.
 More
fuse wire was used to make the turret grab handles as this was easier than
cleaning up the kit ones, and are probably a bit more in scale thickness. To do
so I made a simple plastic card jig to make them all the same size. I took
opportunity to drill out the headlight so I could later paint the reflector
surface silver and make a lens from 5-minute clear epoxy. The horn was drilled
out two, and a wire for this and the lamp run back up the glacis.
More
fuse wire was used to make the turret grab handles as this was easier than
cleaning up the kit ones, and are probably a bit more in scale thickness. To do
so I made a simple plastic card jig to make them all the same size. I took
opportunity to drill out the headlight so I could later paint the reflector
surface silver and make a lens from 5-minute clear epoxy. The horn was drilled
out two, and a wire for this and the lamp run back up the glacis.
My biggest problem was when the machine gun mounting ring broke into three pieces upon removal from the sprues. This proved to be surprisingly hard to fix satisfactorily. So instead I decided to make a new one from a section of plastic pen barrel and fix the gun pintle mount from the broken kit part. Unfortunately the pintle pinged off into the ether as I cut it, never to return. With frustration at my clumsiness increasing I decided to make one of these along with is reinforcing flange. I then replaced the gas tube below the fluted machinegun barrel with thin rod as this made it easier to clean up the flash on the gun barrel. Finally I added a small locking leaver at the base of the gun pintle mount.
| DISPLAY BASE |
 I make my
bases from cork tile. In this case I made some laminations of tile to represent
a field leading to a small rise at its boundary, followed by a drainage ditch
and dirt road.
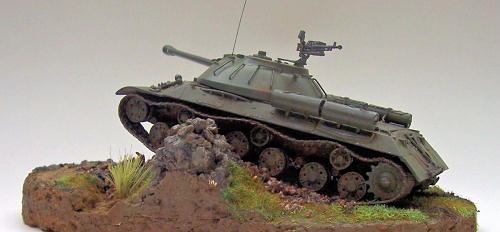
This gave me the terrain-based “excuse” I needed to displace the model’s
suspension. I then thought to add a smashed stone wall fro dramatic effect. This
was possibly a mistake as my base was a bit narrow to make the breach in the
wall as wide and realistic as I would have liked. But like most of my modelling,
I’m focused on achieving build volume over perfection, so decided to move on and
finish. I chalk up my observation to experience for future builds. The cork base
was covered with some wall filler and then real dirt and smashed up kitty
litter. I added a bit of paint, some washes, dry brushing plus a bit of scenic
grass, and I was done
I make my
bases from cork tile. In this case I made some laminations of tile to represent
a field leading to a small rise at its boundary, followed by a drainage ditch
and dirt road.
This gave me the terrain-based “excuse” I needed to displace the model’s
suspension. I then thought to add a smashed stone wall fro dramatic effect. This
was possibly a mistake as my base was a bit narrow to make the breach in the
wall as wide and realistic as I would have liked. But like most of my modelling,
I’m focused on achieving build volume over perfection, so decided to move on and
finish. I chalk up my observation to experience for future builds. The cork base
was covered with some wall filler and then real dirt and smashed up kitty
litter. I added a bit of paint, some washes, dry brushing plus a bit of scenic
grass, and I was done
| COLORS & MARKINGS |
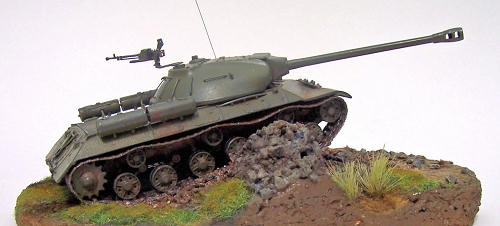
The tank was
painted with Gunze acrylic FS34079 and artists oil paints. I decided not to use
matt varnish as this machine is represented as simply being on exercise, and the
slight sheen I had did not seem too far removed from that I had seen during my
own army career on AFV’s. The vinyl tracks were painted and added. I had to cut
a few unseen teeth of the drive sprocket to assist their fit and the track droop
was achieved my super-gluing the tracks to wheel and idlers.
 Roden
provides decals for four machines, being Soviet, Polish, Chinese and Egyptian.
I’m sure the last two would be for later production machines to that which the
kit represents, and I should think that the Egyptian should be for an IS-3M.
Suffice to say that my model has no markings.
Roden
provides decals for four machines, being Soviet, Polish, Chinese and Egyptian.
I’m sure the last two would be for later production machines to that which the
kit represents, and I should think that the Egyptian should be for an IS-3M.
Suffice to say that my model has no markings.
| CONCLUSIONS |
I’m enjoying this tank building lark as a relaxing alternative from aircraft - possibly because ignorance is bliss and I’m basically building out of the box. To my mind this seems a quite reasonable kit, which would have been better with more detailed external fuel tanks. I also think the main production version with the three stowage hatches on each side would have been a better choice.
November 2008
If you would like your product reviewed fairly and quickly, please contact me or see other details in the Note to Contributors.