| KIT #: | UA 72057 |
| PRICE: | $26.95 from China |
| DECALS: | Several options |
| REVIEWER: | Dana Griffith |
| NOTES: | Modelcollect is a fairly recent player on the international scale model market. They present an expanding and interesting selection of kits at an affordable price. |
| HISTORY |
The Black Eagle tank (Russian:
Чёрный Орёл,
Čërnyj Orël, or
Object
640), was a planned prototype
main battle tank
to be produced in the
Russian
Federation. It was
believed to have been developed by the KBTM design bureau in
Omsk
in the late 1990s. A production version of this tank has never been
 publicly
demonstrated. The Black Eagle was canceled, with all production and development
permanently stopped.
publicly
demonstrated. The Black Eagle was canceled, with all production and development
permanently stopped.
The company that was developing the tank, Omsk Transmash, went bankrupt, and its designs and projects have been absorbed into Uralvagonzavod and other state owned services. Uralvagonzavod was developing the T-95 in competition to the Black Eagle, and now owns the rights to both projects. The Russian government has withdrawn all support and funding for the Black Eagle project.
When I saw photos of the tank a few years ago I though it was a life size adaptation from a science fiction miniatures war game. It certainly looked the part. When I learned that Modelcollect was producing a kit in 1/72nd scale it was happy dance time. So, onto the kit build.
| THE KIT |
The kit comes in a sturdy box and has some heft to the box. Upon opening the box, looking at the instructions and the contents revealed even more joy and a few dichotomies. In the box are ten sprues of molded parts. The instructions show seven. There are two frets of photoetch. There is one turned brass cannon barrel. There is also a decal sheet. The instructions show DS type vinyl. What came in the box were two sprues of link and length track. Lastly came a really nice looking decal sheet. I figured, Meh, no worries.
| CONSTRUCTION |
The turret is pretty straight forward, but dry fit the top and bottom turret halves together before gluing. There are no guide pins present. Steps one through four involve attaching plastic, photo etch, and brass to the turret. I usually attach small parts while keeping the item corralled in an appropriate size box. While this usually works fine, I had to cobble together a replacement turret periscope as Part K5 slipped the bonds of gravity and free from my tweezers. Be careful handling the really small parts. The photoetch frets are sandwiched between two layers of tape and larger pieces of photoetch require to be flattened again as the tape seems to hold well.
In Step 5 I found it easier to attach the spaced armor to the
glacis and then add all the little bits. However item PE-9 followed part K5 into
the ether never to be found again.
 Though I did find a missing 'steel' roadwheel
for a Matchbox Pz IV-70 Lang that had been AWOL for some time. (That's for
another review...Maybe)
Though I did find a missing 'steel' roadwheel
for a Matchbox Pz IV-70 Lang that had been AWOL for some time. (That's for
another review...Maybe)
Steps 6 through 8 are for attaching the suspension items. The I saw Step 9 was Attach the hull. So, Step 8.5, the non existent one, is attach the link and length track. In step 6 there can be a challenge with attaching PE-1. I tried sever time with no luck. After counting to ten, I noticed that among the several spare sprues was a plastic version of PE-1. Needless to say, it all looks good to me now.
In Step 6, be careful in figuring which torsion bars go where. If done right you'll have a couple of extras with the springs. Put the ones with the springs on the appropriate ends and work toward the middle keeping everything properly lined up. For the missing step about attaching the track I attached the Sprockets, Idler Wheels, as well as the first and last road wheels. I the figured the proper sections of link and length track. Add one single track block to the front and back of that run and attach. I then attached the proper track length from the last road wheel to the sprocket. Once that was done, the rest of the road wheels and other parts were attached to that side of the hull. By this time you'll have noticed a plethora of ejector pin depressions on the inside of the track blocks. Those actually pretty much manage to be hidden by the build process. Purists are more than welcome to help themselves and fix the pin marks. Lastly the rest of the track is attached. If there is to be a gap in the track run set it up so that it will be hidden by the fender atop the idler wheel.
Steps 9 through 13 is finishing the outside. Be advised both fenders want to be dry fitted and demand a bit of gentle jiggling before they will connect to their attachment points. Somewhere between Steps 9 and 13, the back deck hast to be attached to the front part of the upper hull. It's not in the instructions either. Dry fit first then glue once you figured out how it's supposed to look. Then attach the two engine deck screens. The engine deck screens and parts PE-13 and PE-14 will probably have to be flattened again after peeling away for the attaching tape. Here is about when you'll notice a gap between the engine deck and the fender on the right rear side which will need to be filled. Once again, my ever trusty water based wood filler comes to the rescue. It seals, smooths and cleans up in moments.
| COLORS & MARKINGS |
 Step 14 is attach the turret.
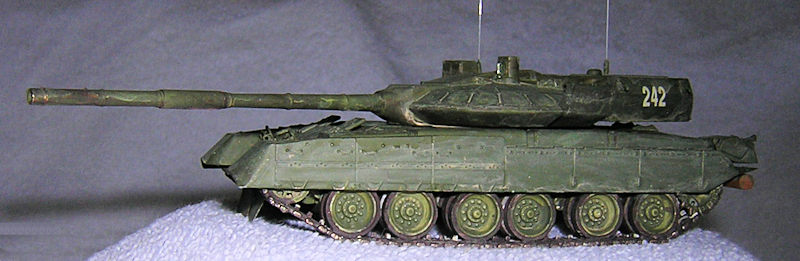
Then comes painting, decals and weathering. The box art shows this splotchy
black and green camouflage. The instructions show a monochromatic green. After a
base of Model Master Acryl paint. I applied an acrylic hobby paint called
English Yew. It's a nice hue of medium green. Then lighter and darker shades of
green tints were applied to break up the large areas of green. Shadows and panel
lines were picked out with a wash of soft black. Then a bit of gloss coat was
added. Decals were applied. Solvaset was used as needed. Gloss coat was applied
once more over the decals to seal them. When all was cured then the decal work
are was coated with a thin flat coat. Once the decals were complete then some
more light weathering was added, not too much, as this tank never really got a
chance. In life this poor beast was pretty much fated to be relegated to a back
lot motor pool Queen. However it seems like it could have been one heck of a
contender. One wonders how much politics may have been in play.
Step 14 is attach the turret.
Then comes painting, decals and weathering. The box art shows this splotchy
black and green camouflage. The instructions show a monochromatic green. After a
base of Model Master Acryl paint. I applied an acrylic hobby paint called
English Yew. It's a nice hue of medium green. Then lighter and darker shades of
green tints were applied to break up the large areas of green. Shadows and panel
lines were picked out with a wash of soft black. Then a bit of gloss coat was
added. Decals were applied. Solvaset was used as needed. Gloss coat was applied
once more over the decals to seal them. When all was cured then the decal work
are was coated with a thin flat coat. Once the decals were complete then some
more light weathering was added, not too much, as this tank never really got a
chance. In life this poor beast was pretty much fated to be relegated to a back
lot motor pool Queen. However it seems like it could have been one heck of a
contender. One wonders how much politics may have been in play.
| CONCLUSIONS |
I would highly recommend this to someone who has moderate experience and was comfortable with working abstractly as the instruction sheet was spotty in places.
| REFERENCES |
Internet Photos, Military Today, Defense Talk, and Pravda Report (useful to know how the other side thinks).
12 January 2017
Copyright ModelngMadness.com.
Thanks to my allowance for this one. If you would like your product reviewed fairly and
fairly quickly, please
contact
the editor or see other details in the
Note to
Contributors. Back to the Main Page
Back to the Review
Index Page
Back to the Previews Index Page