| KIT #: | 326 |
| PRICE: | $10.96 |
| DECALS: | six options |
| REVIEWER: | Jim Gross |
| NOTES: |
| HISTORY |
In the beginning the tank was simply called the T-34. But all the older tanks with the 76.2cm gun were referred to as the T-34/76. The West designated them as types E through F. As this kit is sold as a 1943, it could be regarded as a type E 1943. It may be difficult or impossible to tell the different types apart due to changes, repairs, modifications, and shortages.
The armament of this tank consisted of a 76.2cm F-34 cannon, and 2x, 7.62mm DT machine guns. Frontal armor is 45mm thick and the vehicle weighs 30.9 tons with a max speed of 55km/h. Ammo supply is 100 rounds. The engine is a V-2-34 12 cylinder four-stroke diesel with 500hp. The crew is four. 33805 T-34/76 Tanks were produced.
This was paraphrased from “Schiffer T-34 Battle Tank” and the kit instructions.
For more information on this kit, please see the preview on this site.
| THE KIT |
 The kit comes with 5 sprues of
injection molded plastic, 2 sprues of vinyl, 1 etched metal fret, and 1 set of
decals. There is very little flash and the few sink marks require very little
work. This model is tiny and I was pleased with the detail of the parts, though
I may need a magnifying glass. As near as I can tell this model is very accurate
according to reference pictures and what may not be accurate would not be seen
in this scale anyway. I did not measure the kit for accuracy and I am extremely
pleased to say that this is indeed a T-34. There are several parts that are not
used but from my light reading it may be ok to use some or all of these parts
that is, if you can determine where they go. The tow cables, and road wheel
rubber are made of vinyl. The road wheel rubber works well except for some
difficulty in getting the guides on the track to fit. The vinyl cables are
difficult to paint and consideration should be given to replacing them. The
small-etched fret contains the engine cover screen, 2-man saw, and the front
machine gun cover. The engine cover looks good but is maybe too thick to conform
to the model. The machine gun cover detail is good but is barely visible after
painting. The saw works well.
The kit comes with 5 sprues of
injection molded plastic, 2 sprues of vinyl, 1 etched metal fret, and 1 set of
decals. There is very little flash and the few sink marks require very little
work. This model is tiny and I was pleased with the detail of the parts, though
I may need a magnifying glass. As near as I can tell this model is very accurate
according to reference pictures and what may not be accurate would not be seen
in this scale anyway. I did not measure the kit for accuracy and I am extremely
pleased to say that this is indeed a T-34. There are several parts that are not
used but from my light reading it may be ok to use some or all of these parts
that is, if you can determine where they go. The tow cables, and road wheel
rubber are made of vinyl. The road wheel rubber works well except for some
difficulty in getting the guides on the track to fit. The vinyl cables are
difficult to paint and consideration should be given to replacing them. The
small-etched fret contains the engine cover screen, 2-man saw, and the front
machine gun cover. The engine cover looks good but is maybe too thick to conform
to the model. The machine gun cover detail is good but is barely visible after
painting. The saw works well.
I don’t often follow instruction sequence. Mostly I use it as a guide. I usually jump around in a build as interest suits me.
| CONSTRUCTION |
I mostly build model jet aircraft though I have built a couple of armor kits in 1/35. I enjoyed the experience as it allowed me to try new techniques and armor is very forgiving. I had seen some 1/48 scale armor kits but until late I was hardly aware that there were kits in 1/72.
 The kit comes with 5 sprues of
injection molded plastic, 2 sprues of vinyl, 1 etched metal fret, and 1 tiny set
of decals. This model is tiny and the detail looks good. Though I may need a
magnifying glass.
The kit comes with 5 sprues of
injection molded plastic, 2 sprues of vinyl, 1 etched metal fret, and 1 tiny set
of decals. This model is tiny and the detail looks good. Though I may need a
magnifying glass.
I did a quick review of the instructions before assembly. I thought that I would first build the lower hull half first as I wanted to see how the tracks install before I got to far. I was in luck, as the instructions seemed to agree with me, that is until I got to actually installing them.
Steps 1 through 9 deal with the actual construction though steps 6 through 9 are all crowded together on one page. Which makes for a visual hard to sort out affair. Maybe this is not a big deal as this is how I build anyway.
Steps 1,2,3 and 4 have the modeler assembling the lower hull.
Step 1 is the assembly of the Lower hull and consists of 2 long sides (parts 45B & 46B) for the attachment of the road wheels, 2 drive motor covers (parts 77B & 76B) and 2 very small beveled edged parts (parts 48C & 50B) that form the front and rear angled edges. I had to refer to the illustration in step 3 to complete step 1. All of these parts fit flat edge to flat edge as in butt joints. There are no locating pins. The edges looked straight and true so I fitted and glued all with Ambroid Pro Weld. The result looked good but later I found that those edges might have not been true as I had gaps when attaching the upper hull and angle issues with the mudguards/fenders. A better plan may have prevented this but was not a disaster. I guessed on the angle of parts 48C & 50B while gluing and was correct. Parts 48C and 50B form the beveled edges that join the upper and lower hull. The drive motor covers parts 77B & 76B may require putty no matter what you do. All in this entire step went well. I should not have installed the fenders/mudguards in this step as I had a hard time installing the tracks, which makes sense as this is done in Step 6.
Step 2 is simple. This involves the assembly of 10 road wheels parts 2F, 5A, and 4A. These parts are for each of the 10 wheels. 2F are the rubber for road wheel rims. I did not glue them in anyway as I figured they may need to be moved and adjusted later on and this proved correct.
 Step 3 involves installing the road
wheels drive sprockets etc. This is an easy step but I did not glue anything
onto the tank, as they needed to move some to install the tracks.
Step 3 involves installing the road
wheels drive sprockets etc. This is an easy step but I did not glue anything
onto the tank, as they needed to move some to install the tracks.
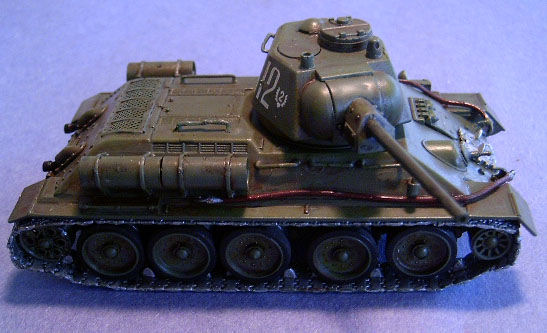
Step 4 is the assembly of the tracks. There are 16 pieces for each side. There are many tiny links, a couple of long pieces, and some medium size pieces. The tiny individual pieces are to form curves around idler and drive sprockets. I may have made this hard on myself. I have not built many armor kits. So I painted them while on the sprue with Model Master Aluminum Enamel. After that I lightly coated them with Future, as I wanted to use an oil wash later. This painting caused me trouble later as the glue had difficulty in holding the links together. I had tried to scrape the paint off for gluing but the parts were so small and fragile the I hoped the glue would hold. In many cases it did not hold well but if I disregard a little mess here and there it all turned out well in the end.
Step 5 is the assembly of the fuel drums. This is not hard but pay attention to the orientation of the filler caps. I did not and had to scribe in new caps. They are easy to miss, as they are hard to see.
Step 6 is installing all the tiny parts on the upper hull and there are a bunch including the photo-etch pieces. I had trouble with the metal engine cover. It was too thick to squarely form to the hull. I did the best I could and filled the gaps with Squadron Putty and after painting the results were excellent. The metal 2-man saw worked out well but the tiny front machine gun cover was mostly covered with paint. This gun cover is too small in this scale and maybe could have been left out.
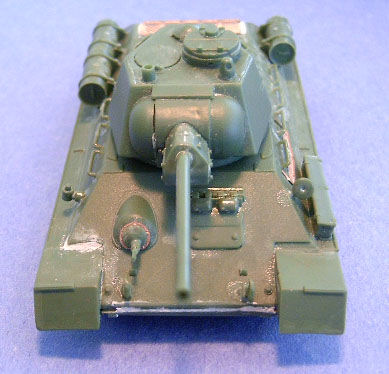
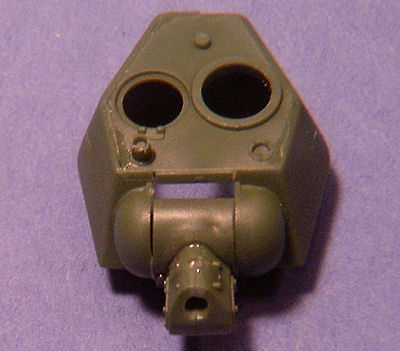 Step 7 is the assembly of the main
gun. The gun is one piece and requires very minor sanding. The mantlet and
associated parts are not difficult but some careful sanding and putty are needed
to cover vertical seams, all in all an easy step. I also drilled out that tiny
main gun tube. It can’t be seen but I am satisfied that it is there.
Step 7 is the assembly of the main
gun. The gun is one piece and requires very minor sanding. The mantlet and
associated parts are not difficult but some careful sanding and putty are needed
to cover vertical seams, all in all an easy step. I also drilled out that tiny
main gun tube. It can’t be seen but I am satisfied that it is there.
Step 8 is the assembly of the turret and the installation of step 7. All the parts went together easily except for a bad vertical seam at the rear of the turret. Along with that seam there was a concave depression in the middle of it. This required a lot of sanding and putty filling to correct; I was mostly successful. The turret is cast and the kit does a nice job of representing this but with the sanding this was lost. I covered the offending area with Ambroid Pro Weld and touched this area with some fine grit sand paper to restore the cast look.
Step 9 is installing the turret and some small parts. I had to enlarge the hole on the hull for the turret to fit. I also had to cut off the tabs on the bottom of the turret for the same reason. This was necessary but no big deal as the corrections can’t be seen and the turret can be glue in a fixed position anyway.
The tow cables are made of vinyl. I had some old Floquil Zinc Chromate paint that kind of looked like a good color for the cable. The color looked good but after a few days it still was not dry. I sealed it with Future and all was well. Maybe some copper wire would have been better. Along with the problems with vinyl, the cables look too thick for the scale. I did not replace it as I was determined to only use what came in the box. The result looks ok.
| COLORS & MARKINGS |
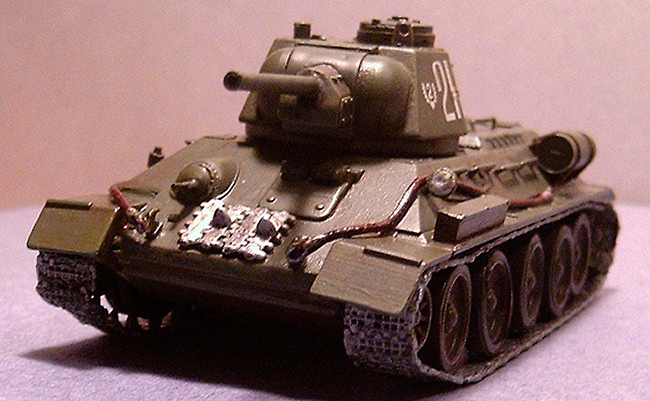
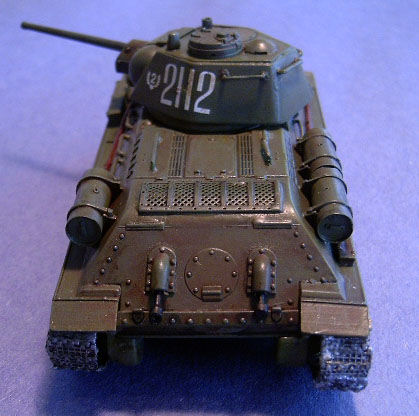
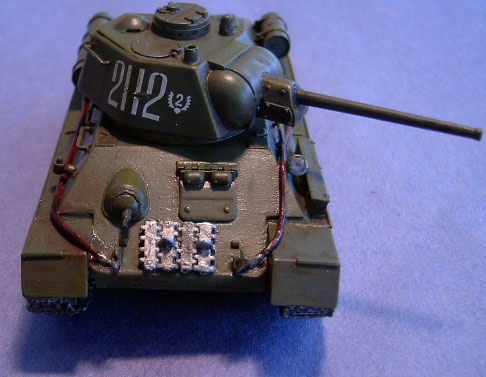
Steps 10 through 15 are decal options. I chose Step 11, as it looked the best to me. This option is for the 2nd Ukrainian Front, Spring 1944. The decals went on great and no problems whatsoever.
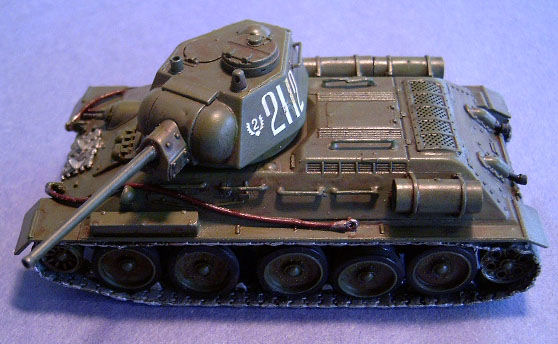 I painted the entire model except for
the tracks using Gunze Dark Green. I used it because I had some and it is easy
to airbrush and can be thinned with water. The results were good but I thought
that maybe Soviet Armor should have an odd green color.
I painted the entire model except for
the tracks using Gunze Dark Green. I used it because I had some and it is easy
to airbrush and can be thinned with water. The results were good but I thought
that maybe Soviet Armor should have an odd green color.
I used an oil paint thinned with low odor mineral spirits for washes. I used raw umber, burnt umber, burnt sienna and black. I mixed some and used some straight until I liked what I was looking at. The model was looking good but I still was not satisfied with the overall color.
I mixed oil paint of sap green and cadmium yellow to a shade that satisfied me. I using a flat brush kind of dry brushed all the sharp angles of the vehicle. I now had the effect that I wanted.
I painted the tracks as previously mentioned. They were given a wash of black oil paint.
After all was assembled, painted and decaled, I sealed the model with a Future and Gunze Flat Base.
| CONCLUSIONS |
 This is a great kit. It is a good
value for the money and is a lot of fun to build. I wish that the tracks were a
paint loving vinyl and that the turret halves had a horizontal split rather than
vertical one.
This is a great kit. It is a good
value for the money and is a lot of fun to build. I wish that the tracks were a
paint loving vinyl and that the turret halves had a horizontal split rather than
vertical one.
I was pleased with the detail especially with the small scale. I did a little light reading of this tank and it appears that it is a T-34/76.
I believe this kit can be built by anyone with careful attention to detail.
I like the 1/35scale models but I am excited at how nice these small kits are and plan on getting more.
| REFERENCES |
“Schiffer Russian T 34 Battle Tank”
Kit instructions
February 2006
Copyright Modeling Madness.com
If you would like your product reviewed fairly and fairly quickly, please contact the editor or see other details in the Note to Contributors.