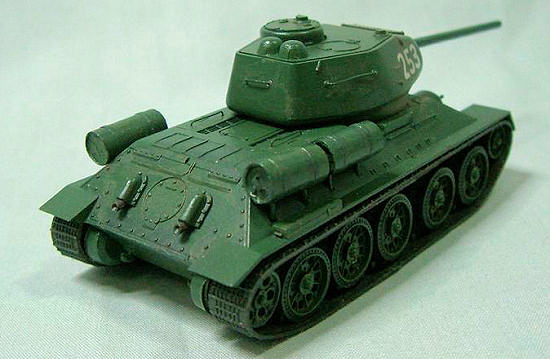
Fujimi 1/76 T-34/85 Volga
| KIT #: | WA 16 |
| PRICE: |
$1.85 back in the ‘70s |
| DECALS: | Three options |
| REVIEWER: | Peter Kwong |
| NOTES: |
| HISTORY |
 The T-34
tank was a relatively simple design that allowed for fast mass manufacturing.
The tank featured sloped armour, rugged suspension, wide tracks for good
mobility in mud and snow and a high caliber gun. Originally it was equipped with
a 75 mm gun but later upgraded with an 85 mm gun that is the subject of this
kit. The simple design allowed it to be manufactured quickly and sent to the
front lines in overwhelming numbers.
The T-34
tank was a relatively simple design that allowed for fast mass manufacturing.
The tank featured sloped armour, rugged suspension, wide tracks for good
mobility in mud and snow and a high caliber gun. Originally it was equipped with
a 75 mm gun but later upgraded with an 85 mm gun that is the subject of this
kit. The simple design allowed it to be manufactured quickly and sent to the
front lines in overwhelming numbers.
The T-34/85 was used after WW2
by many countries such as the Soviet Bloc countries,
| THE KIT |
The kit has 58
parts molded in dark green styrene. The lower hull is made up of three pieces: a
middle piece (with front and back), left and right sides. The gun barrel is in
one piece. A tank commander in a relaxed leaning pose is also included but my
commander suffered from a lower abdomen injury. Two vinyl tracks with fairly
simple details are provided.
The left and right lower hull sides
have mold sink marks that needs filling. The small tow hooks had small amounts
of flash that would be easiest to clean up while they are still attached to the
sprue. The left side tool box has a slight sink mark on the top. The
 hand holds
are all molded flush to the hull and turret. The tool boxes are blank rectangles
without any latch or handle details. The extra fuel drums are molded in upper
and lower halves, resulting in a challenging seam line to clean up. The drum
faces have no grab handle or cap detail.
hand holds
are all molded flush to the hull and turret. The tool boxes are blank rectangles
without any latch or handle details. The extra fuel drums are molded in upper
and lower halves, resulting in a challenging seam line to clean up. The drum
faces have no grab handle or cap detail.
Instructions provide a historical
background and technical specifications for the T-34. Painting information for
the tank and commander, plus paint mix information are also provided.
Assembly takes 4 steps using exploded diagrams and
decent English explanations for detailed explanations.
Decals are for three versions: a Czech
Army tank (CS-043), a 1st White
Russian Regiment 1945 (#209) and an iron coloured (it supposedly left the
factory unpainted in the rush to get to the front) tank captured by the Germans
at the Eastern Front (#212) which is shown on the action box art, strangely, in
action against a Japanese tank. Unfortunately, the decals have yellowed by now
so you will have to try and bleach them white by putting them out in the sun
before using them.
| CONSTRUCTION |
Building this kit began as an exercise
in doing a quick out of the box build to pare down my stash of old kits, and to
build something different, such as armour. Construction began with assembling
the lower hull. It is made up of left and right hull sides attached to the
center. The upper hull is then to be glued to t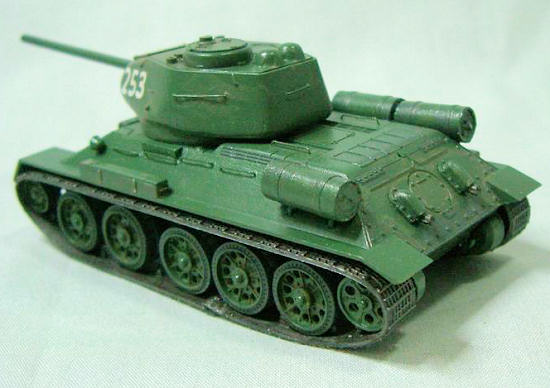 he
lower hull assembly. I had difficulty trying to keep the left and right hull
sides perpendicular to the middle lower hull (so that the wheels will later sit
on the ground properly later) and at the same time, minimizing the gap between
the top of the lower hulls and the sides of the upper hull. Fortunately, the gap
is on the underside so it is hidden from view. There is also a gap by the front
wheel where the upper and lower hull haves join, but the front wheel hides it
quite well so I just roughly filled and sanded it.
he
lower hull assembly. I had difficulty trying to keep the left and right hull
sides perpendicular to the middle lower hull (so that the wheels will later sit
on the ground properly later) and at the same time, minimizing the gap between
the top of the lower hulls and the sides of the upper hull. Fortunately, the gap
is on the underside so it is hidden from view. There is also a gap by the front
wheel where the upper and lower hull haves join, but the front wheel hides it
quite well so I just roughly filled and sanded it.
The 14 wheels
halves were glued together and then the sprue attachment points and mold limes
on the edge of the wheels were sanded off with a sanding stick. The wheels were
not glued to the hull until after painting.
At this late point
in assembly, I decided to replace the molded on hand holds on the upper hull and
turret with ones made from wire. I would recommend doing this before assembling
the hull. The molded on hand hold details were removed with a ¼” chisel (I would
recommend using a knife or a micro-chisel to do this) and sanded with various
sanding tools. Following that, holes were drilled to accept the wire rails made
from electronic wire bent around wooden popsicle stick. The wire rails were
attached with super-glue.
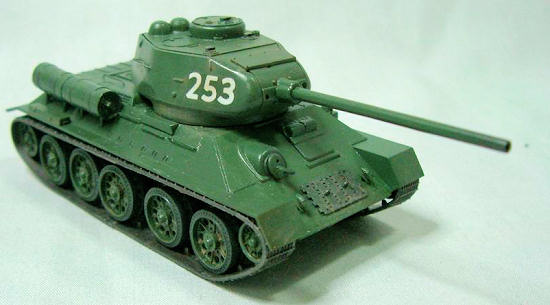
The fuel drums that come with the kit
were in two halves. I gave up trying to eliminate the seams of the halves so I
scratch built 3 new drums. To do this, I used the kit pieces to measure and cut
3 correct lengths of drinking straw of the right diameter. Then pieces of wooden
takeout chopsticks were cut slightly shorter and glued to the inside of the
straw with white glue. One metal grab handle and one cap were made per drum. The
grab handles were made by bending short, thin strips of thin aluminum and
 and the
caps were made by cutting thin pieces of styrene rod. These were attached using
super glue to one face of each drum. Mr. Surfacer 500 was used to prime all the
metal pieces and to hide the wood grain. To simulate the frame upon which the
drums attach to the tank, I drilled 2 holes in each barrel for the 2 frame post,
then wrapped 2 thin strips of tape to simulate the frame straps that sit on top
of the posts.
and the
caps were made by cutting thin pieces of styrene rod. These were attached using
super glue to one face of each drum. Mr. Surfacer 500 was used to prime all the
metal pieces and to hide the wood grain. To simulate the frame upon which the
drums attach to the tank, I drilled 2 holes in each barrel for the 2 frame post,
then wrapped 2 thin strips of tape to simulate the frame straps that sit on top
of the posts.
The towing hooks
at the front and lower hull were attached. One of them flew off into a corner so
it was replaced with one carved from a thick strip of plastic. The spare track
link section was glued to the front chassis as was the machine gun. A small hole
was drilled above the machine gun as per the box art picture. I decided not to
use he kit’s commander so the commander hatch was glued closed.
Both tool boxes did not have any detail
on them so I scribed a line around both boxes to simulate lids, and simplified
handles and the latches were made with short lengths of stretched sprue glued to
the boxes.
The searchlight was hollowed out and glued to the left hull. The various view ports were hollowed up as best as I could with a small drill and then carefully cutting away plastic with a #11 blade.
| COLORS & MARKINGS |
Before painting began, I used wire coat
hanger to make handles to insert into the turret and chassis told these pieces
during painting. From the paint collection, I chose Gunze H302 (Green FS34012
for USAF A-10 etc) as a generic Russian armour green, thinned it with Tamiya
acrylic retarder and sprayed all tank parts (wheels, chassis, turret, barrels)
with it using my Bader 350
 airbrush.
This was followed by light mists of Testors Acryl RLM 70 Black-Green (just
because I was painting a Fw-190 propeller during the same painting session) here
and there to break up the monotony of a single colour.
airbrush.
This was followed by light mists of Testors Acryl RLM 70 Black-Green (just
because I was painting a Fw-190 propeller during the same painting session) here
and there to break up the monotony of a single colour.
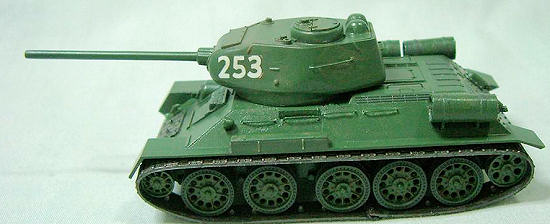
After the wheels
were dried, Polly Scale Railroad Grimy Black was hand painted around the edges
of the road wheels to simulate the rubber around the wheels as per box art.
The tank was then
lightly dirtied up with a wash of Grimy Black brushed across the big rivets, the
engine screens, the road wheels and crevices. Thinned brown paint was then
brushed across the road wheels and around the lower sides of the chassis.
The inside of the
light was painted silver and the clear lens made with a drop of white glue. The
view ports were painted with amounts of black.
The vinyl track and spare track link were painted Gunze Burnt Iron, as was the exhaust stack. The exhaust stack was then brushed with bits of black and brown to vary its colour.
| FINAL CONSTRUCTION |
I initially glued all the wheels to the
lower chassis and then tried to attach the track to the wheels. Unfortunately,
this did not work because there is not enough slack left in the track to either
glue or use a hot screwdriver (as per instructions). A quick search on the
Internet came up with several solutions. The one I chose was leave off one wheel
and attach the track and the last wheel at the same time to the chassis.
The instructions suggested using a hot
knife to put together each of the two vinyl tracks. Not wanting to do this, I
used 5-minute epoxy (super-glue will not work) to glue the track together. To
change the circular track assembly to an oblong shape while drying, I put 2
wooden clothes pegs inside the track and a weight on top of the track. While
this was drying, I removed the front
 wheel from
the chassis that fortunately was not glued on very tightly and came off easily
with some twisting.
wheel from
the chassis that fortunately was not glued on very tightly and came off easily
with some twisting.
After drying over
night, the track was wrapped around the wheels. Then the front wheel was
inserted into the track and the track pulled (tensioned) enough to get the front
wheel inserted into the wheel pin on the lower chassis. The track stayed glued
together and the front wheel did not need gluing.
Now would be the
time to glue the drums to the rear of the tank. Once done, the turret was
carefully squeezed into the chassis and assembly was completed.
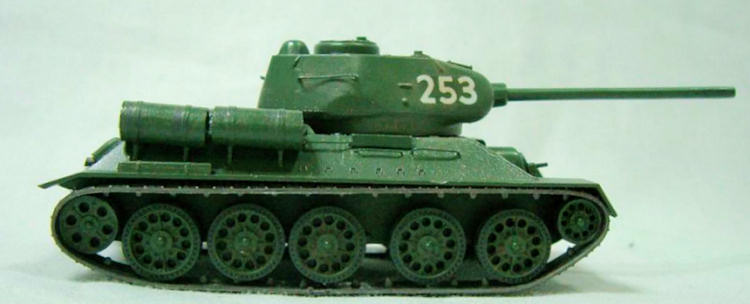
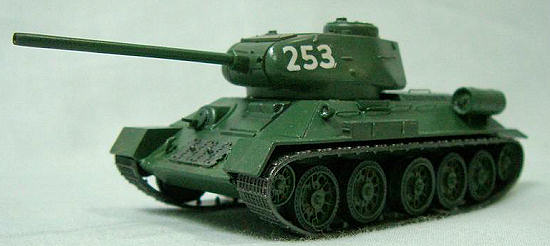
The decals were
quite yellowed and the prospects of enough sunlight to bleach it white was not
too good during Winter here, so I found some white numbers from a police car kit
to use. These were cut out, soaked in water, dragged across a puddle of Future
before applying the decal to the turret. I found the decals did not want to
budge after laying them down so be careful with the placement. Excess Future was
brushed out of the decal and when dried, very little decal film was visible.
After reviewing
the pictures, I noticed the tracks were riding higher on the right side than the
left side. Don’t know what happened.
| CONCLUSIONS |
This was a simple
kit with few parts (compared to, say, the Revell 1/72 T-34 kit) and fairly easy
to assemble. Challenging assembly areas were the hull sides and the tracks. The
single colour scheme made painting very straightforward with lots of opportunity
for applying shading and weathering techniques. Replacing the hand holds with
wire and replacing the drums really improved the appearance. I had lots of fun
building this kit which is suitable for modelers of all levels.
| REFERENCES |
Kit instructions.
Internet pictures of T-34’s.
Peter Kwong February 2012 If you would like your product reviewed fairly and fairly quickly, please contact the editor or see other details in the
Note to
Contributors.