| KIT #: | 82495 |
| PRICE: | $47.00 |
| DECALS: | One option |
| REVIEWER: | Scott Lyle |
| NOTES: |
| HISTORY |
The most produced tank of the interwar period, the T-26 was the mainstay of the Soviet Army from its development in the early 1930s right up to the catastrophic German invasion of 1941.
The British firm Vickers-Armstrongs was the world’s leader in tank design and production during the 1920s and in 1928 they unveiled their 6-Ton Tank, also known as the Mark E. A light tank offered in several different variants, fifteen of the twin-turreted, Type A versions were sold to the Soviet Army, who at the time were embarking on a massive mechanization effort.
Delivery of the tanks took place during the fall of 1930, and in February 1931 the Soviets renamed it the T-26 and ordered 500 from their own factories. In 1933 they began producing a single-turreted version, and soon the various Soviet tank plants were churning out thousands. By the time production of the T-26 finally ceased in 1941 more than 11,000 had been built.
The T-26 got its first taste of action in October 1936 when 500 T-26s manned by “voluntary” Soviet crews were sent to the Republican forces fighting in the Spanish Civil War. The tanks were immediately popular and effective in combat against the small tankettes and Panzer I’s of the Nationalist forces, but poor quality and maintenance problems dogged the tanks from the start. Poor visibility when buttoned up, poor ventilation when the gun was fired, poor radio performance, poor track life, and poor engine reliability all hampered the tank’s effectiveness. Nonetheless the tank boosted infantry morale when and where it was present, and captured T-26s became the preferred tanks of the Nationalists as the war went on.
 The T-26’s
next use in combat was against the Japanese in 1938 in the Far East theater.
They were in action once again during the Soviet invasion of Poland in 1939, but
they saw very little combat as the Polish were preoccupied with the Germans to
the west. On November 30, 1939, the Soviet Union began its invasion of Finland,
and this time terrible Soviet leadership and tactics against a skilled and
resourceful foe resulted in a near fiasco for the Soviets. The performance of
all tanks, including the T-26 was still poor. Lingering mechanical reliability
issues hampered their effectiveness, as did the heavy snow and stubborn Finnish
anti-tank defenses. In two months of fighting some 1,110 out of more than 1,500
Soviet tanks deployed were lost to all causes. A break in the action in February
1940 allowed the Soviets to regroup after which they finally overpowered the
Finns, though they lost some 3,200 tanks of all types including 1,170 T-26’s.
The T-26’s
next use in combat was against the Japanese in 1938 in the Far East theater.
They were in action once again during the Soviet invasion of Poland in 1939, but
they saw very little combat as the Polish were preoccupied with the Germans to
the west. On November 30, 1939, the Soviet Union began its invasion of Finland,
and this time terrible Soviet leadership and tactics against a skilled and
resourceful foe resulted in a near fiasco for the Soviets. The performance of
all tanks, including the T-26 was still poor. Lingering mechanical reliability
issues hampered their effectiveness, as did the heavy snow and stubborn Finnish
anti-tank defenses. In two months of fighting some 1,110 out of more than 1,500
Soviet tanks deployed were lost to all causes. A break in the action in February
1940 allowed the Soviets to regroup after which they finally overpowered the
Finns, though they lost some 3,200 tanks of all types including 1,170 T-26’s.
The German invasion during the summer of 1941 resulted in even more disastrous results. With some 23,000 tanks in its inventory, the Red Army looked ferocious on paper. In reality most of those tanks were old and broken down, with the now long-in-the-tooth T-26 making up roughly half of the tank inventory. Most tanks were in poor condition and the level of crew training and tactical leadership was less than adequate. In the huge encircling battles of Operation Barbarossa the Soviets lost thousands upon thousands of tanks and men. By the end of 1941 they had lost roughly 20,500 tanks, the majority of them being the T-26 or BT light tanks. At that point the T-34 and KV tanks had established themselves as the preeminent tanks on the front, and those T-26s that survived were relegated to reserve and training units
Small numbers of T-26s saw action during the Caucasus campaign during the summer of 1942. Some soldiered on in other fronts in ever dwindling numbers throughout the war until finally closing out their combat careers in the Far East against the Japanese. When the war finally ended 1,455 T-26s were still on the books. A few were preserved for museums, but the vast majority was scrapped.
| THE KIT |
 Hobby
Boss’s line of T-26 tanks debuted in 2012 with the early, twin-turreted version
(Model 1931). Since then they have steadily released virtually every T-26
variant including the self-propelled artillery and flamethrower versions.
Opening the box I was pleasantly surprised to find 14 sprues of parts molded in
olive green plastic, one “hull tub”, one clear plastic sprue, a photo etch fret,
a bag of separate brown plastic track links, a ton of sprues of tiny track link
pins (more on that later), a full color painting guide for two different tanks,
decals for said tanks, and lastly, one instruction booklet. The hull tub was set
aside in its own cardboard compartment, adding an air of quality to the
production.
Hobby
Boss’s line of T-26 tanks debuted in 2012 with the early, twin-turreted version
(Model 1931). Since then they have steadily released virtually every T-26
variant including the self-propelled artillery and flamethrower versions.
Opening the box I was pleasantly surprised to find 14 sprues of parts molded in
olive green plastic, one “hull tub”, one clear plastic sprue, a photo etch fret,
a bag of separate brown plastic track links, a ton of sprues of tiny track link
pins (more on that later), a full color painting guide for two different tanks,
decals for said tanks, and lastly, one instruction booklet. The hull tub was set
aside in its own cardboard compartment, adding an air of quality to the
production.
Overall the kit has received good reviews online, with the main caveat being that assembly of the suspension is tedious with its many very small parts. It is a small, pre-war tank, so construction can be expected to be on the fiddly side.
| CONSTRUCTION |
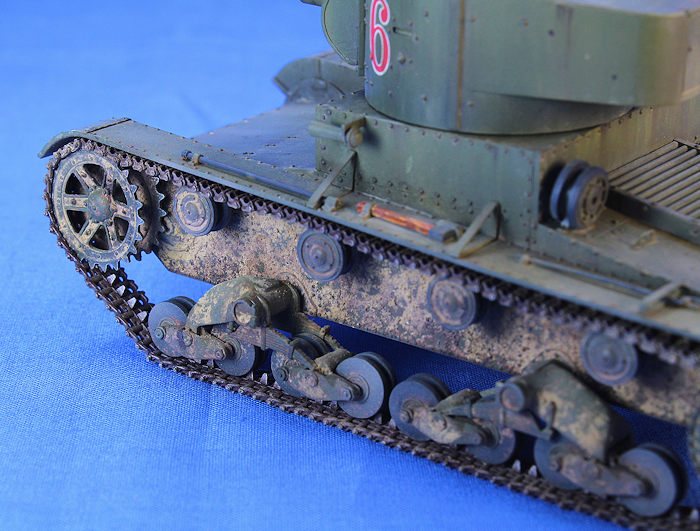
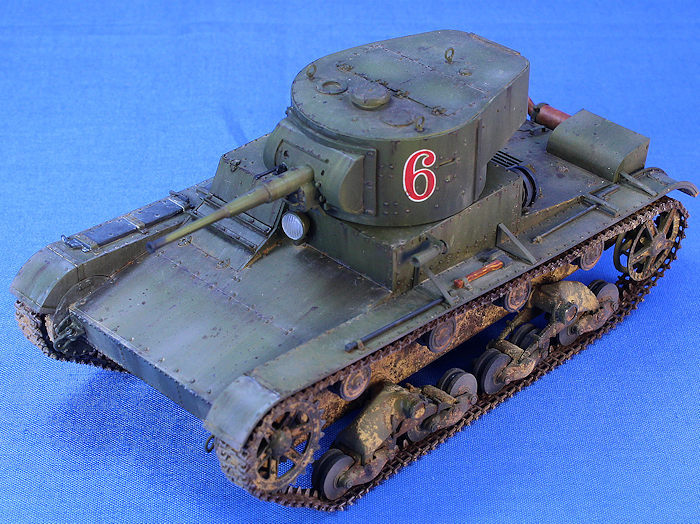
Just as you’d expect, construction begins with said suspension. You first assemble the drive sprockets, idler wheels, and sixteen pairs of road wheels. The road wheels in this kit are of the early solid rubber variety, whereas later T-26 variants featured more traditional steel road wheels with rubber rims. Detail is excellent on these parts - very fine and precise, though I have to say there was a small amount of flash on some of the parts and the plastic was a little on the gummy side.
 These minor
quibbles aside, the next step was to assemble the four carriages that hold all
of the road wheels, and they are in fact made up of many small, delicate parts –
beware of the carpet monster, which attacked me on one occasion. The road wheels
are paired up in trucks, two of which fit into each carriage. They are free to
rotate in the carriage, which is a nice feature for diorama builders.
These minor
quibbles aside, the next step was to assemble the four carriages that hold all
of the road wheels, and they are in fact made up of many small, delicate parts –
beware of the carpet monster, which attacked me on one occasion. The road wheels
are paired up in trucks, two of which fit into each carriage. They are free to
rotate in the carriage, which is a nice feature for diorama builders.
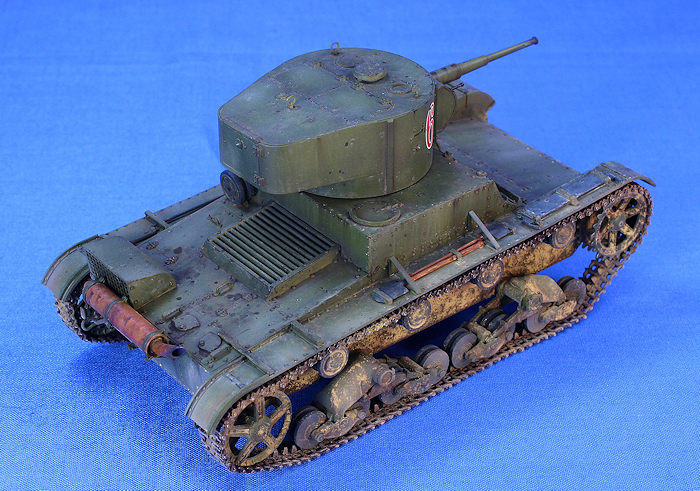
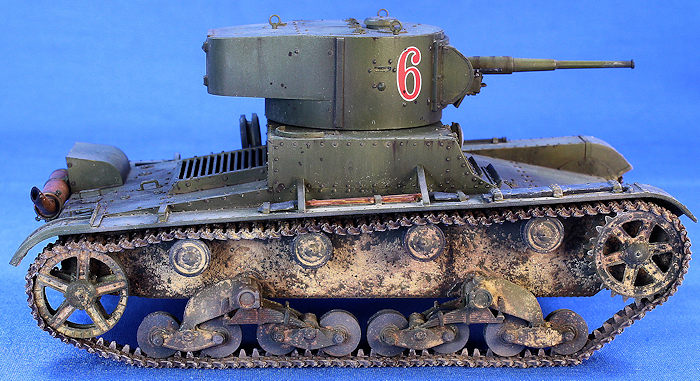
Once the wheels are finished, you next move on to the hull tub and add the housings for the return rollers, drive sprockets, and idler wheels. The instructions would have you attach the four road wheel carriages at this point, but I left them off to facilitate painting. Glacis and engine deck plates are added next, followed by the hull superstructure which is built up out of four side plates and a roof plate. The fit was very good, with no filler needed.
The instructions have you tackle the tracks next, but I skipped over those and continued with the muffler assembly and other engine deck detail parts. The fenders go on next, which feature some nice photo etch triangular support brackets as well as the usual shovels and other tools. After a few more hull details were added I began assembling the turret. Made up of left and right halves, it went together with minimal cleanup of the seams. The turret roof plate fit perfectly into a slightly recessed pocket in the turret top. The gun mantlet went together next, followed by several turret roof and rear hatches and finally the main gun and coaxial machine gun. At that point the tank was finished, except for the tracks, which I worked on while I painted the tank.
Ahh, the
tracks. Consisting of separate track links and tiny pins, they proved to be a
bear to put together. At first I stared at the tiny pins, each no more than a
couple of millimeters long and thought, “How the heck am I going to hold these
things?” Even with tweezers and my optivisor I just couldn’t see fitting two of
those tiny pins to each track link, on 113 track links per side, times 2 sides!
Finally it dawned on me how it’s all supposed to work. The sprues the pins are
molded on have 20 pins each, with each pin molded on the end of a length of
sprue. You are supposed to snip off that length of sprue, not the pin. Using
that piece of sprue as a handle, you then insert the pin into the track link,
which is sitting in a jig Hobby Boss provides. A tiny drop of glue is then
applied to the head of each pin, and once th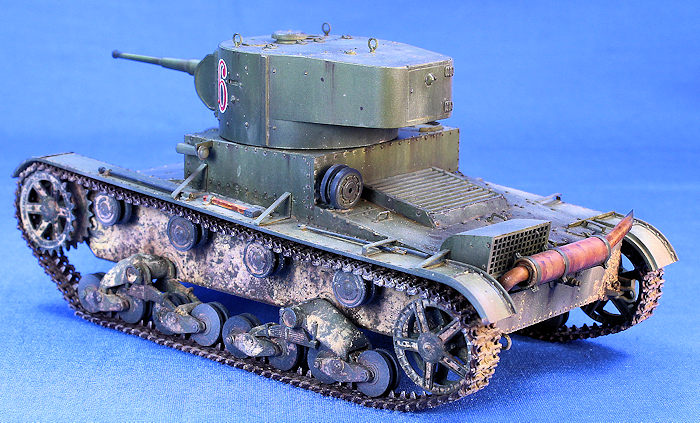 e
glue is dry you come back and carefully snip off the length of sprue, leaving
just the pin glued into the track link. If everything went right the pin will be
glued just to the outer part of the track link, leaving the inner link free to
rotate on the shaft of the pin.
e
glue is dry you come back and carefully snip off the length of sprue, leaving
just the pin glued into the track link. If everything went right the pin will be
glued just to the outer part of the track link, leaving the inner link free to
rotate on the shaft of the pin.
My first attempt at this procedure gave mixed results. Using liquid glue flooded the whole joint, hardening the pin and both track links together. After some experimentation I settled on a technique that worked for me. I attached the pins on one side of the track links with liquid glue and let them harden. With one pin in each link I could connect the various links together, and then attach the pins on the other side with small drops of gap filling CA glue. The CA glue was thick enough that it stayed put, and once everything was dry the assembled tracks flexed as they were supposed to. They were small and fiddly however, and didn’t give me a lot of confidence with regards to their strength. I didn’t play with them too much, and definitely prefer the one-piece track links that just click together.
| COLORS & MARKINGS |
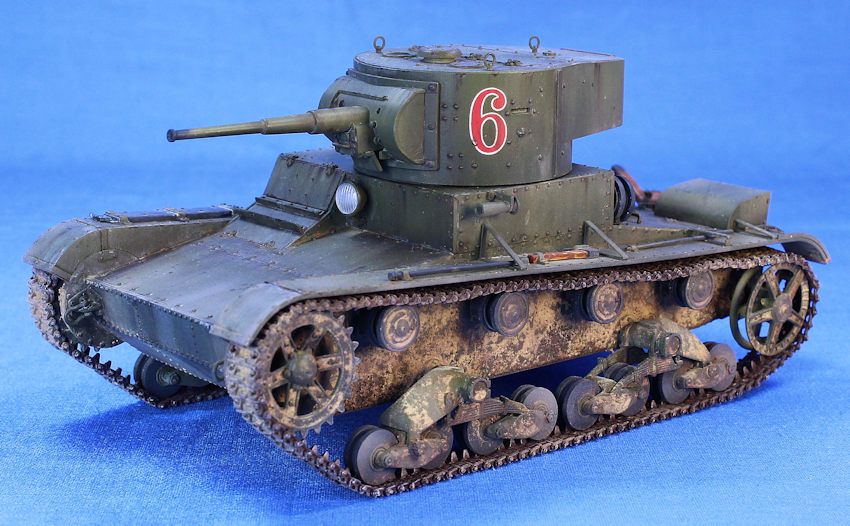
My first painting step was to prime everything with Tamiya’s Liquid Surface Primer and then check the model for any gaps or seams that needed attention. I spent a little extra time on the suspension carriages, filling some seams that I missed. I then preshaded the model Tamiya XF-69 NATO Black, spraying it in the shadowy areas of the tank including underneath the fenders, around the suspension units, underneath the turret overhang, and the crevice areas of the hull.
For the Soviet 4BO base color I made a custom mix of about 70% Tamiya XF-67 NATO Green and 30% Tamiya XF-64 Red Brown. This resulted in a sort of earthy medium green that I thought looked “sufficiently Soviet” (could be the name of a new sitcom…) I sprayed it in light coats over the whole model, letting some of the preshading show through. I then lightened the mix with some Tamiya XF-3 Flat Yellow and subtly airbrushed just the higher surfaces of the tank to represent some fading. A coat of Vallejo Model Air Satin Varnish was sprayed on to the whole model to give it some sheen for the washes to come.
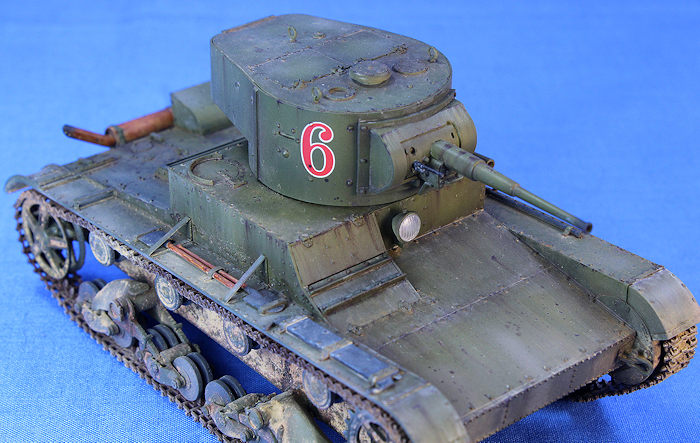 I chose to
use a couple of decals that came with the kit, red “9”, and placed one on either
side of the turret. Some more Vallejo Satin was sprayed over those to seal them,
and then I hand-brushed Sin Industries Filter, P246 Grey for Bright Green, over
the whole model. This left a sort of dusty finish on the model that I liked. I
next applied dabs of Yellow Ochre, Raw Umber, and Raw Sienna oil paint onto all
of the surfaces and used White Spirit to blend and streak them downwards on the
angles and vertical surfaces. This effect gave some fading and variation to the
green paint underneath. That was followed by pin washes of MIG Productions’
Brown Wash and Dark Wash, and then some paint chipping using AK Interactive
Chipping Color was applied to the edges with a very small brush.
I chose to
use a couple of decals that came with the kit, red “9”, and placed one on either
side of the turret. Some more Vallejo Satin was sprayed over those to seal them,
and then I hand-brushed Sin Industries Filter, P246 Grey for Bright Green, over
the whole model. This left a sort of dusty finish on the model that I liked. I
next applied dabs of Yellow Ochre, Raw Umber, and Raw Sienna oil paint onto all
of the surfaces and used White Spirit to blend and streak them downwards on the
angles and vertical surfaces. This effect gave some fading and variation to the
green paint underneath. That was followed by pin washes of MIG Productions’
Brown Wash and Dark Wash, and then some paint chipping using AK Interactive
Chipping Color was applied to the edges with a very small brush.
Once that was dry, I applied some streaking effects on the vertical and angled surfaces using AK Interactive Streaking Grime for Dark Yellow vehicles. I’m amazed at the sheer volume of new weathering products continually coming to the market. Though they’re pricey, I feel like the amount you get in each jar will last me the rest of my life, so I pick one up every now and then.
I turned my attention to the muffler next and first painted a light coat of rust onto it by mixing some white and yellow with some Testors Earth Red. That was followed with some progressively darker shades, created by adding a little black to the mix. Some AK Interactive Rust Streaks were the final step.
 The next
weathering step was to add some pigments. Turning the tank on its side, I laid
out a pattern of MIG Pigments’ Dark Earth and North African Dust on the hull
around where the bogie carriages attach. I then applied MIG Pigments Pigment
Fixer with an eye dropper to fix them in place. This process was applied on the
other three sides of the hull and the bogie carriages themselves, creating a
nice “caked-on” dirt effect.
The next
weathering step was to add some pigments. Turning the tank on its side, I laid
out a pattern of MIG Pigments’ Dark Earth and North African Dust on the hull
around where the bogie carriages attach. I then applied MIG Pigments Pigment
Fixer with an eye dropper to fix them in place. This process was applied on the
other three sides of the hull and the bogie carriages themselves, creating a
nice “caked-on” dirt effect.
Once the pigments were dry I glued the bogie carriages and drive sprockets in place and dusted on a few more pigments with a brush. The model was complete except for the dreaded tracks.
Sticking with the method I outlined above, it still took me three full night to have both tracks assembled. To paint them I sprayed them with an overall coat of Tamiya XF-10 Brown, and followed that up with a rusty home-made wash. Some Testors Steel was dry brushed onto them, and then I fastened them to the tank. The instructions would have you use 113 links, but I found that created too much sag so I ended up at 110 links per side. Some more pigments were dusted onto them to make them look sufficiently dusty and dirty, and finally the model was done.
| CONCLUSIONS |
Hobby Boss’s T-26 is a very solid kit. Nicely detailed and well molded, it goes together easily, my troubles with the tracks aside. I’m glad Hobby Boss has brought us kits of the entire lineup of this important tank, and look forward to building more from them in the future. Recommended to all.
| REFERENCES |
- Steve Zaloga, Osprey Publications, New Vanguard #218, “T-26 Light Tank”
Scott Lyle
19 December 2016
Copyright ModelingMadness.com
If you would like your product reviewed fairly and fairly quickly, please contact the editor or see other details in the Note to Contributors.
Back to the Main Page Back to the Review Index Page Back to the Previews Index Page