|
|
6614 |
|
PRICE: |
$50.00 |
|
DECALS: |
One Option |
|
REVIEWER: |
|
|
NOTES: |
Smart kit with individual track links/photoetch parts |
|
HISTORY |
The T-34 was developed
from the
BT series of
fast tanks. It was intended to replace both the BT-5 and BT-7
tanks and the
T-26
infantry tank. At its introduction, it was the tank with the best
balanced attributes of firepower, mobility, protection and ruggedness, although
its battlefield effectiveness suffered from the poor layout of its crew
compartment, scarcity of
radios, and
 poor
tactical employment. The two-man
turret crew arrangement required the commander to aim and fire the
gun, an arrangement common to most Soviet tanks of the day. This proved to be
inferior to three-man (commander, gunner, and loader) turret crews of the German
Panzer III and
Panzer IV tanks. On the other hand, the T-34 apparently had
superior optics over other tanks in its days.
poor
tactical employment. The two-man
turret crew arrangement required the commander to aim and fire the
gun, an arrangement common to most Soviet tanks of the day. This proved to be
inferior to three-man (commander, gunner, and loader) turret crews of the German
Panzer III and
Panzer IV tanks. On the other hand, the T-34 apparently had
superior optics over other tanks in its days.
The T-34 had several
features that made it a respectable tank: sloping armor increased protection for
the crew; the
V-2
diesel engine used a less flammable fuel; its Christie suspension
was fast on rough terrain; and its wide tracks gave low ground pressure for good
mobility in mud and snow. These were the T-34’s positive attributes, in theory
at least, although reliability and manufacturing issues dogged the wartime
production models. The T-34 continued to give the Soviet Army a critical
advantage in the war even after the Germans had equaled and surpassed its
technological advantages.
The Soviets
continuously refined the design and construction of the tank during the war to
enhance its effectiveness and decrease its production costs, which allowed them
to field steadily greater numbers of T-34s. In early 1944, the Soviets
introduced the improved T-34-85 with a more powerful 85 mm gun and a three-man
turret design. By the war's end in 1945, the versatile and relatively
inexpensive T-34 had replaced many
light and
heavy tanks in Soviet service, and accounted for the majority of
Soviet tank production. Its evolutionary development led directly
to the
T-54/55 series of tanks, built until 1981 and still operational as
late as 2010. The T-54/55 tanks in turn led to the
T-62,
T-72 and
T-90 tanks which, along with several Chinese tanks based on the
T-55, form the backbone of many of the world's armies today.
The T-34 was the most important
weapon fielded by the Red Army in World War II. When first produced in 1940,
commentators considered it one of the finest tank designs in the world. The T-34
tank is not only one of the most recognizable tanks of World War II, it is
arguably the most produced tank in WWII, and is rivaled only by the American M4
Sherman series. T-34 design and initial production took place in Kharkov until
the fall of 1941, when the Soviets evacuated the factory. Of the 35,595 T-34s
built, 12,604 were built at Factory 112 in 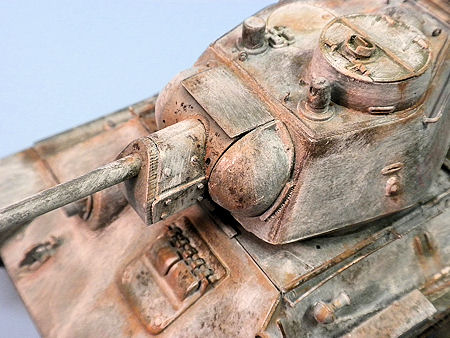
|
THE
|
|
CONSTRUCTION |
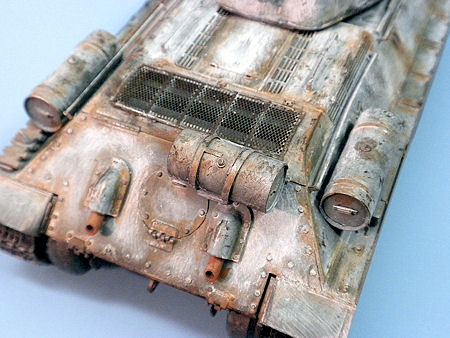
In Step 3, I mounted the
front of the hull to the lower hull and super-glued the photoetched screens over
the engine intakes on the hull’s rear deck. I then attached various other parts
to the upper hull and set it aside to dry. I finished up the upper hull in Step
5.
Steps 6 and 7 involved
assembly of the main gun and the commander’s cupola on the turret top. Here, I
found a mislabeled part: Part C17 should be labeled in the instructions as
“L15.” I then moved to Step 8, which included mounting the main gun inside of
the turret and gluing the turret to the lower turret ring.
Step 9 was the assembly of
the rather intricate external fuel tanks. These include PE parts to provide
extra detail.
In Step 10, I assembled
the individual link tracks. I used regular styrene cement in the process because
it allows me to form the links around the drive sprockets and road wheels as I
assemble them. After I formed the links around the front idler and the rear
drive wheel, I then left this large section of track on the tank to dry. I then
glued links together to form the top center section of the tracks (I would later
glue this to the ends of the formed track sections after painting both. Once
dry, the glued, formed track links are flexible enough to be pulled off the
lower hull assembly for painting. The fact that I did not glue the road wheels
to the hull aids in this process and allows you to carefully pull the wheels off
with the tracks in the event of any “rigidity” you encounter when removing the
tracks. I
subsequently airbrushed the track sections using Testors Steel enamel paint.
|
COLORS & MARKINGS |
 adherence
of a second paint layer. To make this work, I sprayed the entire model with the
hairspray and let it dry (overnight in a dry climate like mine).
adherence
of a second paint layer. To make this work, I sprayed the entire model with the
hairspray and let it dry (overnight in a dry climate like mine).
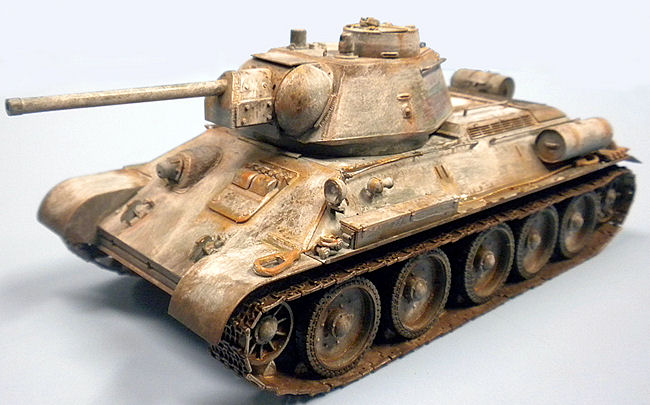
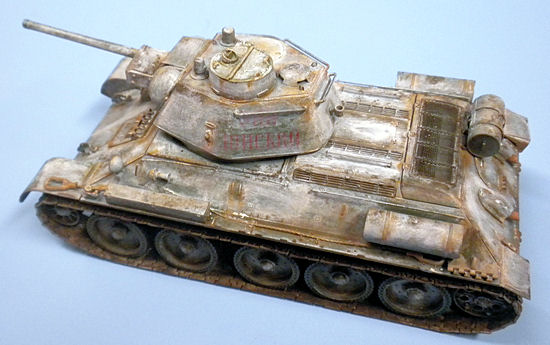
For the next step, I
airbrushed acrylic “white wash” craft paint on the entire model (except the
tracks and road wheels). I didn’t make any effort to get an even coat on the
entire model. I let this dry overnight in preparation for the next step in the
weathering process.
What makes this technique
work is the fact that Hairspray is a water-soluble fixative. The hairspray
sticks to the model and the top paint layer sticks to the hairspray. When you
dissolve the hairspray, the top paint layer comes off in an almost random and a
natural-looking way. All one really needs to dissolve the hairspray is a soft
brush and warm water. Using the wash brush and warm water, I soaked the whole
model by slopping water all over it. Keeping the brush very wet, I then used
using gentle strokes to brush the surface until the paint began to “erode.” The
best approach is to work on one area until you are happy with it and then move
onto another. For some of the more scratched areas, I lightly scrubbed using the
stippling brush, and then came back with the wash brush. As you do the first
area, you will begin to see how this approach can nicely resemble the often
field-applied winter camouflage schemes – slopped on with mops, buckets, and
other implements - for World War II armor. The brush will leave small marks in
the white paint, which further adds to the realism.
 Once I was
satisfied with the winter camouflage look, I then began weathering the model.
For weathering, I used the dry brush technique to apply acrylic rust colored
paint and then dark brown. I used the brush to “spackle” on some wear spots, as
well.
Once I was
satisfied with the winter camouflage look, I then began weathering the model.
For weathering, I used the dry brush technique to apply acrylic rust colored
paint and then dark brown. I used the brush to “spackle” on some wear spots, as
well.
For the tracks and road
wheels, I applied a heavy wash of burnt sienna acrylic paint to simulate mud,
and let this dry. I then took a wide paint brush and dry brushed white acrylic
over the road wheels to blend them into the winter camouflage scheme on the rest
of the tank.
For a final weathering
step, I took a No. 2 pencil and rubbed it on numerous high spots to simulate
fresh paint wear and to give the appearance of bare metal. This can also be
simulated using a silver pencil such as Prismacolor Metallic Silver, which is
available at local craft stores.
|
CONCLUSIONS |
|
REFERENCES |
Thanks to
www.dragonmodelsusa.com
and your editor
for the review kit. You should be able to find this at your local hobby shop. If
not, have them order one for you.
If you would like your product reviewed fairly and fairly quickly, please contact the editor or see other details in the Note to Contributors.