| KIT #: | 85-7821 |
| PRICE: | $23.95 |
| DECALS: | One option |
| REVIEWER: | John Cheyney |
| NOTES: | 2014 Revell reissue of Renwal kit |
| HISTORY |
The M47 medium
tank was one of four tanks (M46/M47/M48/M60) to be named after World War II
General George Patton. The M47 took the hull of the M46 and added the turret
from the T42 prototype. This upgraded the main gun to the M3 90mm from the 75mm
gun on the M46. The M47 was crewed by 5 (commander, gunner, loader, driver,
assistant driver). Other armament included two M1919A1 .30 caliber
 machine guns
(one mounted in the bow of the hull and one mounted coaxially with the main gun)
and an M2 .50 caliber machine gun mounted on the roof. The M47 was the last US
tank to have the bow mounted machine gun. In later export versions it was
removed and the crew was dropped to four, with the extra space used to store
90mm ammunition. The M47 used an air-cooled, gasoline engine with twin
turbochargers from Continental, rated at 810 horsepower. Production ran from
1951 to 1953 with around 9000 units being produced.
machine guns
(one mounted in the bow of the hull and one mounted coaxially with the main gun)
and an M2 .50 caliber machine gun mounted on the roof. The M47 was the last US
tank to have the bow mounted machine gun. In later export versions it was
removed and the crew was dropped to four, with the extra space used to store
90mm ammunition. The M47 used an air-cooled, gasoline engine with twin
turbochargers from Continental, rated at 810 horsepower. Production ran from
1951 to 1953 with around 9000 units being produced.
The M47 was used by both the US Army and US Marine Corps but only for a relatively short time. They were replaced by the M48 Patton and retired in 1959. The M47 saw significant usage as an export model with multiple NATO and SEATO countries using it and it remains in service with some of those nations. It has seen combat with several export customers. US tanks remained in storage until the 1970’s with most of them meeting their ultimate end as targets for M60 gunners or A-10 pilots.
Interesting triva fact: Actor and former Governor of California Arnold Schwarzenegger crewed an M47 during his mandatory service with the Austrian Army in 1965. He currently owns a former Austrian Army M47.
| THE KIT |
I
rarely do armor models, spending most of my time on 1/48 scale aircraft. After a
couple of rounds of fiddling with tiny landing gear parts and masking canopies,
I decided to try something a little simpler. My local hobby shop has a good
selection of WWII armor, but I tend to gravitate toward Korean and Vietnam era
models. I had seen several of these ‘Renwal Blueprint Models’ in 1/32 scale with
some awesome
 looking
old-school box art. Renwal was a model and toy maker in the 50’s and 60’s. The
company started making housewares and doll furniture at the end of WWII. Renwal
folded in the mid 1970’s and the molds ended up with Revell. The original
Visible Man/Visible Woman, as well as the Visible V8 engine are Renwal products
later released by Revell. The box that mine came in was in very nice condition
with a 2014 date on the back.
looking
old-school box art. Renwal was a model and toy maker in the 50’s and 60’s. The
company started making housewares and doll furniture at the end of WWII. Renwal
folded in the mid 1970’s and the molds ended up with Revell. The original
Visible Man/Visible Woman, as well as the Visible V8 engine are Renwal products
later released by Revell. The box that mine came in was in very nice condition
with a 2014 date on the back.
Opening the box, I was immediately struck by old-school modelling come back. This is the kind of kit I pestered my mother to buy me back in the 70’s. It made me want to go get a squeeze tube of Testor’s model glue, but I let the feeling pass. The kit comes with two tracks molded in black flexible black rubber, two plastic bags of green molded parts, and a small decal sheet. The plastic is very thick compared to what we see in more modern molds. What is not thick is the point where the parts connect to the sprue. Be very careful when you take the parts out that they don’t break off, and make absolutely sure you have every part accounted for before you throw the plastic bags away. The moldings had what I would consider a moderate, but not horrible, amount of flash. All the detail is molded in. The tools you normally expect to find as separate pieces on a modern armor model (axe, shovel, tow chains) are all molded in place here. While this limits your ability to detail, it makes the build fast.
| CONSTRUCTION |
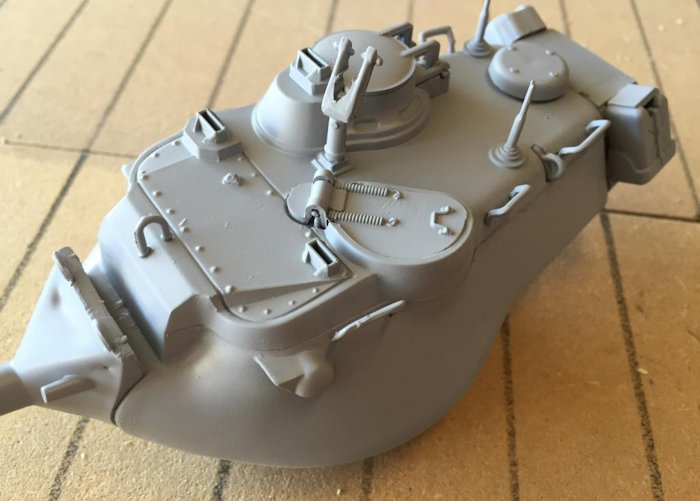
I started by covering everything with a coat of Tamiya primer from a can. I then went after subassemblies. First were the very tedious wheel assemblies. Details on the parts facing out are nice and sharp, but non-existent on the inside parts. The kit does not provide a lot of alignment pins. After applying the glue you have to carefully put them aside without knocking them out of alignment. The main gun, which consists of 5 separate pieces, is the same way. Getting it straight was a challenge. The basic fit of the sides to the hull was good, but the sides bowed slightly. I ended up having to glue one end, clamp it in place, then work my way down the sides, gluing and clamping as I went along. The final fit was good, with some slight seams that I filled with acetone-thinned Squadron white putty. The turret comes in two halves, with the line going right through the middle. The seam was small and also took some Squadron white putty.
It was interesting trying to use Tamiya liquid cement on this thick plastic. It definitely takes more glue than I typically use to get a good bond.
 The road
wheels and hulls assembled, I grabbed some Testor’s acrylic olive drab. All
military vehicles are olive drab, right? I painted the hull using my Paasche VL
at 20psi. When I got the coat on it was a little more brown than I expected. All
of the color pictures and tanks I have seen from the 50’s and 60’s have a
distinct green to them. After a second look I realized I had grabbed ‘olive drab
khaki’.
The road
wheels and hulls assembled, I grabbed some Testor’s acrylic olive drab. All
military vehicles are olive drab, right? I painted the hull using my Paasche VL
at 20psi. When I got the coat on it was a little more brown than I expected. All
of the color pictures and tanks I have seen from the 50’s and 60’s have a
distinct green to them. After a second look I realized I had grabbed ‘olive drab
khaki’.
I started looking around the paint bin and found some Testor’s acrylic dark green. That looked a little better but I ran out. At that point I ran into an existential crisis on what color I wanted to paint this thing. Olive drab khaki was too brown and I was out of dark green.
I moved on to the hull. For such an old school build it can be incredibly detailed in some places. Like many other models from the time period, this was actually meant to be played with as a toy once done. That means it has several pieces that are meant to move. The kit comes with a piece that glues into the hull that is meant to simulate the top of the engine. On the hull are multiple panels that you can build to open and show the engine. I was building this to be display only so I glued everything in place. Things fit nicely with just a small amount of super glue to fill the gaps. I began to rethink my comment about there only being a moderate amount of flash. The smaller pieces had a lot more than the larger ones and required cleanup before I could use them.
The sprue layout often makes finding the parts difficult. The part number is either on a tag on the sprue OR stamped on the part OR on a small round tag on the part itself (assuming it hasn’t fallen off). I also noticed that parts are not well organized. Several times I found versions of the same part on different sprues.
 After
getting the hull built I went back to the turret. The kit comes with a
collection of figures, which I decided not to add. The two figures that are
meant to go in the turret connect to a piece that glues in to the back of the
gun and provides a pivot for the gun to go up and down. This would make the
figures go up and down and you raised and lowered the barrel. I ended up gluing
the hatches shut with a little gap filling super glue in a couple of places. I
assembled everything except the M2 .50 caliber machine gun, cleaned up some
seams, and did a little re-priming.
After
getting the hull built I went back to the turret. The kit comes with a
collection of figures, which I decided not to add. The two figures that are
meant to go in the turret connect to a piece that glues in to the back of the
gun and provides a pivot for the gun to go up and down. This would make the
figures go up and down and you raised and lowered the barrel. I ended up gluing
the hatches shut with a little gap filling super glue in a couple of places. I
assembled everything except the M2 .50 caliber machine gun, cleaned up some
seams, and did a little re-priming.
I decided to revisit my earlier paint color crisis. I found a jar of Testor’s acrylic green drab. I loaded it up and started spraying. This was clearly the color I was looking for.
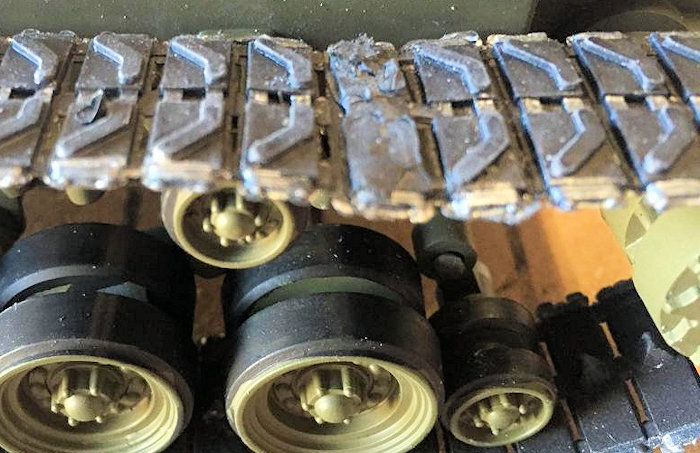
Although the tracks were black rubber, they were shiny and didn’t look like most armored vehicles I have seen. I primed them, sprayed them flat black, and detailed the metal link parts with Testor’s acrylic steel.
The tracks attach with small knobs on one end that fit into small holes in the other then melted together. I used a pair of tweezers heated on a stove burner with the connection on the top so it won’t be seen underneath the skirts. I was surprised how well this actually worked. Unfortunately what this doesn’t allow you to do is adjust the tightness of the track without major modifications. Pictures that I have seen of M47’s show very little track droop. The track really needed to be about half a link smaller, but fit well enough that I didn’t try to make it fit exactly.
| COLORS & MARKINGS |
With the hull/wheels/tracks assembled, I painted the deck and turret assemblies and after they dried I did the final assembly. The parts went together easily with only a little extra pressure needed at the very front where the hull met the desk. There are two mufflers, one on the top of the deck on each rear quarter. I had this idea what I would rough them up and then dry brush them with Testor’s acrylic rust. That failed miserably. The good news is that there are flat pieces that cover almost all of the mufflers, so you can’t really see them.
 I painted
the bow machine gun, the coaxial machine gun, and the metal parts of the
trenching tools black. The .50 caliber gun black was also painted black and dry
brushed with steel. There are jerry cans on each side of the turret bustle. Just
to give the green a little variance I painted them olive drab khaki, as I did
the handles on the trenching tools.
I painted
the bow machine gun, the coaxial machine gun, and the metal parts of the
trenching tools black. The .50 caliber gun black was also painted black and dry
brushed with steel. There are jerry cans on each side of the turret bustle. Just
to give the green a little variance I painted them olive drab khaki, as I did
the handles on the trenching tools.
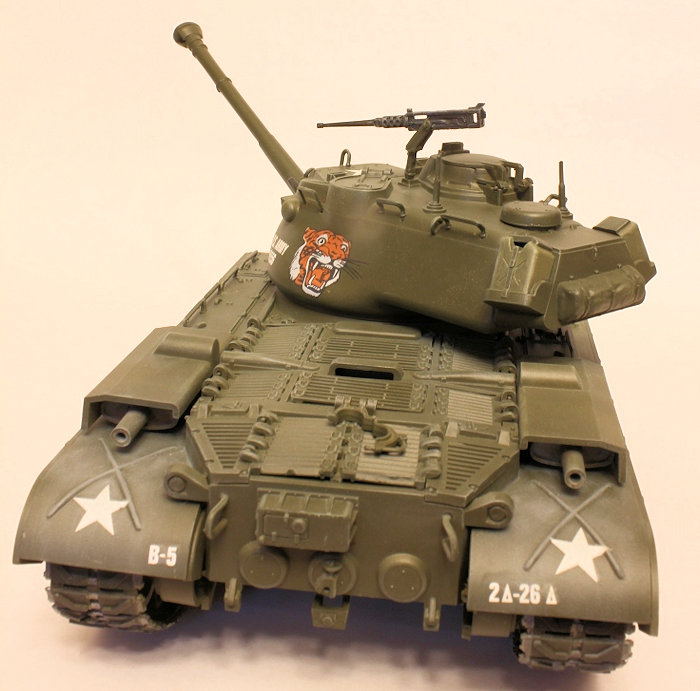
The last pieces to assemble are skirts that cover the top of each track. Not unlike the hull sides there was noticeable flex in them and I had to clamp and glue one end and then clamp my way down. The fit was alright but there is a pronounced line. I decided not to try and make it less obvious and used glue to fill the gaps. The turret fits in place with two small tabs, and I decided to leave it moveable for now. One more touch up with dark green and the painting was done.
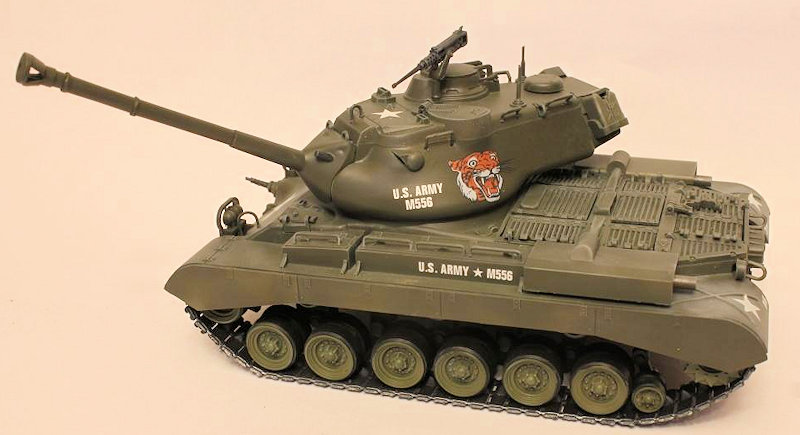
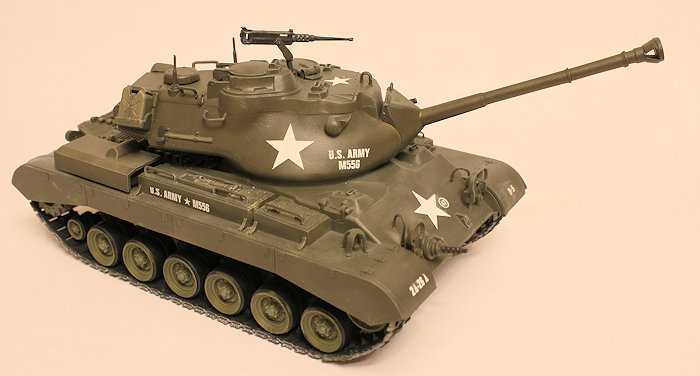
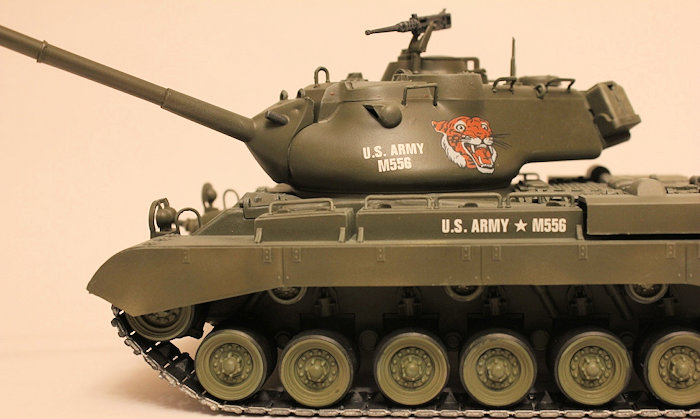
The kit has one set of decals. The quality is high, not too thin or thick. I sprayed the sides of the turret with Testor’s acryl gloss. After letting it dry I slid the decals in place with Micro-Set. There is one option, to replace one of the white stars on the turret with a tiger’s head. I have no idea if it’s realistic, but it looked cool so I went with it. I let the kit sit overnight to dry and then shot the entire model with Testor’s acryl flat.
I didn’t want to invest a massive amount of time and effort in weathering, so I decided to do this as a slightly worn tanks. I have a set of Tamiya weathering powders in tan, gray, and dark green, The intitially come out almost like a crayon, slightly greasy. I brushed some on the rear fenders where the exhaust would come out of the mufflers. I then scrapped the gray and green off into powders and dry brushed the entire model to bring down the shine and tone down the bright white of the decals.
| CONCLUSIONS |
All in all I am very happy with this model. It was exactly what I was looking for, a simple model that looks good and was easy to build. This would be a great model for starting someone in modeling or for someone getting back into the hobby after years out. The entire work was about 9 hours from start to finish. There aren’t any clear parts to deal with. This would not be a good model for someone who is building for a competition, or who is looking for a real challenge. I didn’t find any add-on pieces/photo-etch/decal sets. And if you are the kind of person takes to the Internet to make sure each hull hatch has exactly the same number of vents as the real version, again, not a model for you. I can definitely say I will be doing one of these kits again.
| REFERENCES |
M47 Patton Tank (https://en.wikipedia.org/wiki/M47_Patton)
M47 (Patton II)-Medium Tank (http://www.militaryfactory.com/armor/detail.asp?armor_id=33)
Renwal Company (http://www.boomerbookofchristmas.com/renwal-company-not-renewal)
Arnold Schwarzenegger Will Ride in a Tank and Crush Things for Charity (http://time.com/22079/arnold-schwarzenegger-will-ride-in-a-tank-and-destroy-things-for-charity/)
January 2016
Copyright ModelingMadness.com
If you would like your product reviewed fairly and fairly quickly, please contact the editor or see other details in the Note to Contributors.