Dragon 1/72 M2A3 Bradley
|
KIT #: |
7324 |
|
PRICE: |
$15.00 SRP
|
|
DECALS: |
Five options |
|
REVIEWER: |
John
Doerr |
|
NOTES: |
A very nice kit, well molded
and detailed at a reasonable price.
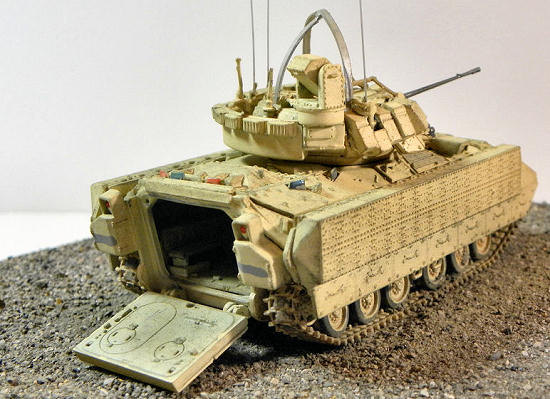
The kit has a hinged rear ramp but lacks an
interior |
The M2 owes it's genesis
to the desire to have a vehicle in which infantry could fight
with out having to enter a Chemical, Biologic, Nuclear (CBR)
contaminated battlefield.
Conceptually, the idea was to have the infantry remain
in the vehicle and not risk bringing contaminates in and avoiding having to go
through decontamination.
It was known as an Infantry Fighting Vehicle (IFV).
As the world situation changed, so did the mission.
The Bradley evolved in to a fast fighting vehicle that
could keep pace with M1 Abrams tank, with upgraded armor to protect the crew and
and infantry with the ability to provide fire support and tank killing
capability and has been redesignated as the Bradley Fighting Vehicle (BFV)
 The
M2 has been upgraded through its service life with improvements to armor and
especially the electronics.
By the time of the Gulf War or
Operation
Desert
Storm, (1991-1992)
the A2 version was in use featuring thermal sights,
upgraded electronics and 30 mm laminate armor.
A3 upgrades were delivered beginning in 1998.
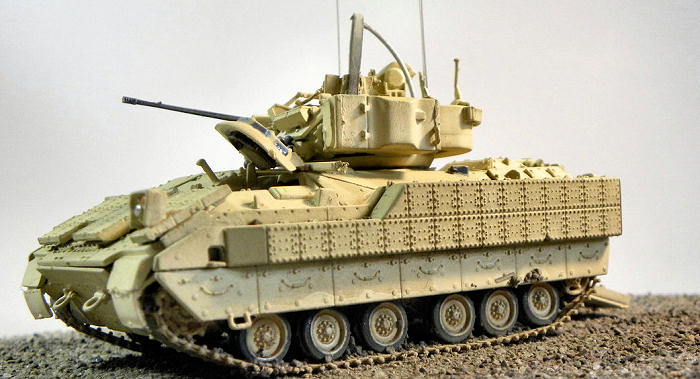
Perhaps the main visual
identifier of the A3 version is the Commander's
Independent Viewer (CIV),
a remotely operated monitor that frees the vehicle commander from exposing
himself to scan the outside.
It is commonly called the doghouse by the troops and is
located on the left outside of the turret.
Experience in Operation Iraqi Freedom has led to the
addition of Explosive Reactive Armor (ERA) blocks on the exterior.
The
M2 has been upgraded through its service life with improvements to armor and
especially the electronics.
By the time of the Gulf War or
Operation
Desert
Storm, (1991-1992)
the A2 version was in use featuring thermal sights,
upgraded electronics and 30 mm laminate armor.
A3 upgrades were delivered beginning in 1998.
Perhaps the main visual
identifier of the A3 version is the Commander's
Independent Viewer (CIV),
a remotely operated monitor that frees the vehicle commander from exposing
himself to scan the outside.
It is commonly called the doghouse by the troops and is
located on the left outside of the turret.
Experience in Operation Iraqi Freedom has led to the
addition of Explosive Reactive Armor (ERA) blocks on the exterior.
1-5
Cav in
Iraq
The 1st
battalion, 5th Cavalry Regiment, 1st
Cavalry Division was deployed to Camp Freedom, in
Iraq
in November 2006.
Alpha company was assigned to
Ameriyah, an insurgent strong hold in
western
Baghdad.
My son was a private, later specialist,
SAW/M240 gunner.
He was a dismounted trooper or essentially infantry,
commonly called trunk monkeys, after the internet ads.
Initially, Alpha Company used Humvees for patrolling but
as they began to display a vulnerability to Improvised Explosive Devices (IED)
they upgraded to the M2A3, which had much better armor and brought along their
own fire support.
They were not invulnerable as I know of two Bradleys
from Alpha Company that were lost to IEDs.
 One
disconcerting thing I had learned
was that CBS reporter Lara Logan considered the 2nd
platoon,
Alpha Company as “her” platoon, the men of the platoon regarded her as a
real grunt.
No higher complement could be paid to a reporter.
The real issue was that watching the news was knowing
that one of the grunts going house to house in combat could be my son and we
were watching the very fighting he was involved in.
Unidentifiable under their gear any of the SAW gunners
we saw might have been him.
One
disconcerting thing I had learned
was that CBS reporter Lara Logan considered the 2nd
platoon,
Alpha Company as “her” platoon, the men of the platoon regarded her as a
real grunt.
No higher complement could be paid to a reporter.
The real issue was that watching the news was knowing
that one of the grunts going house to house in combat could be my son and we
were watching the very fighting he was involved in.
Unidentifiable under their gear any of the SAW gunners
we saw might have been him.
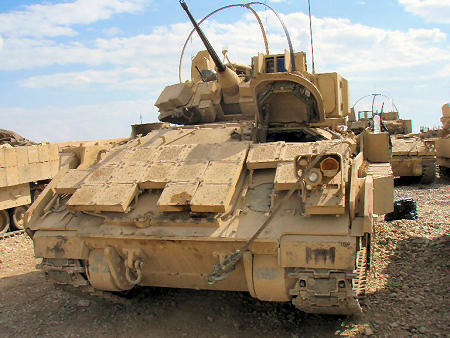
The
vehicles were unmarked with the original markings painted over in gray paint.
The reason was that rather than every unit bringing over
all their equipment, the vehicles remained and were handed down to each incoming
unit.
Sometimes the vehicles were well maintained and others not, with the
departing troops not wanting to put in the extra work knowing they would be
handing over the equipment to a new unit.
1-5 Cav stayed for 15 months through the thick of the
fighting in
Baghdad,
and sad to say Alpha Company returned in January 2008 minus a number of
troopers.
The kit is a gem.
It contains enough pieces to build any M2A2/A3 actually
used by the
US
Army.
It consists of 176 parts, three main pieces, five trees, and one each
vinyl tree and PE fret.
A number of the parts are for the A2 version and not
used.
One entire
 tree
consists of the ERA blocks. I question the need for the PE in that most of the
pieces are the turret ERA mounting brackets that disappear when the ERA blocks
are added.
The molding is crisp, accurate and precise.
They even had the A3
GPS
antenna that is mounted on the rear of the turret basket.
I had no fit issues at all in the build.
tree
consists of the ERA blocks. I question the need for the PE in that most of the
pieces are the turret ERA mounting brackets that disappear when the ERA blocks
are added.
The molding is crisp, accurate and precise.
They even had the A3
GPS
antenna that is mounted on the rear of the turret basket.
I had no fit issues at all in the build.
The
instructions are comprised of nine steps.
Given the large number of parts involved the drawings
are quite busy.
The instructions have to studied quite carefully as a number of
parts are shown installed with call outs that seem to get lost in the busyness
of the drawings.
I have to
admit I am not an armor guy.
I have built some but I am not up to speed on all the
details a real armor modeler would catch.
The vinyl tracks looked correct when compared to the
photos and were much easier than individual links.
Another point was that most of the track was hidden
behind the side skirts or under the road wheels.
The only really visible parts were the front and rear
For anyone wishing to convert the
pristine M2 into a worn street fighting machine, the conversion is simple and
requires only basic tools.
My son gave me some photos and also advised me on the
changes necessary to convert the kit into one of Alpha company's M2A3s.
The conversion was simple.
Some of the ERA blocks on the forward hull needed to be
removed to conform
 to the
photos.
The deck mounted tools removed and the identification panels left off.
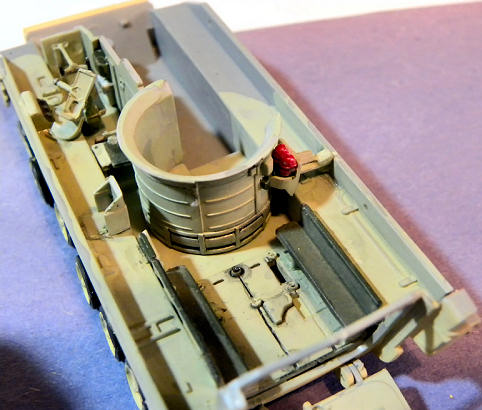
The build was straight forward except I decided to
construct the full hull interior.
This was above and beyond my original plan and
I had a kit in the stash, an A2 version that featured a
full interior, so I decided to add that as well.
to the
photos.
The deck mounted tools removed and the identification panels left off.
The build was straight forward except I decided to
construct the full hull interior.
This was above and beyond my original plan and
I had a kit in the stash, an A2 version that featured a
full interior, so I decided to add that as well.
Construction started with the new
interior.
The pirated interior featured the earlier individual seats but
the A3 version had bench seats along the rear sides, as well as the jump seat to
the left rear of the turret basket.
Also the assistant driver's seat was retained but the
seat back was left folded down.
The
interior was surprisingly easy as most of the parts required, at most, minor
trimming to fit.
Plastic sheeting was trimmed and installed to cover some unused
mounting holes.
The in progress photos were emailed to my son for comments and
advice.
The interior was painted light green with Tamiya acrylics, a mix of
XF-71 cockpit green XF-2 White.
The seat covers were painted with Tamiya XF-27 black
green.
The interior was given a light wash of black then dusted with light
brown ground pastel to enhance the dusty effect.
Also the driver's periscopes were added to the inside of
the hatch because they would be visible when the hatch was opened.
They were constructed out of simple strips of plastic
and painted olive drab
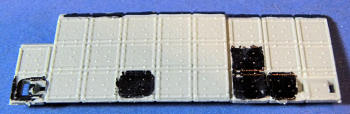 Following
the construction of the interior, the first step was to take the full forward
hull ERA assembly and mark out which blocks need to be removed.
The ERA blocks do not sit flush but are on spacers above
the hull armor.
Dragon caught this and there are mounting bracket spacers under
the front piece.
Following highlighting, the blocks were removed with a razor saw
and the filed smooth.
The tools molded to the rear deck of the hull were
scraped off with an Exacto knife and the hull sanded smooth.
And that was all that was necessary beyond not adding
the identification panels.
Following
the construction of the interior, the first step was to take the full forward
hull ERA assembly and mark out which blocks need to be removed.
The ERA blocks do not sit flush but are on spacers above
the hull armor.
Dragon caught this and there are mounting bracket spacers under
the front piece.
Following highlighting, the blocks were removed with a razor saw
and the filed smooth.
The tools molded to the rear deck of the hull were
scraped off with an Exacto knife and the hull sanded smooth.
And that was all that was necessary beyond not adding
the identification panels.
The rest was strictly OOB.
I just followed the instructions with occasio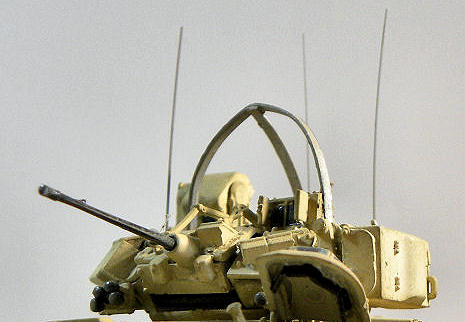 nal
stops for painting along the way. The road wheels, drive sprockets and idlers
were assembled and paint as was the lower hull as the first steps.
The rubber tires of the road wheels were painted Tamiya
XF-63, German gray
nal
stops for painting along the way. The road wheels, drive sprockets and idlers
were assembled and paint as was the lower hull as the first steps.
The rubber tires of the road wheels were painted Tamiya
XF-63, German gray
Following that the side skirts, turret and
upper hull were assembled and each set aside for painting.
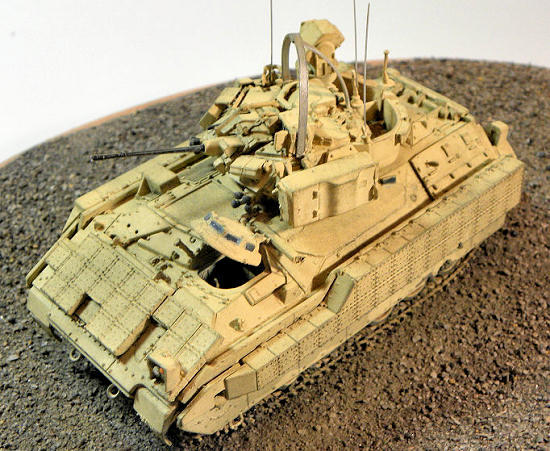
After painting and weathering of the OOB turret, the
last details need added.
The urban Bradleys were fitted with metal deflector
hoops on the top of the turret.
The
Baghdad
power lines are festooned over the street and quite low, so the deflectors were
installed to prevent the wires from snagging on the turret and to protect the
commander if he chose to ride in the open.
The three whip antennas were made from stretched sprue.
After the hull was completely assembled and weathered,
the turret was installed as the final assembly.
An
oval wooden base had been purchased and was stained.
The top was given a coat of Elmer’s glue and local soil
was was sifted through a fine mesh strainer unto the surface.
The track bottoms were given a coat of white glue also
and set in place
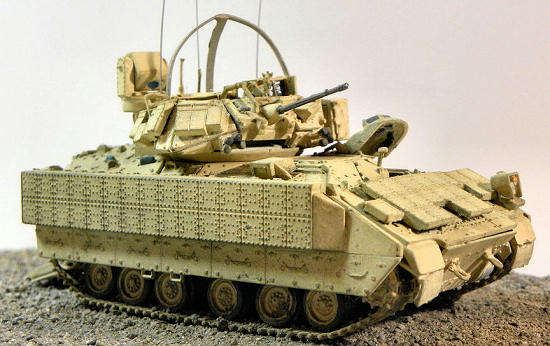
The Bradleys were painted
in one color, overall sand.
I chose Model Master enamel FS33722, Modern Desert Sand
in the spray can.
The entire vehicle was sprayed, including the tracks.
The rubber pads on the tracks were given a coat of
Tamiya XF-63.
The radiator outlet was given a wash of black to add
depth.
The Baghdad Bradleys carried no markings and t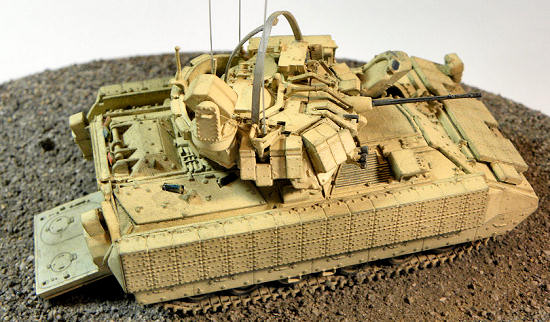 he
locations where they had been were brushed with Tamiya XF-19 sky gray.
The power line defectors and whip antenna were natural
metal, so Model master Metalizer steel was brushed on.
Photos showed the vehicles to be dusty and worn but not
muddy or conspicuously dirty.
Tracks, drive sprockets, road wheels and idlers were
given a light wash of “rust”.
he
locations where they had been were brushed with Tamiya XF-19 sky gray.
The power line defectors and whip antenna were natural
metal, so Model master Metalizer steel was brushed on.
Photos showed the vehicles to be dusty and worn but not
muddy or conspicuously dirty.
Tracks, drive sprockets, road wheels and idlers were
given a light wash of “rust”.
The
finale was to grind a mix of dark gray, brown and tan pastel chalks and sprinkle
it liberally on the top of the hull and turret.
A ½ inch soft, long bristle brush was used to work the
dust into all the nooks and crannies and rub it into the surface.
The excess was swept down the sides and into the tracks
and wheels, as well as dusting the exposed front and rear tracks.
The final step was to simple blow off any remaining
pastel dust.
The
model was being built, not only as a tribute to my son but also as an entry at
BuffCon 28, hosted by IPMS Niagara Frontier, on April 10.
 Bradley
Fighting Vehicle:
http://en.wikipedia.org/wiki/Bradley_Fighting_Vehicle
Bradley
Fighting Vehicle:
http://en.wikipedia.org/wiki/Bradley_Fighting_Vehicle
Bradley M2 / M3 Tracked
Armoured Fighting Vehicles, USA :
http://www.army-technology.com/projects/bradley/
M2
and M3 Bradley Fighting Vehicle Systems (BFVS):
http://www.globalsecurity.org/military/facility/iraq-map-aor_040400.htm
Inside
the Surge: 1-5 Cavalry in Ameriyah:
http://smallwarsjournal.com/blog/2008/10/inside-the-surge-15-cavalry-in/
M2/M3
Bradley at War: Michael Green and James D. Brown; Zenith Press, 2007
Egon
W. Doerr, personal communication
John
Doerr
April 2011
If you would like your product reviewed fairly and quickly, please
contact
me or see other details in the
Note to
Contributors.
Back to the Main Page
Back to the Review
Index Page