CMK 1/35 Sherman Driver's Set
| KIT #: | 3026 |
| PRICE: | $47.00 MSRP |
| DECALS: | None |
| REVIEWER: | Andrew Garcia |
| NOTES: | Resin and photo-etched parts |
| HISTORY |
The M-4 Sherman medium tank was the main U.S. tank during WWII. With more than 55,000 produced and used in all war zones it was truly a major contributor to wining the war. Anyone who grew up in the 1950’s in the U.S. will have heard many stories from Sherman tankers reminiscing about their WWII activities. They all loved the tank but felt the enemy in Europe had superior hardware for the most part. It’s superb reliability; mobility and sheer numbers compensated for any design shortcomings.
| THE KIT |
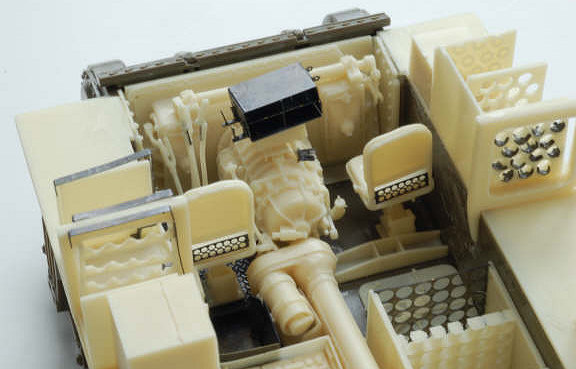
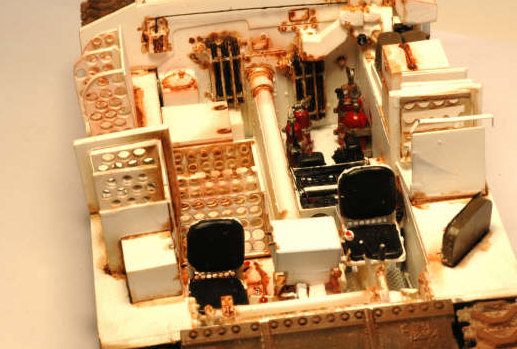
This resin
accessory set qualifies as a kit in my opinion. It is not an add on accessory
that enhances existing details. This resin set provides extraordinary detail for
the interior of the Sherman tank. The casting is flawless and the details
extremely well 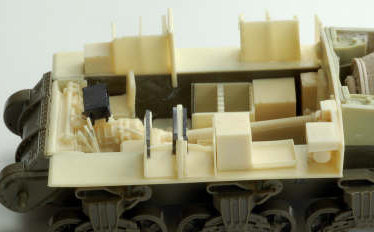 represented. Comparing the resin set to the Tamiya kit parts,
which are quite nice, gives rise to my claim the CMK product is actually a kit
due to its complete representation of the interior and ability to stand alone as
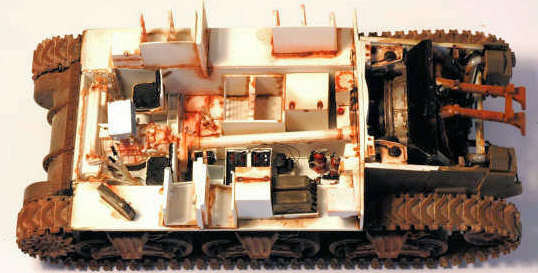
a finished product. The main dilemma with an “interior kit” is how can you show
off all this gorgeous detail since a tank by its nature is a buttoned up shell?
I chose to build the Tamiya kit in a way that allows me to place the main parts
together without glue for a look “under the hood” by removing the turret and
upper body.
represented. Comparing the resin set to the Tamiya kit parts,
which are quite nice, gives rise to my claim the CMK product is actually a kit
due to its complete representation of the interior and ability to stand alone as
a finished product. The main dilemma with an “interior kit” is how can you show
off all this gorgeous detail since a tank by its nature is a buttoned up shell?
I chose to build the Tamiya kit in a way that allows me to place the main parts
together without glue for a look “under the hood” by removing the turret and
upper body.
I wanted to build some armor models after visiting my son while he was stationed at Fort Knox, Kentucky as an M1A2 Abrams armor officer. I had spent some time at the Patton armor museum located on the base and walked around the armor displays outside. This gave me the incentive to toss in an occasional armor build into my normal 1/48th aircraft efforts.
As a
break from building 1/48th scale aircraft I chose the M4 Sherman in
1/35th scale by Tamiya (kit # 35190) as a starting point. It started
out as an OOTB build effort until I discovered the M4 Sherman resin detail sets.
After looking at a few alternatives I purchased the CMK M-4 Sherman Driver’s set
#3026 and M-4 Sherman Interior set (# 3027). Am I ever pleased that I chose this
detail set! Using an awesome reference book for this project, “Inside the Great
Tanks” by Hans Halberstadt, Windrow & Greene Publishing 1997, I was able to get
the final interior painting details that were not well covered in the
instructions. The instructions give very good overall painting suggestions with
color-coded alpha symbols associated with the resin components. They are
 adequate but the Inside the Great Tanks book had absolutely awesome color
reference photos that allowed me to improve on the kits directions. Pages 56 to
70 are devoted to the Sherman tank interior (with a few awesome exterior shots
as well). They are large clear color photographs that make this the perfect
reference source for this type of project.
adequate but the Inside the Great Tanks book had absolutely awesome color
reference photos that allowed me to improve on the kits directions. Pages 56 to
70 are devoted to the Sherman tank interior (with a few awesome exterior shots
as well). They are large clear color photographs that make this the perfect
reference source for this type of project.
The M-4 Sherman – drivers set is composed of one hundred and twelve (112) resin parts, two etched metal frets and a clear acetate instrument panel cluster similar to the Eduard aircraft etched metal instrument panels. The instructions are excellent. Using the step by step, clearly illustrated eight-page instruction booklet combined with the clear color box cover photo I found the project to be a rewarding build. I know little about the subject so it is important to have good, clear instructions.
For another detailed review I suggest going to the Perth Military Modeling site “PMMS” using http://www.perthmilitarymodelling.com/reviews/vehicles/cmk/cmk3026.htm .
| CONSTRUCTION |
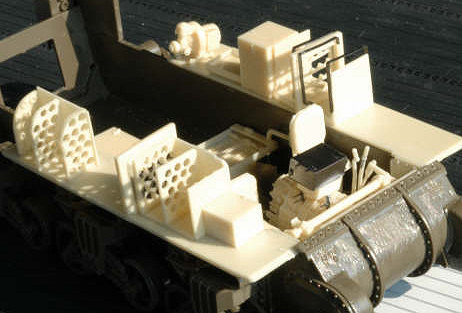
The
CMK resin parts had no flash and careful separation from the carrier blocks was
the main effort. A bit of filing or wet and dry sanding while wearing a
respirator was all that was required to prepare the parts for assembly. Test fit
the assembly to ensure the depth does not change the dimensions. The parts just
dropped into place! My main construction tip for this type of project is use
 small dimension copper and guitar wire as “connector pins”. Drill a small
diameter hole into both parts to be glued together. This also works with parts
that are very “fidley”. I have found in this type of project, the pins with some
cyano glue will hold together better than just glue alone. For example, the
steering brake control handles looked like a problem assembly and they were. The
problem was with attaching the grips to the top of the levers. There was very
little surface and I opted to drill into the bottom of the grips and place a
small guitar wire pin inside the shaft. The wire extended just a small amount
past the grip and I used this to attach it to the main lever. Cyano should work
but the slightest touch and it will break free. With the pins in place the parts
can tolerate heavy movement, painting and shake off accidents.
small dimension copper and guitar wire as “connector pins”. Drill a small
diameter hole into both parts to be glued together. This also works with parts
that are very “fidley”. I have found in this type of project, the pins with some
cyano glue will hold together better than just glue alone. For example, the
steering brake control handles looked like a problem assembly and they were. The
problem was with attaching the grips to the top of the levers. There was very
little surface and I opted to drill into the bottom of the grips and place a
small guitar wire pin inside the shaft. The wire extended just a small amount
past the grip and I used this to attach it to the main lever. Cyano should work
but the slightest touch and it will break free. With the pins in place the parts
can tolerate heavy movement, painting and shake off accidents.
I also enhanced the interior by adding the Verlinden # 1120 Sherman M4 Engine and Compartment set. (See the second part of this article) The Verlinden engine was very simple to assemble but the instructions were quite poor. I found an excellent photo of a Sherman tank recovery unit changing out an old engine for a new engine. Unfortunately it is in black and white – it would have been a spectacular color photo (see page 95 ”Images of War” Sherman Tank, by Gavin Birch). I have seen some other color photos of Sherman engines but I am suspicious regarding whether they are the same colors as the original August 9, 1944 photo I refer to above depicts or not. I would enjoy having CMK provide a state of the art engine which would fit perfectly with the rest of the resin set. Maybe they could make a few of the different engines that could go into the new DML Sherman’s – that would be great!
| COLORS & MARKINGS |
 Painting:
I used an old Monogram acrylic paint “off white” with some additional Gunze Sangyo and Tamiya paints for small details. For the Verlinden engine I used Testors steel enamel and Gunze acrylics.
Decals:
I used the Tamiya kit decals for the exterior and lament the lack of a big aftermarket in armor decals compared to what I am used to in aircraft modeling.
| FINAL CONSTRUCTION |
I spray
painted the larger assemblies based on components that build up in the
instruction booklet’s steps using the Monogram “off white”. Some detailing with
the other acrylic 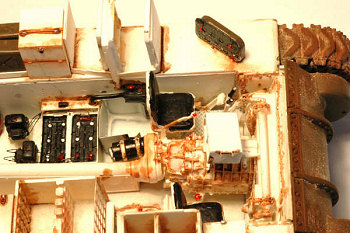 paints and light dry brushing with Testors chrome and steel
enamels was the main painting effort. I used some Windsor & Newton artist’s
oil’s for washes to extract highlights for some raised detail and that was it.
paints and light dry brushing with Testors chrome and steel
enamels was the main painting effort. I used some Windsor & Newton artist’s
oil’s for washes to extract highlights for some raised detail and that was it.
| CONCLUSIONS |
This was a fun build. At first the sheer number of parts and minute details stalled my effort. After looking at the superb details on the resin and excellent instructions, I realized the project would turn out fine if I dry fitted and took my time. I just wish CMK had a corresponding Sherman engine set for the Wright/Continental R795 radial engine. That would be a great addition to their awesome Sherman resin sets.
Part II
| KIT: | Verlinden M-4 Sherman Engine and Compartment |
| KIT #: | 1120 |
| PRICE: | $25.00 MSRP |
| DECALS: | None |
| REVIEWER: | Andrew Garcia |
| NOTES: | Resin |
I used the Verlinden resin accessory set to complete a recent CMK M4 Sherman resin interior build (see above) on a 1/35th scale Tamiya M4 Sherman. I realized having an engine added to that project would make the finished model look much better.
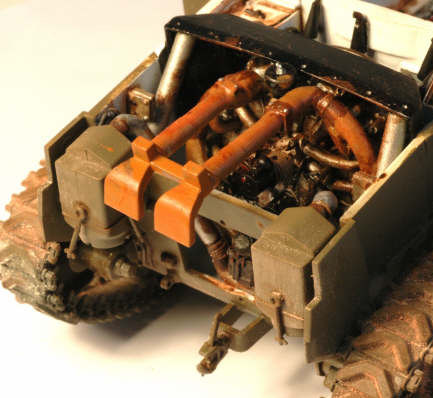
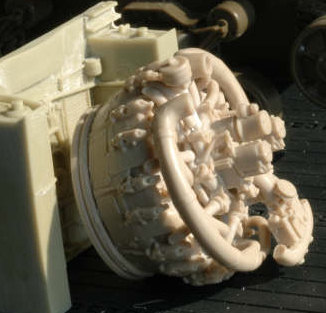 The
Verlinden M4 Sherman Engine & Compartment resin accessory set provides nicely
detailed and cast resin components that build up into a very nice looking
result.
The
Verlinden M4 Sherman Engine & Compartment resin accessory set provides nicely
detailed and cast resin components that build up into a very nice looking
result.
Like most other Verlinden sets, its only drawback is a small, barely usable instruction sheet. If you really know your subject or are on your 2nd or 3rd project using the same accessory set the instructions are not a problem. Otherwise, a fast assembly will get you into some trouble with misplaced parts or an assembly that is missing a part you cannot retrofit. This resin set provides nice detail for the interior engine area of the Sherman tank. The casting is flawless and the details well represented.
As a break from building 1/48th scale aircraft I chose to build the M4 Sherman in 1/35th scale by Tamiya (kit # 35190). It started out as an OOTB build effort until I discovered the CMK M4 Sherman resin detail sets. I installed the CMK M-4 Sherman Driver’s set #3026 and M-4 Sherman Interior set (# 3027). I did not like the empty box behind all that terrific CMK fighting compartment resin detail so the search for an engine led me to Verlinden’s offering.
The M-4 Sherman – engine set is composed of approximately 25 to 30 resin parts and no etched metal frets. The instructions are the weak link in an otherwise good resin set.
| CONSTRUCTION |
With
such a small parts count it is a quick build, The potential problems caused by
the weak instructions can happen despite a limited parts count. In step #2, the
engine mount is shown as a task. However, back in step #1 the engine appears
with the 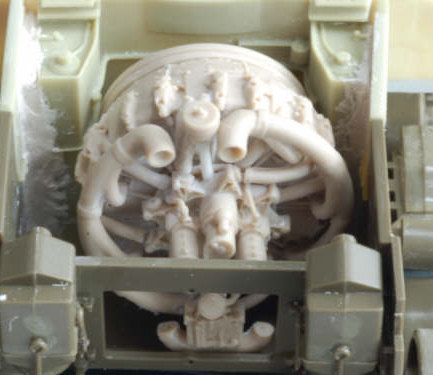 exhausts attached. If you install the exhausts before attaching the
engine mount you cannot add the engine mount to fit in step two.
exhausts attached. If you install the exhausts before attaching the
engine mount you cannot add the engine mount to fit in step two.
I also had a challenge fitting all the parts into the engine compartment. Some artistic license was employed to add parts for appearance sake foregoing total accuracy. So, for the Internet rivet counters – hold off on those emails bringing to my attention some misplaced part – I know it is in the wrong place. Go buy the kit and build it yourself. Then, take some pictures and help us all out please, by sending the final result in to Scott for publishing in M2. I am new to armor modeling so give me a break!
The Verlinden resin parts had minimal flash and careful separation from the carrier block(s) was the main effort. A bit of filing or wet and dry sanding while wearing a respirator was all that was required. Test fit the assembly to ensure the depth does not change the dimensions and the parts almost dropped into place! . I found an excellent photo of a Sherman tank recovery unit changing out an old engine for a new engine. Unfortunately it is in black and white – it would have been a spectacular color photo (see page 95 ”Images of War” Sherman Tank, by Gavin Birch). I have seen some other color photos of Sherman engines but I am suspicious regarding whether they are the same colors as appear in the original August 9, 1944 photo I refer to above.
| COLORS & MARKINGS |
Painting:
I used a sprayed on base coat of Testors steel enamel. This was followed by some Windsor & Newton artist’s oil’s (burnt umber) for washes to extract highlights for some raised detail. I use a bit of MIG rust weathering powder on the steel exhausts. Small detail painting was done using Gunze Sangyo and Tamiya acrylic paints.
 Decals:
I considered using the Archer transfers # 35209 for the engine compartment stencils as I did with the CMK interior but could not identify any stencils from reference sources so I used no decals or transfers with this part of the project.
| FINAL CONSTRUCTION |
The key here was dry fitting all the components and using small metal pins to join some of the parts with cyanoacrylate glue. I used some fast drying epoxy glue to fill some gaps in engine components like connecting areas between the exhaust and carburetor intake pipes.
It was a tight fit but I like the end result. It adds a lot to the rest of the CMK Sherman interior and driver’s compartment resin sets.
| CONCLUSIONS |
This was an easy build that adds a lot to the finished model. The base resin allows a superdetailer to launch from the kit provided components into a masterpiece if you so desire. There is sufficient detail in the Verlinden set but after working with Aires and CMK resin sets on 1/48th aircraft, I suspect a new release Sherman engine set from them or Quickboost would be an outstanding complement to the CMK interiors.
As I mentioned in the M-4 Sherman drivers set project, I just wish CMK had a corresponding Sherman engine set for the Wright/Continental R795 radial engine. That would be a great addition to their awesome Sherman resin sets.
One last thought. I would encourage someone, especially the OEM model manufacturers like DML and Tamiya, to issue a clear plastic hull and turret version. This would allow for a very interesting alternative model that would allow us to show off these great interior resin sets!
| REFERENCES |
“Inside the Great Tanks” by Hans Halberstadt, Windrow & Greene Publishing 1997
“Code Name Swallow” British Sherman Tanks at Alamein by Dennia Oliver, Mushroom Model Magazine Special No. 4102 2006
”Images of War” Sherman Tank, by Gavin Birch , Pen & Sword Books 2005
December, 2006
Review resin and decals courtesy of my growing armor stash.
If you would like your product reviewed fairly and fairly quickly, please contact the editor or see other details in the Note to Contributors.