Italeri 1/35 M4A3 Sherman (76mm)
| KIT #: | 6440 |
| PRICE: | $35.00 MSRP |
| DECALS: | Six options |
| REVIEWER: | Ryan Koschatzky |
| NOTES: | Reissue |
| HISTORY |
Taken from Scott's preview.
When most people think of US WWII armor, the name 'Sherman' comes to their mind.
And rightly so as it was the most produced tank in the US arsenal. Though
considered a medium tank, it saw action in every theater of war from the North
African desert to the islands of the Pacific. Even decades later, Sherman
derivatives were vital parts of the armies of many of the world's military
forces.
| THE KIT |
This particular kit is of the M4A3 version, which started rolling off the assembly lines in 1943. Earlier tanks were out-gunned by those of the Germans and though the actual protection provided the crew in this later variant wasn't increased that much, the 76mm gun was a very good one and was capable of defeating the heavy Tiger and Panther tanks in the proper circumstances.
| CONSTRUCTION |
 With armor kits I feel you get more choice in how and when you build a majority
of the items, so in turn I jumped around a lot building this kit. For the
purposes of this review I am going to lump everything into the four basic
categories of tank building.
With armor kits I feel you get more choice in how and when you build a majority
of the items, so in turn I jumped around a lot building this kit. For the
purposes of this review I am going to lump everything into the four basic
categories of tank building.
Turret: On top of the turret most pieces fell into place nicely. I spent a good
amount of time around the ammo door (83c). Lots of filler and sanding to blend
the corners in to make them look right. The bottom still could have used some
work. Once the top and bottom halves were glued together some sanding was done.
Care must be used when sanding so as not to round it off smooth but to still
have defined breaks in the shape. I glued part 75c to the turret first. I worked
the gun up through the turret underneath and glued it to the mantel (part 74c).
I left off parts 78c, 79c and 80c (guards around the breach block) because I had
closed up the turret, so no extra work because it won't be seen. One saved round
for the turret, as Mario in the design shop mis-measured the turret tabs.
The diameter for the turret ring is the same size as the turret tab, so bottom
line the turret doesn't lock into the hull. I glued the turret down at the very
end so it was not issue for me, but if you don't the turret will fall off and
break the radio antenna (90c). I found out the hard way when my tank lost
communications with HQ.
Lower Hull: I worked from the rear to the front.
Nothing special to note on this portion all parts fell into the correct
positions with a little sanding on the sides of the front transmission cover
(41a). I also roughed up the transmission cover with filler and a spare
toothbrush (warning: do not use your regular toothbrush) to give the cast
impression. Glue can also be used to achieve this. I
 have put my experiences
assembling the bogies in the track section.
have put my experiences
assembling the bogies in the track section.
Upper Hull: I left part 42a off to the very end, as I was never happy with the
angle and fit to make it look right. When studying the instruction sheet I
noticed that the upper hull looks very different than the kit I am building. The
rear deck shows five access caps and three gas caps that are not on the kit. My
rear deck has three gas caps molded in to it and the instructions show a fourth
to be added as part 76c, but part 76c is the lower gun barrel and breach block
on my kit. I left off the fourth gas tank off my kit.
I decided that I want to the travel lock in the travel/up position, just because
you never see it done that way. My version of Burger King, I get to have it my
way. This freedom caused me some work. The kit layout for the travel lock has
the base of the travel lock at the base of the machine gun mount. This is
incorrect, as the base of the travel lock should be at the top of the machine
gun mount (39a). After I glued the base pieces (48a), I checked the position of
the travel lock (55a) so that it angled back to met the step in the barrel as I
feel this is where it should met. If you don't want the travel lock up, you can
leave the travel lock base as is or move it up to the machine gun mount and trim
the travel lock legs (55a), otherwise it won't look right with the travel lock
sitting too high on the upper hull. I glued part e48a in the up position and not
the out position.
To assemble the rear storage bucket, I glued 71a to the hull first then attached
72a and lastly 73a. I attached the taillights. I glued the rectangle piece on
the bottom. This is what modern armor guys call the cat eyes. I had to do this
twice on one side, as I screwed it up. I lost part 57a, which I believe is the
horn. I replace it with a Tamiya piece, which looks a lot different and more
like a horn.
 Track: I painted the track with rattle can flat black, and then used a silver
pencil to highlight the raised pad portion, along with the edges of the track
teeth. I used Mig pigments to weather up the track. The silver raised portion
came out well, but the teeth work was lost. Before I go into the bogie assembly,
a couple of parting notes. The drive sprocket part (13a/b) is for early war
Shermans, while (15a/b) is for late war Shermans. I used both as toward the end
of the war we mixed and matched parts. On the road wheel (4c), if you want new
road wheels then you should leave the mold line showing. Just like a tire, it
will wear off. Also the two dimples on the road wheel is correct. The return
wheel (5b) has no rubber on it and I painted it overall Olive Drab. One thing I
did forget but would add to the bogies is on the bottom of part 8b/9b (1b/7b):
add 3 bolts.
Track: I painted the track with rattle can flat black, and then used a silver
pencil to highlight the raised pad portion, along with the edges of the track
teeth. I used Mig pigments to weather up the track. The silver raised portion
came out well, but the teeth work was lost. Before I go into the bogie assembly,
a couple of parting notes. The drive sprocket part (13a/b) is for early war
Shermans, while (15a/b) is for late war Shermans. I used both as toward the end
of the war we mixed and matched parts. On the road wheel (4c), if you want new
road wheels then you should leave the mold line showing. Just like a tire, it
will wear off. Also the two dimples on the road wheel is correct. The return
wheel (5b) has no rubber on it and I painted it overall Olive Drab. One thing I
did forget but would add to the bogies is on the bottom of part 8b/9b (1b/7b):
add 3 bolts.
For the bogies I glued 8b and 9b together with 3b and 5b added. 2b and 6b was
also added but were glued together. I sanded the front of the boogies to fix the
seams and sanded the top to level it out. There is a void left on the back on
the bogies, after the first round in the paint shop, I used CA
glue to cover it as that was the only thing I could get to reach into that spot.
Another round in the paint helped to cover it up but it still is an issue.
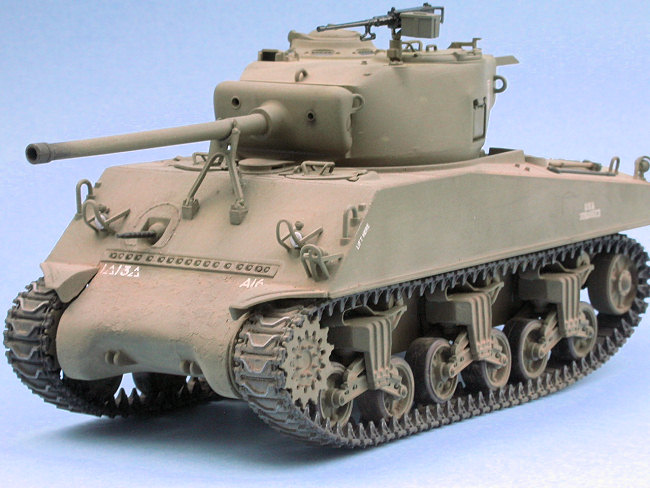
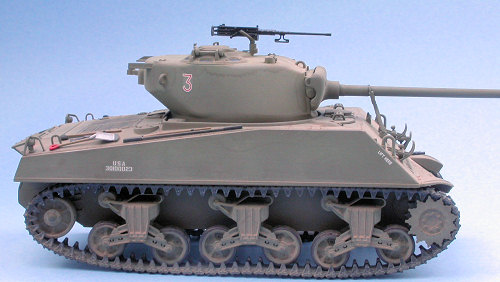
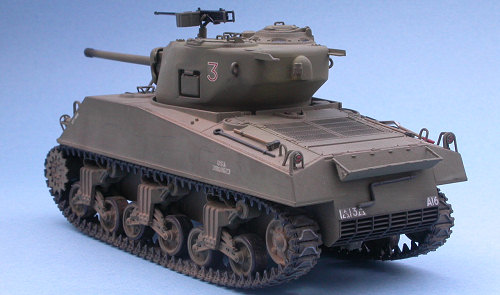
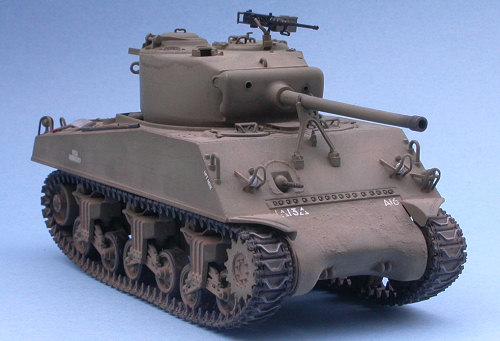
| COLORS & MARKINGS |
I used Olive Drab (FS 34087) enamel rattle can for the base scheme. Polly Scale
NATO Black was used for all black parts and Polly Scale red for the reflectors.
Polly Scale gun metal was used on the machine guns. I added the kit decals fo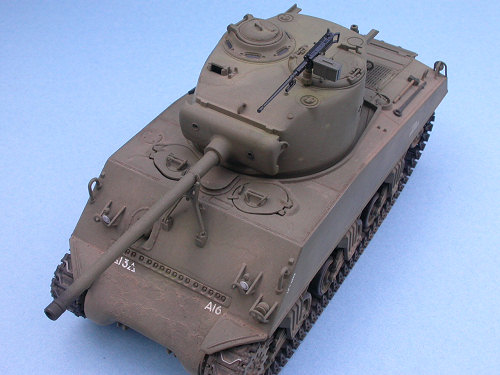 r
the 1st Armored Division, 13th Tank Bn set around Italy April 1945. I used
Archer dry transfers for the "Lift here" stencils. I painted the periscopes on
the tank
r
the 1st Armored Division, 13th Tank Bn set around Italy April 1945. I used
Archer dry transfers for the "Lift here" stencils. I painted the periscopes on
the tank
commanders cupola flat back than used blue food coloring mixed with future to
give a glass finish. I applied an overall wash of burnt oil and thinner and then
weathered using different colors of Mig pigments. I trimmed, painted and
attached the tools and .50 cal machine gun. For some of the final marks on the
hull and turret, I used a #2 pencil by striking it a few times at different
angles against the model to show some more wear and tear.
| CONCLUSIONS |
I enjoyed building the kit despite some of the minor issues and the time it took
me. When all is said and done it looks like a Sherman. As for the type and
accuracy, I will leave that to others. I would recommend this kit to anyone who
has built a kit or two.
I would to thank Scott for the kit and Lee Kolosna for the pictures. Also Norm
Samuelson. for letting me bend his ear about the Sherman and the guys at
the club - Tracy, Spanky and others for helping me with weathering and asking
the same questions over and over again.
| REFERENCES |
Osprey Modelling Manuals No.14, M4 Sherman.
December 2006
Copyright ModelingMadness.com
If you would like your product reviewed fairly and fairly quickly, please contact the editor or see other details in the Note to Contributors.