| KIT #: | 35323 |
| PRICE: | $71.00 SRP |
| DECALS: | Three options |
| REVIEWER: | Dan Lee |
| NOTES: |
| HISTORY |
In 1953, an Israeli delegation visited France to examine the new AMX 13 light tank. The tank was armed with the high-velocity 75 mm gun CN 75-50. While the gun was satisfactory, the armor of the French tank was considered too light. Eventually, Israel did purchase the AMX 13, however in a parallel development it was decided to graft the powerful French gun onto the available, familiar and better-armored hull of the American M4 Sherman, the standard tank of the IDF armored units in the early 1950s.
The project started in 1954, and in 1955 a prototype turret was sent from France to Israel. In March 1956 Israeli Ordnance Corps facilities started to convert tanks, using guns received from France. The gun was known in Israel as the M-50 and as a result the upgunned Sherman was designated Sherman M-50. The M-50 was similar to the Sherman Firefly in that it had the original turret of the smaller type (as used by the 75 mm gun M3 armed Shermans), which was fitted with a large counterweight at the rear end.
The first 50 units were based on M4A4 hulls, had a
Continental R-975 gasoline engine and VVSS suspension. However, the increased
weight of the vehicle combined with na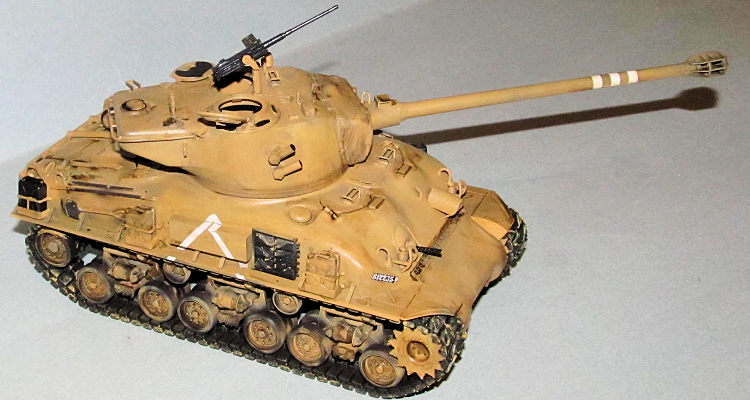 rrow tracks led to poor off-road mobility.
It was also putting too much strain on the engine, resulting in frequent
mechanical failures. Consequently, for the rest of the conversions, hulls fitted
with HVSS suspension and Cummins V-8 460 horsepower (340 kW) diesel engine were
adopted. These subvariants were sometimes referred to as the M-50 Continental
and M-50 Cummins. Diesel engines were also preferred since diesel fuel is less
flammable than gasoline, which factors into battlefield survivability. In total,
about 300 M-50s were built by 1964 (though it's possible that this number
includes 120 155 mm self-propelled guns on Sherman chassis, also designated
M-50).
rrow tracks led to poor off-road mobility.
It was also putting too much strain on the engine, resulting in frequent
mechanical failures. Consequently, for the rest of the conversions, hulls fitted
with HVSS suspension and Cummins V-8 460 horsepower (340 kW) diesel engine were
adopted. These subvariants were sometimes referred to as the M-50 Continental
and M-50 Cummins. Diesel engines were also preferred since diesel fuel is less
flammable than gasoline, which factors into battlefield survivability. In total,
about 300 M-50s were built by 1964 (though it's possible that this number
includes 120 155 mm self-propelled guns on Sherman chassis, also designated
M-50).
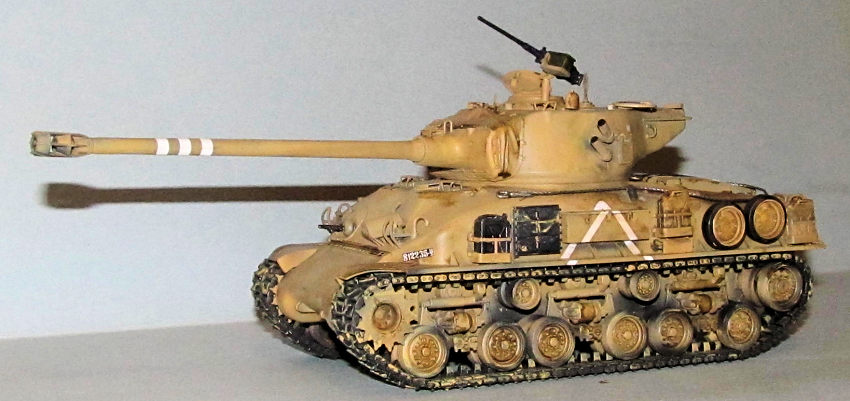
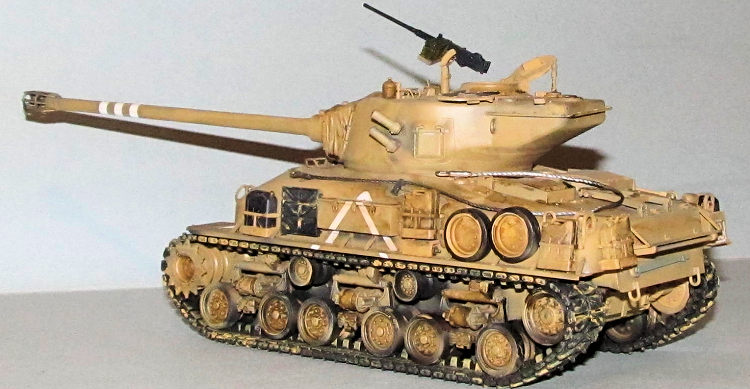
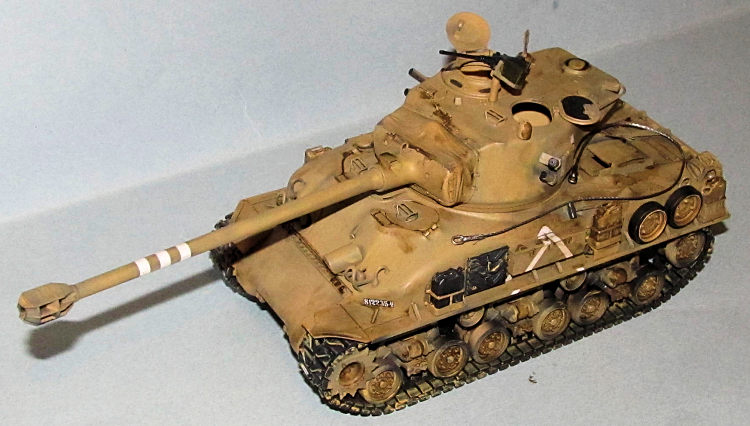
In the 1960s, 180 Sherman tanks received the even more powerful French 105 mm Modèle F1 gun. The barrel length of the gun was reduced from 56 caliber to 44 and equipped with a muzzle brake; ammunition was altered to use a smaller cartridge. In Israel the gun was designated M-51 and the tank the Sherman M-51. M4A1 hulls and the larger T23 turrets (from 76 mm armed Shermans) were used for the conversion. All tanks were fitted with Cummins diesel engines and HVSS suspension. The tank was displayed to the public for the first time during the Independence Day ceremony in 1965.
Abroad the M-50 was known as Super Sherman (the "Continental" variant as Mark I and the "Cummins" variant as Mark II) and the M-51 as either Super Sherman or Isherman (i.e. Israeli Sherman). These designations were never used in Israel. The only tank model designated Super Sherman by the IDF was M4A1 with 76 mm M1 gun and HVSS suspension, which was named Super Sherman M-1.
| THE KIT |
The parts are well done and reasonably detailed.
There was no flash but the mold markings were prominent on the road wheels which
require some sanding to make them smooth while the cannon and turret assembly
will have some seams to fill and sand. The top hull is one piece with fine
detail and weld seams on the surface while the bottom hull is a multi-piece
affair. Finally, it comes with an M2 .50 caliber machine gun and two figures but
have the wrong helmets as they happen to be wearing WW2
 US style tanker helmets
and not 1960s/70s Israeli helmets based on photos from the 1967 and Yom Kippur
war I have found on the internet.
US style tanker helmets
and not 1960s/70s Israeli helmets based on photos from the 1967 and Yom Kippur
war I have found on the internet.
The two tracks are one piece flexible plastic tracks that only require gluing and no hot screwdrivers required unlike Tamiya's older one piece rubber tracks.
The decals come on one tiny sheet and are for three tanks (two from the 1967 war and one from the Yom Kippur war.) The white is pure white and seem to be thinner than their older decals. However, these decals will probably need a powerful decal solution like Solvaset which has been my experience with Japanese decals in general.
As for accuracy, I am not an Israeli Sherman, Sherman or even tank expert so I am probably the wrong guy to quibble about fine details. It looks like a Sherman.
| CONSTRUCTION |
I began by assembling the cannon barrel and the muzzle brake. The cannon barrel was tossed back into the box for about a month (usually two weeks) to give the glue to cure and eliminate any issues with phantom seams. Next I assembled the turret top and bottom halves which also went back in the box for the same reason, but left off most of the tiny parts till later.
The rollers and suspension were assembled easily.
Tamiya does not allow for a working suspension b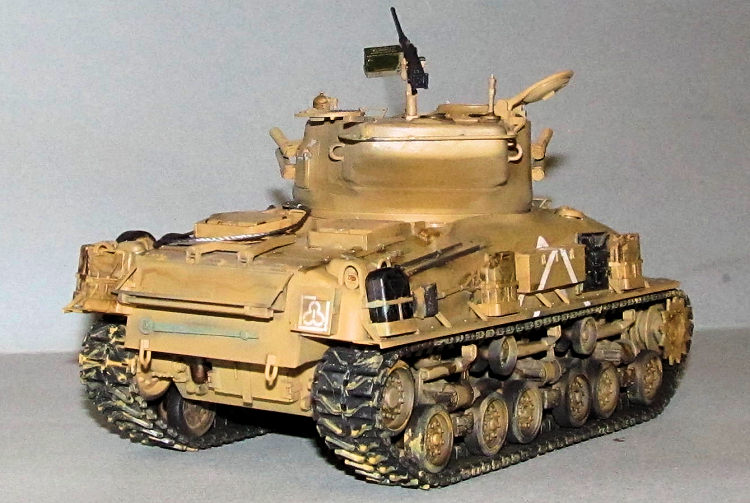 ut it also makes things easier
to build. I cleaned up the road wheels but did not assemble them till after
painting them.
ut it also makes things easier
to build. I cleaned up the road wheels but did not assemble them till after
painting them.
Only major seams to be dealt with were the turret and the cannon barrel. I used CA glue to fill the cannon barrel's extra long top and bottom seam and then when dry, I sanded it smooth. The turret seam I filled in with Vallejo plastic putty and then sanded a little and left that area rough as per real life as that seam was visible on real tanks. The flashed out holes in the hull were drilled out as per instructions.
I started adding all the small bits to the surface of the model's three sub assemblies (the turret, the hull and bottom of the hull.) Various grips, anchors, tools and other bits were added. This was a fairly straight forward process but as per usual for me kind of frustrating as small parts had a tendency to fly out of my fingers and/or tweezers.
| COLORS & MARKINGS |
 The three sub assemblies of the ISherman were
painted flat black and gunmetal (mostly the tracks) as I often spray whatever
leftover dark paint originally for other models to preshade my models. The model
sat for a couple of months as I didn't have time to do much except work on
cleaning up/fixing my home or work overtime. When I had the chance to build
again, I sprayed on several light coats of Tamiya Desert Yellow XF-59 (not
accurate as the Israelis used Sinai Grey but I didn't have any available so I
used what I had) to give the tank a blotchy used look, but not bone yard worn
out as I prefer my armor models to look combat used.
The three sub assemblies of the ISherman were
painted flat black and gunmetal (mostly the tracks) as I often spray whatever
leftover dark paint originally for other models to preshade my models. The model
sat for a couple of months as I didn't have time to do much except work on
cleaning up/fixing my home or work overtime. When I had the chance to build
again, I sprayed on several light coats of Tamiya Desert Yellow XF-59 (not
accurate as the Israelis used Sinai Grey but I didn't have any available so I
used what I had) to give the tank a blotchy used look, but not bone yard worn
out as I prefer my armor models to look combat used.
I hand painted the road wheels black, assembled the bogies and then glued them on the hull. When the glue was cured I added the tracks and glued the track ends together (very simplified detail, but the flexible one piece track is so much easier to use than multi-piece tracks.)
A month or so later, I sprayed on a gloss coat for the decals.
I selected the third decal option for this tank, a tank from the 1973 Yom Kippur War and the unit the tank belonged to is unknown. The kit decals are modern Tamiya. A touch thick, but not as thick as their older decals. These went on well without trouble using Micro Sol and Set decal solutions and where necessary, Solvaset.
I tried to keep the tank looking rough, but not
junk yard rough. I started off with dry brushing Vallejo Yellow Ochre on the
forward portions of the tank (I alternated between an old brush and Q-tips) and
all over the tracks to approximate sand/dirt. I followed up with using white and
blue dot filters on the tank hull/turret. The Dot filter technique for those who
don't know is usually done with randomly placed c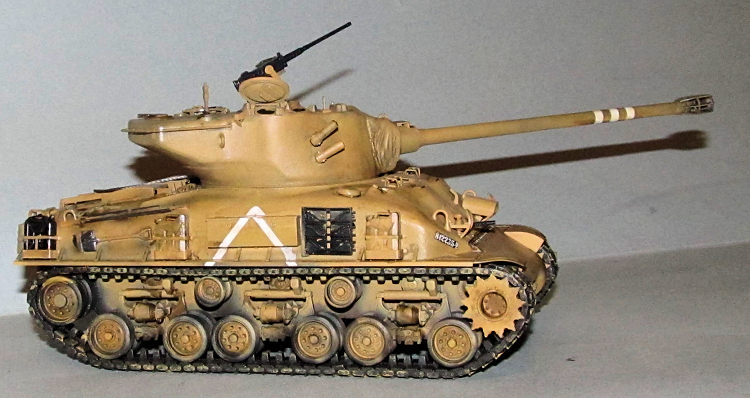 olor dots of various colors of
oil paint that are streaked using thinner to weather paint and make it “more
realistic.” I prefer using water colors and water instead of oil paint and turpenoid because it is less toxic. It means I have to be more careful as water
color washes off easily but it is very forgiving. Finally, I used a dark brown
water color wash to bring out the details.
olor dots of various colors of
oil paint that are streaked using thinner to weather paint and make it “more
realistic.” I prefer using water colors and water instead of oil paint and turpenoid because it is less toxic. It means I have to be more careful as water
color washes off easily but it is very forgiving. Finally, I used a dark brown
water color wash to bring out the details.
It was all sealed in with two thin coats of Tamiya premixed Flat coat.
The M2 machine gun was sanded smooth and painted gunmetal. I hand painted the olive drab ammo box and the ammo box tray Desert Yellow. It was attached without glue.
I cut the length of string for the tow cable and glued the two ends on with CA glue. Both the exhaust and tow cable were sprayed metallic grey and weathered before being added to the Isherman.
Finally, I left the assembled figures off and may paint/add them at a later date.
| CONCLUSIONS |
This was not the weekend build I envisioned it would have been as it took longer than I hoped (five months at the time of writing this review!) Still though it is a fairly straight forward and well detailed kit of a WW2 tank whose service life and effectiveness was extended against more modern tanks due to the ingenuity and skill of the Israeli Armor Corps.
I feel that this Tamiya kit can be built by any skill of modeler, but requires some care and patience for beginner ones. It looks good without any aftermarket details, but probably spectacular with additional details.
| REFERENCES |
29 May
2017 If you would like your product reviewed fairly and
fairly quickly, please
contact
the editor or see other details in the
Note to
Contributors. Back to the Main Page
Back to the Review
Index Page
Back to the Previews Index Page