| HISTORY |
Tamiya 1/48 M4 Sherman (early)
| KIT #: | 32505 |
| PRICE: | $26.00 MSRP |
| DECALS: | Three options |
| REVIEWER: | Bill Michaels |
| NOTES: | Cast metal hull |
| HISTORY |
The evolution of the M4 Sherman family of tanks is a long story, starting with the M4 and M4A1 tanks, up through the M4A6 model. During the evolution of the design, there were a number of significant changes— hull shape, suspension, powerplant, turret, and main gun were the big ones, but thousands of little changes were made as well. Over 55,000 tanks were eventually built.
 Entire books have been
written about the Sherman history, so I’ll only go with the barest of highlights
here. The M4 was originally designed to replace the (stopgap) M3 medium tank,
as a medium tank armed with a 75mm gun in a turret, and using many of the
components of the M3 to speed production. Two versions of the tank went into
production at the end of 1941. The M4 was a tank with a welded hull,
characterized by the sharp cornered hull shape, while the M4A1 featured a cast
hull with a more rounded shape. The reason for the two styles was that, in
order to meet production targets, factories without the ability to handle hull
castings were used. These firms could not produce the large armor castings
needed for the M4A1 hull, but they were able to produce the welded M4 hull. (In
the end, the welded hull variants out-numbered the cast hull versions.)
Entire books have been
written about the Sherman history, so I’ll only go with the barest of highlights
here. The M4 was originally designed to replace the (stopgap) M3 medium tank,
as a medium tank armed with a 75mm gun in a turret, and using many of the
components of the M3 to speed production. Two versions of the tank went into
production at the end of 1941. The M4 was a tank with a welded hull,
characterized by the sharp cornered hull shape, while the M4A1 featured a cast
hull with a more rounded shape. The reason for the two styles was that, in
order to meet production targets, factories without the ability to handle hull
castings were used. These firms could not produce the large armor castings
needed for the M4A1 hull, but they were able to produce the welded M4 hull. (In
the end, the welded hull variants out-numbered the cast hull versions.)
When the tank first entered combat in North Africa in 1942, it was quite successful, but combat experience showed a number of changes were needed. Some of the changes involved improving protection, as the tank’s armor was insufficient to stand up to the larger German guns. Additional armor was added at the depot level, by welding additional armor over vulnerable areas, such as the ammo storage bins. This armor was called “applique armor”. Additional soft armor was added by crews in the field. This took the form of sandbags, logs, tracks, and other similar materials. This type of add-on protection didn’t really help against anti-tank cannon fire, but was effective against Panzerfaust (Germany’s version of the bazooka) rocket propelled HE rounds.
| THE KIT |
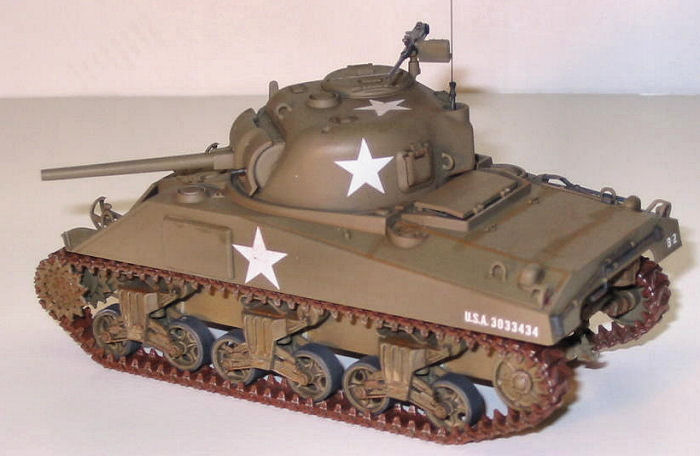
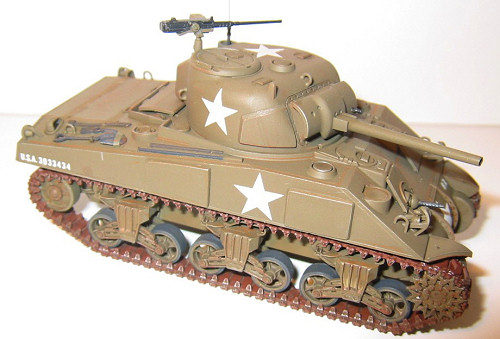
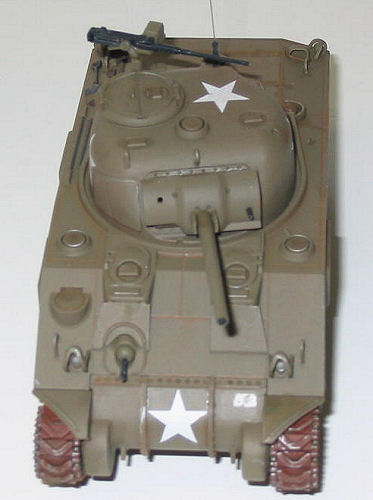
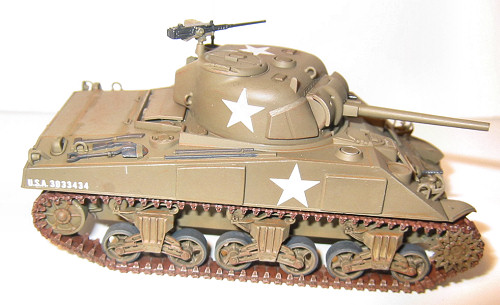
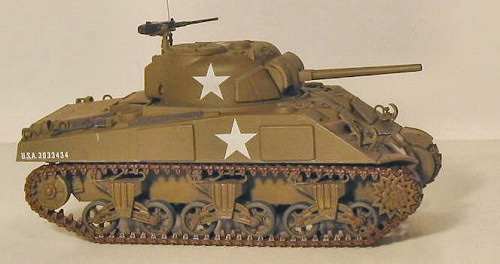
The subject of this kit is a 1943 Production, 75mm M4 tank. This tank has a welded hull, but still has the early-style three-piece, bolted transmission cover. The tank carried the standard 75mm gum, but with the later full-width mantlet. Two of the three vehicles on the decal sheet carried appliqué armor.
 THE
This is my first Tamiya 1/48 scale armor kit. I had heard
good things about these new kits, and this one certainly lived up to
expectations. The kit features the diecast metal lower hull found on all the
armor kits so far in this series.
THE
This is my first Tamiya 1/48 scale armor kit. I had heard
good things about these new kits, and this one certainly lived up to
expectations. The kit features the diecast metal lower hull found on all the
armor kits so far in this series.
The rest of the kit is molded in olive drab plastic. The molding of the parts is generally good, with no flash. The upper hull has nice weld bead detail, with a subtle surface texture. Many of the smaller parts do have small mold lines on them, though— for example, the road wheels all have a circumferential ridge that will need to be sanded away.
The tracks are link and length style, which I like a lot. A nice touch on this kit is the fact that the last link in the long runs is not flat like the rest of the links, but actually angled upward. This is a clever touch, as it makes it easier to join two runs of track when they are joined at the spot where they go around a roadwheel. The tracks are well detailed, on both the inner and outer surfaces. The tracks do have some big ejector pin marks on them, but the marks fall in places where they are hidden by roadwheels, so you won’t have to fill them.
A thorough instruction sheet and a nice decal sheet complete the package. Color information is given in standard Tamiya format, using Tamiya and Gunze colors.
| CONSTRUCTION |
Hull Construction
No real surprises or difficulties were encountered. I used medium-viscosity super glue to attach the plastic parts to the metal lower hull. In general, the hull parts all fit together very well. A couple of annoyances— all of the roadwheels and the return idler wheel have a prominent mold seam down the center. Also, the front transmission cover has a gap on the side where it meets the lower hull. (I filled mine with a bit of superglue.)
Tracks and Running Gear
The road wheels are well molded, with nice spoke detail. When assembling the roadwheels, you need to pay close attention to the instructions— the wheels are not the same front and back, and should be installed with the correct side facing out. Also, you need to be sure that you make three bogey assemblies for the right side, and three for the left.
For me, the hardest part of starting a tank is deciding how I’m going to paint the suspension parts. Like many tanks, the Sherman has rubber tires on the roadwheels. Should I paint everything before assembly? Or assemble everything except the tracks, airbrush the base color, and try to paint the tires with the wheels in place? Does the fact that the hull is metal factor in?
 After thinking about it,
I came up with a plan. First, I glued the front and rear parts to the metal
hull. I then airbrushed the hull with PollyScale olive drab, and also did the
wheels and other suspension parts while they were still on the sprue. After it
dried, I removed the parts from the sprue, and got rid of the mold lines on the
roadwheels. I then brush painted the tires using PollyScale scale black. When
that dried, I assembled the suspension parts, cleaned up the sprue nubs, and
touched up the paint where necessary with a brush. I then glued the suspension
parts to the hull with super glue. Everything fit together well, and some of the
parts are keyed so that they’ll only go together one way.
After thinking about it,
I came up with a plan. First, I glued the front and rear parts to the metal
hull. I then airbrushed the hull with PollyScale olive drab, and also did the
wheels and other suspension parts while they were still on the sprue. After it
dried, I removed the parts from the sprue, and got rid of the mold lines on the
roadwheels. I then brush painted the tires using PollyScale scale black. When
that dried, I assembled the suspension parts, cleaned up the sprue nubs, and
touched up the paint where necessary with a brush. I then glued the suspension
parts to the hull with super glue. Everything fit together well, and some of the
parts are keyed so that they’ll only go together one way.
The tracks are injected molded plastic, link and length style. (Personally, this is my favorite style for small scale armor.) The long runs are molded as single pieces, while individual links are provided to go around the drive sprocket and return wheels. The sections of the track are all well molded, and fit together really well. The track pieces all had a few ejector pin marks on the interior surface. Filling these with obscuring the detail would be a challenge, but fortunately it is not a problem. After the tracks are assembled, the road wheels hide the sink marks completely, so there’s no need to worry about filling them.
The first thing I do is to paint the tracks while they are still on the sprue. I airbrushed them with ModelMaster acrylic rust color. After they dried, I highlighted some wear points on the guide teeth using my silver artist’s pencil—it is a lot easier to do that before the tracks are installed. Airbrushing the tracks before assembly ensures that I won’t have unpainted spots later, in the hard to reach areas.
I always start with the front sprocket- it is the spot where the fit of the tracks is the most visible. The instructions are very good here – they explicitly tell you how many single links to use, and they also give an installation order for the rest of the pieces. (Every other “link and length” kit I’ve built has left it to the builder to figure out where to start and what order to follow when installing the tracks.)
The installation of the tracks is an area where the kit really shines. Tamiya used very clever engineering to make it easy to get the tracks installed correctly. The long run on the top is keyed so that it fits in exactly one place. The individual links are glued to the sprocket, and then the front sprocket is mounted using a vinyl cap, so it is a press fit without glue. This allows you to adjust the fit of the sprocket and links to the long track. All the remaining pieces are attached to these pieces, so everything ends up in just the right spot. This was definitely the easiest link and length track install I’ve ever done!
 The rest of the hull of
the tank went together well, with good fit all over. Two of the tools are molded
separately, so I did not attach them to the tank until after everything was
painted. The upper hull is attached to the lower hull by two screws. The seam
falls on a natural seam at the top of the transmission cover, and the fit is
perfect, so you can’t even tell that there is an unglued joint.
The rest of the hull of
the tank went together well, with good fit all over. Two of the tools are molded
separately, so I did not attach them to the tank until after everything was
painted. The upper hull is attached to the lower hull by two screws. The seam
falls on a natural seam at the top of the transmission cover, and the fit is
perfect, so you can’t even tell that there is an unglued joint.
The only complaint I’ve seen about this kit is the fact that the hull has open sponsons- that is, the part of the hull over the tracks is open. (This is similar to many of Tamiya’s 1/35 scale Sherman kits.) Of course, it is only noticeable if you turn the model over, and can be easily fixed with thin pieces of sheet plastic. As I was building mine OOB, I didn’t bother to do anything about it…..
Turret Assembly
The basic parts of the turret went together well—fit was very good, with no filler needed. The hatches on both the hull and the turret can be posed open or closed, but there is no interior detail at all, so you’ll probably want to glue them in the closed position unless you’re planning on scratchbuilding at least a partial interior.
The gun mantlet uses vinyl bushings, which means you can elevate the gun as desired, and the gun will stay where it is put. The gun itself is molded in two pieces- the main barrel and a separate end piece. The end piece is meant to provide for the fact that there is a slight flare at the end of the barrel. Filling this seam was a bit of a pain—I wished they had just molded the barrel in one piece without the flare at the end- it is too fine to be bothered with, IMO.
The turret-top .50 caliber machine gun is nicely molded. It includes nice mount detail, and a separate (closed) ammo box. I painted the gun with “gunmetal” color, and then highlighted the edges with my silver artist’s pencil. The mount and ammo box were painted olive drab.
| COLORS & MARKINGS |
The kit includes decals to do one of three tanks:
 1.
France, summer 1944, unknown unit. Tank has
appliqué armor and is finished in overall olive drab.
1.
France, summer 1944, unknown unit. Tank has
appliqué armor and is finished in overall olive drab.
2. H Company, 66th Armored Regiment, 2nd Armored Division, Normandy, August 1944. Tank has appliqué armor, and is camouflaged in olive drab with broad bands of red-brown.
3. C Company, 756th Tank Battalion, 5th Army, Italy, February 1944. Tank does not have appliqué armor, and is camouflaged in olive drab and sand.
I chose the first option, for a good reason—I wanted to do a tank with appliqué armor, and I didn’t have any red-brown paint in the stash.
Once the model was complete, I started by airbrushing the upper hull and turret with olive drab. I then screwed the upper and lower hulls together. I then brush painted the molded-on tools, and then glued the other tools in place. The model was now ready for the decals.
To prepare for the decals, I brushed a coat of future in the places the decals would be going. I let that dry overnight, and then applied the decals. The decals were fairly thin (thinner than in many of their aircraft kits) and went down very well, with just water as the setting solution. The decals all settled down well, only one needed a little help with some Micro-Set. After the decals had cured overnight, I brushed on a topcoat of future to help seal the edges. I then finished the painting with a coat of Pollyscale flat clear.
Weathering:
 Most of the tanks used
in Normandy in the months after D-day would not be heavily weathered. A lot of
tanks were new going into the battle, and many were knocked out before they had
more than a couple of hundred miles on them. So, with that in mind, I did not
go overboard when weathering my model. (I also think this model may someday be
used as cargo on a 1/48 scale Radio Control Landing craft project, and a
mud-caked tank would look out of place on the boat.)
Most of the tanks used
in Normandy in the months after D-day would not be heavily weathered. A lot of
tanks were new going into the battle, and many were knocked out before they had
more than a couple of hundred miles on them. So, with that in mind, I did not
go overboard when weathering my model. (I also think this model may someday be
used as cargo on a 1/48 scale Radio Control Landing craft project, and a
mud-caked tank would look out of place on the boat.)
So, the first step was to apply a dark wash to the model. I used a light touch on the upper hull and turret, but used more on the tracks- I wanted them darker, especially in the crevices. After that had cured, I used my silver artist’s pencil to give that slight metallic sheen along the edges and corners of the hull and turret.
I find that I use my silver artist’s pencil almost exclusively now, instead of drybrushing with silver paint. I find I get better control with the pencil, and it seems to work well over the PollyScale acrylic paint. I also used my rust pencils--two shades of orange/red-brown. I used them to add subtle streaks of rust along the edges of the fenders and on the running gear.
To further weather the tracks, I hit them pretty heavily with my “rust” pencils. I ended up with a blending of three different rust hues, which was the effect I was after. The tracks were them finished off with a light highlighting in silver- tracks in use have wear points of bare metal where the rust gets worn off.
| FINAL CONSTRUCTION |
There wasn’t much left to do at this point. I glued the turret machine gun in place. I drilled out the end of the antenna mount, and used super glue to attach a radio antenna made from a short piece of .005 steel wire.
| CONCLUSIONS |
Highly Recommended. These Tamiya small armor kits are nice models - a very enjoyable build. On the positive side, fit was very good, I only used a dab of putty on the gun barrel. The fit of the link and length tracks was very good, too. Detail is generally very good, and the finished model sure looks like the pictures and drawings in the “In Action” book.
 On the down side, the kit
has open sponsons, and is a bit on the expensive side. (The only real knocks
I’ve seen on this series of 1/48 armor models.) You could buy two and a half
1/72 scale armor kits for the price of one of these.
On the down side, the kit
has open sponsons, and is a bit on the expensive side. (The only real knocks
I’ve seen on this series of 1/48 armor models.) You could buy two and a half
1/72 scale armor kits for the price of one of these.
Overall, though, I’m very happy with the kit. I enjoyed the build so much that I went out and bought another kit from the series before I had even finished this one— Tamiya’s new M-10 Tank Destroyer. That one shares the M4’s lower hull, and the upper hull looks even nicer than the Sherman!
The selection of 1/48 scale armor kits is really growing. Tamiya has released both soft-skins and AFVs in this scale, and a later version Sherman is on the way. Tamiya also has accessory sets and a nice US infantry set that also includes two tank crewmen. I built mine out of the box, but I found there are already aftermarket parts available. For example, the firm Lion Roar has a nice metal barrel and small PE detail fret for this kit for about $7, if you’re looking for an inexpensive upgrade.
Review kit courtesy of a Christmas present from my dear wife. (Thanks again, dear!)
February 2006
| REFERENCES |
M4 Sherman in Action, Squadron/Signal Publications.
If you would like your product reviewed fairly and fairly quickly, please contact the editor or see other details in the Note to Contributors.