| KIT #: | 35326 |
| PRICE: | $17.50 (used) |
| DECALS: | Two options |
| REVIEWER: | Robert Myers |
| NOTES: |
This kit was purchased partly built from an on-line dealer. I am
building it as a hybrid TUSK I. It is not totally accurate for a
specific tank, rather the era of early modifications. |
| HISTORY |
The M1A2 Abrams is a turbine powered American
third-generation main battle tank produced by the United States. It is named
after General Creighton Abrams.
The extra nomenclature in the name
breaks down to SEP (System Enhancement Program) and
TUSK II (Tank Urban Survivability Kit version 2).
 The
SEP upgraded third-generation depleted uranium armor components with
graphite coating as well as improvements to the digitized M1A2 platform such
as a new command and control system, second-generation FLIR thermal sights
that include a Commander's Independent Thermal Viewer for "hunter-killer"
operation, the Under Armor Auxiliary Power Unit
that lets crews run key electronics without running
the engine, a Thermal Management System (air conditioning for crew and
electronics) and enhanced electronics/displays.
The
SEP upgraded third-generation depleted uranium armor components with
graphite coating as well as improvements to the digitized M1A2 platform such
as a new command and control system, second-generation FLIR thermal sights
that include a Commander's Independent Thermal Viewer for "hunter-killer"
operation, the Under Armor Auxiliary Power Unit
that lets crews run key electronics without running
the engine, a Thermal Management System (air conditioning for crew and
electronics) and enhanced electronics/displays.
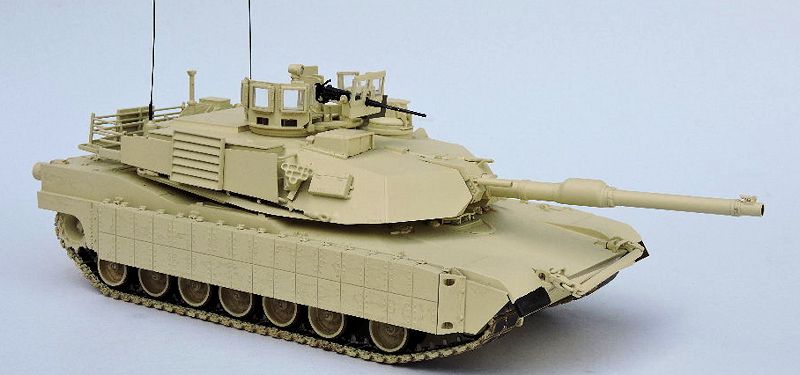
The TUSK is a series of improvements to the M1
Abrams intended to improve fighting ability in urban environments. Armor
upgrades include reactive armor on the sides of the tank and turret; along
with transparent armor gun shields. The TUSK system is a field-installable
kit that allows tanks to be upgraded without needing to be recalled to a
maintenance depot. Not all tanks got a full TUSK I or II package at first.
The packages were installed in order to enhance the "fleet survivability"
with early available kits being parceled out to more than one vehicle; as
necessary until more kits were received.
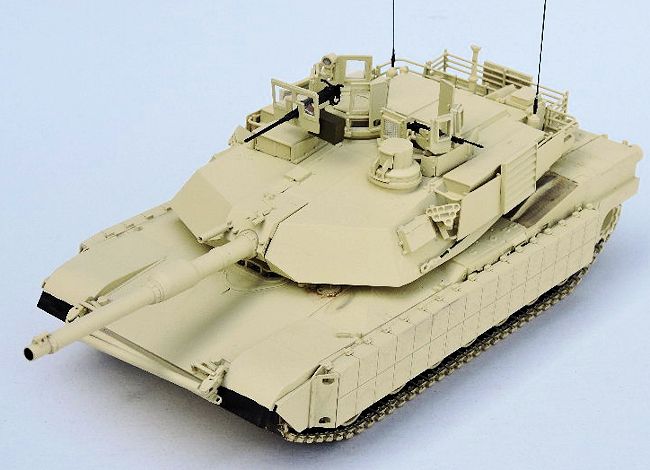
| THE KIT |
 This
is a newer version of the M1xx Abrams series of tanks (marked 2012), by
Tamiya. I like Tamiya because the parts count is reasonable and the tracks
are Tamiya's standard rubber band tracks. The 16 page instruction booklet is
straight forward with no major errors that I caught. Be sure you look at it
and decide which one of the three tanks you want to build because there are
holes that need to be opened to install the TUSK I or II accessories.
This
is a newer version of the M1xx Abrams series of tanks (marked 2012), by
Tamiya. I like Tamiya because the parts count is reasonable and the tracks
are Tamiya's standard rubber band tracks. The 16 page instruction booklet is
straight forward with no major errors that I caught. Be sure you look at it
and decide which one of the three tanks you want to build because there are
holes that need to be opened to install the TUSK I or II accessories.
The plastic was molded in Tamiya's tan. The
molding was crisp with no flash. The parts on the trees were solid enough to
clip off with out breaking them. This kit was designed to have an electric
motor, so there are cutouts on the bottom of the hull. These can be ignored
as there is a "belly pan" included as part of the TUSK parts.
Tamiya includes two standing figures with the
digital uniform paint guide, ammo cans and jerry cans.
| CONSTRUCTION |
This kit was bought open and with all of the
parts loose, so before starting the build I did a parts inventory. Since
this kit was missing part of the TUSK II curved armor, I decided to build it
as an in-theater TUSK I
tank that had some previous field expedient
modifications to the turret. This tank is based on pictures of different
tanks a friend showed me of his time in Iraq. As I said in my notes above,
it is not accurate to a specific tank, but to an era when the Abrams needed
to be modified to better survive the urban environment. This would have been
during the time the TUSK were being installed and the older unauthorized
modifications removed.
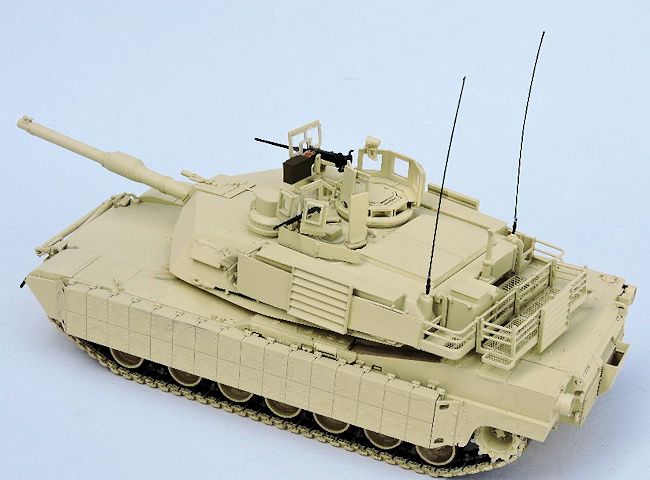
The turret was fitted with flat armor plates added
to the turret racks along with the identification panels, while the machine
gun positions on top got full ballistic protection. The hull got the TUSK I
reactive armor.
 Normally
I would start by gluing the road wheels and drive sprockets together. These
had already been done so I set them aside for paint. The next step for me is
the hull. The upper, lower hull and the reactive armor had been glued
together. The seams all line up with real seams or panels on the real tank,
so no filling should be done. I continued by gluing on the small parts with
Tamiya extra thin glue. There are actually some small grab handles that I
had to use tweezers with. My hint to keep from losing the small parts out of
the tweezers is to wet the tweezers on my tongue before picking up the part.
Saliva will hold the part to the tweezers even if they come open or you
squeeze too hard. The hull had a lot to add to it, but it only took me a
little over an hour. It was set aside for drying.
Normally
I would start by gluing the road wheels and drive sprockets together. These
had already been done so I set them aside for paint. The next step for me is
the hull. The upper, lower hull and the reactive armor had been glued
together. The seams all line up with real seams or panels on the real tank,
so no filling should be done. I continued by gluing on the small parts with
Tamiya extra thin glue. There are actually some small grab handles that I
had to use tweezers with. My hint to keep from losing the small parts out of
the tweezers is to wet the tweezers on my tongue before picking up the part.
Saliva will hold the part to the tweezers even if they come open or you
squeeze too hard. The hull had a lot to add to it, but it only took me a
little over an hour. It was set aside for drying.
Next stop: the turret. I have to admit there is a
lot to glue on the turret, it looked a little intimidating. The whole thing
took about three hours. Nothing was difficult. I was afraid of the baskets.
They look so intricate and hard to assemble. Luckily, if you follow the
assembly sequence they go together very well with good positive connections.
There is mesh for the bottom of the baskets and with careful cutting it will
drop right into place. (I tried the mesh for the sake of build review, then
replaced it with extra parts box photo etch.) Some thin super glue was
touched to the joins and everything was set aside to dry.
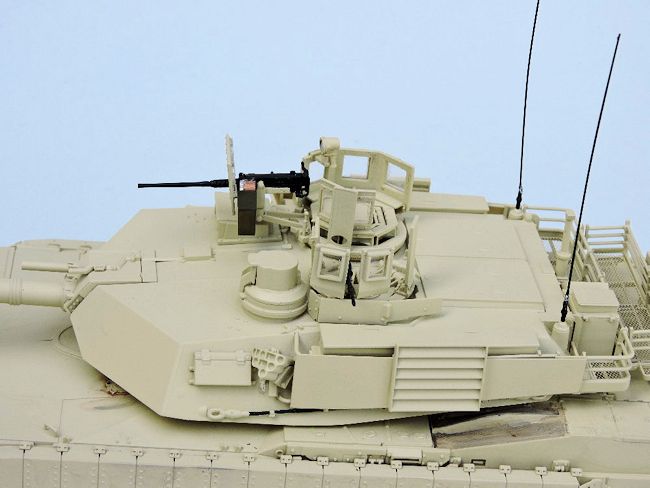
At this point I started the TUSK ballistic shields
around the hatches/machine guns. I fully assembled everything except the
clear windows and the frames around them. Those were set aside. I cut some
sheet plastic for the "field expedient" armor on the side rails. These were
glued in place with the identification panels glued to them. A third
identification panel was glued to the back of the rear basket.
The hatches are built closed, but only held in
place from inside by tape. That way I can open them in the future if I so
choose. I will not be painting or using the crew for this review. I want to
practice the digital camo pattern and see if I can do it.
| COLORS & MARKINGS |
 nter
and set the model on the fender of one of their trucks. It was really close.
nter
and set the model on the fender of one of their trucks. It was really close.
After a few days drying time. I gloss coated
everything but the tracks with MM Gloss Coat and set them aside to dry for a
week. During this time, I went back to brush paint the track pads with
Testor's Flat Black. I used the decals for the 1st
Battalion, 22nd Infantry
Regiment, 1st Brigade, 4th
Infantry Division, Iraq. They are soft, pliable and easy to apply. Of course
they are also small. I put each one on over a dot of Future floor wax. Again
a few days drying time and everything was given a couple of light coats of
MM flat coat. The decals blended right into the paint.
The first step in my final painting was detailing
with flat black and flat black wash. The rubber on the road wheels was
painted flat black as was the main gun barrel muzzle. The black wash was put
over all of the grill areas to give them a little depth. I thought it was
too dark and looked like bad diesel exhaust. Not good on intakes or turbine
powered tanks. I decided to mix up a dark brown wash, made from Americana
artist acrylic and lots of water, to apply over the black wash. It toned the
mesh down a bit, but I may try a lighter tan wash after I finish this
review. The second step was painting the machine guns MM gunmetal with black
dots on the barrel muzzles.
| FINAL CONSTRUCTION |
 the
track together. After about ten minutes I took the clamps off and stapled
across the join. The track was rotated so the staples don't show. Each of
the lower road wheels were pressed into place and the tracks were on. Gotta
love this robust Tamiya suspension!
the
track together. After about ten minutes I took the clamps off and stapled
across the join. The track was rotated so the staples don't show. Each of
the lower road wheels were pressed into place and the tracks were on. Gotta
love this robust Tamiya suspension!
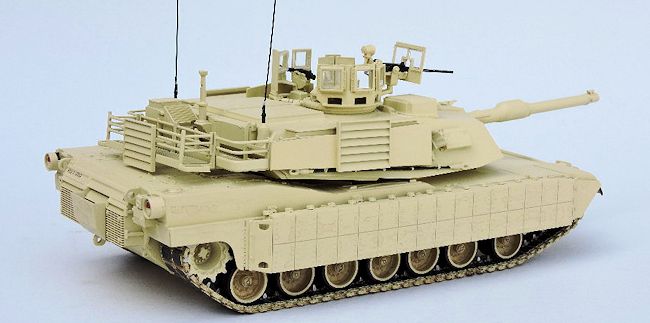
Next was the ballistic glass and frames for the turret hatch protection. I set the glass in the protective armor plates, put a drop of super thin Tamiya glue next on each and let it run into the join space. The frames were glued in place over the glass. The rest of the parts were just straight forward glueing small stuff in place. After all of the glue had dried, I filled each vision block in with Testors clear cement/window maker. I chose not to use the kit provided clear plastic for the vision blocks, because I think the clear cement is so much easier to use. The turret was set in place on the hull, rotated into to lock it in and I this project is done!
OOOPS, I forgot the radio antennae (antennas?). I keep a stock of them pre-made so all I have to do is cut them to length. They go on last because I always knock them off at least once. They are 22P guitar string cut to length, with the ends dipped in super glue gel to form a little ball. I then spray them with Krylon semi-gloss black.
| CONCLUSIONS |
As usual, I enjoyed building this Tamiya kit.
It was an easy 8 to 10 hour build. I consider it a 3 in
1 kit. You can build a standard M1A2, M1A2 SEP TUSK I OR M1A2 SEP TUSK. I plan
on doing a full accurate TUSK I and II version to park with my field expedient
modified version. There were no unpleasant surprises or problems on this model.
The small parts like the headlight guards are sturdy enough to cut from the
sprue with no damage, if you are careful. Since this one has the TUSK parts and
needs holes opened up from the inside; I would recommend it to moderate to
advanced modelers or kids with dad's help. The molding is crisp and sharp with a
lot of molded on detail. These are showing up on the second hand market already
so bargains are to be had!
| REFERENCES |
Reference: about an hour just cruising Google Images
and a trip to our local Army Reserve Center to check the paint next to a real
truck in Modern Desert Sand.
June 2015
If you would like your product reviewed fairly and fairly quickly, please contact the editor or see other details in the Note to Contributors.