Tamiya 1/48 M10 Tank Destroyer
| KIT #: | 32519 |
| PRICE: | $26.00 |
| DECALS: | Three options |
| REVIEWER: | Dale Rannals |
| NOTES: |
Add-ons:
Legend M10 Stowage set ($17) |
| HISTORY |
US
combined-arms doctrine on the eve of World War II held that tanks should be
designed to fulfill the infantry support and exploitation roles. The anti-tank
warfare mission was assigned to a new branch, the tank destroyer force. Tank
destroyer units were meant to counter German blitzkrieg tactics. Tank destroyer
units were to be held as a reserve at the Corps or Army level, and were to move
quickly to the site of any enemy tank breakthrough, maneuvering aggressively to
destroy enemy tanks. This
 led to a
requirement for very fast, well-armed vehicles. Though equipped with turrets
(unlike most tank destroyers of the day), the typical American design was more
heavily gunned, but more lightly armored, and thus more maneuverable, than a
contemporary tank. The idea was to use speed and agility as a defense, rather
than thick armor, to bring a powerful self-propelled gun into action against
enemy tanks.
led to a
requirement for very fast, well-armed vehicles. Though equipped with turrets
(unlike most tank destroyers of the day), the typical American design was more
heavily gunned, but more lightly armored, and thus more maneuverable, than a
contemporary tank. The idea was to use speed and agility as a defense, rather
than thick armor, to bring a powerful self-propelled gun into action against
enemy tanks.
The
M10 tank destroyer,
formally 3-inch Gun
Motor Carriage, M10 was a United States tank destroyer
of World War II based on the chassis of the M4 Sherman tank. It was numerically
the most important U.S. tank destroyer of World War II and combined a reasonably
potent anti-tank weapon with a turreted platform (unlike the previous M3 GMC,
whose gun was capable of only limited traverse). Despite the introduction of
more-powerful types as replacements, it remained in service until the end of the
war. Some of those replacements were in fact modified and/or rebuilt from the
M10 itself.
It was christened the Wolverine by the British, although unlike other vehicle names such as the M4 Sherman, the name was not adopted by American soldiers, who called it TD (a nickname for any tank destroyer in general) beyond its formal designation.
| THE KIT |
Tamiya’s 1/48 M10 Tank Destroyer is delivered in olive drab flash-free
plastic.
Since the vehicle chassis was derived from the M4 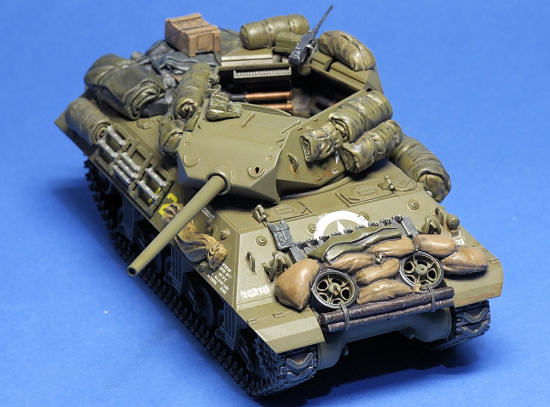 open, spoked
type.
The hull and turret of course are unique to this kit, and since this is
an open turret design, some interior detail is included as well.
An added bonus is a sprue from their
Jerry Can Set, this
has several types of bags, some fuel cans, and 55-gal drums.
A nice addition since M10’s were adorned with all types
of supplies hanging off the sides (apparently there was not much room inside for
stowage).
A rather large omission, in my opinion, is the lack of any crew.
Again, with an open top, one would think that this would
have been a no-brainer.
Strange.
open, spoked
type.
The hull and turret of course are unique to this kit, and since this is
an open turret design, some interior detail is included as well.
An added bonus is a sprue from their
Jerry Can Set, this
has several types of bags, some fuel cans, and 55-gal drums.
A nice addition since M10’s were adorned with all types
of supplies hanging off the sides (apparently there was not much room inside for
stowage).
A rather large omission, in my opinion, is the lack of any crew.
Again, with an open top, one would think that this would
have been a no-brainer.
Strange.
Instructions are typical Tamiya, which means very well done.
The front page includes a history section in several
languages.
Color call-outs are in Tamiya colors of course.
The assembly section is straightforward and clear, with
the final pages depicting colors and decal guides.
Decals are for three vehicles, all olive drab, but with
varying-enough markings to make them somewhat different from each other.
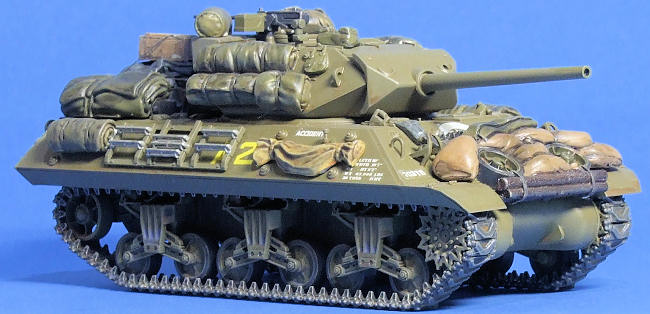
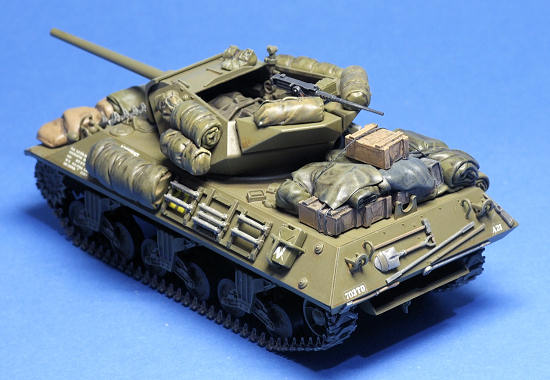
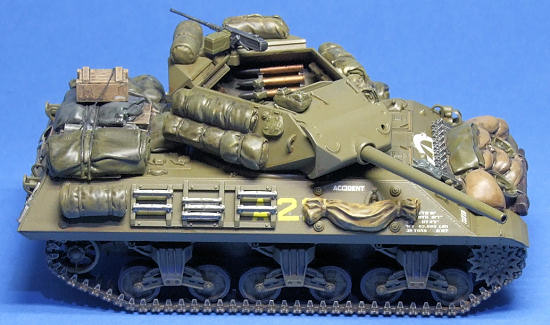
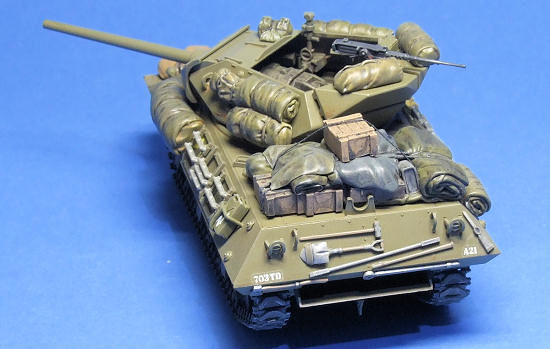
The Legend stowage set includes a front piece adorned with sandbags, logs, spare wheels and track.....typical added protection for this hard-hitting but thin skinned vehicle. A single rear piece includes a tarp-covered assortment of jerry cans, rolls, crates, etc. And then there is a plethora of assorted bags and bed rolls to put wherever. I pretty much covered this M10 with these, and I still have a bunch left over for other projects. Well worth the money.
| CONSTRUCTION |
For me, these kits get broken down into three major sub-assemblies.
You have the lower hull and suspension, the upper hull,
and the turret.
These sections can all be worked on concurrently, so you can work
on one section while putting off working on another (say, painting road wheels).
It is mostly straightforward and most of the bits can be
assembled without worrying about paint ….. it’s all gonna be Olive Drab when
it’s done.
I deviated from the instructions and began by assembling the upper hull
and turret.
The few bits that weren't gonna be OD, like the shells inside the
turret, were left off for now.
| COLORS & MARKINGS |
I then took the cast chassis, upper hull, turret, and most of the sprues
to the paint booth and blasted everything with Olive Drab (Testor Model Master
with a few drops of brown mixed in to change the hue slightly).
While at the booth I also sprayed the track sections a v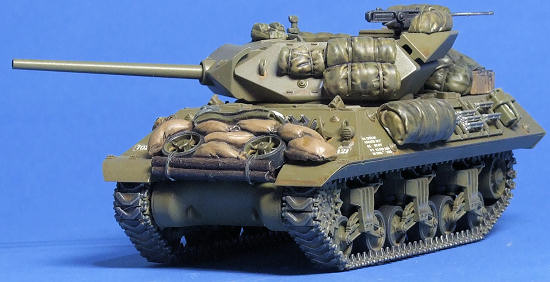 ery
dark grey (VDG - almost black). When all this was dry I painted the rubber
sections of the wheels the same VDG.
This VDG isn’t anything special.
I think using straight black is always too intense for
the scale, so I mix some white into the flat black to lighten it up a bit.
More realistic in my opinion.
Anyway, the wheel and suspension trucks were assembled
and super-glued to the cast metal.
ery
dark grey (VDG - almost black). When all this was dry I painted the rubber
sections of the wheels the same VDG.
This VDG isn’t anything special.
I think using straight black is always too intense for
the scale, so I mix some white into the flat black to lighten it up a bit.
More realistic in my opinion.
Anyway, the wheel and suspension trucks were assembled
and super-glued to the cast metal.
The tracks were given some oil washes of blacks, reds, and browns.
Once that dried, I dry-brushed the sections with Testors
Steel.
These were then attached to the wheels.
The upper hull and turret were attached and we now have
a pretty complete Tank Destroyer.
The model was given a gloss coat of Future and then the few decals were
added.
Then I attacked the kit with a Burnt Sienna oil was to dirty things up
and pop out the details.
| FINAL CONSTRUCTION |
At this point the kit was pretty much set aside and I concentrated my
efforts on painting the Legend Stowage kit parts.
The resin used on these parts is beautiful and I found
no flaws in any of them.
The front and rear pieces took some time to paint.
There is
 mucho detail
in these and as I wanted a variety of shades to enhance this detail I used
everything from panzer grey to tan and browns and several shades of green and
Olive Drabs.
The bags and rolls were painted different shades also.
These were all given a dark oil wash to pop out the
details some more.
These were all added to various places on the tank.
The front and rear pieces needed some hollowing out in
places to lay correctly.
This was easily done with a Dremel and plenty of water.
I added an extra crate to the rear supplies and
“fastened” it down with a painted piece of thread.
mucho detail
in these and as I wanted a variety of shades to enhance this detail I used
everything from panzer grey to tan and browns and several shades of green and
Olive Drabs.
The bags and rolls were painted different shades also.
These were all given a dark oil wash to pop out the
details some more.
These were all added to various places on the tank.
The front and rear pieces needed some hollowing out in
places to lay correctly.
This was easily done with a Dremel and plenty of water.
I added an extra crate to the rear supplies and
“fastened” it down with a painted piece of thread.
One thing I noticed while perusing pictures of M10's was the variety of
fabricated brackets welded on the hull to hold stuff.
I decided to add one.
I took some small wire and soldered two pieces together
in the form of a small “T”.
I assembled one of the jerry cans, painted it, and added
a “W” to it (for water).
I then placed the wire T over the can and loosely bent
the wire ends down around the can.
Presto, a nifty little bracket.
This was placed on the rear side of the tank and pushed
against it a bit so I could see were it attached.
These points were drilled out, the bracket glued in
place and painted, and the Water can dropped inside.
A neat little addition methinks.
| CONCLUSIONS |
 I've always
liked the look of these Tank Destroyers.
And Tamiya's kit builds up into a fine representation of
the real thing.
One thing for sure:
Even though it's all Olive Drab, when you start looking
at the different shades and weathering possibilities, whitewashes and field
applied camo stripes and swathes, and the variety of stuff hanging all over
them, each one built can be truly unique.
I've always
liked the look of these Tank Destroyers.
And Tamiya's kit builds up into a fine representation of
the real thing.
One thing for sure:
Even though it's all Olive Drab, when you start looking
at the different shades and weathering possibilities, whitewashes and field
applied camo stripes and swathes, and the variety of stuff hanging all over
them, each one built can be truly unique.
Have fun with it.
| REFERENCES |
Squadron/Signal #2036:
U.S. Tank Destroyers in Action
Dale Rannals
July 2011
Thanks to If you would like your product reviewed fairly and quickly, please contact me or see other details in the Note to Contributors.