DML 1/200 Tu-95K-22 'Bear G'
|
KIT # |
2006 |
|
PRICE: |
$? |
|
DECALS: |
One aircraft |
|
REVIEW : |
|
|
NOTES: |
|
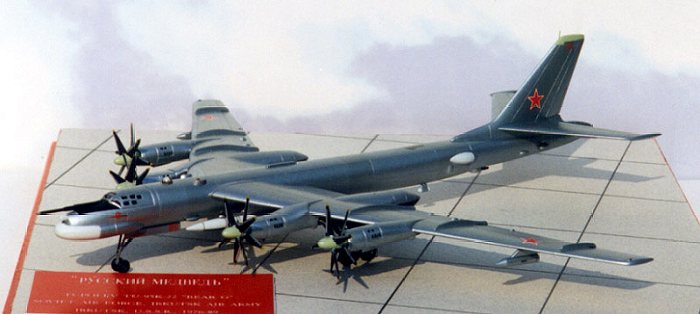
“РУССКИЙ МЕДВЕДЬ”
TUPOLEV TU-95K-22 "BEAR G"
SOVIET AIR FORCE
IRKUTSK, U.S.S.R., 1976-1990
|
HISTORY |
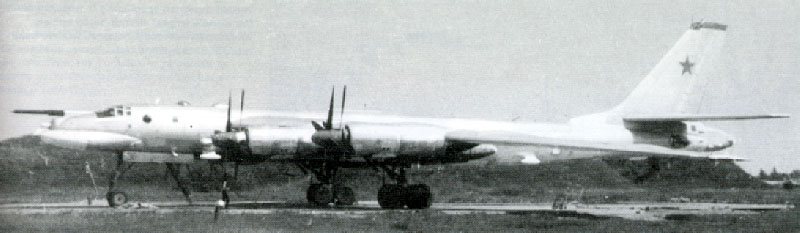
Descended indirectly from the American Boeing B-29 via the Tupolev Tu-4 and later refined Tu-80 and its larger cousin Tu-85, the Tu-95 was developed for use by the Soviet Union's DA (Long-Range Bomber Aviation) as an intercontinental strategic bomber, a role in which the latest variants still serve. Design of the Tu-95 began late in 1951 and the first test bed airframe was completed in 1953 for bench testing. The prototype was first flown in 1954 and originally called the Tu-20 by western powers, which was what I remember them being called during my adolescent and early adult years, but this was later changed sometime in the late 1960s or early 1970s to Tu-95, which it has always been designated by the Soviets.
In an age when turbojets and turbofans are the major power sources for first-line aircraft, it seems almost unbelievable that the Tu-95 has remained in operational use for over forty years. Nevertheless, its turboprop powerplants give remarkably high speed, in addition to long range and endurance. The large size of the Tu-95 has permitted the carriage of extensive radar equipment and the largest Soviet air-to-surface (AS) cruise missiles and bombs. Production was suspended in 1990 by Boris Yelstin as a unilateral arms limitation measure, but they still are combat capable with many Russian Air Armies and a few of their former republics.
|
THE KIT |
The model represents what is called a "Bear G" model by NATO. The Tupolev designation is Tu-95K-22, which was a development of the Tu-95K-20 and Tu-95KM (Bear B and Bear C), retaining the I-band radar scanning 'duckbill' or 'Crown Dome' guidance installation, but giving the radar improved performance, adding ECCM qualities, and increasing the modes for navigation and targeting of the three Kh-22 cruise missiles (NATO: AS-4 'Kitchen'), one carried internally and one each on a hardpoint under each wing root. An ECM thimble was added to the nose and small pylon-mounted pod antennas were mounted in pairs on the front and rear of the fuselage. The rear dorsal turret was deleted and replaced by a special fairing housing a high-power tail-on ECM. The rear ventral turret housing two 23-mm cannon and sighting blisters was retained. As of 1993, 45 Tu-95K-22s were still in operable condition with the Russian Federation Air Force based at Irkutsk, but lack of money and fuel still ground these mighty beasts. The plaque's title is transcribed in English as "Russkiy Medved'" and means "Russian Bear".
|
CONSTRUCTION |
Interior:
Other than adding the required nose weight from dental lead, nothing. Okay, so I did add four seats and a center console made from lead sheet to the kit's cockpit platform, the kit did not tell one where to add the weight. The cockpit was painted Polly Scale British Sea Gray Medium with the lead seats and console picked out in flat black. Various Reheat Models control placard decals occupy the cockpit, but they are unseen through the thick smoke-colored canopy. All areas inside the rear of the fuselage received a coat of Sea Gray Medium also.
Exterior:
Not a thing! I drilled out the cannon barrels and really wanted to replace them with hypo tubing, as they look more like mortars in this scale, but that would have taken this out of the OTB category. The turret is white glued in place in case I should desire to do such in the future. I also wanted to add a couple of fuselage blade antenna, but this too would take it out of the OTB group. They would be very easy to add, should I decide to replace the cannon.
|
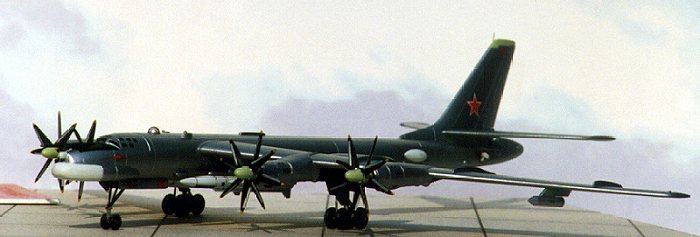
PAINT & DECALS |
After masking the canopy sections and rear glass with Bare-metal foil, I gave the canopy and rear ECM station, plus all landing gear bays a coat of Sea Gray Medium (I also painted the landing gears struts this color at this time). The gear bays were masked with small strips of masking tape and the fuselage, wings, and stabilizers were primed in flat white, sanded and reprimed where necessary (I painted the Kh-22 missiles and four side pod antennas white also). I next painted the undersurface of the wings flat black in the areas noted in reference material and the kit instructions.
The flat white 'Crown Dome' radome, ECM thimble dome, and side blister radomes were masked along with the flat black sections of the wings and all subassemblies were given three coats of Polly Scale Bright Silver in very light coats. Silver paints cover very well over a white primer and I owe this hint to a friend in IPMS that builds airliners, only he prefers gloss white because he likes to use the metallizer paints and polish his finishes.
After two days I masked sections of the fuselage (rudder included), wings, and stabilizers and airbrushed unmasked panels Polly Scale Stainless Steel, which gave a slight dissimilar effect. After removing the low tack masking from the silver, but leaving the masking on the white and black areas, I lightly polished the metallic painted areas with some SNJ powder before giving all subassemblies two coats of Polly Scale Clear Gloss.
I removed all masking tape from the white and black areas and picked out the exhaust areas in Gunze Burnt Iron.
I used the red stars from a SuperScale sheet in 1/72 scale as the white borders on the kit decals had an orange hue to them. I used the numbers and identification markings from the kit. Various data placards were added to the missiles and landing gear struts from Reheat Models decals. All propeller-protecting strips were cut from black trim film and silver trim film and applied as per painting instructions. The propellers were originally primed in the correct color green (which I closely matched with Polly Scale British Sky) and hand painted from there. Various highlights of the missiles were done with black trim film and a technical pen with a .005 tip and black India ink, which was also used on control panel recesses. All decals received a sealing coat of clear gloss, after assembling all subassemblies and masking any flat areas.

|
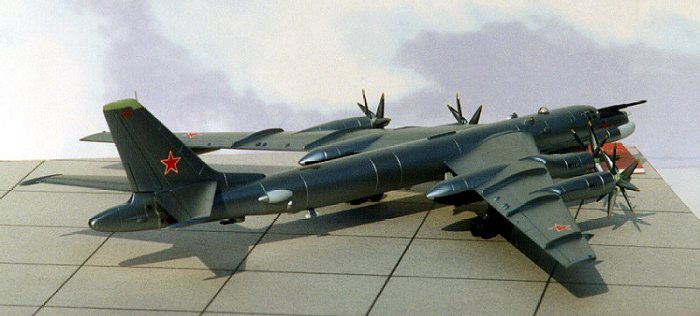
CONCLUSIONS |
What a neat little kit this was! I was expecting a tough time with tiny parts and bad fit problems, but encountered none. Needless to say, the propellers took up a great part of the construction and painting of the kit. I have presented them somewhat unauthentically on the finished model to highlight the counter-rotation of them, but as a rule, they are lined up when the plane is in a static position. I installed the missiles as directed in the instructions, but in one reference I have, the hardpoints appear to be reversed from the position I have them in, as odd as that might appear. I actually reversed the hard points with the missiles attached before I permanently mounted them, but doing so forced the model weight too far back and the model became a tail sitter. They are only white-glued in place, so I may reverse them and glue the front wheels to the base, if more homework turns out that they were mounted in such and odd-ball way. Any help IPMSers.
April 2001
Copyright ModelingMadness.com. All rights reserved. No reproduction in any form without express permission from the editor.
If you would like your product reviewed fairly and fairly quickly, please contact the editor or see other details in the Note to Contributors.
Back to Reviews Page 2017