Arii 1/144 P-3C Orion
|
KIT # |
2 |
|
PRICE: |
@ $12.00 |
|
DECALS: |
one option |
|
REVIEWER: |
Les Dorr Jr. |
|
NOTES: |
Converted to NP-3D |
|
HISTORY |
Derived from the L-188 Electra commercial airliner, the U.S. Navy’s Lockheed P-3 Orion has been stalking submarines and surface ships from the sky for 35 years. Powered by four Allison T-56 turboprop engines, the P-3 can fly for as long as 16 hours at 350 knots. Lockheed has updated the aircraft over the decades with increasingly sophisticated electronics, acoustic detection equipment, optical sensors and various antisubmarine and anti-ship weapons.
The versatility
that makes the Orion the Navy’s premier sub-hunting and electronic
reconnaissance aircraft also appeals to several civilian government
agencies. NASA, the National Oceanic and Atmospheric Administration (NOAA)
and the U.S. Customs Service fly P-3 variants, as does the Naval Research
Laboratory. 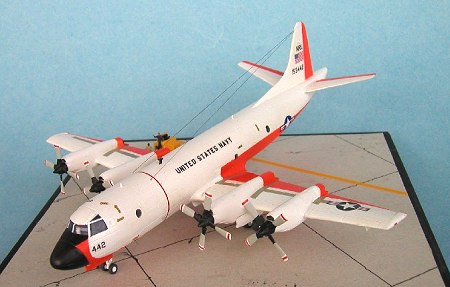 According to the NRL website, “The Flight Support Detachment,
located at NAS Patuxent River, MD, operates and maintains a fleet of six
uniquely configured, research-modified NP-3D ‘Orion’ aircraft. The men
and women of the detachment provide the Naval Research Laboratory with
airborne research platforms, conducting flight operations worldwide in
support of a wide spectrum of projects and experiments. These include:
magnetic variation mapping, hydroacoustic research, bathymetry,
electronic countermeasures, gravity mapping, and radar research. The
detachment annually logs approximately 2,000 flight hours and in its 33
years, the Flight Support Detachment has amassed over 53,000 hours of
accident free flying.”
According to the NRL website, “The Flight Support Detachment,
located at NAS Patuxent River, MD, operates and maintains a fleet of six
uniquely configured, research-modified NP-3D ‘Orion’ aircraft. The men
and women of the detachment provide the Naval Research Laboratory with
airborne research platforms, conducting flight operations worldwide in
support of a wide spectrum of projects and experiments. These include:
magnetic variation mapping, hydroacoustic research, bathymetry,
electronic countermeasures, gravity mapping, and radar research. The
detachment annually logs approximately 2,000 flight hours and in its 33
years, the Flight Support Detachment has amassed over 53,000 hours of
accident free flying.”
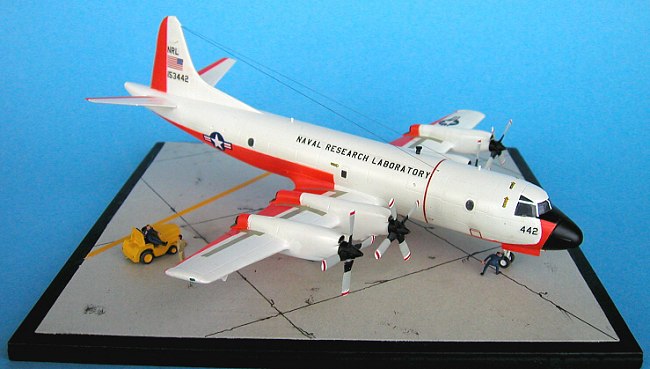
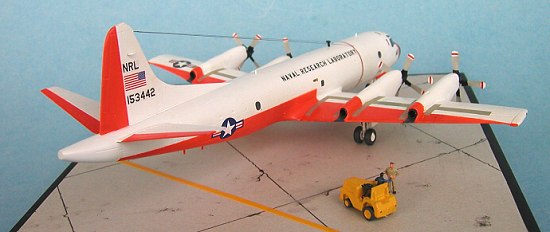
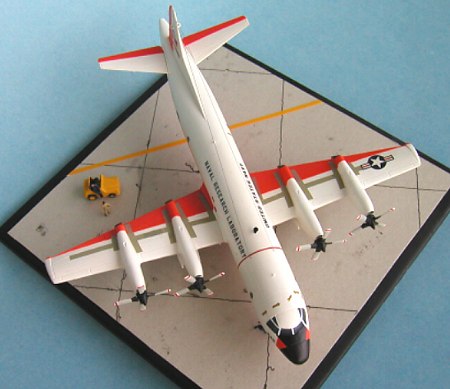
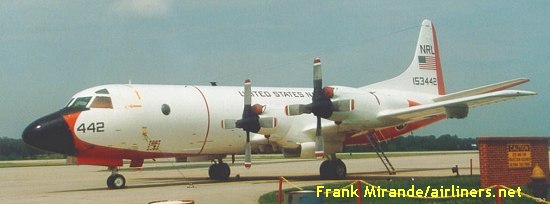
Several NRL Orions wear a high-visibility orange-and-white scheme that caught my eye as I searched the web for P-3 info and photos. The subject of this review, Bu. No. 153442, now sports a large Hawkeye radar dish, but earlier in its research career looked much like a standard P-3. Since I love colorful aircraft, the combination of garish markings and few necessary modifications moved the NRL NP-3D right to the top of my “To Do” list! (As an addendum to this, those P-3s in the white and orange scheme are actually ex-VXN-8 aircraft that were transferred when the squadron was disestablished in the early 1990s during the initial flurry of downsizing after Gulf War I. Ed)
|
THE KIT |
LS Models (now
defunct) and Arii both issued this kit as a P-3C, with either U.S. Navy
or Japanese markings. (Your editor at one time had all the different
boxings of this kit and they also included a Canadian CP-140 and an
Iranian P-3F) Mine included
 the Japanese decals, but somewhere along
the way I picked up a VP-45 “Pelicans” sheet as well. The kit features
excellent detail, including alternate parts for P-3 “Update I” and
“Update II” versions.
the Japanese decals, but somewhere along
the way I picked up a VP-45 “Pelicans” sheet as well. The kit features
excellent detail, including alternate parts for P-3 “Update I” and
“Update II” versions.
All panel lines are recessed, but a little too deep for 1/144 scale. The fuselage is split into right and left halves. The horizontal stabilizers are single pieces. The upper wing halves are separate parts that attach to a one-piece lower wing. The Orion’s six outer weapons pylons (three on each side) are molded to the lower wing, while three others and a sensor package come as individual parts. No weapons are supplied, but the kit includes a piece with under-fuselage sonobuoy ports. The forward bomb bay doors can be shown open – the bay itself has no detail – or closed. The rear two-thirds or so of the engine nacelles are molded with the upper and lower wing parts. The nacelle fronts are split into left and right halves, to which an engine front is attached. The four exhausts are individual parts. The propellers feature a very delicate four-bladed piece that gets sandwiched between two hub parts. The landing gear struts are adequate for this scale, but the gear wells have no detail -- not untypical for 1/144 multi-engine aircraft models.
|
CONSTRUCTION |
The Arii P-3, like many 1/144 aircraft, has few parts to its basic airframe. I had no problems gluing together the fuselage, wing and stabilizer pieces using liquid cement. Several small antennas originally sprouted along the top and bottom fuselage joints, but I cut them off to make working the seams easier. After sanding, I filled small gaps with gel-type super glue.
Unfortunately, fit of the parts went downhill from there. The less-than-stellar mating of the wings to the fuselage left gaps at the wing fairings, which I shimmed with thin plastic sheet cut into tiny strips. The rear joint was slightly better, but still required numerous applications of CA glue and sanding to look right. (The forward wing-fuselage joint was perfect. Go figure.) I also added the sonobuoy and closed bomb bay inserts to the fuselage bottom, rescribing the resulting panel lines in a couple places.
Next, I tackled
the multi-part nacelles. The nacelle halves went together fine,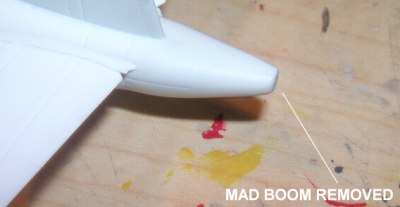 but dryfitting
showed the assemblies were wider than the corresponding rear nacelle
parts on the wing, and there would be noticeable steps at the joints. The
culprit seemed to be a positioning lug molded to the rear nacelle face,
but cutting off the lugs did little to improve matters. Fit of the
nacelle fronts was equally bad. After cementing everything together, it
took multiple applications of CA glue and many tedious sanding sessions
-- done in a very small space -- to achieve a smooth surface. Too smooth,
really, because the recessed panel lines and details on the nacelles
disappeared.
but dryfitting
showed the assemblies were wider than the corresponding rear nacelle
parts on the wing, and there would be noticeable steps at the joints. The
culprit seemed to be a positioning lug molded to the rear nacelle face,
but cutting off the lugs did little to improve matters. Fit of the
nacelle fronts was equally bad. After cementing everything together, it
took multiple applications of CA glue and many tedious sanding sessions
-- done in a very small space -- to achieve a smooth surface. Too smooth,
really, because the recessed panel lines and details on the nacelles
disappeared.
At this point, I
performed two bits of surgery needed to turn the kit airplane into the
NRL NP-3D. Using a razor saw, I cut off the MAD (Magnetic Anomaly
Detection) boom at the back of the fuselage and the two innermost weapons
pylons on the outer wings, filling the resulting
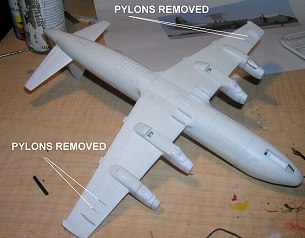 holes with super glue and
sanding them smooth.
holes with super glue and
sanding them smooth.
With the airframe essentially finished, I began rescribing panel lines lost during building. As a guide, I used Dymo label tape in most places, doubled-up thin strips of black electrical tape in the highly curved rear fuselage area. I passed on trying to engrave those pesky nacelles. Technically, they should have panel lines, but I didn’t think I could achieve a decent result given the limited space in which to work. The lines are barely visible in photos of the actual NRL aircraft, anyway.
I wrapped up construction by assembling the propeller parts and gluing the gear doors next to the nose and main wheel wells. (The latter would prove to be a big mistake!) I decided to leave the gear struts and all the clear parts off until later to facilitate painting. Finally, I added four inboard underwing pylons -- three from the kit, one from the spares box.
|
COLORS AND MARKINGS |
Painting the high-viz scheme on the NRL Orion wasn’t particularly challenging. It just demanded a lot of masking. I first sprayed an overall coat of flat white from a discount chain spray can. Subsequently, I applied several coats of Model Master (MM) Gloss White, which I let dry for several days before further handling.
My normal method of outlining color divisions with thin strips of electrical tape and filling in large areas with masking tape worked quite well. During the masking process, though, I ended up knocking off all the gear doors – some several times! In retrospect, it’s probably better to paint the doors separately and attach them after painting. I airbrushed Floquil Southern Pacific Railroad Red for the high-viz orange on the NP-3D. To my admittedly imperfect eyes, it looks like a very close match.
 After pulling off
all the tape, I was pleasantly surprised how little touch-up was needed.
The worst spots were the inboard
underwing pylons, where I’d used liquid mask. Some of it stubbornly
refused to pry off, so I had to repaint them with gloss white. I had to
clean up the orange areas near the nose with a pointed size 0 brush
because I hadn’t masked the curves quite right. I painted the radome MM
Aircraft Interior Black, the wheels Floquil Acrylic Grimy Black and the
hubs and gear struts gloss white. I also attached the landing gear struts
sans wheels at this point.
After pulling off
all the tape, I was pleasantly surprised how little touch-up was needed.
The worst spots were the inboard
underwing pylons, where I’d used liquid mask. Some of it stubbornly
refused to pry off, so I had to repaint them with gloss white. I had to
clean up the orange areas near the nose with a pointed size 0 brush
because I hadn’t masked the curves quite right. I painted the radome MM
Aircraft Interior Black, the wheels Floquil Acrylic Grimy Black and the
hubs and gear struts gloss white. I also attached the landing gear struts
sans wheels at this point.
Next up was painting the props: interior black hubs, MM Flat Gull Gray blades, flat white tips. I cut tiny pieces of red cheatline from an old Air France Boeing 737 decal for the red tip stripe. The only troublesome aspect of the job was the fragility of the prop blades themselves. Each blade is attached to the center of the part by a very thin cylinder of plastic that doesn’t tolerate much handling. Maybe I’m just getting ham-fisted, but I broke off almost every blade during the painting process and had to patiently superglue them back on.
The decals I applied are a mix of various items. I used the kit’s national insignia, prop warning stripe, wing walkways and rescue arrows. (A note on the latter: The arrows in the Japanese version are far superior to those in the USN VP-45 issue, which aren’t even legible.) The American flags on the vertical tail came from an ATP/Airliners America sheet. I crafted the lettering and aircraft numbers using the USAF Amarillo font in MS Word and printed them on clear decal with a laser printer. The result is OK, but if I were doing it again, I’d print two sets of decals and double them up for better opacity.
The NRL birds look virtually pristine in photos, so I didn’t apply a wash to the panel lines. The only weathering I did was a to apply a faint grayish stain that’s visible in photos above the vent area decal on the forward starboard fuselage.
|
FINAL ASSEMBLY |
 With the gear
struts in place, I airbrushed several coats of MM Semi-Gloss Lacquer to
give the plane a more realistic appearance and seal the decals. I then
painted the inside of the cockpit and fuselage windows dark gray and
attached them to the fuselage with white glue. The white framing on the
cockpit glass is white decal cut into thin strips.
With the gear
struts in place, I airbrushed several coats of MM Semi-Gloss Lacquer to
give the plane a more realistic appearance and seal the decals. I then
painted the inside of the cockpit and fuselage windows dark gray and
attached them to the fuselage with white glue. The white framing on the
cockpit glass is white decal cut into thin strips.
I painted the exhaust nozzles interior black and inserted them into the nacelles. I replaced the fuselage antennas with minute bits of plastic sheet and painted them the appropriate colors. Finally, I drilled holes in the tail and on either side of the fuselage and attached “wires” of stretched sprue.
The base is a piece of ceramic tile painted flat black. The “concrete” apron section is a piece of cardboard boxtop with black marker lines, “stained” with drybrushed grimy black and spots of crud from the bottom of my paint cleaning jar. The tractor is part of a 1/144 military accessories set from NAResin (you can find a preview here) and the figures are from a hard-to-find 1/144 Preiser NATO pilots and ground crew set.
|
CONCLUSIONS |
 I highly recommend
the Arii P-3 for its level of detail. It’s perfect for modelers like me
who like building good-looking four-engine aircraft but don’t want to
build an extra addition to the shelves to hold them. If 1/72 (my usual
scale) is your choice, Hasegawa makes a well-regarded kit that they have
issued with a variety of decals over the years.
I highly recommend
the Arii P-3 for its level of detail. It’s perfect for modelers like me
who like building good-looking four-engine aircraft but don’t want to
build an extra addition to the shelves to hold them. If 1/72 (my usual
scale) is your choice, Hasegawa makes a well-regarded kit that they have
issued with a variety of decals over the years.
If you’re really ambitious, you could try adding a Hawkeye radar dish and supports to the basic P-3 in either scale and model the current configuration of the NRL aircraft or a Customs P-3!
December 2003
|
REFERENCES |
Naval Research Laboratory Flight Support Detachment website, http://planes-www.nrl.navy.mil/
NRL section of U.S. Navy Patrol Squadrons website, http://www.vpnavy.org/vpnavy_index.html
Airliners.net website, www.airliners.net
Copyright ModelingMadness.com. All rights reserved. No reproduction in part or in whole without express permission from the editor.
If you would like your product reviewed fairly and fairly quickly, please contact the editor or see other details in the Note to Contributors.