Monogram 1/48 (F)/A-18 Hornet (High Tech Aircraft Series)
Kit Number: 5833
Price: I cannot recall what I paid, probably $8-12
Decals: One possible version for an example of VFA-151 "Vigilantes", USS Midway
Reviewer: C.J. Hamilton
This is my first review, and I thank Scott for giving me the opportunity to give it a shot. I am basically a straight-out-of-the-box modeler, who makes a few additions as I see necessary. As I examined the kit, I noticed it had Monogram's usual attention to detail with raised and recessed lines, supplanted with a sheet of Model Technologies photo etched details. First I completed the cockpit, and with the three large displays it looks great if you give them a good gloss coat to create a 'glassy' look. I built the kit fairly straight forward. Before I cemented the top and bottom of the aircraft together, I bored out the cavities for the gun in the nose section. The fit was average, and I had to use a lot of putty around the nose area to make it look good. However, the most atrocious fit is on the undersides of the LEX slots. I was afraid I was going to run out of putty, and if I did it again, I would use sheet styrene to fill the gaps. The elevators are molded as one piece so they can move together. After examining photos of the Hornet, I realized that when the aircraft is on the ground, the elevators droop significantly, therefore I cemented them in the drooped position. The kit is supplied with FLIR pods which are molded into the fairings on either side of the main landing gear, so if you have visions of arming this kit with sparrows on those fairings, you have your work cut out for you. On the flip side, the FLIR pod is molded in two pieces, so I took my Dremel Drill and drilled out the FLIR window, which Monogram suggests you paint. Out of an extra piece of clear sprue, I fashioned a new window to be inserted from the backside of the pod. I then painted the inside of the clear sprue black before cementing the pod together. The result is very convincing.
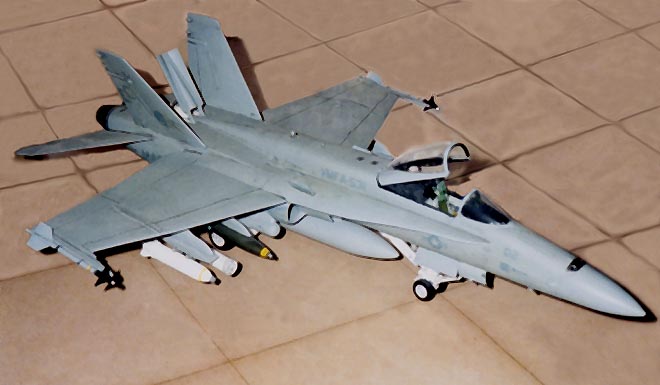
After sanding the model, I painted it with Model Master enamel in an overall Light Ghost Gray (FS 36375) scheme, followed by a coat of Future Floor Wax to give the decals a good surface to adhere to. I chose to use aftermarket decals by Super Scale. I modeled an example of VMFA-531 "Gray Ghosts" out of MCAS El Toro, California. After the decals, I applied another coat of Future Wax and weathered the aircraft. I used dark brown and black watercolor in a somewhat viscous mix (*Many thanks to those on RMS who gave me tips on this type of weathering.) After weathering, I applied yet another coat of Future Wax to seal the finish. The outcome at this point was nice.
To finish it, I added the photoetched heads-up display. Instead of using clear plastic for the HUD glass, I used overexposed slide film, which is very thin and when cut to appropriate shape and size provides an excellent representation. The thinness of the transparency allowed me to model the dual glass plates of the Hornet HUD.
I chose to model the USMC version in order to use a CAS ordnance load. Although the kit is provided with 4 smart bombs, I used my Hasegawa weapons accessory pack to equip it with a mix of GP bombs, cluster bombs and Zuni rocket pods. To accurately fit these to the aircraft, I had to rob dual ejector racks, from an old Hornet kit of mine which just made its way to a nephew of mine as cannon fodder for him to enjoy. I finished the model with dullcoat to give it the correct appearance.
In the final analysis, I am pleased with the finished product. It sits nicely on an excellent Monogram landing gear, which is realistically reproduced, giving the aircraft that 'slouched' look that the Hornet has on the tarmac. When you make a few modifications, and dress it up, it really is an eye-catching kit -- even in such a dull paint scheme. However, be ready to putty away on a few places, and find a way to reproduce the wing fences on top of the LEX's. Overall, a beginner could have fun with this kit, which is still produced by Monogram (# 5807) albeit without photoetched parts. But it will take a little experience to really make it look good.
C.J. Hamilton