Hasegawa 1/72 Mirage F.1C
| KIT #: | 00234 (B4) |
| PRICE: | $8.63 in 2004 |
| DECALS: | Three options |
| REVIEWER: | Jon Hudak |
| NOTES: | Not sure if still readily available new but can be found secondhand at shows relatively on the cheap |
| HISTORY |
The Mirage F1s
development began in the mid 1960s when the famed and proven firm of Avions
Marcel Dassault started working on a program with the Armee de l'Air to develop
a future successor to the classic delta wing Mirage III. Dassault was a favorite
and with such noted successes as the Ouragan, Mystere and Super Mystere series
under its belt, they were a natural choice. Several prototype configurations
were developed focusing on VTOL and variable geometry (swing wing) designs. The
Balzac was one of the VTOL designs and it crashed twice, the first time in
January of 1964. The French pilot who was flying it at this time was killed. It
was rebuilt but only to crash again with a US pilot at the controls in September
of 1965. Other designs using VTOl were tried such as the Mirage IIIV which
featured 8 Rolls Royce turbojet engines and most of them did not develop beyond
the experimental stage. Eventually the VTOL program was cancelled for good.
It was realized that VTOL
and variable geometry designs would be too expensive based on the French
governments limited military budget and that they needed something that could
also prove favorable to foreign export customers as well. So the design team
began work on a low cost replacement which would have to offer better
performance than the Mirage III in terms of increased endurance, a reduced
landing approach speed, shorter takeoff and landing distances and improved
maneuverability. Development and design costs were significantly reduced by
retaining the basic Mirage III fuselage and using an upgraded version of the
famous Atar 9 turbojet engine. The airframe would be fitted with shoulder
mounted swept wings with double-slotted flaps and maneuvering slats along with
swept tail surfaces with low set stabilators out back. Some partial redesigning
of the fuselage had to be performed with the switch to the shoulder mounted
wings as well and also to provide room for the redesigned landing gear. Since
another factor for the new fighter would be to be able to operate from semi
prepared landing fields, twin wheels were used on the nose and main landing gear
units.
The first prototype flew
on December 23 1966 and already it showed its improved performance over the
Mirage III in several of the key targeted areas such as shorter takeoff
distances, increased combat radius, better maneuverability, lower approach speed
etc. Unfor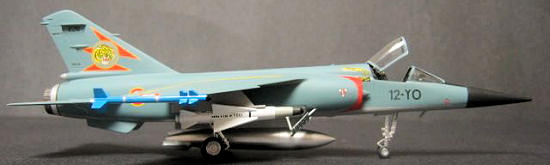 tunately the second prototype crashed on May 10, 1967 while practicing
at the Paris Air Show. The test pilot Rene Bigand was killed but this did not
stop the authorities from ordering three preproduction aircraft. The Mirage F1
appeared to offer the best solution for a new, modern fighter for the Arme de
L'Air and one that would not burden or drain the national budget. Trials with
these three aircraft would take place during 1969 and 1970. During this time
twin ventral fins were added to two of the aircraft to improve lateral
stability. Soon an order was placed by the Arme de L'Air for 35 of the new
fighters and the type would enter official service with the French Air Force in
December 1973. Powered by an SNECMA Atar 9K50 turbojet with afterburner which
had a maximum thrust of 15,873 lbs at sea level the F1 was able to achieve a top
speed of 1,451 mph, had a service ceiling of 65,615 feet and could fly up to
1,490 miles with three ferry tanks. These versions ordered were of the F1C (as
kitted here by Hasegawa) version and were fitted with two internally mounted 30m
cannons, two wingtip mounted Matra Magic infrared-homing air-to-air missiles and
two Matra R 530 air-to-air missiles with either infrared-homing or semi-active
radar guidance. Later these would be replaced by the Matra Super 530s around
1979. These weapons were all key for the air to air intercept and air
superiority roles. For ground attack missions the type could be fitted with
pylons for bombs, rocket launchers, and or 1,200 liter drop tanks on a
multi-store ventral rack. The F1 would also feature the Thompson-CSF Cyrano IV
radar as well as antenna for the Thompson-CSF BF passive radar warning receivers
which were added to the vertical tail surfaces. The F1 could also be fitted with
a boom for inflight refueling.
tunately the second prototype crashed on May 10, 1967 while practicing
at the Paris Air Show. The test pilot Rene Bigand was killed but this did not
stop the authorities from ordering three preproduction aircraft. The Mirage F1
appeared to offer the best solution for a new, modern fighter for the Arme de
L'Air and one that would not burden or drain the national budget. Trials with
these three aircraft would take place during 1969 and 1970. During this time
twin ventral fins were added to two of the aircraft to improve lateral
stability. Soon an order was placed by the Arme de L'Air for 35 of the new
fighters and the type would enter official service with the French Air Force in
December 1973. Powered by an SNECMA Atar 9K50 turbojet with afterburner which
had a maximum thrust of 15,873 lbs at sea level the F1 was able to achieve a top
speed of 1,451 mph, had a service ceiling of 65,615 feet and could fly up to
1,490 miles with three ferry tanks. These versions ordered were of the F1C (as
kitted here by Hasegawa) version and were fitted with two internally mounted 30m
cannons, two wingtip mounted Matra Magic infrared-homing air-to-air missiles and
two Matra R 530 air-to-air missiles with either infrared-homing or semi-active
radar guidance. Later these would be replaced by the Matra Super 530s around
1979. These weapons were all key for the air to air intercept and air
superiority roles. For ground attack missions the type could be fitted with
pylons for bombs, rocket launchers, and or 1,200 liter drop tanks on a
multi-store ventral rack. The F1 would also feature the Thompson-CSF Cyrano IV
radar as well as antenna for the Thompson-CSF BF passive radar warning receivers
which were added to the vertical tail surfaces. The F1 could also be fitted with
a boom for inflight refueling.
One could go and on (and I'm glad I kept this one short!:) but different versions would follow and the Mirage F1 proved to be a successful and adaptable aircraft which would fill out its various roles very well. During the early 1970s the F1 would fiercely compete with The F-16 for the NATO contract to resupply foreign countries outdated F5-As, F-100-Ds and F-104Gs. It lost but that's another story for another day. The F1 would do very well in the export sales role with countries such as South Africa, Morocco, Ecuador, Iran, Iraq, Spain, Greece and Jordan to name a few. The Mirage F1 would also have the dignity of serving as the main interceptor of the Arme De L'Air until it was replaced by the Mirage 2000 in 1984. It also saw action in the Persian Gulf in the hands of the Iraquis.
| THE KIT |
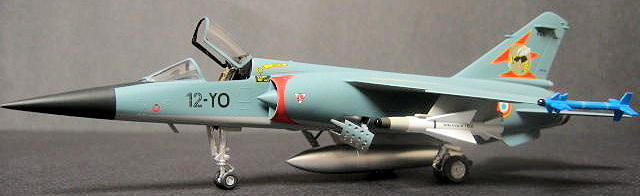
I'm not sure of this kits original debut but If I had to guess I'd say it probably dates back to the late 1970s or early to mid 1980s. It's exactly what you'd expect of an older Hasegawa kit. This doesn't make it bad or anything, it's just one that's been around for a while. Panel line detail is of the raised variety while the control surfaces on the main wings are recessed. The same goes for the numerous small holes that I can only guess are a sort of speed brake on the upper wing surfaces. Inside are 4 sprues of light gray plastic and a clear two piece canopy totaling 50 parts in all. A standing pilot figure is included and a separate boarding latter. Both of which would come in nice should you pose your model on a display base. Markings are provided for three aircraft all in French service and all in the familiar color scheme of Blue Gray over Silver Gray. (Whatever "Silver Gray" is that is.) No. 1 is from E.C. 1/5 VENDEE Solenzara BA. No. 2 is from EC 1/12 "CAMBRESIS" Cambrai BA and lastly is No. 3 the infamous "Tiger Meet" plane also from E.C. 1/12 Cambrai BA June 1979. This airplane is certainly the most colorful one of the lot with its yellow and black striped tail and lower ventral fuselage fins. Decals look to be of good quality and in register though the roundels are in three separate pieces with the white being more of an ivory color than a true white. With only 4 construction steps this kit looks like a pretty easy and relatively quick build.
| CONSTRUCTION |
This is another one of
those kits that fell into the started pile category. Previously I'd managed to
assemble the entire airframe over a weekends time and it went together without
any trauma. The cockpit and inside of the engine nozzle had been painted in flat
black and the decals were placed on for the consoles and instrument panel. The
ones for the consoles seemed a bit oversized and would have benefitted from some
trimming beforehand. The completed cockpit tub was trapped between the
 fuselage
halves which were then glued together. I forgot if I added weight to the nose
but am pretty sure I did add some to avoid having a tail sitter. Besides you're
always better safe than sorry. The wings came next and were easy since they were
one piece. These were followed by the stabilizers after allowing some drying
time.
fuselage
halves which were then glued together. I forgot if I added weight to the nose
but am pretty sure I did add some to avoid having a tail sitter. Besides you're
always better safe than sorry. The wings came next and were easy since they were
one piece. These were followed by the stabilizers after allowing some drying
time.
Everything fit pretty well with the normal amount (for me at least) of filler used in most places. The worst fitting parts of the airframe were the intake covers on the sides of the fuselage. It took several applications of filler to get them to blend in with the rest of the fuselage. It was also hard to get rid of the seam that runs down the top of the fuselage about halfway down the length of it all the way up to the tail. I'd read somewhere that a fairly close match for the blue color used on these jets is WW2 era US Navy Blue Gray. I used the blue color for the intake nozzle cones and USSR Light Topside Gray for the insides of the intake covers. Make sure you paint the insides of these before attaching them. As said these required extra work to get them blended in after attaching but nothing impossible. A good idea would be to use some very very thin styrene sheet strips behind were the nozzle covers attach to give the filler something to stick to. Polly Scale Acrylics were the choice here as I already had them on hand. The lower fins at the bottom of the rear fuselage were added next but needed a little blending here and there with filler to eliminate a few small gaps. The cockpit and intake nozzles were masked off and the airframe was ready for painting.
| COLORS & MARKINGS |
Or so I'd thought! A
quick squirt of paint over some of the seam areas showed there were still a few
flaws that needed to be dealt with. This was true especially of the intake
covers. Noting to do but try and correct it right? Once I was satisfied with the
overall appearance it was time to move on and try my hand at some more painting.
As mentioned before, Polly Scale USSR Light Topside Gray was used for the
bottom, outsides of the gear doors and weapons racks. A while later I finally
got back to the kit a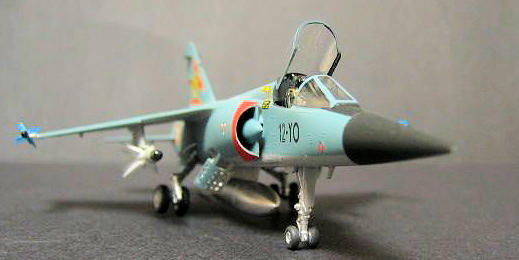 nd masked off the bottom areas. Trying to figure out the
demarcation line between the blue and the gray was a bit tricky at first and I
used the diagrams from the kit along with some pictures in a good reference book
to get things right. Polly Scale US Navy Blue Gray was then sprayed on and when
that was dry enough I masked off the radome and sprayed it with their Flat
Black. I even tried lightening the black to give it more of a dark gray hue but
obviously didn't lighten it enough. The next day I did the anti glare strip in
front of the windscreen and used the same color but straight out of the bottle.
I had hoped to have had a bit of a contrast between the two colors but didn't
get it. Oh well, better luck next time Charlie.
nd masked off the bottom areas. Trying to figure out the
demarcation line between the blue and the gray was a bit tricky at first and I
used the diagrams from the kit along with some pictures in a good reference book
to get things right. Polly Scale US Navy Blue Gray was then sprayed on and when
that was dry enough I masked off the radome and sprayed it with their Flat
Black. I even tried lightening the black to give it more of a dark gray hue but
obviously didn't lighten it enough. The next day I did the anti glare strip in
front of the windscreen and used the same color but straight out of the bottle.
I had hoped to have had a bit of a contrast between the two colors but didn't
get it. Oh well, better luck next time Charlie.
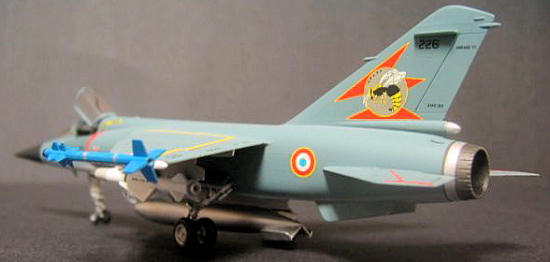
A coat of Polly Scale Clear Gloss was used in preparation for the decals. I had bad luck with this product and didn't get the kid of finish I was hoping for. Trying to get it finished for a club meeting that weekend I just pressed on and went with it as it looked smooth enough for the decals. I wasn't crazy about the Tiger Meet version but wanted to portray a Mirage with the colorful Wasp and Tiger markings as seen in version#2 from EC 1/12 Cambresis Cambrai BA ala the kit markings. However I did not feel like having to saw off some of the radar homing cones that are a part of the aircrafts ECM complement. It was in the Aerofax Minigraph 17 "Dassault Mirage F1" book that I saw a nice color photo of "12-YO" also from that same unit that had all of these attractive tips and cones intact. I like the appearance of the airplane with these in place and by depicting this version I would in a sense be doing something different and not exactly straight from the kit.
A friend gave me the "O"s that I needed along with some small black numbers for the 3 digit code on the vertical fin. In this case it came out to be #226. Thanks PZL Phil! (For those of you really into French aircraft, Modeldecal does/did several serial/code number sets. Ed) The kit decals were a little thick but for the most part went on without any problems though some of them wrinkled from the Micro Sol. You'd think by now I'd know from previous experiences that for the most part this stuff and Hasegawa decals just do not mix! Other reviews I've read have also mentioned this. The red areas around the intake housings wrinkled badly and try as I might I could not undo the damage so I had to leave them as is. With some patience and perhaps a circle template you could probably paint and mask these and achieve a better result than using the decals. An area like this would be better if masked and painted due to the amount of curve. A coat of Testors Dullcote was sprayed on after the model was wiped down with a damp cloth to remove any setting solutions. Soon after I began to notice that unfortunately some of the decals had silvered. Too late now and time to keep going and not look back.
| FINAL CONSTRUCTION |
The landing gear were
glued in place after painting the wheel wells with two coats of Humbrol
Metalcote #27002 Polished Aluminum. To be honest this is probably one of my
least favorite parts of building model aircraft. Everything up to this point
could go smooth but if you screw up the alignment of the gear units it will
haunt you forever and can ruin not only the sit but also the appearance of a
model. At first I thought I had the cat in the bag as the nose gear unit went
into place without any problems other than having to trim the top of the door a
bit to get the part to sit better. The main gear units are comprised of two
pieces each with the main struts and a secondary actuating arm. One end of the
arm connects with the main gear strut and the other end plugs into a hole in the
gear well. This should have been an omen of bad things to come! The right
landing gear unit went into place without any trou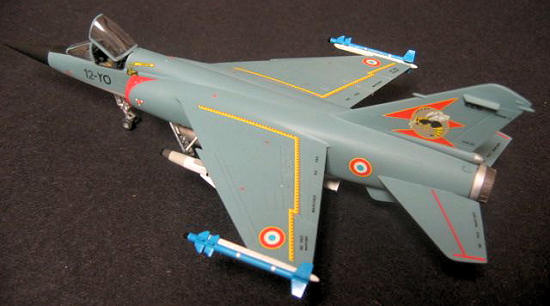 bles while the left one needed
some tweaking and sweet talking to go into place properly. Just when I thought
everything was going swell I gasped in horror as I saw the right unit wasn't
evenly touching the ground. Try as I might I could not fix it and with fear of
breaking the offending unit I left it as it was figuring I could maybe hide it
were I to pose it on a base. Given the complex nature of the F1s landing gear I
wasn't surprised that this would prove to be problematic. Moving on, the gear
units were painted with some more of the aforementioned Humbrol aluminum color
along with the insides of the landing gear doors. The tires were painted with a
flat black color and the gear were now done. The canopy and windscreen were
cleaned up and masked off using a combination of Bare Metal Foil and Tamiya
tape. These were then sprayed with some flat black and followed up with some
Blue Gray.
bles while the left one needed
some tweaking and sweet talking to go into place properly. Just when I thought
everything was going swell I gasped in horror as I saw the right unit wasn't
evenly touching the ground. Try as I might I could not fix it and with fear of
breaking the offending unit I left it as it was figuring I could maybe hide it
were I to pose it on a base. Given the complex nature of the F1s landing gear I
wasn't surprised that this would prove to be problematic. Moving on, the gear
units were painted with some more of the aforementioned Humbrol aluminum color
along with the insides of the landing gear doors. The tires were painted with a
flat black color and the gear were now done. The canopy and windscreen were
cleaned up and masked off using a combination of Bare Metal Foil and Tamiya
tape. These were then sprayed with some flat black and followed up with some
Blue Gray.
The missiles were next and some trimming and carving up was needed to remove some of the mold seams. I also drilled out the ends of each to add a little more realism. The Matra 550s and 530s were painted with a base coat of silver then a coat of black for the bands on the main bodies of the 530s. I masked off the bands for these (as well as what would later be the silver bands on the 550s) with some thin cut strips of Tamiya tape then shot all 4 of the missiles with some H1 Gunze Gloss White. After allowing some extra time for the gloss paint to dry I masked off and sprayed some H22 Gunze Gray for the forward part of the 530s and some H45 Light Blue lightened with white for the main bodies of the 550s. Some more masking was done and I used some Gunze dark gray (forgot the exact number) for another section of the 550s. Finally the tips for all four missiles were painted with gloss black and the pieces of tape removed from all of them. There was only the two decals for each 530 and since the paints were gloss I was able to apply them without using a gloss coat. But alot of work they were! The pylon for the drop tank was masked off to avoid any overspray when painting the tank itself. For this I cheated and used some Tamiya silver paint out of a spray can which gives a nice finish. At the same time I also painted the engines exhaust nozzle too.
Things were getting close to the finish line here and the various gear door covers were glued in place along with the speed break doors which I posed in the open position. I didn't realize it at the time but most photos of Mirage F1s on the ground show these doors to be in the closed position. However I had made the decision to pose them open from early on as I had drilled out all the holes for a little added realism. Besides it would have been a little more work to blend them in had I done them the other way. The locating points for the hydraulic arms for these aren't exactly well defined but were simple enough to figure out. Just a bit on the fiddly side. I didn't add the boarding ladder or the refueling probe as I liked the appearance of the model without them. The racks for the Matra 530s were glued on next followed by the large central drop tank unit. The missile rails on the wing tips were brush painted with some Polly Scale Flat White, this took several applications (and they could still probably use another coat!) to cover over the blue color. The 530s went on without any troubles though the wing tip mounted 550s seemed to require alot of glue to get them to stay in place. Fortunately I was able to avoid making a mess. The windscreen was glued in place with some Elmers white glue and the canopy itself was posed in the open position to show off the nice aftermarket resin ejection seat which I put in to dress up the cockpit. The engine nozzle areas which were to remain silver were masked off and the rest of the unit was sprayed with some Gunze H76 Burnt Iron. I wanted to achieve as best as I could the silver, burnt iron, silver colors of this part as seen on color photos of the real thing. This was one of the last items to be glued in place and with a little detail painting here and there the model was now finally finished.
| CONCLUSIONS |
Building and finishing this kit was a fun project and it's always good to be able to delete another kit from the started pile. It's not always one you see on the tables at model shows either and for its age the Hasegawa kit has stood up well and is a pretty solid, straightforward build. An often underappreciated aircraft the Mirage F1 has nice lines and is a pleasing aircraft to look at. With some good kits of the type available from the likes of Hasegawa, Heller and a rerelease of the Airfix kit due out soon there is enough to go around for everyone. If you can find the old Esci kit grab one as it looks very nice in the box with its recessed panel lines and looks to be the most modern kit of the four. The fact that the F1 was used by so many countries leads to many possibilities for color schemes and markings and with the Hasegawa version being a more than good enough starting point I can certainly recommend this kit.
| REFERENCES |
Aerofax Minigraph 17 Dassault Mirage F1 by Rene Francillon by Aerofax Inc.
various Google searches
July 2009
Copyright ModelingMadness.com. All rights reserved. No reproduction in part or in whole without express permission from the editor.
If you would like your product reviewed fairly and quickly, please contact the editor or see other details in the Note to Contributors.