Formaplane 1/72 Hawker Nimrod MR.2
| KIT #: | 3 |
| PRICE: | About $25.00 when new |
| DECALS: | None provided |
| REVIEWER: | Carmel J. Attard |
| NOTES: | Vacuformed plastic |
| HISTORY |
The Nimrod is a highly sophisticated and sensitive suite of systems used for reconnaissance and gathering electronic intelligence as well as ASW and Air /Sea search and rescue missions. The Nimrod has the ability to transit at high speed and then later in an operational area at a lower speed for long period of time and so makes it ideal suited for the task. The operating crew of 14 consists of two pilots and a flight engineer, two Weapons Systems officers and a WSO who is the sensor and communications co-coordinator. This is supported by a team of seven WSOs who supervise the aircraft’s acoustic processors, which monitor active and passive sonobuoys as well as manage a wide range of avionics and weapons systems that are essential to delivering Nimrod’s full capability.
The Nimrod is powered by four Rolls Royce Spey 250
turbofans, which gives a trust of 12,500 lbs each. It has a wingspan of 114’9’’,
a length of 126’9’’ and a maximum take off weight of 184,000 lbs. It has a
maximum endurance of 9.5 hours and can operate at a maximum height of 44,000 Ft.
The offensive weapons that are carried by t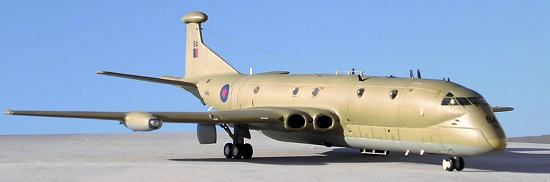 he Nimrod are the Sting Ray torpedoes
for use in the ASW role and he Harpoon missiles for the ASUW role. For SAR the
aircraft has a selection of air deliverable, multi-seat dinghies and survival
packs. For self-defence the aircraft can carry four AIM-9L sidewinders
air-to-air missiles carried on Pylons under the wings. The aircraft can carry in
excess of 200 sonobuoys internally of several different types, both active and
passive that are delivered via two unpressurised 6-buoy rotary launchers and two
pressurized single-shot launchers.
he Nimrod are the Sting Ray torpedoes
for use in the ASW role and he Harpoon missiles for the ASUW role. For SAR the
aircraft has a selection of air deliverable, multi-seat dinghies and survival
packs. For self-defence the aircraft can carry four AIM-9L sidewinders
air-to-air missiles carried on Pylons under the wings. The aircraft can carry in
excess of 200 sonobuoys internally of several different types, both active and
passive that are delivered via two unpressurised 6-buoy rotary launchers and two
pressurized single-shot launchers.
The Nimrod remains the only jet powered maritime patrol aircraft in military service and offers the advantages of speed and height in transit while capable of operating for long on-task periods. It offers stealth element in anti-submarine warfare, as the jet noise of the Nimrod is much less detachable than most propeller driven aircraft that makes discrete resonance during flight. The Nimrod has an endurance of 10 hours, which can be extended by air refueling during flight.
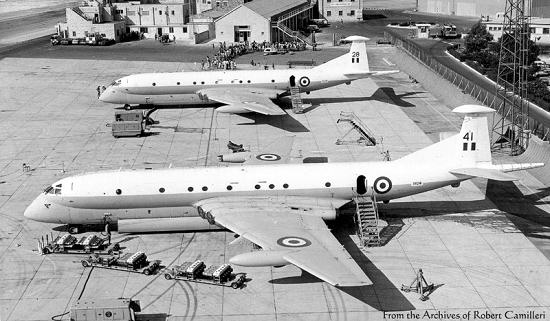 The early Nimrods MR1 began to use Luqa airfield in Malta in
July 1971 when it started to replace the Shackleton MR3 of 203 Squadron the last
of which departed in January 1972. They remained stationed on the island until
December 1977.This was towards the end of British forces using facilities on the
island. Nimrods continue to make visits to the island of Malta during the annual
international air show held on last weekend of September. Today the majority of
Nimrod’s tasking comes from the Maritime Headquarters at Northwood. Peacetime
work includes surface and sub-surface surveillance and maintenance of a one-hour
standby in support of the Air Rescue Coordination Centre, allocated at RAF
Kinless. Today, No 201,120 and 206 Squadrons operate Nimrods, all based at
Kinloss, in Morayshire, UK. This is also the home of No 42 Squadron. The Nimrod
MR2 will continue in service until it is replaced by the MRA4, which is expected
to enter service from 2007.
The early Nimrods MR1 began to use Luqa airfield in Malta in
July 1971 when it started to replace the Shackleton MR3 of 203 Squadron the last
of which departed in January 1972. They remained stationed on the island until
December 1977.This was towards the end of British forces using facilities on the
island. Nimrods continue to make visits to the island of Malta during the annual
international air show held on last weekend of September. Today the majority of
Nimrod’s tasking comes from the Maritime Headquarters at Northwood. Peacetime
work includes surface and sub-surface surveillance and maintenance of a one-hour
standby in support of the Air Rescue Coordination Centre, allocated at RAF
Kinless. Today, No 201,120 and 206 Squadrons operate Nimrods, all based at
Kinloss, in Morayshire, UK. This is also the home of No 42 Squadron. The Nimrod
MR2 will continue in service until it is replaced by the MRA4, which is expected
to enter service from 2007.
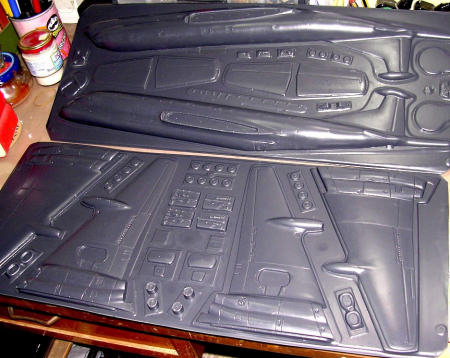
| THE KIT |
The Nimrod is a large vacform scale model released by Formaplane some years ago.
Today it is in circulation under a
different kit manufacturer: Aircraft in Miniature Limited, of Nuneaton,
Warwickshire, UK. The forgoing information relates to the early Formaplane kit
release where the vacform plastic was white and no decal and metal parts
 were
supplied. The more recent release was in black plastic and though some of the
pictures that accompany the review are of a more recent release these were
exactly the same as the Formaplane kit with the main difference that originally
the kit appeared in white plastic.
were
supplied. The more recent release was in black plastic and though some of the
pictures that accompany the review are of a more recent release these were
exactly the same as the Formaplane kit with the main difference that originally
the kit appeared in white plastic.
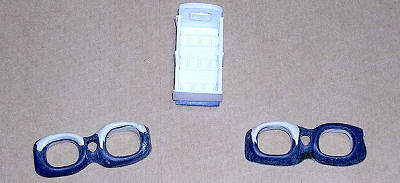
The kit consisted of sheets of vacform plastic containing 16 parts for the fuselage, wings, tail planes, wheel doors, exhaust outlets, 3 fuselage bulkheads, four cockpit items, and 28 smaller vacform items for the undercarriage parts including vacform wheels. Parts from the clear Perspex sheet are the wing search light dome, cockpit windshield and two strips with impressions for the cockpit side windows. Incidentally for those who still have the Formaplane kit, the Aircraft in Miniature/ Transport wings also releases a set in white metal to cater for the undercarriage and oleo parts as well as refueling probe and other small items for the price of 7 Sterling.
 Considering the huge size of the kit, which comes in a sturdy Formaplane type of
packing with a side view picture of the Nimrod in black and white, this is not
the type of kit for one to start on vacform modeling. It is the type that needs
some experience besides a lot of patience and one should have a go at smaller
vacform kits such as the type offered by a wide range from Esoteric, Rareplanes
and the like. It is recommended to acquire good scale plans and make good
reference to clear pictures of the Nimrod version that one desires to build from
websites as
www.airliners.net among others. This is so because there are visible
variations between a Nimrod and another as if equipment is updated constantly
and makes changes on the outside etc.
Considering the huge size of the kit, which comes in a sturdy Formaplane type of
packing with a side view picture of the Nimrod in black and white, this is not
the type of kit for one to start on vacform modeling. It is the type that needs
some experience besides a lot of patience and one should have a go at smaller
vacform kits such as the type offered by a wide range from Esoteric, Rareplanes
and the like. It is recommended to acquire good scale plans and make good
reference to clear pictures of the Nimrod version that one desires to build from
websites as
www.airliners.net among others. This is so because there are visible
variations between a Nimrod and another as if equipment is updated constantly
and makes changes on the outside etc.
| CONSTRUCTION |
The same
sequence of steps is applied for building vacform kits. Start by outlining the
plastic parts with a pointed permanent marker pen held at an angle of 45 degrees
to the flat surface. In so doing you will identify the kit part and surplus
backing sheet. Next is make a scribed line around the model parts using a sharp
pointed Exacto blade drawn forwards. Then snap off the unwanted plastic from
around the parts. It may take a couple of times scribing to get the plastic snap
off easily. The cut kit parts are then sanded on a 200 grit sanding paper, which
is fixed to a flat backing piece of wood. Being a large model, the Nimrod kit
parts would require a rectangular sanding area 2 ft x 6” in order to help you
sand evenly. Smaller areas of sanding paper are only
 recommended for smaller
models. The plastic parts are moved in a gentle circular rubbing motion until
the sanding edge reaches the permanent marker line. All the components are
treated in this manner. Other items such as main wing parts and tail planes must
be sanded so the edges form a natural contour, i.e. sanded to a very sharp thin
edge. One of the weak points would be if you leave a thick trailing edge that
spoils a nicely done model. The vacform kit also contains some imperfections on
the plastic arising from tiny holes on t the models mould through which the
vacuum is created when the model is made. These are sanded off and filled with
putty as needed.
recommended for smaller
models. The plastic parts are moved in a gentle circular rubbing motion until
the sanding edge reaches the permanent marker line. All the components are
treated in this manner. Other items such as main wing parts and tail planes must
be sanded so the edges form a natural contour, i.e. sanded to a very sharp thin
edge. One of the weak points would be if you leave a thick trailing edge that
spoils a nicely done model. The vacform kit also contains some imperfections on
the plastic arising from tiny holes on t the models mould through which the
vacuum is created when the model is made. These are sanded off and filled with
putty as needed.
Having the parts cut and brought to size it is then the turn to attend to each part. Starting with the fuselage, where the windows needs to be cut to fuselage sides and cockpit area using a sharp modeling knife and a set of files to shape each window according to the outline printed on kit part half. Small air intakes are opened and when this stage is complete the attention is turned to the pilot and crew office, using the supplied parts already shaped accordingly and given detail treatment and paintwork. Bulkheads are cut, glued and secured in place. Some dry fitting and checking is carried out in order to ensure that fuselage halves are not over sanded. It will help if at this stage to glue small tabs of plastic on alternate sides inside the edges of the two fuselage halves. This will give the glue more holding surface.
 Bearing in mind that this is a big
model then one have to ensure that the vertical and horizontal axis of the model
from being twisted during joining and building process. This is essential during
joining of wings and horizontal stabilizers to the fuselage and when mounting
the landing gear. The wings are quite sizeable, and when the undercarriage bay
is cut, wing spars are added and the undercarriage bay is boxed using scrap
plastic strips cut to fit to sides. Small dowels made from sprue are added to
tail planes and main wing root ends. A jig made from thick cardboard is useful
to maintain the correct alignment and anhedral during joining process.
Bearing in mind that this is a big
model then one have to ensure that the vertical and horizontal axis of the model
from being twisted during joining and building process. This is essential during
joining of wings and horizontal stabilizers to the fuselage and when mounting
the landing gear. The wings are quite sizeable, and when the undercarriage bay
is cut, wing spars are added and the undercarriage bay is boxed using scrap
plastic strips cut to fit to sides. Small dowels made from sprue are added to
tail planes and main wing root ends. A jig made from thick cardboard is useful
to maintain the correct alignment and anhedral during joining process.
 The
cockpit parts supplied with the kit are very basic if also of the wrong shape.
The floor and instrument panel are first fixed in place. Control sticks are
added and crew figures added to the reshaped seats. Rudder pedals and other side
instruments are added to the cockpit. It is not possible to emphasize on cockpit
detailing since much of it will be hidden but the parts added are correctly
painted in the respective colour. Cockpit area was painted light grey with
touches of darker grey and black. The items were glued to one fuselage half.
Nose weight was added in a boxed compartment and glued to a forward part of the
nose area. Wheel well detail is then added and finally the fuselage halves are
joined together and held with masking tape strips. Fitting the clear canopy
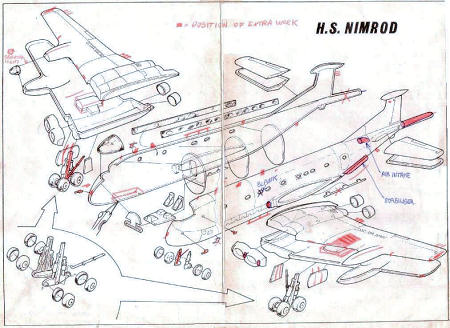
Perspex was left to a later stage. The kit instructions contain an exploded view
of the kit parts. The ones I marked in red are the items that I had to add to
the kit or are replaced. The progressive assembly of the Nimrod model followed
three phases: Correction of the kit parts, conversion of the kit into an early
Mk 2 and extra work done to the kit.
The
cockpit parts supplied with the kit are very basic if also of the wrong shape.
The floor and instrument panel are first fixed in place. Control sticks are
added and crew figures added to the reshaped seats. Rudder pedals and other side
instruments are added to the cockpit. It is not possible to emphasize on cockpit
detailing since much of it will be hidden but the parts added are correctly
painted in the respective colour. Cockpit area was painted light grey with
touches of darker grey and black. The items were glued to one fuselage half.
Nose weight was added in a boxed compartment and glued to a forward part of the
nose area. Wheel well detail is then added and finally the fuselage halves are
joined together and held with masking tape strips. Fitting the clear canopy
Perspex was left to a later stage. The kit instructions contain an exploded view
of the kit parts. The ones I marked in red are the items that I had to add to
the kit or are replaced. The progressive assembly of the Nimrod model followed
three phases: Correction of the kit parts, conversion of the kit into an early
Mk 2 and extra work done to the kit.
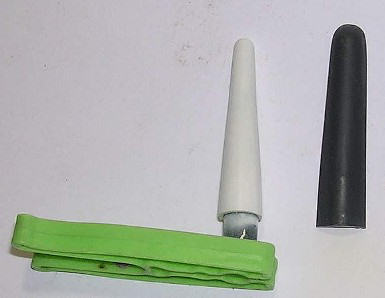 Correcting the kit parts included the reshaping and repositioning ¾” forward of
the tail bumper which is now enlarged. The MAD boom was grossly oversize
and was replaced with a scratch build one made from a disused wooden brush stick
shaped and cut to size. The leading edge area close to fuel tank and searchlight
was reshaped with a file. Nose area was also rebuilt and filed to a more
acceptable shape. Fuel dampers were added three on each trailing edge using
stretch sprue pieces.
Correcting the kit parts included the reshaping and repositioning ¾” forward of
the tail bumper which is now enlarged. The MAD boom was grossly oversize
and was replaced with a scratch build one made from a disused wooden brush stick
shaped and cut to size. The leading edge area close to fuel tank and searchlight
was reshaped with a file. Nose area was also rebuilt and filed to a more
acceptable shape. Fuel dampers were added three on each trailing edge using
stretch sprue pieces.
The
conversion into an early Mk2 mainly consisted in the following alterations:
Adding a large air intake to the aft compartment, port side only, adding a large
ventral stabilizer. Blanking one window to port side. Adding a series of
antennae to upper fuselage. One should note that there was a variety of window
arrangements fitted to different Nimrods and therefore one should make
 correct
study of the particular Nimrod that one is building by careful study of photos
of the real aircraft. An additional six antennae made from plastic card were
joined to various localities on the roof of the fuselage. Two pitot tubes were
added to starboard fuselage side and another added to port side near crew cabin.
There is a small air intake located between the two larger engine air intakes.
This was filed to shape and stretch sprue brackets cut to small lengths added
across the intakes. The cockpit windshield was now added to the fuselage and the
joint faired over with putty and sanded to a smooth finish. Windscreen wipers
were added. A tiny aerial made from thin steel wire was added to end of tail
boom. The exhaust outlets also needed careful cutting and shaping before being
joined to the wing trailing root area.
correct
study of the particular Nimrod that one is building by careful study of photos
of the real aircraft. An additional six antennae made from plastic card were
joined to various localities on the roof of the fuselage. Two pitot tubes were
added to starboard fuselage side and another added to port side near crew cabin.
There is a small air intake located between the two larger engine air intakes.
This was filed to shape and stretch sprue brackets cut to small lengths added
across the intakes. The cockpit windshield was now added to the fuselage and the
joint faired over with putty and sanded to a smooth finish. Windscreen wipers
were added. A tiny aerial made from thin steel wire was added to end of tail
boom. The exhaust outlets also needed careful cutting and shaping before being
joined to the wing trailing root area.
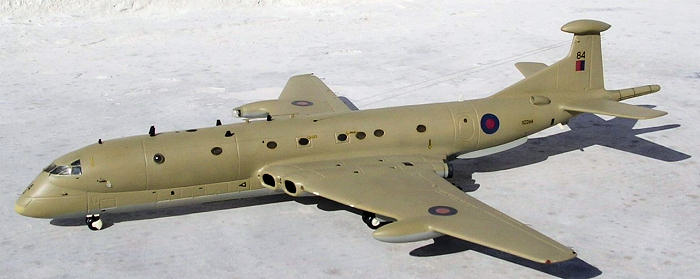
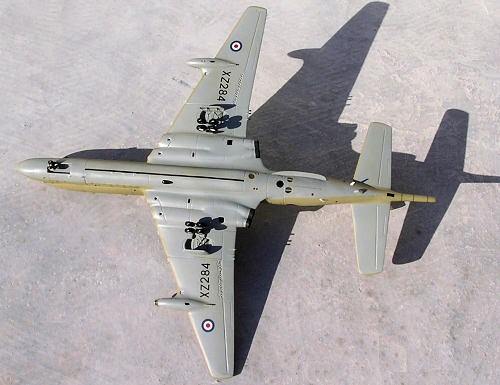
| COLORS & MARKINGS |
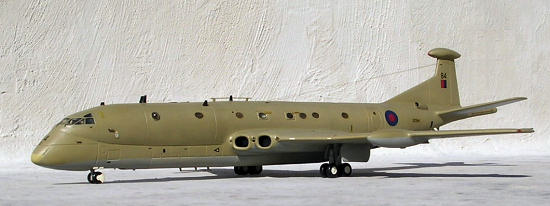
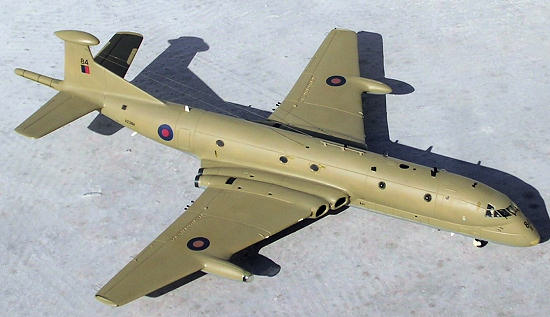 All
undersurfaces were airbrushed in two coats of Humbrol light aircraft grey while
the upper surfaces were coated in Hemp, which included an area extended under
the leading edge and wing tips. At the time I built the kit I used Gloy
Authentic Aircraft paints. Freshly painted Hemp consisted of four parts A3775
and one part A333. Later hemp colours tended to fade with weathering and tended
to appear slightly lighter in shade on Nimrods after a time. Other smaller
details as antennae of various shape were black and others white. No decals are
supplied with the kit and I had to sort these out from a variety of sources. The
upper wing roundels came from a Model Decal Lightning sheet, and for the
fuselage roundel I used one from a Matchbox Hunter sheet. The serial numbers
were sorted out from a sheet issued by Model Decals. The black trim at the bomb
bay came from Scale Master black strip sheet. I have used Micro setting solution
for all the decal applications. The completed model was finally given a semi
matt finish using 50:50 mix of Micro Matt and Micro Gloss varnish.
All
undersurfaces were airbrushed in two coats of Humbrol light aircraft grey while
the upper surfaces were coated in Hemp, which included an area extended under
the leading edge and wing tips. At the time I built the kit I used Gloy
Authentic Aircraft paints. Freshly painted Hemp consisted of four parts A3775
and one part A333. Later hemp colours tended to fade with weathering and tended
to appear slightly lighter in shade on Nimrods after a time. Other smaller
details as antennae of various shape were black and others white. No decals are
supplied with the kit and I had to sort these out from a variety of sources. The
upper wing roundels came from a Model Decal Lightning sheet, and for the
fuselage roundel I used one from a Matchbox Hunter sheet. The serial numbers
were sorted out from a sheet issued by Model Decals. The black trim at the bomb
bay came from Scale Master black strip sheet. I have used Micro setting solution
for all the decal applications. The completed model was finally given a semi
matt finish using 50:50 mix of Micro Matt and Micro Gloss varnish.
| CONCLUSIONS |
 This was
a large vacform kit that I had no patience to wait for one of the kit
manufacturers to release it by injection moulding. With the Airfix Nimrod
supposedly due to be released soon, it is hoped that other versions of the
aircraft can eventually be built (so long there is empty space left on the
display shelves}.
This was
a large vacform kit that I had no patience to wait for one of the kit
manufacturers to release it by injection moulding. With the Airfix Nimrod
supposedly due to be released soon, it is hoped that other versions of the
aircraft can eventually be built (so long there is empty space left on the
display shelves}.
October 2006
Copyright ModelingMadness.com. All rights reserved. No reproduction in part or in whole without express permission from the editor.
If you would like your product reviewed fairly and fairly quickly, please contact the editor or see other details in the Note to Contributors.