Revell AG 1/72 Tornado ECR
| KIT #: | 04617 |
| PRICE: | $14.00 MSRP |
| DECALS: | One option - Tiger Meet 1996 |
| REVIEWER: | Kaidick Cheung |
| NOTES: |
| HISTORY |
 The Tornado ECR was a development of the IDS, originally intended for
radar suppression and reconnaissance duties for the Luftwaffe. Eventually
the reconnaissance requirement was dropped, but it continued with the SEAD
mission, similar to a Wild Weasel mission. A Raytheon Emitter Locator
System was added, which enabled the aircraft to use the AGM-88 HARM. The
standard payload of a SaabTech BOZ 101 flare and chaff dispenser pod and a
Cerberus C III ECM pod was also carried. The Mauser cannons were deleted.
It also used uprated RB199 Mk 105 engines, each one delivering 9550 pounds
of thrust and 16,700 pounds with afterburner. First delivery was in May
1990, and a total of 35 were built. Italy converted an additional 16 IDS
airframes to the ECR version.
The Tornado ECR was a development of the IDS, originally intended for
radar suppression and reconnaissance duties for the Luftwaffe. Eventually
the reconnaissance requirement was dropped, but it continued with the SEAD
mission, similar to a Wild Weasel mission. A Raytheon Emitter Locator
System was added, which enabled the aircraft to use the AGM-88 HARM. The
standard payload of a SaabTech BOZ 101 flare and chaff dispenser pod and a
Cerberus C III ECM pod was also carried. The Mauser cannons were deleted.
It also used uprated RB199 Mk 105 engines, each one delivering 9550 pounds
of thrust and 16,700 pounds with afterburner. First delivery was in May
1990, and a total of 35 were built. Italy converted an additional 16 IDS
airframes to the ECR version.
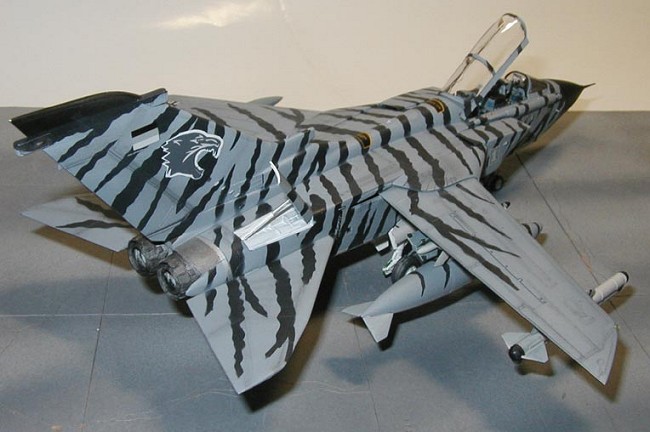
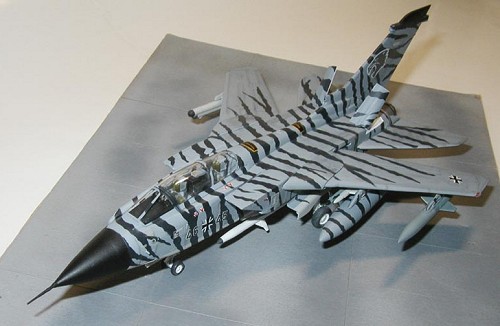
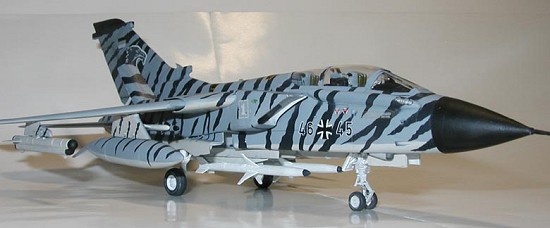
All ECRs are assigned to JadgbomberGeschwader 32, based at Lechfeld west of Munich. During NATO peacekeeping operations in the Balkans, a number of aircraft were attached to EinsatzGeschwader 1, based at San Damiano AB in Piacenza Italy. There, they flew SAM suppression totaling 2035 flight hours with no losses. At Tiger Meet 1996 held in Beja, Portugal, aircraft 46+45 arrived with a dark grey tiger stripe pattern over the entire aircraft.
| THE KIT |
For a look in the box, please visit the Preview.
| CONSTRUCTION |
This is a fiddly kit, but for the most part everything goes together quite well so I won’t spend too much time on this. There are 155 pieces and 57 steps in the instructions, all for a kit that is only 9 inches long. The breakdown of parts is that the fuselage comes in 4 major parts, similar to the Hasegawa kit. The rear section comes in top and bottom sections, while the front part comes in left and right sections.
 The cockpit has raised surfaces and decals. I chose to use the decals,
but they don’t stick on very well, don’t match up with the buttons, and
don’t react to Micro Set and Sol. Next time, I’ll just paint the
instruments. The rest of the cockpit is quite detailed. The ejection seats
look too upright, they should incline more. The wing pylons can pivot, but
it’s a very fragile part and during sanding I broke one of the pylons off.
So 3 of the 4 pylons can swivel now. * sigh * The tailplanes can
pivot but I would suggest that they be glued in place. The main wings fit
very securely in place and are actually quite robust. The kit is engineered
very tightly so that there is no way the gears can slip.
The cockpit has raised surfaces and decals. I chose to use the decals,
but they don’t stick on very well, don’t match up with the buttons, and
don’t react to Micro Set and Sol. Next time, I’ll just paint the
instruments. The rest of the cockpit is quite detailed. The ejection seats
look too upright, they should incline more. The wing pylons can pivot, but
it’s a very fragile part and during sanding I broke one of the pylons off.
So 3 of the 4 pylons can swivel now. * sigh * The tailplanes can
pivot but I would suggest that they be glued in place. The main wings fit
very securely in place and are actually quite robust. The kit is engineered
very tightly so that there is no way the gears can slip.
The only real fit problem comes when attaching the front fuselage to the
rear. The instructions say to attach the air intakes to the front, then
glue the whole thing to the rear, but that creates a huge gap. An easier
way is to leave off the air intakes until the front and rear fuselage is
together, then cut off all the alignment pins (th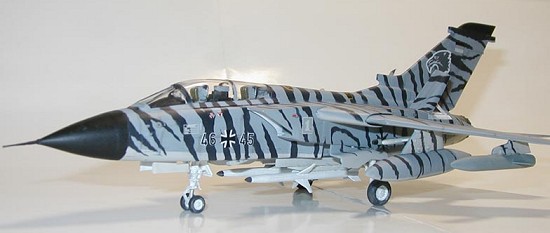 ey don’t fit) for the
intakes, and slide them into the wing root. This will result in a very good
fit and minimal putty will be required. The top of the intake is not
supposed to be flush, it forms a vent.
ey don’t fit) for the
intakes, and slide them into the wing root. This will result in a very good
fit and minimal putty will be required. The top of the intake is not
supposed to be flush, it forms a vent.
The main gear is particularly fiddly and Cyanoacrylate type glue (super glue) is recommended. The airbrakes do not fit flush, but I think that’s a problem with every Tornado kit. That doesn’t really detract from the kit because the detail inside the well is quite good, so the airbrakes might as well be open. A neat feature is that the canopy fits very well, such that it fits perfectly flush in the closed position and no glue is needed to hold it. Also, it fits well enough to hold itself in the open position without glue. After most of the parts are put on, it’s off to the paint shop.
| COLORS & MARKINGS |
As a friend said, it looks like a zebra exploded all over it. The actual
aircraft looks like the stripes were painted on top of the standard
camouflage. The kit comes with all the stripes as decals, however my
experience with the instrument panel decals led me to decide to paint on
the stripes. To be contrarian, I chose to paint it the reverse order of how
it should be done. I sprayed the black first, then dark grey, then the
upper fuselage medium grey, and finally the under fuselage light grey. The
stripes were made by masking off the dark grey. It looks more tedious than
it actually is. The entire vertical fin is a b ig decal sheet, so I had to
cut the tiger heads off from that sheet.
ig decal sheet, so I had to
cut the tiger heads off from that sheet.
The exact color callouts are for Revell paints and all of them require mixing; none of the colors can be obtained straight from the bottle. I didn’t worry too much about getting the exact shade of grey as I was using Testors Model Master enamels. If anyone asks, I’ll just say RLM 02 and snicker. I should add that I was in a hurry, so most of the camouflage was sprayed outdoors, after sunset, with bad lighting, and it was starting to sprinkle. I did not use a water trap on the air hose. Kids, don’t try this at home!
The kit has very fine recessed panel lines and recessed rivet detail. I wanted to bring that detail out so I used a very thin acrylic wash. Even though this was an air show airplane, it still had a bit of grime on it. The remaining decals were applied, and at this point I was again reminded that painting the stripes was a good idea. The decals are very thick and do not react at all to setting solution. They also do not conform to the panel lines. Fortunately, the remaining decals are pretty small so it’s not too noticeable. Add the weapons, and the kit is done.
| CONCLUSIONS |
This is a fun kit. Even though it’s in all black and grey, it will definitely stand out in among all the other modern grey jets. The stripes seem like a hard thing to do, but all it really takes is a little patience. Highly recommended for people of moderate skill.
| REFERENCES |
A Google of Tornado ECR
www.airliners.net for pictures of the real thingDecember 2005
Copyright ModelingMadness.com. All rights reserved. No reproduction in any form without express permission from the editor.
If you would like your product reviewed fairly and fairly quickly, please contact the editor or see other details in the Note to Contributors.