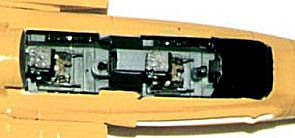
 Figure 1 Upgraded Cockpit of the Tornado
|
KIT: |
Italeri 1/48 Tornado IDS |
|
KIT # |
834 |
|
PRICE: |
$35.00 (AUD) |
|
DECALS: |
Four aircraft |
|
REVIEW & PHOTOS BY: |
|
|
NOTES: |
PROPAGTEAM Decals for this kit – No. 48104 |
|
HISTORY |
The Panavia Tornado was conceived as a result of a need to replace the Lockheed F-104G Starfighter. Initial talks took place early in 1968 with four nations, Belgium, West Germany, Italy and the Netherlands. These countries were joined by Great Britain and Canada later that year. A few months later Belgium and Canada had dropped out leaving four companies, BAC (Britain), MMB (West Germany), Fiat (Italy) and Fokker (the Netherlands) to form Panavia Aircraft. The four customers – the Luftwaffe, Marineflieger, Aeronautica Militare and the Royal Air Force – established the NATO MRCA Management Agency, which allowed them to act as a single body to present their requirements to Panavia. By July of the following year the Netherlands had dropped out of the consortium leaving just three European countries, United Kingdom, Germany and Italy.
Over the next few years the prototypes were built and flown. It was not until October 1974 that the aircraft, P.02/XX946 (a British prototype), flew as the Tornado. The RAF aircraft were designated Tornado GR. Mk1 although our countries simply referred to it as the ‘Tornado’. To Panavia the aircraft is always the IDS (Interdictor / Strike) variant. This is the model that I chose to build.
|
THE KIT |
This is the second Tornado that I have built, the first being a Panavia Tornado F. Mk 3, using the kit decal offerings. There were similarities between the two kits and the problems I encountered in this review also applied to my first effort.
The Italeri kit is fraught with fit and accuracy problems. Many a night was spent filling, sanding and filing the lack of fit between the fuselage front and rear portions as well as the leading edge fairing for the swing-wing. I had also try to second-guess Italeri’s incorrect positioning of the pivot point for the swing-wing by moving the pivot approximately 4mm forward. It lasted long enough for me to attempt to fit the fuselage front and rear portions together when the left wing pivot snapped and the whole thing floated. The solution was to superglue the whole thing together and hence no more moveable wings. In a similar fashion the under wing pylons were glued, as were the tailerons. The latter was as a result of too much movement, coupled with a lack of enthusiasm to see moving parts by this stage!
|
CONSTRUCTION |
I decided to upgrade the very basic cockpit with Eduard photo etch (Tornado IDS Interior 48-091) and a pair of Mk 10 Martin Baker ejection seats from Paragon Designs. The interior was painted in Model Master enamel FS36375, Light Ghost Grey as per the kit instructions. The instrument panels were painted with Light Ghost Grey and the instrument surrounds were painted black. Various knobs and levers were painted red and yellow and the whole area was given a dry brush with a light coat of silver to highlight detail and to simulate wear.
The ejection seats were painted Light Ghost Grey with the cushion and backrest being painted Model Master FS34087, Olive Drab and the seat belt harness painted Tamiya Buff and Desert Yellow. The buckles were painted in Tamiya XF16, Flat Aluminium.
The MFD’s were painted a dark green/grey on the acetate and the whole sheet glued in behind the brass after painting. This was set in place for the front and rear positions. The shroud for the pilot’s instrument panel was removed and replaced with the brass offering, which was then painted matt black.
I elected to leave the original consoles in position rather than use the brass. This had more to do with raised detail on the kit offering, although the throttle quadrant was replaced. All the area was painted Model Master FS37038, Flat Black and the various knobs and switches were painted red, yellow and silver. Although I could have gone to town in this area, due to my lack of reference material I stuck with upgrading those parts for which I had replacements.
Figure 1 Upgraded Cockpit of the Tornado
Once the cockpit was completed it was glued into position and the front fuselage halves glued together. There is a lack of locating pins on the edges, with Italeri preferring to use little tabs. They are effective provided you use care. My personal preference is for locating pins that give a more robust unit once completed. Other, more experienced modellers may have a different point of view, neither is right or wrong it is merely a choice.
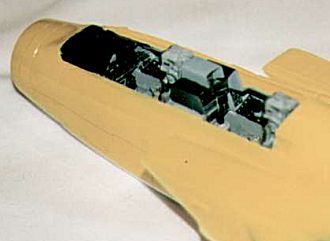
Figure 2 Completed cockpit joined to the rear fuselage portion
The wings and fuselage rear are relatively straightforward to assemble, with the exception of attempting to keep the wings moveable. Once I had given up on the idea of having a moveable model it was relatively straightforward!! All the moveable parts were immobilized, those that hadn’t suffered failure during construction and the whole assembly was married to the front fuselage.
This is where the problems with fit become serious. The front fuselage is relatively easy to construct and the cockpit floor gives the whole structure some rigidity. Not so the rear fuselage. This has a great gaping hole where it attaches to the front and is braced by three lengths of plastic designed to give some rigidity, although it is a use of the word ‘designed’ that has previously escaped me! I had trouble getting the two parts to line up and in the end just used loads of filler cyanoacrylate and applied pressure until it had bonded sufficiently to remove my hands. Great stuff superglue; just don’t get it on your hands! A few layers of skin later, followed by some colourful language and the fuselage was now in one piece.
The engine nacelles were glued in position. I really do wish that kit manufacturers would explain complicated joining in detail for the dummies. I realised well after I had tried desperately to fill the gap at the back topside of the nacelle that it is supposed to be there. This slot is to redirect air from the intake to prevent a build up of air pressure during normal flight. The solution was to open up a gap and insert a plastic piece to accommodate the oversized hole made by the dummy! It looks about right, but I would have preferred not to make the error in the first place. Just check literature and as many pictures of the real thing as possible. I had access to limited material and only a few showed this gap before I realised what it was.
Next comes a real nightmare as the wing fairings on the outside of the engine nacelles were glued into position. There is simply no easy way to glue them into position without using some putty and lots of hands as you wait for the glue to set. Once it had dried I then sanded the whole thing back. Lots of detail was lost and my patience was being sorely tried!
I had purchased the Italeri Fin correction offered by Paragon Designs and when I checked the kit item against the correction could discern no differences, perhaps my Superman eyesight is defective, hence the glasses! Having spent the money on the item I promptly cut up the kit and attached the replacement part. I then attached the tail fin to the fuselage with the almost always-present fit problem. I managed to get around this by sliding the tail fin into its position from the rear. There are two locating lugs present on the fuselage top and these help locate the tail fin onto the fuselage. It’s bizarre that these locating lugs exist when other areas of the kit are devoid of them. They would be very beneficial when gluing fuselage halves together! Lastly I bled polystyrene glue along the edge of the tail fin to fill the gaps.
The exhaust ports were attached and the model was starting to resemble a tornado, and not the aftermath of it’s namesake!
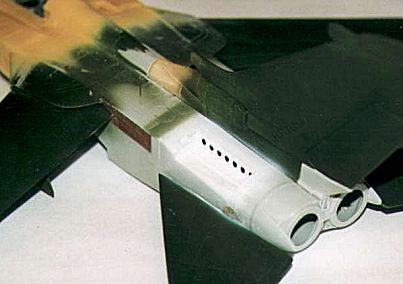
Figure 3 Rear Fuselage showing Eduard photo etch and Paragon Fin Correction
Eduard Photo etch brass (Tornado IDS Exterior 48 –092) was used to cover the sliding portion of the wings along the fuselage. I suspect that this is made of a rubber of some kind as it is referred to as the wing root pneumatic seal, although this is merely supposition. Brass was also used on the area above and below the exhaust ports. Both of the air brakes were up graded with brass and the fuselage recess for the brakes was completely removed and replaced by brass bits. This certainly looks more realistic than the kit’s representation. Both these parts were sprayed with Model Master FS17875, Insignia White and masked off when the fuselage was painted.
The undercarriage also received some additions and modifications. I used the Paragon Designs ‘weighted’ wheels and the Eduard brass to modify the wheel struts. As Paragon had duplicated the disc brake assembly on the main undercarriage I elected not to use the brass. The struts and wheel wells were sprayed with Insignia White. The wheels were painted with Gunze Sangyo Tyre Black and a thin wash of black was bled into the front and rear of the hubs. I hope that no Luftwaffe ground crew take umbrage at my implication of dirty aircraft, it is merely to simulate wear and tear!
I did not attach the gear at this stage, preferring to paint the entire model before going to the trouble of masking off all bits that stick out!
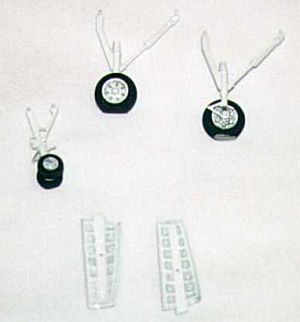
Figure 4 Paragon ‘weighted’ wheels and Eduard photo etch
|
PAINT & DECALS |
The next stage of the model was the spraying. I had managed to obtain a set of decals, which contained an ECR (Electronic Combat Reconnaissance) Tornado from the Jabo Geschwader 321 squadron, based at Lechfeld. This aircraft first appeared at the Cambria Tigermeet in 1994 along with two others from the same squadron. I managed to obtain some information from Gert Weckx, who looks after the SIG on NATO Tigers. For anyone interested in these fabulous aircraft and their squadrons I would direct you to:
http://www.ping.be/tigersqn/index.html for all the information you wanted to know but were afraid to ask. Gert has been very helpful with my project and has supplied a few facts missing from the decal sheet. The decal sheet is manufactured by PROPAGTEAM, a Czech Republic outfit and distributed by Aeromaster Decals. The set includes decals for a Tornado GR. Mk 1 from 16th Sqn RAF, a Tornado F. Mk 3 of Saudi Arabia Royal Air Force, a Tornado IDS belonging to 50th Stormo of the Italian Air Force and a Tornado ECR from 321 Jabo Geschwader Squadron of the Luftwaffe operating at Lechfeld.I first sprayed the forward fuselage area with Insignia White. This formed the undercoat for the yellow that was to follow. The yellow used was Model Master FS13655, Blue Angels Yellow. The decal sheet calls for Chrome Yellow Med (FS23655) but as the first number refers to the shininess of the paint, with 1 being gloss and 2 being satin, I elected to use the gloss and overspray with satin finish. This colour was sprayed down the fuselage and graded onto the undercoat at the lower edge of the forward fuselage and down the sides of both engine nacelles. The color extended to just behind the cockpit and just in front of the wing fairing at a slight rearward angle to finish immediately forward of the main wheel well doors. The remainder of the fuselage was sprayed in two-tone green camouflage using Model Master enamels, RLM70 Schwarzgrun and FS34079, Dark Green. I sprayed the dark green first and used Parafilm as the masking medium and then sprayed the Schwarzgrun. This was my first use of this product and I was very impressed.
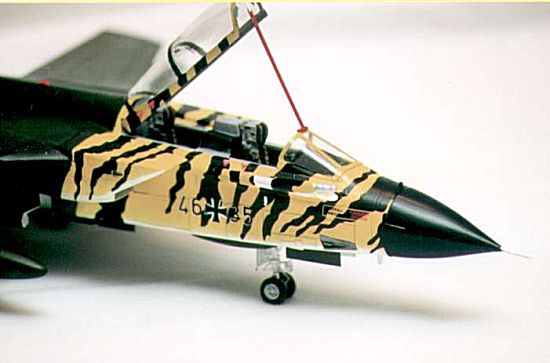
Figure 5 Starboard view of forward fuselage showing the white edge effect on the engine nacelles and lower fuselage
As I had little information about the underside colour below the forward fuselage, I had asked Gert Weckx if he could shed some light on the subject. Gert had let me know that, given the exterior colour of the front wheel well doors being a dark colour, it suggested that the lower fuselage was Dark Green. I compromised by extending the white around the lower edge and onto the lower fuselage, but kept the majority of the forward area Dark Green and extended the Schwarzgrun camouflage pattern. The decal sheet shows this entire area to be the same colour as the forward fuselage, i.e., Chrome Yellow Med.
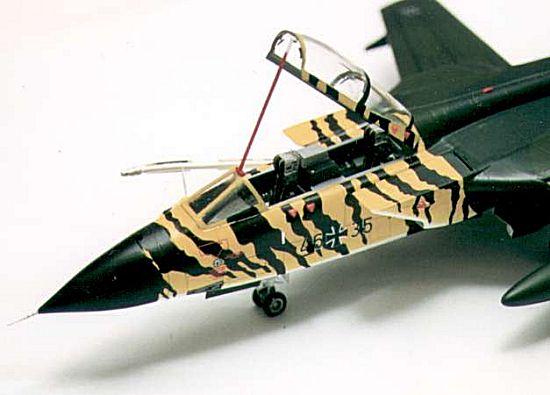
Figure 6 Port view of forward fuselage showing the in-flight fueling probe
I painted the inside of the exhaust cans in Insignia White, and painted the external areas in Gunze Sangyo Burnt Iron. I then painted the gun blisters, wing sliding covers, and ancillary bits on the airframe Model Master FS36081, Gun Metal
Once the paint had dried overnight, I applied a gloss clear over the entire aircraft in preparation for the decals. The undercarriage and doors were fitted and then it was on to the decals.
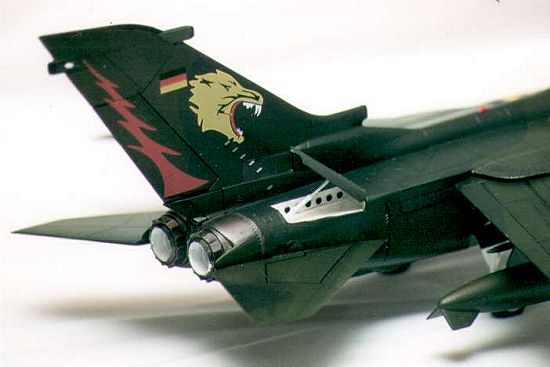
Figure 7 Rear Fuselage view showing the 321 Jabo Squadron markings and the airbrake details
The decals are extremely thin and require great care in handling. The very first decal was a tiger stripe that virtually fell to pieces as I tried to maneuver it into position. I eventually settled for plain old water and did not use any decal setting solution. The final few decals went on without a hitch. Where the tiger stripes were damaged or did not quite fit I was able to hand paint some black paint, the overall effect being quite good.
Once all decals had been applied I sprayed satin clear over the entire airframe.
The final bit of work on the Tornado was to attach the photo etch brass to the canopy, in the form of two frames inside the cockpit, plus the six mirrors. The mirror surfaces received some Ultra Bright Chrome from Bare Metal Foil and the inside of the canopy was painted with Light Ghost Grey. The forward canopy was fitted using white glue. The little aerials and pitot tubes were attached and painted and finally I scratch built the canopy brace used to support the open canopy.
The finished product certainly looks like some of the photos of the real thing; the Tiger stripes give the aircraft a striking appearance. The project has been on the go for almost a year, from my initial purchase of the decal set and shortly afterwards the kit itself. I had previously purchased the F. Mk 3 and realised it was going to be too big an effort to build the ECR version.
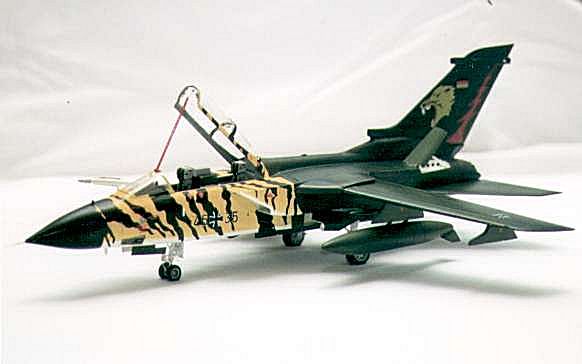
Figure 8 46 + 35 of 321 Jabo Squadron based at Lechfeld
|
CONCLUSIONS |
Have I enjoyed the model? Yes, it has been hard but the final product is worth all the effort, although if asked that during the construction the questioner would have met his/her maker! Would I enter it into a competition? – Not a chance! There are far too many problems with my efforts. But the main thing is that the result looks like a Tiger and is in an impressive colour scheme. Will I build another Tornado? Only if I find Hasegawa or Tamiya has decided to offer one, I think I will leave Italeri fit problems for a while.
I have been asked if this kit has inspired me to build another Tiger, and the answer to that is YES! I have already purchased the F16A from the Belgian Air force by Revell. It may be on the site within a few months.
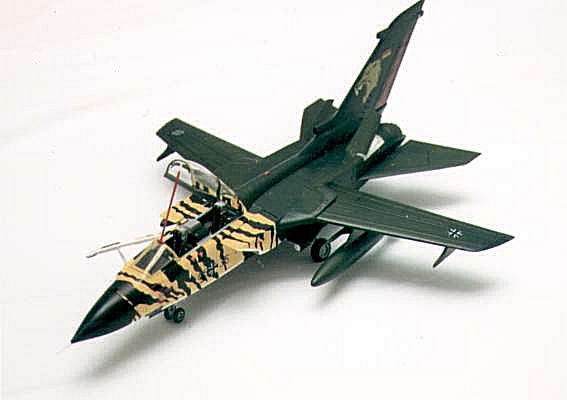
Figure 9 The Tornado ECR as presented to the Tigermeet at Cambria, 1994
I would like to thank Gert Weckx for providing information about the Tornados of 321 Jabo Geschwader, Gavin Stratford (IPMS UK 7165) for the helpful review he gave on the Panavia Tornado F.3, and Scott Van Aken for letting me post my reviews her in Modeling Madness
|
REFERENCES |
World Aircraft Information Files Bright Star Aerospace Publishing – A weekly series still in progress
Modeling Madness Webzine The various contributors to this site (see acknowledgments)
Gavin Stratford Tornado F3 Review (
http://www.swan.ac.uk/mateng/gavins/tf3mod.htm)