Italeri 1/72 A-129 Mangusta
|
KIT #: |
006 |
|
PRICE: |
45 Yuan RMB |
|
DECALS: |
Two Options |
|
REVIEWER: |
Richard F. |
|
NOTES: |
|
Remember the Cold War? That was when attack helicopters were designed to
deal with vast fleets of enemy tanks and armour, at least in that short
interval before the tactical nukes came into play (itself a short interval
before the ICBMs launched...). In those days, it was ok to design an attack
chopper without a gun, because the plan was to pop off as many TOW or
Hellfire style anti-tank missiles as you could before someone shot you down.
Even a big 30mm cannon was not necessarily an advantage in that kind
 of
fight - you had rockets to deal with lighter skinned vehicles or troops
brave (dumb) enough to risk moving around in the open.
of
fight - you had rockets to deal with lighter skinned vehicles or troops
brave (dumb) enough to risk moving around in the open.
Italy's Agusta company came up with a neat solution for that requirement
with its Mangusta, or Mongoose, the A129. These days, of course, attack
choppers like the Apache and Mangusta (in a smaller class) and the new
Eurocopter Tiger are more likely to be seen chasing down Taliban or Al-Qaeda
operatives in the altogether more complex battlefields of places like Iraq
or Afghanistan. There, guns seem to be very useful, one reason the Italians
upgraded their Mangustas with a 20mm gatling gun in recent years.
This kit only allows you to build the earlier, non-gun Mangusta, and before
you think it'd be easy to add a nose turret, remember that when they added
the gun, they added a fifth blade to the main rotor. Not such a simple
conversion after all.
Designed in the 80s with those Cold War conditions in mind, the Mangusta
entered service in 1990 just as t
he
Cold War wrapped up. The last batch came out of the factory in 1999 with the
improvements (gun, extra blade, plus better avionics) and not long after,
the earlier ones were upgraded.
Italy has used these choppers in Somalia, Macedonia and Angola on UN
missions and deployed them to Iraq and Afghanistan as well. Turkey is the
only export customer, picking up the first nine of its 60 aircraft order in
May 2014. The Turkish model is called T-129, and features all the upgrades
of the latest Italian variant, plus modifications specific to Turkey's
needs.
 This
is one of Italeri's great little helicopter kits - simple, easy to build,
and inexpensive. As noted, it comes with parts for the pre-upgrade Mangusta,
and includes two rocket pods and two of the quad-pack TOW launchers. Other
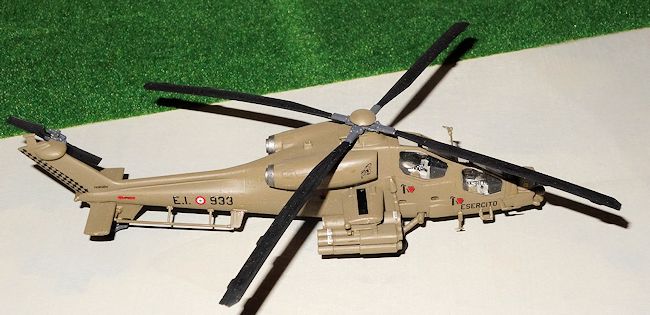
than that, it contains a basic cockpit, a nice clear one-piece canopy, and
nicely moulded parts with restrained details, mostly raised, which seems
appropriate for the detail represented. There are no pilot figures. Decals
include basic cockpit detail (the plastic parts are flat, not moulded-detail
instrument panels), and the markings for two different units from 1998, both
in an overall olive scheme.
This
is one of Italeri's great little helicopter kits - simple, easy to build,
and inexpensive. As noted, it comes with parts for the pre-upgrade Mangusta,
and includes two rocket pods and two of the quad-pack TOW launchers. Other
than that, it contains a basic cockpit, a nice clear one-piece canopy, and
nicely moulded parts with restrained details, mostly raised, which seems
appropriate for the detail represented. There are no pilot figures. Decals
include basic cockpit detail (the plastic parts are flat, not moulded-detail
instrument panels), and the markings for two different units from 1998, both
in an overall olive scheme.
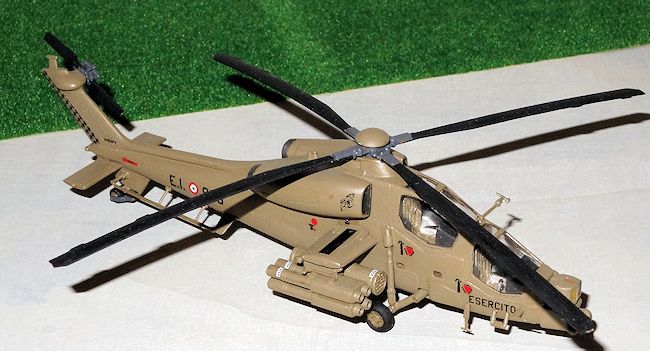
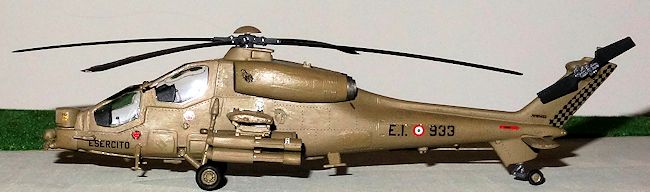
I started in the cockpit by painting the one-piece tub a light grey colour,
and doing the two instrument panels black. The seats can go in later, and
there are also two control sticks (one per pilot) but no collectives. The
front cockpit has a pretty distinctive sighting tube/periscope type thing,
which is missing in the kit (see the pics in the wikipedia link below).
The little turret on the nose which houses the FLIR or weapons guiding
sensors is designed to pivot, but the fit looked like it'd be a bit wobbly
so I cut off the attachment pieces and just glued it in place. Before
sealing up the fuselage, you need to add the rear cockpit wall, and the
little piece that holds the main rotor. I forgot to instal the attachment
axle for the tail rotor but that wasn't a big deal in the end - I just
glued
the tail rotor in place.
From here it is pretty easy. The stub wings go on and tail wings too, and
you build up the engine housing and intakes from five parts. These fit
reasonably well but I used some putty on most of the seams. Just a little,
but you do need it.
I added the canopy here (remembering to put the seats in first), and needed
some putty to get a good seal. It fits reasonably, but you will need a
little work to get a clean smooth match, and as it is so prominent, it's
worth the effort. I did the best I could be bothered with - more committed
builders can probably do better.
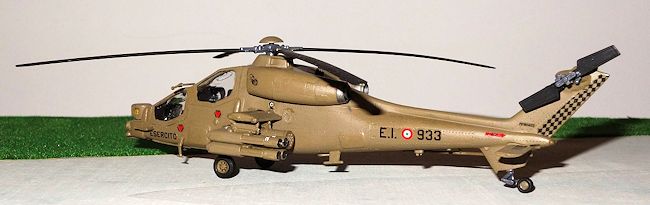
After this point, I painted the airframe and then,
once done, added on the weapons, the various air data probes and antenna,
and of course, the undercarriage. That fits snugly into its holes and seems
sufficiently sturdy.
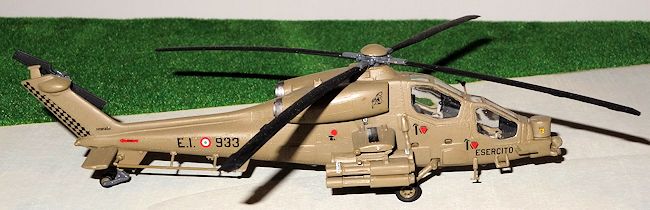
 The
instructions ask you to use Olive Drab on this helicopter but most pictures
seem to show a slightly more yellow, lighter colour. I considered putting
down a coat of Tamiya Olive Drab first, to compare with the pictures, and
then mixing a drop of yellow into the OD. But the first stroke of OD showed
it was way too green. The plastic is actually a very close match to the
colour of the real thing, and then I tried Tamiya XF-49 Khaki. It was pretty
much spot on, so rather than muck around, I just applied two coats of that.
Indeed, it's so close that on my second coat I discovered a few bits I'd
missed on the first coat, as the plastic itself is essentially the same
colour.
The
instructions ask you to use Olive Drab on this helicopter but most pictures
seem to show a slightly more yellow, lighter colour. I considered putting
down a coat of Tamiya Olive Drab first, to compare with the pictures, and
then mixing a drop of yellow into the OD. But the first stroke of OD showed
it was way too green. The plastic is actually a very close match to the
colour of the real thing, and then I tried Tamiya XF-49 Khaki. It was pretty
much spot on, so rather than muck around, I just applied two coats of that.
Indeed, it's so close that on my second coat I discovered a few bits I'd
missed on the first coat, as the plastic itself is essentially the same
colour.
Later gun-equipped versions seem to be a slightly darker colour in photos.
But anyone who's spent time on the forums (at any modeling site) knows the
long and laborious discussions you can have about colour. It depends on the
light on the day the photo was taken and also on the monitor used to view
the photo, as well as the controversial "scale effect". To my eye, this
paint job seemed a good combination of "pretty close" and "pretty
straightforward".
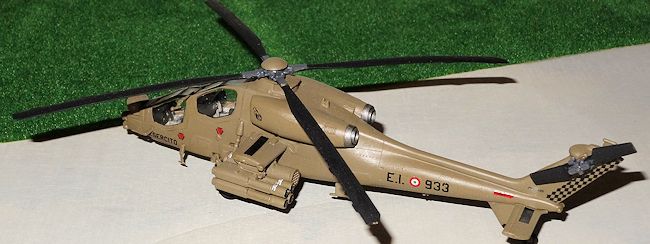
You
might notice a blemish on the left side beneath the engine. Somehow I
managed to flick the glue brush against the rim of the glue jar, and a small
drop of glue flew onto the side of the model. Talk about "amateur hour"! I
fixed it up as best I could but yes, you can still see it, and no, I don't
really mind. This was a weekend wonder, after all.
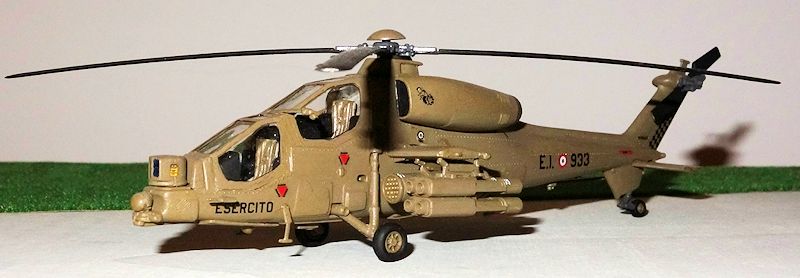
The decals are simple, as there are only a few. Both options are pretty
sparse, but I went with the one that has a chequered tail just because it is
slightly more interesting than the one that doesn't.
The decals are a lot thinner than what I've been
used to lately (HobbyBoss) but with a little extra care they are ok to
handle and they responded well to careful application of Mr Mark Softer.
A simple, neat kit, perfect for a quick build to get
you back in the groove. Enough detail out of the box to make it fun; plenty
of scope for upgrading (cockpit, gun, extra blade). And at a very affordable
price, I think it's easy to recommend this kit. With an Apache, and a Cobra
and Tiger, all readily available from Academy, Hasegawa, Revell or HobbyBoss,
you could have a neat collection of Western attack choppers, too.
Richard F.
September 2014If you would like your product reviewed fairly and fairly
quickly, please
contact
the editor or see other details in the
Note to
Contributors.
Back to the Main Page
Back to the Review Index Page