|
KIT: |
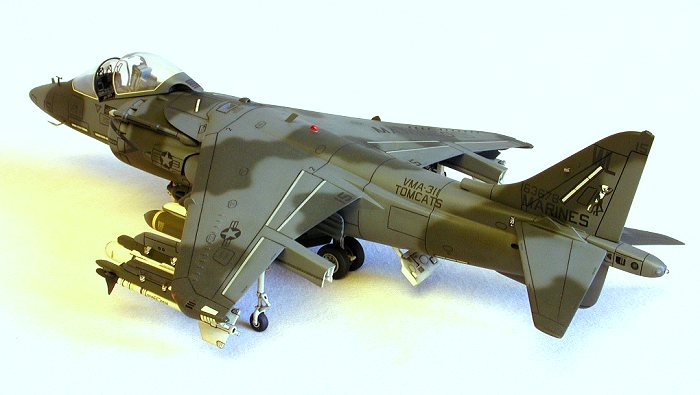
Monogram 1/48 AV-8B Harrier II |
|
KIT # |
5448 |
|
PRICE: |
$11.45 |
|
DECALS: |
Two aircraft |
|
REVIEW & |
Roger Jackson Faith Jackson |
|
NOTES: |
` |
|
HISTORY |
The McDonnell-Douglas AV-8B was an evolutionary extension of the company’s earlier ‘A’ model with more advanced technologies and materials incorporated to overcome some deficiencies noted in the initial design. First flown in 1978, the prototype featured an up-rated powerplant and a new, larger wing of graphite/epoxy composite construction. Offering both greater range and payload, the redesigned Harrier sported many new external lift and stability augmentation devices, as well as a raised cockpit with all-new digital systems and a multi-function display (MFD).
Wing hardpoints were increased from four to six and the original twin 30mm Aden cannon were replaced with a single 25mm weapon with the ammunition magazine co-located in a companion pod. The new lift-enhancement devices (LIDs) provided for increased gross take-off weights and added maneuverability and stability in the VTOL mode, the latter a virtual necessity when shipboard recovery is required. In-flight refueling equipment was provided via a retractable probe located on top of the port-side intake, replacing the AV-8A’s fixed unit. The raised cockpit was covered by an enlarged canopy, offering a panoramic view to the pilot.
 AV-8B deliveries to the
Marine Corps began in 1984, with plans to equip eight attack squadrons and the
training unit at MCAS Cherry Point, North Carolina. Production totals amounted
to 332 units, most of them available for combat service at the start of Desert
Shield/Storm. Three squadrons (VMA-311, VMA-331, and VMA-542) actually deployed
to the Kuwaiti Theater of Operations (KTO) where they distinguished themselves
while providing Close Air Support, Battlefield Aerial Interdiction, and RESCAP
support during both the air and ground phases of the conflict.
AV-8B deliveries to the
Marine Corps began in 1984, with plans to equip eight attack squadrons and the
training unit at MCAS Cherry Point, North Carolina. Production totals amounted
to 332 units, most of them available for combat service at the start of Desert
Shield/Storm. Three squadrons (VMA-311, VMA-331, and VMA-542) actually deployed
to the Kuwaiti Theater of Operations (KTO) where they distinguished themselves
while providing Close Air Support, Battlefield Aerial Interdiction, and RESCAP
support during both the air and ground phases of the conflict.
As a result of combat experience in the Gulf War, Harriers were fitted with additional countermeasures equipment to enhance and increase survivability during operations in high threat environments. Low altitude sorties and losses due to infra-red surface-to-air missiles had demonstrated the critical need for upward-firing chaff and flare dispensers. Additionally, many airframes were retrofitted with the ‘Night Attack’ avionics package, providing true all-weather capabilities. AV-8Bs remain in service with the United States Marine Corps, while the ‘A’ models have been retired and placed in storage.
|
THE KIT |
Monogram’s AV-8B kit consists of 80 pieces molded in blue-gray styrene, plus clear parts for the windscreen, canopy, HUD, mirrors, and nose-mounted laser designator. The instruction guide includes sequential assembly steps, a brief history of the aircraft, and a painting guide specifying Humbrol colors. A right-, left-, and top-view drawing of the standard three-color camouflage pattern with FS595a call-outs completes the pamphlet.
Moldings are clean, crisp, and relatively flash-free, with only minor dimpling noted on some of the thicker parts. Surface detail is comprised of mostly correct raised panel lines with recessed vents, grilles, and control surface demarcations. A separately-molded chaff and flare dispenser is particularly noteworthy.
 The cockpit is fairly
comprehensive, though purists may find an aftermarket seat an attractive
alternative. The canopy is separate from the frame and includes three
individually molded rearview mirrors. A two-piece seated pilot figure is
provided, though the review copy had a (scale) 90mm hole cast into his abdomen
(!).
The cockpit is fairly
comprehensive, though purists may find an aftermarket seat an attractive
alternative. The canopy is separate from the frame and includes three
individually molded rearview mirrors. A two-piece seated pilot figure is
provided, though the review copy had a (scale) 90mm hole cast into his abdomen
(!).
The landing gear is sufficiently detailed, though the outrigger units have been simplified with integral wheels/struts/doors. The exhaust nozzles, with careful attention to assembly and clean-up, look convincing. The forward LID and speedbrake are designed to mount in the deployed position and offer excellent interior detail.
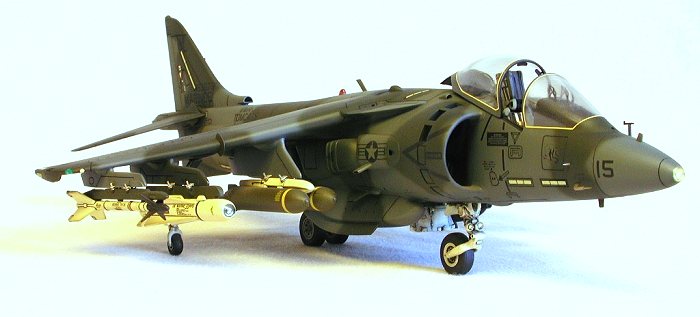
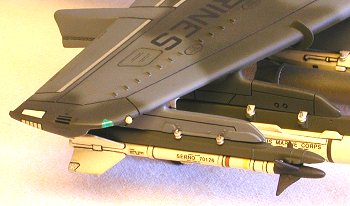
External stores consist of a pair of well-detailed AIM-9L Sidewinders with the correct launch rails, 500-lb Mk 82 Snakeyes, and two Aero 300B fuel tanks (seldom used for anything but ferry missions) molded integral with the inboard pylons.
All of the ‘whiskers’ are included with recessed locators for the pitot tubes, temperature probe, and yaw indicator. The intakes properly depict the blow-in doors in the partially-open condition, while a realistic fan front completes the assembly.
Options are limited to ventral strakes to be installed in lieu of the gunpack (blasphemy!) and an ambiguously located centerline pylon. Decals are provided for two different aircraft from VMA-331.
|
CONSTRUCTION |
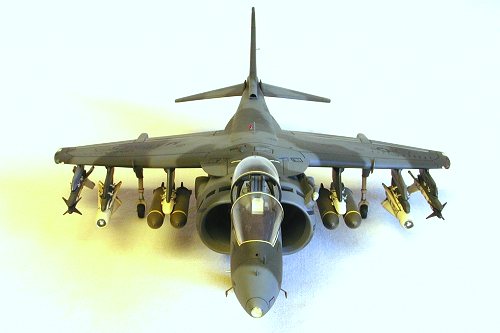
The major engineering challenge with this model is achieving and maintaining five ground contact points. Accordingly, I planned the construction based on this premise and dispensed, for the most part, with the recommended assembly sequence.
 The two-piece wing was
assembled and after dressing and sanding the seams, I installed colored
Plexiglas at the wingtips to serve as position lights. The RHAW antennas,
removed to facilitate seam clean-up, were replaced with buff-colored stretched
sprue ‘knobs’. The mid-span wing fences as molded did not align correctly
between top and bottom halves and were supplanted with sheet aluminum
equivalents, pre-shaped and inserted into slots sawed into the leading edge. I
drilled out the RCS vents at the wingtips, squared up the holes, and installed a
set of baffles using .010" Evergreen sheet.
The two-piece wing was
assembled and after dressing and sanding the seams, I installed colored
Plexiglas at the wingtips to serve as position lights. The RHAW antennas,
removed to facilitate seam clean-up, were replaced with buff-colored stretched
sprue ‘knobs’. The mid-span wing fences as molded did not align correctly
between top and bottom halves and were supplanted with sheet aluminum
equivalents, pre-shaped and inserted into slots sawed into the leading edge. I
drilled out the RCS vents at the wingtips, squared up the holes, and installed a
set of baffles using .010" Evergreen sheet.
The outrigger fairings were assembled and attached to the wing, with much filling and sanding necessary on top to arrive at an acceptable fit. After removing the drop tank halves from the inboard pylons I sanded and rescribed all six pylons and installed them, with special attention to the angle (all should be perpendicular to the ground plane). With the pylon-to-wing joints filled and sanded, I rescribed the remainder of the wing and added some additional refinements to the upper fuselage details. A photo-etched brass grille and a red anti-collision beacon were located here, along with some new, hollowed-out engine vents.
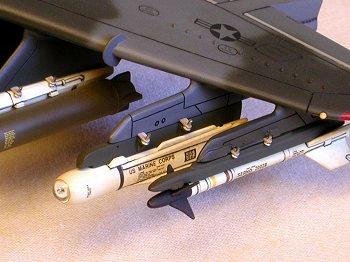 The ordnance was
assembled and installed in removable modular fashion using steel pins and
pre-drilled holes in the pylons. Pre-shaped strips of sheet aluminum were used
as sway braces with cut-down straight pins for the casing nuts. The AIM-9Ls
included with this kit are little jewels, rivaling anything included in the
Hasegawa sets. I elected to install a single AGM-65 on each center pylon, using
a pair of scratch-built launch rails. Inboard, I mounted TERs from the Monogram
F-4J kit and attached a pair of Mk 20 Rockeye CBUs to each one from the Hasegawa
‘A’ set. The outrigger wheels were next, and after cleaning them up I added
brass tie-down rings to the struts, painted and weathered them, then glued them
into position.
The ordnance was
assembled and installed in removable modular fashion using steel pins and
pre-drilled holes in the pylons. Pre-shaped strips of sheet aluminum were used
as sway braces with cut-down straight pins for the casing nuts. The AIM-9Ls
included with this kit are little jewels, rivaling anything included in the
Hasegawa sets. I elected to install a single AGM-65 on each center pylon, using
a pair of scratch-built launch rails. Inboard, I mounted TERs from the Monogram
F-4J kit and attached a pair of Mk 20 Rockeye CBUs to each one from the Hasegawa
‘A’ set. The outrigger wheels were next, and after cleaning them up I added
brass tie-down rings to the struts, painted and weathered them, then glued them
into position.
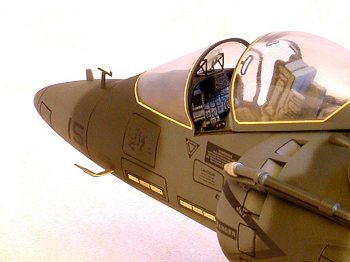
With the wing complete I turned to the fuselage, starting with the interior. After removing the molded belts from the seat, I assembled it and painted all the components neutral gray (FS 36270). After detailing with flat black, dark gray, and olive green, I ‘washed’ everything with Liquitex watercolor, dusted a bit with powdered graphite, then dry-brushed the instrument panel and side consoles with flat white. Some wire and a new belt set with Model Technologies photo-etched buckles gave a finished look to the cockpit.
I tackled the intakes next, after some very careful pre-fitting. Be advised, they are ‘handed’ (ie; a specific right and left part). After removing them from the sprue I marked the left one with a red felt tip pen to keep them segregated. A lot of filling with CA followed by careful sculpting resulted in a realistic set of blow-in doors with just the right amount of reveal around them. I removed the IFR probe from the fairing, then glued the fairing to the shoulder of the left intake. A new probe, scratch-built from aluminum tubing, was reinstalled with wire and a brass pin.
I drilled out and relieved all the various scoops and vents on the fuselage, pre-fitted the chaff/flare dispenser, then installed the pre-painted fan front into the right fuselage half. After similarly attaching the cockpit, I assembled and painted the nose gear bay then glued it in as well. With everything correctly positioned and solidly anchored, I buttoned up the fuselage with CA and sanded the seams out.
Nylon pins were installed in the forward LID and speedbrake to allow for a tight friction fit, then I replaced the speedbrake actuator with a metal one constructed of aluminum tubing and a chrome-plated straight pin. The cantilevered angle allowed for a glue-less removable installation, facilitating easier painting and weathering. A lower anti-collision beacon was added to the fuselage forward of the speedbrake, while a piece of clear sprue was affixed to the tail cone as a rear position light.
 I was less-than-thrilled
with the awkward depressions in the nose and fin for mounting the various
‘whiskers’, and in any event, delicate plastic parts such as these seldom
survive my ham-handed handling. Accordingly, I built new parts from straight
pins (points and heads), hypodermic needles, and guitar string, then filled the
depressions and installed sockets to receive the various appendages after
painting.
I was less-than-thrilled
with the awkward depressions in the nose and fin for mounting the various
‘whiskers’, and in any event, delicate plastic parts such as these seldom
survive my ham-handed handling. Accordingly, I built new parts from straight
pins (points and heads), hypodermic needles, and guitar string, then filled the
depressions and installed sockets to receive the various appendages after
painting.
A large MV lens was used as a stand-in for the laser designator and after tacking it into position, the clear nose cover was installed with CA. This piece was not a great fit and required filing it to shape, then sanding and polishing to restore the clarity. Blade antennas constructed from .010" Evergreen sheet were installed, top and bottom on the nose, and on the top of the wing. After assembling and detailing the gunpack and ammunition magazine, these were carefully pre-fitted to the fuselage and installed. Numerous gaps were addressed with gap-filling Hot Stuff, and when dry I cleaned up the joints and rescribed the fuselage.
After assembling the nose gear strut I removed the axle and line-bored holes through both sides of the fork to install a metal spindle. I put the nose wheel together, flattened the tire on the bottom, then installed an aluminum bearing in the hub. After test-fitting the wheel to the strut using a piece of #20 hypodermic needle as an axle, I drilled out the landing/taxi lights and replaced them with MV lenses. The simplified rear door was cut off the strut and rebuilt with its own set of nylon mounting pins. After gluing the nose strut into position, I turned my attention to the vexing problem of the main gear.
As I saw it, a two-fold problem existed: The angle of the strut (because the tires would be flattened) and the height of the axle (to maintain full contact between the tires and the ground plane). After ruminating my way through several possible scenarios, I decided that the angle dilemma could be solved by providing a rotational fit between the wheels and the axle. I drilled a hole through the axle and both wheel hubs and installed a piece of .066" music wire in the knuckle with the ends cut slightly longer than the wheel hubs (when installed). After pre-fitting the wheels onto the strut I checked the rotation. They worked fine so I flattened the tires and moved to the larger issue of mounting the strut.
The remaining variable of axle height was solved by building a strut mount from 3/32" aluminum tubing and attaching it inside the fuselage in the appropriate position. Concurrently, I removed the issued mounting pins from the strut and glued a piece of 1/16" aluminum tubing at the top, allowing a vertically-telescoping fit to the 3/32" tubing mount inside the fuselage. After taping the wing to the fuselage (with the other three wheel/strut assemblies already in place), I carefully test-fitted the main gear and set the model on a pane of glass. Yes, there is a God! After a little adjustment of the rotating tires, all five made solid contact with the glass.
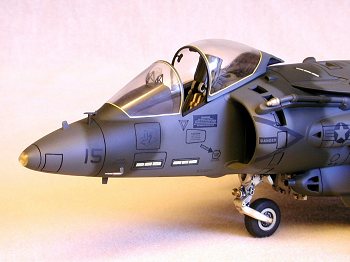 I glued the wing to the
fuselage, then rescribed the stabilators and press-fit them into position while
I prepared the clear parts for installation. A True Details photo-etched HUD
frame replaced the kit part and I used some thin acetate for the reflectors. The
windscreen was attached with white glue and after it had solidified, I removed
the excess glue with a moistened Q-Tip, thus providing an air-tight ‘gasket’ so
I could blend the part with CA without fear of chlorosis. The canopy was mated
to the frame with Testor’s liquid cement and allowed to dry overnight. I used CA
to fill numerous gaps and integrate the pieces. After filing and sanding, both
the canopy and windscreen were polished out with Bare Metal compound, jeweler’s
rouge and a Dremel-powered buffing wheel.
I glued the wing to the
fuselage, then rescribed the stabilators and press-fit them into position while
I prepared the clear parts for installation. A True Details photo-etched HUD
frame replaced the kit part and I used some thin acetate for the reflectors. The
windscreen was attached with white glue and after it had solidified, I removed
the excess glue with a moistened Q-Tip, thus providing an air-tight ‘gasket’ so
I could blend the part with CA without fear of chlorosis. The canopy was mated
to the frame with Testor’s liquid cement and allowed to dry overnight. I used CA
to fill numerous gaps and integrate the pieces. After filing and sanding, both
the canopy and windscreen were polished out with Bare Metal compound, jeweler’s
rouge and a Dremel-powered buffing wheel.
The jet exhaust nozzles were assembled, carefully cleaned up and sanded, then attached with Testor’s liquid cement, while I replaced the oil drain tube and fuel dump mast on the right side of the fuselage with scratch-built pieces and attached them with CA. With the airframe complete, I mixed some 5-minute epoxy, put a dollop on the main gear strut mount, slid the strut/wheel assembly into position, then set the model right side up on my glass and let the adhesive cure. When the glue had set up I gave the model a final light sanding and moved it into the paint shop.
|
PAINT & DECALS |
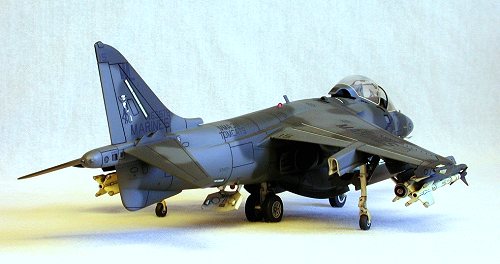
The interiors of the LID and speedbrake areas were painted gloss white, weathered with a black watercolor wash and powdered graphite, then sealed with Testor’s DullCote. After masking the cockpit and glass, the landing gear, and the various lights and optical sensors I painted the exterior camouflage using Modelmaster enamels. As the light gray undersides were deleted some time ago, I dispensed with this color and configured the pattern as a full wrap-around scheme. The model was gloss-coated, again using Testor’s lacquer and set aside to dry for a week.
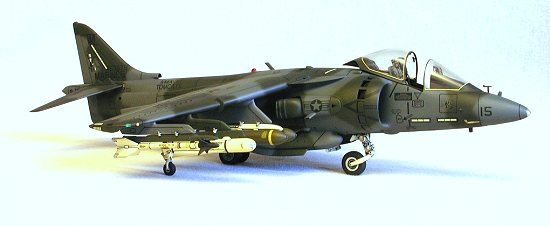 I decaled the model using
SuperScale sheet #48-352, depicting an AV-8B serving with VMA-311, the "Tomcats"
during the Gulf War. SuperScale sheet #48-354 provided the service stenciling,
while ‘slimelights’ were cut from the ScaleMaster sheet. Markings for the
ordnance were cobbled together from various sources to replicate the myriad of
instructions and warnings typical of modern weapons.
I decaled the model using
SuperScale sheet #48-352, depicting an AV-8B serving with VMA-311, the "Tomcats"
during the Gulf War. SuperScale sheet #48-354 provided the service stenciling,
while ‘slimelights’ were cut from the ScaleMaster sheet. Markings for the
ordnance were cobbled together from various sources to replicate the myriad of
instructions and warnings typical of modern weapons.
When the decals had dried, I sprayed several heavy coats of flat lacquer to seal the paint and decals, then used Liquitex watercolor to highlight and shade the panel lines, vents and grilles, and the moveable control surfaces. A final misting of DullCote sealed these effects, then I removed the masks. The ‘whiskers’ were attached in the appropriate positions and all the ordnance was hung on the corresponding pylons.
After installing the LID and speedbrake, I drilled three holes on the inside
of the canopy bow and attached a set of True Details photo-etched mirrors with
white glue, replacing the slightly over-scale kit pieces. The canopy was affixed
using a diluted solution of Elmer’s then the model was taxied to the parking
apron and chocked.
|
CONCLUSIONS |
This is not a great kit as 1/48th scale AV-8Bs go but it has two things going for it…it is a good kit and it is the only kit. Fit is about average for Monogram releases of this vintage, and while the model is hampered by lackluster ordnance and the problematical installation of the landing gear, it nonetheless correctly captures the lines and nuances of this significant aircraft. There are aftermarket decals and some other accessories available which give a modeler some options in detailing and finishing this machine. While this issue is no longer cataloged by R-M (Revellogram, Monovell…take your pick), the recently released ‘Night Attack’ Harrier is probably similar in most respects to this kit’s parts breakdown and most of the construction notes here will be applicable. Semper Fi…
|
REFERENCES |
AV-8 Harrier; In Detail & Scale – Don Linn; Airlife Publishing LTD
Harrier In Action – Lou Drendel; Squadron-Signal Publications
Air War Desert Storm – Lou Drendel; Squadron-Signal Publications
Marine Air: First To Fight – John Trotti & George Hall; Presidio Press
Encyclopedia of World Air Power – Bill Gunston; Crescent Books
International Combat Arms – July 1988; Petersen Publishing Company
Ó August 2001 by Roger M. Jackson
If you would like your product reviewed fairly and quickly by a site that averages thousands of visits a day, please contact me or see other details in the Note to Contributors.