|
KIT: |
Hasegawa 1/48 F-16CJ |
|
KIT # |
09421 |
|
PRICE: |
CDN$35.00 |
|
DECALS: |
Two aircraft |
|
REVIEWER: |
|
|
NOTES: |
Aftermarket True Detail seat/Hase weapons set |
|
HISTORY |
 There has been a lot written about both the
real F16 in addition to the Hasegawa F16 kit. The long and the short of the F16
is that it was the plane that beat out the Northrop F17 Cobra for the US Air
forces light fighter contract. Since than, the F16 in many versions has become
one of the most successful and best-marketed airframes in history with many of
the worlds countries air forces having purchased versions of the mark.
There has been a lot written about both the
real F16 in addition to the Hasegawa F16 kit. The long and the short of the F16
is that it was the plane that beat out the Northrop F17 Cobra for the US Air
forces light fighter contract. Since than, the F16 in many versions has become
one of the most successful and best-marketed airframes in history with many of
the worlds countries air forces having purchased versions of the mark.
The Hasegawa F16 has also become one of, if not the most successful and in my opinion the best engineer f16 kits available in 1/48. Having previously built both the Monogram and Tamiya F16a kits, there is absolutely no comparison. With superior engineering, finely engraved panel lines and comprehensive stock detail, the Hasegawa version beat all other makers’ hand down.
|
THE KIT |
This particular kit represents and F16CJ Wild Weasel variant. The kit comes in the form of 14 spues, 2 of which are modeled in clear while the others in medium gray. The gray sprues come in one clear bag while the decals and clear sprues are packages separately. The plastic is typically good quality with little to no flash on any parts as well as no warping. Panel lines are fine and well rendered. The clear parts are equally well molded with no defects or warping, the only qualm being the seam running along the canopy midline.
 To save production costs,
Hasegawa elected to use the existing f16 moulds, but added additional parts to
constitute the CJ variant. There is of course no loss of detail or accuracy, but
by the time the model is done, there are enough parts left over to make you
wonder if you missed anything. To build the CJ, Hasegawa has included a brand
new 5-piece intake, new brilliantly detailed burner can, main wheels, missile
rails, and an array of scoops, masts, and aerials. Additionally, and unlike most
other of their kits, Hasegawa has included a good ordinance load with optional
fuel tanks, AIM120s, AIM9Ls, and AGM88 HARMs
To save production costs,
Hasegawa elected to use the existing f16 moulds, but added additional parts to
constitute the CJ variant. There is of course no loss of detail or accuracy, but
by the time the model is done, there are enough parts left over to make you
wonder if you missed anything. To build the CJ, Hasegawa has included a brand
new 5-piece intake, new brilliantly detailed burner can, main wheels, missile
rails, and an array of scoops, masts, and aerials. Additionally, and unlike most
other of their kits, Hasegawa has included a good ordinance load with optional
fuel tanks, AIM120s, AIM9Ls, and AGM88 HARMs
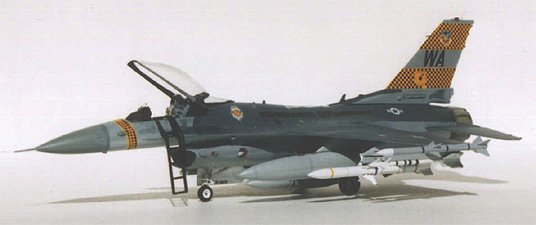
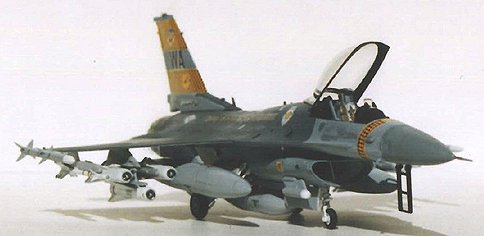
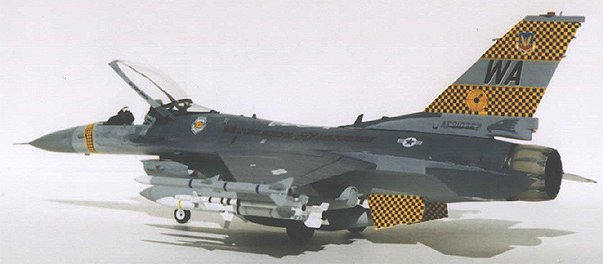
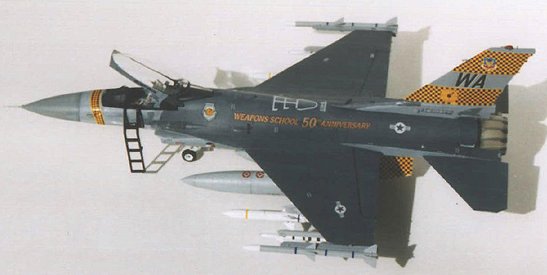
Two decal options are provided. The first (the ones I used) depicts a commemorative scheme of the 50th anniversary of the Air War center, 57th Wing fighter weapons school. The second represents a plane from the 52nd fighter wing, 23rd fighter squadron. The decals are thin and well printed. Plenty of stenciling is also provided to add extra detail to the schemes.
The instruction sheet is quite clear and follows a logical progression to the finished kit. My only gripe is that the sheet is quite cluttered and therefore requires a thorough check to make sure that you haven’t missed anything.
|
CONSTRUCTION |
This would be my second attempt at a Hasegawa kit and I was hoping for some good results with the finished model. After briefly studying the instructions, I set about the first step; the cockpit assembly. I elected to use a true details resin ACES2 seat I had in stock rather than the stock three-part affair. I have always used true detail seats and swear by their accuracy and good fit. The cockpit goes together quite easily and in 5 pieces does a good job at emulating the vipers’ office without any photo-etched extras. The sheet provides basic painting instructions for the panels.
 Next the great new burner can is assembled.
This is a three-piece affair with an other 6 pieces representing the exhaust
nozzle. The whole thing fits together with little fuss and after painting with
the benefit of some good photo aids looks remarkably like the real McCoy. A
comical side note is that this 6-piece exhaust is the identical unit to
Monograms F14d kit. I guess that both Hasegawa and Monogram do their shopping at
the same place.
Next the great new burner can is assembled.
This is a three-piece affair with an other 6 pieces representing the exhaust
nozzle. The whole thing fits together with little fuss and after painting with
the benefit of some good photo aids looks remarkably like the real McCoy. A
comical side note is that this 6-piece exhaust is the identical unit to
Monograms F14d kit. I guess that both Hasegawa and Monogram do their shopping at
the same place.
Next comes the wing and fuse assembly followed by the landing gear.
The wings are two parts each (top and bottom). These fit together easily and leave only a thin seam on the wings bottom were it is not usually seen. The assembled wings are then but jointed to the fuse. This requires patience and a little filling and sanding to get right. I used a level and two paint jars to jack the wings as they dried to the fuse to get the right anhiedral. The horizontal tails come as independent one-piece units that allow them to be posed as desired. Plastic pins at the horizontal tail roots fit into predrilled holes in the planes tail. The gear is remarkable well detailed in addition to the gear bays. All struts and actuators are accounted for. One of the clear sprues supplies the landing lights.
The gear struts fit into pre existing holes in their respective bays and bare the completed models weight very well even when not completely dry.
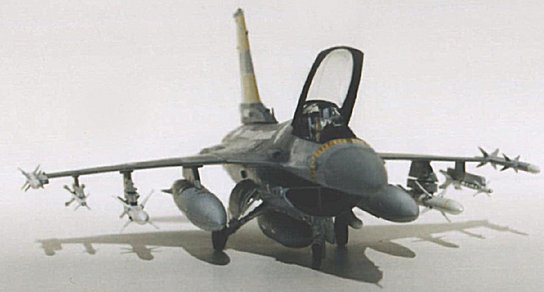
The final step is to build the supplied under wing stores. Some variety is provided in the kit. Two 370gal tanks, one 300gal tank, one cargo container, two HARMS, four AMRAAMs, and four sidewinders are supplied in the kit. As can be seen in the pictures, I experimented with two load outs. Firstly I used the three tanks with two wingtip AMRAAMs as the basic loading. Then I decided on two AIM9J sidewinders in addition to a couple of the harms from the Hasegawa weapons c kit I had previously built, painted and decals. Later I reloaded it with a six set of AGM 65 mavericks and two AIM9Es, also from the weapons C set. This selection really gives the f16 a “loaded up” appearance and makes for a really striking look.
The very last thing I did before painting was to modify the True Details ACES 2 seat by adding the plastic guide rails found on the stock parts and the ejection handle also from the stock parts.
|
PAINTING & MARKINGS |
Firstly I must say that I paint all my models using only hand brushing techniques and brushes of different sizes and shape to create the effects I try to recreate.
Generally I like to paint the wheel wells and any internal parts on the sprue prior to assembly so I don’t have to go back and paint between struts and other now added details later. This is especially true of any parts to be painted white as we can all vouch for the fact the hand brushing white is a real pain. With the aid of the box top picture and some other comprehensive F16 pictures, I was able to create a pretty convincing portrayal of a well-used viper CJ.
 Basic airframe paint was as
outlined on the paint key. I use Testors acryl. Model master paints. They brush
on pretty well (accept white) and when properly mixed to the right consistency
provide a smooth coat, though usually at least two coats are required.
Basic airframe paint was as
outlined on the paint key. I use Testors acryl. Model master paints. They brush
on pretty well (accept white) and when properly mixed to the right consistency
provide a smooth coat, though usually at least two coats are required.
Here are the basic colors I used.
Upper surface behind cockpit: gunship gray FS36118
Upper surface at and in front of cockpit: dark ghost gray FS36270
Vertical tail: dark ghost gray FS36270
All lower surfaces: light ghost gray FS36375
Additional paints I used included Tamiya clear red, green and yellow for the nav lights and canopy tinting (tinting done after pictures were taken, Sorry!), flat black, insig. yellow, aluminum, steel, and of course flat and SG white. After basic painting was applied to the plane, I began weathering the paint beginning at the nose and progressing backwards. From my reference pictures the F16s seam to be starting to show their age. Paint is somewhat uneven and patchy in places. The paint also exhibits quite a bit of bleaching on the upper surface from exposure to the sun. The front fuselage under the canopy appears quite dirty and patchy, as does the radome.
To accomplish these effects I mixed small amounts of the base colors in slightly lighter and darker shades and applied them using dry brushing with different amounts of paint left on the bristles depending on how much contrast I wanted. To create the bleaching effect I dry brushed areas of the plane I saw this to be happening (upper surfaces of nose and especially the fuselage spine) with lightened base color. To increase the amount of bleached color I simply added more white to the mix. Immediately after dry brushing I like to run my finger over the applied paint to slightly smear the paint. This removes the pixilated effect that comes with dry brushing (or at least my dry brushing). Light streaking was also applied to the wings and tail using the same process.
 The burner can and exhaust was
painted using a mixture of aluminum, steel, and flat black to achieve the right
tones. A picture of the F16c tail pipe was used as a reference. After drying,
burnishing and weathering (soot and charring) were done using dry brushing
techniques with flat black and flat black/ steal mixtures of various shades.
The burner can and exhaust was
painted using a mixture of aluminum, steel, and flat black to achieve the right
tones. A picture of the F16c tail pipe was used as a reference. After drying,
burnishing and weathering (soot and charring) were done using dry brushing
techniques with flat black and flat black/ steal mixtures of various shades.
I also chose to do some highlight work around the gun bay, wing flap, and fuselage structure access plates. This was done with some slightly thinned and darkened base coloring.
The last thing to do was apply the decal. I did this over two sittings. I chose the colorful anniversary scheme, beginning with the larger decals and moving to the smaller ones until none remained. After a brief socking in luke warm water, the decal apply quite easily with no tendency to tear. Even without decal solution, they conform pretty well to the overall contour of the area.
|
CONCLUSIONS |
All in all I am very happy with the outcome. This became an exercise in perfecting my dry brushing skills and after looking at the finished product I’m very happy. This is definitely a kit that every serious modeler should have at least one of. In the hands of a skilled model, even a stock model can become a masterpiece!
If you would like your product reviewed fairly and quickly by a site that has well over 150,000 visitors a month, please contact me or see other details in the Note to Contributors.