Airfix 1/72 Avro Vulcan B.2
|
KIT # |
9002 |
|
PRICE: |
$36.95 |
|
DECALS: |
Three planes, 9, 44 & 617 Sq |
|
REVIEW : |
|
|
NOTES: |
` |
|
HISTORY |
Who can look at the bat-like outline of the Avro Vulcan and not think of its central role in the James Bond film Thunderball? Hijacked by the evil and mysterious Number One by a look-alike pilot and ditched in the Atlantic Ocean near the Bahamas, its two nuclear devices were removed by Emilio Largo and his team of black-clad scuba men as a means of blackmailing the world. Of course, the suave and debonair James Bond saves the day with the help of lots of Navy frogmen, making the world safe for democracy. Of course Bond steals off into the palm trees with his latest babe, Domino. They don’t make movies like that anymore!
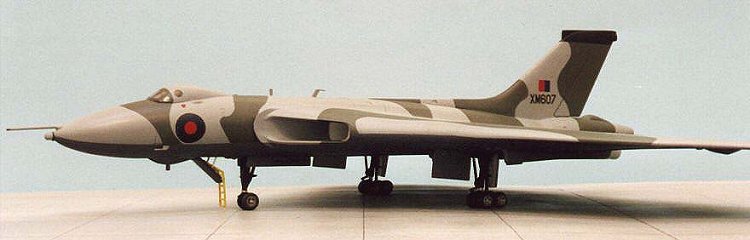
The Avro Vulcan served with the RAF for three decades, beginning as a nuclear weapons delivery system and ending up, like its contemporary the B-52, as a conventional bomber. Ministry of Defense specification B35/46 started the ball rolling for A. V. Roe and Company in 1947 when they began work on a delta-winged aircraft that could deliver a nuclear weapon at over 550 knots, with a range of 3350 nautical miles. Two 1/3 scale proof-of-concept prototypes were made (designated Avro Type 707), but the first one crashed early in the test cycle. The second prototype demonstrated great promise, so the green light was given to the manufacture of a full-sized prototype, which first flew in 1952. Deliveries of production variants began in 1955 and continued on for the next ten years, with a total of 133 being built. The first Mark 1 variants were delivered in an overall anti-flash white finish, which eventually gave way to the more familiar gray and green camouflage that the Vulcan wore for the rest of its operational life. As the state of Soviet air defenses improved, it became more and more obvious to Western defense tacticians that sending a subsonic aircraft at high altitude into aerial combat was a sure fire way of not achieving success. Standoff nuclear missiles were developed, and the overall mission of the aircraft was redirected towards the delivery of conventional munitions.
 The first use and only use of the
Vulcan in anger came with the "Black Buck" missions during the
Falkland Islands War. At the time, it was the longest distance war time sortie
ever flown, spanning the nearly 4,000 miles between Wideawake airfield on Ascension
Island and the target, the Argentinean-occupied airfield at Port Stanley. Five Vulcans were refitted with their air-to-air refueling equipment
and prepared for the mission. Underwing pylons were fitted for the use of Shrike
anti-radiation missiles, provided as a courtesy by the US Air Force. The Light
Aircraft Grey undersides on these aircraft were repainted (with rollers!) in
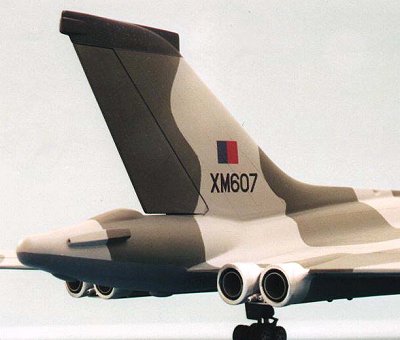
Dark Sea Grey. On 29 April 1982, two Vulcans, XM607 and XM598, took off for the
long trip, along with eleven Victor tankers. XM598 developed pressurization
problems and had to turn back. XM607 pressed on, and after six air-to-air
refuelings, arrived over the airfield to deliver twenty-one 1000 LB pounds in a
precision placement on the runway. Three more Black Buck missions were flown,
two of which included the firing of the Shrikes, with some success. During the
last mission, Vulcan XM597 had the refueling probe snap off on the way home.
Unable to take on fuel, the crew decided to divert to Brazil, where it was
impounded for a week before being released.
The first use and only use of the
Vulcan in anger came with the "Black Buck" missions during the
Falkland Islands War. At the time, it was the longest distance war time sortie
ever flown, spanning the nearly 4,000 miles between Wideawake airfield on Ascension
Island and the target, the Argentinean-occupied airfield at Port Stanley. Five Vulcans were refitted with their air-to-air refueling equipment
and prepared for the mission. Underwing pylons were fitted for the use of Shrike
anti-radiation missiles, provided as a courtesy by the US Air Force. The Light
Aircraft Grey undersides on these aircraft were repainted (with rollers!) in
Dark Sea Grey. On 29 April 1982, two Vulcans, XM607 and XM598, took off for the
long trip, along with eleven Victor tankers. XM598 developed pressurization
problems and had to turn back. XM607 pressed on, and after six air-to-air
refuelings, arrived over the airfield to deliver twenty-one 1000 LB pounds in a
precision placement on the runway. Three more Black Buck missions were flown,
two of which included the firing of the Shrikes, with some success. During the
last mission, Vulcan XM597 had the refueling probe snap off on the way home.
Unable to take on fuel, the crew decided to divert to Brazil, where it was
impounded for a week before being released.
The Brits love their war birds, and Vulcans flew extensively on the airshow circuit after their retirement in 1984 (I think that only one Vulcan was kept flying, but I can easily be corrected! Ed). Today, there are a few left in museums, and a couple are technically airworthy. Sadly, no Vulcan is actively flying, mostly because of the immense costs involved in such an endeavor. Like the EE Lightning, seeing a Vulcan fly overhead is an experience that is not easily forgotten.
|
THE KIT |
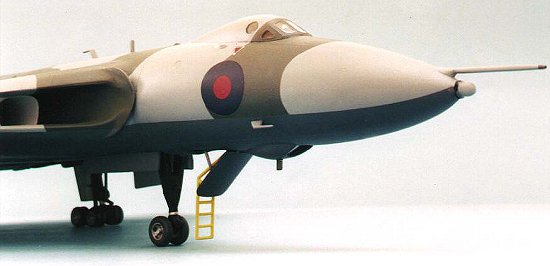
Airfix produced this kit in the late 1970s, and it shows all the evidence of such a heritage. Panel lines are raised, and are inconsistently high in some places. Cockpit detail is limited to a floor, two seats, a decal instrument panel and two control sticks. You get the option of displaying the aircraft with the crew access door open and a deployed boarding ladder. Detail in the wheel wells is non-existent. A Blue Steel standoff nuclear missile is provided (the program was cancelled before it was made operational), as is the modified bomb bay piece to accommodate the device. The clear pieces are not too bad, but the major components are marred by large sink marks, especially in the engine air intake area. The engine exhausts don’t exist – there’s nothing there but four gaping holes in the back of the wings. Dry-fitting the wings to the two fuselage halves reveal major gaps in virtually every area. No doubt about it, this is a putty queen.
 A friend of mine approached me as
I was walking out of my model club meeting last December and handed me the kit
(actually the MPC boxing) and said, "I know that you like big models. Here
you go –- Merry Christmas!" And then he left, cackling with laughter. I
know a dump when I see one, and this was a classic dump. What he was really doing
was clearing a bunch of space in his model closet and getting rid of a real
stinker. I groaned when I realized what had happened. Not another crappy Airfix
kit! I had sworn to myself that I would never build another Airfix kit again so
long as I lived. And here I was, with a biggun’ in my hand.
A friend of mine approached me as
I was walking out of my model club meeting last December and handed me the kit
(actually the MPC boxing) and said, "I know that you like big models. Here
you go –- Merry Christmas!" And then he left, cackling with laughter. I
know a dump when I see one, and this was a classic dump. What he was really doing
was clearing a bunch of space in his model closet and getting rid of a real
stinker. I groaned when I realized what had happened. Not another crappy Airfix
kit! I had sworn to myself that I would never build another Airfix kit again so
long as I lived. And here I was, with a biggun’ in my hand.
What to do? I thought about it for three days, and was coincidentally helped by a rental of the film Thunderball. There were a lot of elements about the kit that I liked. It was a unique subject, one you never see built up, and it represented a challenge with its poor fit and Airfix engineering. For some bizarre reason, I caught the spark and said, "What the heck," as I plunged into the project head first, knowing full well what would await me.
|
CONSTRUCTION |
 One of the great things about big
1/72 scale jet models is that you rarely have to do anything to the cockpit
except paint it quickly and seal it up. I did precisely that, even applying the
instrument panel decal. With those tiny windows and overall black color, I can
assure that no one can see anything in there at all. This left me free to tackle
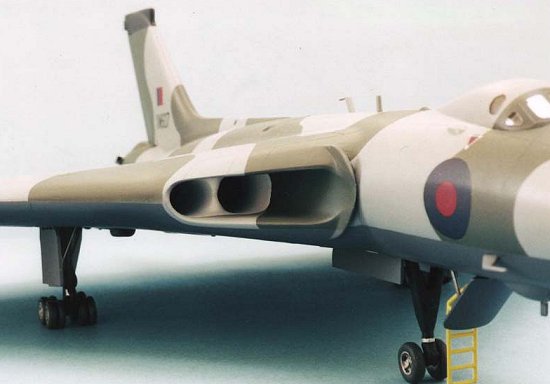
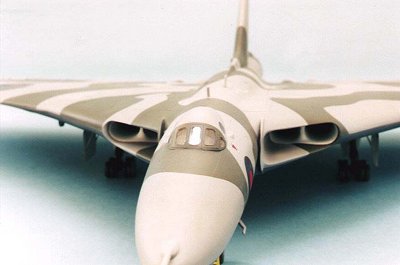
the biggest obstacle, which were the engine air intakes. They are so badly
molded, and so prominent on the model, that the whole model’s presentation
relies on how well they turn out. I suppose one could scratchbuild FOD covers,
but even then major seam work would be required to blend the pieces into the
front edge of the wing. I sat down with a full bottle of gap-filling CA glue and
spent ten hours over a few days carefully working on the horrible sink marks
first, then the seams between the upper and lower halves. I used a piece of
sandpaper wrapped around a modeling knife handle as my main tool for smoothing
the sides. Slowly but surely, everything came together with repeated
applications of CA glue and a lot of sanding. I then glued the smooth intakes
into the fuselage bottoms. More filling and sanding was needed to blend the
intake in with the bottom of the wing before I did it all over again as the top
fuselage half was glued on. It took a long time, but I am probably prouder of
the result than anything I have ever done in my modeling career. When I finished
priming the intakes with flat white paint, I got a real sense of accomplishment
of what I had achieved. I had confronted the mighty Airfix beast
head-on, and I was victorious! The rest of the airplane was going to be easy.
One of the great things about big
1/72 scale jet models is that you rarely have to do anything to the cockpit
except paint it quickly and seal it up. I did precisely that, even applying the
instrument panel decal. With those tiny windows and overall black color, I can
assure that no one can see anything in there at all. This left me free to tackle
the biggest obstacle, which were the engine air intakes. They are so badly
molded, and so prominent on the model, that the whole model’s presentation
relies on how well they turn out. I suppose one could scratchbuild FOD covers,
but even then major seam work would be required to blend the pieces into the
front edge of the wing. I sat down with a full bottle of gap-filling CA glue and
spent ten hours over a few days carefully working on the horrible sink marks
first, then the seams between the upper and lower halves. I used a piece of
sandpaper wrapped around a modeling knife handle as my main tool for smoothing
the sides. Slowly but surely, everything came together with repeated
applications of CA glue and a lot of sanding. I then glued the smooth intakes
into the fuselage bottoms. More filling and sanding was needed to blend the
intake in with the bottom of the wing before I did it all over again as the top
fuselage half was glued on. It took a long time, but I am probably prouder of
the result than anything I have ever done in my modeling career. When I finished
priming the intakes with flat white paint, I got a real sense of accomplishment
of what I had achieved. I had confronted the mighty Airfix beast
head-on, and I was victorious! The rest of the airplane was going to be easy.
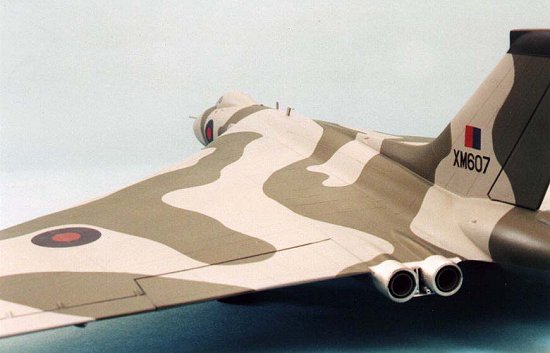
 Since there are no engine
exhausts, I cut appropriately sized pieces of brass tubing and stuck them in
there. Painted with Testor’s Metalizer burnt metal, they greatly improve the
look of the area. Gluing the tail section to the fuselage revealed more huge
gaps, but since I was on a high from the air intakes, I chuckled as I just
applied layer after layer of CA glue and sanded them out. The same can be said
for the wings, which had similar gap problems.
Since there are no engine
exhausts, I cut appropriately sized pieces of brass tubing and stuck them in
there. Painted with Testor’s Metalizer burnt metal, they greatly improve the
look of the area. Gluing the tail section to the fuselage revealed more huge
gaps, but since I was on a high from the air intakes, I chuckled as I just
applied layer after layer of CA glue and sanded them out. The same can be said
for the wings, which had similar gap problems.
I used clear green and red styrene pieces from Cutting Edge (CEC48163) for the navigation lights. This is the first time that I’ve used this product and I was pleased with the results. After cutting off a piece (I bought the raw stock rather than the pre-made navigation light shapes), I sanded the plastic down to blend in with the wingtip and then polished it with tri-grit fingernail file. A primer was applied to all the seams which revealed a few more areas that needed attention. These were quickly dealt with and I rescribed the areas that had been obliterated by sanding, washed the model, and headed for the paint shop.
|
PAINT & DECALS |
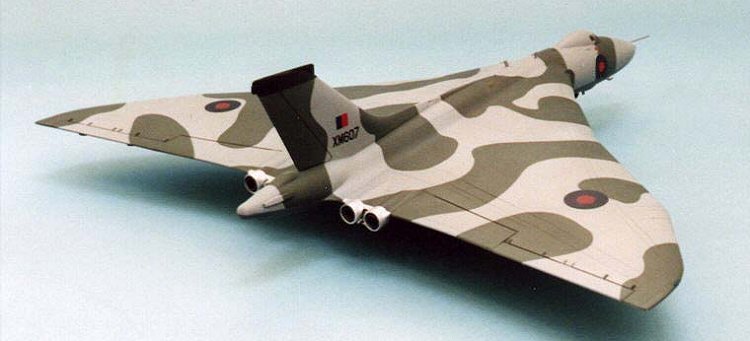
I chose to do XM607, which participated in the first Black Buck mission. A few queries on various modeling discussion boards resulted in nearly instant responses from Vulcan experts on the proper colors and markings. This is what is so great about the on-line world – you can ask a question and get numerous helpful answers. As mentioned above, XM607 was painted with a disruptive camouflage scheme of Medium Sea Grey (matched to FS 36270 by Urban Fredricksson) and RAF Dark Green (matched to FS 34079) over Dark Sea Gray (matched to FS 36173). I used Model Master Acryl paints for the upper surfaces and the undersides got sprayed with Polly Scale US Gunship Gray, lightened with a bit of flat white to match the FS 36173 chip I had. The demarcation lines are all hard, so I used drafting tape for the considerable masking required. I placed the tape on the model, drew the camouflage pattern with a pencil, took the tape off and placed it on a piece of glass, and cut the line with a sharp X-acto knife. Then the tape was placed back on the model and the color sprayed. While slightly tedious, this worked very well. The shrouds surrounding the exhausts were painted with Testor Metalizer Aluminum. Since the windows are tiny and oddly shaped, I used blobs of white glue to seal them before painting. When done, I popped off the glue with a toothpick.
 The wheels wells got a coat of
Light Aircraft Gray (FS36495), and the struts were painted flat black. The
wheels were sprayed aluminum and I hand-painted Scale Black on each of the
eighteen tiny tires. Future floor polish was applied in preparation for the
decals.
The wheels wells got a coat of
Light Aircraft Gray (FS36495), and the struts were painted flat black. The
wheels were sprayed aluminum and I hand-painted Scale Black on each of the
eighteen tiny tires. Future floor polish was applied in preparation for the
decals.
Since the kit that I built was an old MPC issue, the decals were immediately suspected of being of poor quality. As I feared, the stencils instantly silvered, so I just threw them away. I did manage to use the serial number on the tail and the ejection seat warning triangles successfully. During Black Buck, the squadron markings on the tail were painted out, so I didn’t have to do anything with them. I went to my spare decal box and found fin flashes from an Airfix EE Lightning sheet, a Fujimi Spitfire Mk V sheet provided the fuselage roundel, and the wing roundels came from an AeroMaster P-40 sheet. None of the shades of red are the same, but unless you look for it, it isn’t that noticeable.
Weathering was done sparingly as the RAF kept their showcase bombers very clean, plus the underside paint was brand new. I accented the panels by lightly running a sharp pencil next to the raised lines. I used a wash of dark gray to highlight the control surfaces, and I sprayed a highly thinned coat of light gray all over the model to tone down the starkness of the paint. A final coat of Polly Scale clear flat topped everything off.
|
FINAL ASSEMBLY |
I chose to leave all the pointy stuff off until I finished all the masking and major painting, so I went back and attached the pitot tubes and various antennae with CA glue. The refueling probe’s attachment point was much too bulky, so I sanded it down and faired it onto the nose. The landing gear were glued on, giving rise to the Airfix beast once again. The wheels for the port landing gear weren’t even close to sitting on the ground (a common problem with any model with complicated, multi-wheel landing gear), so I fussed with it for a couple of hours. I sanded down some wheels and broke off a couple of pairs and repositioned them. No model contest "Best of Show" awards for this baby, but I finally managed to get it to the stage where most of the wheels were close to the ground. You have to look for it (and judges do), but the large delta wing planform works to my advantage with the casual observer. I made some simple landing gear door retraction struts out of stiff stainless steel wire and glued them in. I drilled out the fuel dump (?) tubes and the refueling probe. The crew access door and boarding ladder were attached after more fussing. One last coat of Polly Scale clear flat got rid of all the shininess of the stray CA glue blobs.
|
CONCLUSIONS |
The Airfix Vulcan is a dated kit that can be built up into a striking model if the builder chooses to do the work necessary to address its fit problems and the lack of detail in the engine exhaust area. Despite the massive amount of CA glue that I used, I still had a good time working on this model, and the friend who gave it to me was very surprised to see it done just a couple of months later. That will teach him to dump Airfix kits on me!
|
REFERENCES |
Copyright ModelingMadness.com
If you would like your product reviewed fairly and fairly quickly, please contact the editor or see other details in the Note to Contributors.
Back to Reviews Page 2017