|
HISTORY |
ESCI 1/72 TU-22 Blinder
|
KIT # |
9100 |
|
PRICE: |
@ $25.00 from eBay |
|
DECALS: |
One Soviet AF in Natural Metal |
|
REVIEW : |
|
|
NOTES: |
Kit is OOP |
|
HISTORY |
In the mid-1950’s, the Soviet Union’s military planners laid plans for a supersonic long range bomber to replace the subsonic propeller driven bombers entering service at the time. Designs by the Tupolev, and Myasischchev design bureau’s were studied, but most led to dead ends. In 1954, Tupolev’s design model 105 was chosen, despite numerous objections within the Communist Party leadership. The definitive configuration of the model 105 was chosen in 1955, and its performance was roughly similar to that of the USAF’s B-58 Hustler. The aircraft was very sleek, but featured an unusual engine arrangement, in which the engines were mounted in pods at the base of the tail. This saved from having a complicated boundary layer separation system in the intakes, but added a 15% weight penalty, and made engine maintenance much more difficult because of how high they were off the ground. September 7th of 1959 saw the first flight of the TU-22, which the Russians called the TU-105A. During testing, numerous problems arose, and a number of crewman were lost in crashes. The new bomber was given the designation TU-22, and the NATO code name "Blinder" by the west. It served the Soviet Air Force, and Navy into the late 1980’s, in its strike, anti-shipping, and reconnaissance versions.
Soviet Blinders saw some combat action in Afghanistan, in both the bomber, and reconnaissance roles . The only two nations to receive the export version of the Blinder were Libya, and Iraq. Iraq got about 12 Blinders in 1973, while Libya received their 12 to 18 from 1977 to 1983. Blinders from these two nations saw extensive combat, mostly with their neighboring countries. A number of Blinders from each nation were lost to SAM’s of opposing nations, and only a few, if any, are thought to remain in service today. In one incident during the Iran/Iraq War, an Iraqi TU-22 was intercepted by an Iranian F-4D. The Phantom got a direct hit with a Sidewinder, and severly damaged the tail section of the Blinder, but could not bring it down. Iraqi Blinders played no roll in Operation Desert Storm, but a number of them were damaged or destroyed by coalition forces on the ground.
While never an outstanding design, or much liked by its crews, the Blinder filled a niche with the Soviets for nearly three decades. As of the new century, Ukraine remains the sole operator of the type, with the Libyan, and Iraqi aircraft thought to be unserviceable. The TU-22 led to the much more successful TU-22M/TU-26 Backfire bomber., which continues to serve.
|
THE KIT |
I could not find a copyright date on the box, or instructions, but I believe this kit was released in the mid to late 80’s. It represents an earlier bomber version of the Blinder. I’ve seen pictures of a later release that represents a strike/anti-shipping version, complete with a large ASM missile (AS-4 Kitchen perhaps?), and refueling probe. The kit is molded in semi-hard light gray plastic, and features accurately inscribe panel lines, that are just a tad on the heavy side, but definitely usable. The bomb bay can be left open, and 16 dumb bombs are included. Detailing in the bomb bay, landing gear bays, and cockpit, is about what you’d expect from ESCI, pretty sparse. Since I had no photos of these area’s to work from, I decided to build the kit right out of the box. The parts were relatively flash free, but did suffer from some warping.
|
CONSTRUCTION |
The cockpit is pretty basic, but once assembled, and the canopy is on, you can barely see anything anyhow, so I didn’t spend a lot of time here. Blinder crews are strapped into the lowered ejection seats, and then hoisted into the aircraft from the bottom. The seats fire downward, so the canopy does not open at all for crew entry. There is an error in the cockpit. The seat for the gunner/radio operator should face to the rear, instead of forward, as in the kit. The only versions of the Blinder to have this seat in the forward facing position were the trainer versions. The cockpit tub, ejection seats, and walls were painted Testors Russian Interior Green, with black dials, and olive green seat cushions.
Once the cockpit was assembled, I started gluing the major wing and fuselage assemblies together. Fit was okay, but a few area’s gave me problems. Fit of the forward fuselage section to the rear section was really bad, and would have resulted in a noticeable step just forward of the wing root. I decide to glue each half of the forward fuselage section to the rear fuselage assembly one half at a time, instead of gluing the forward halves together, and then to the rear assembly, as the instructions show. This worked out pretty good, but required a lot of patience, clamps, and super glue! I was still left with a small step, and a few gaps. These were filled with sheet styrene, and gap filling super glue, and sanded when dry.
Figuring that this kit would be real tail heavy, I assembled the nose section halves, and once dry, loaded it up with about 3 ounces of weight. Fit of the nose cone to the forward fuselage assembly was nearly as bad as that of the forward fuselage section to the rear fuselage assembly, and required lots of gap filling CA, and more sanding.
To make painting easier, I assembled the engines, but did not put them on the model. Once I attached the wings, I was left with some large gaps on the underside of the wing root. I filled these with putty, and once dry, sanded, then re-scribed the area. The horizontal stabilizers required the same treatment the wings did on the underside.
Once all the major sub assemblies were together, lots of filling, sanding, and re-scribing ensued. It was somewhere in this time period that the kit sat on my table for about a month, due to lack of motivation. I finally picked it up again, glued the already masked off canopy on, and got it ready to paint.
|
PAINT & DECALS |
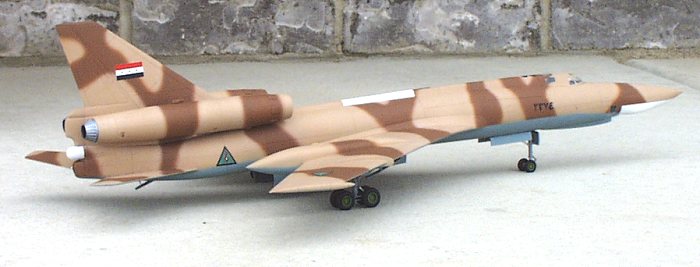
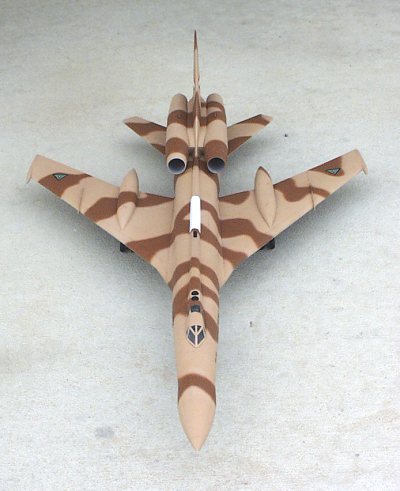
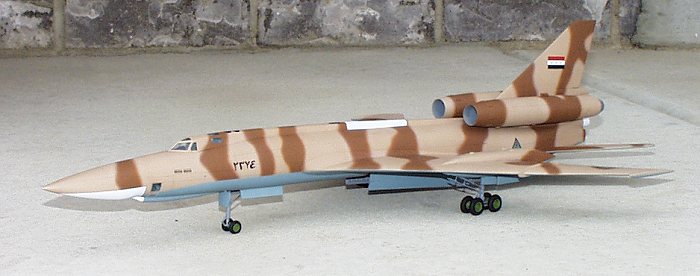
Natural metal finishes have never done a whole lot for me. Since Soviet, and Ukrainian Blinders wear this scheme, this narrowed my options to the two export countries, Libya, and Iraq. After a lengthy search, the only picture I could find was an old black and white shot of two Libyan Blinders taken on their delivery flight. I recalled seeing paintings of this scheme with both current, and older style (as in the picture) Libyan national insignia, and also an Iraqi a/c in this same scheme, but could never find this reference. I did manage to find a painting/plan view of a Libyan Blinder in Bill Sweetman’s book Soviet Military Aircraft. I decided to model a Libyan a/c with this scheme, but with the later style "green disc" national insignia.
I first sprayed the canopy with Testors Russian Interior Green color to match the cockpit interior. Next came Testors Model Master Russian Underside Blue on the bottom, which I also used as a primer on the seams on the top of the model as well. I had to go back and re-sand a few areas, but was quickly back to painting again. I used a home brewed mix of Model Master FS 33613 Radome Tan, and FS 30117 Military Brown, for the tan. The resulting color was much more tan than the a/c featured in Sweetman’s book, which had a more yellow shade to it, but I liked my brew better, and went with it. Its been my experience that paintings in books are often quite inaccurate color-wise anyhow. I used the previously mentioned FS 30117 Military Brown for the brown in this scheme. The engines, while still separate, were painted at this time. The painting went smoothly, but still required a few touch ups of all three colors. When I did the final touch up of the underside blue color, I used thin cardboard to create a soft mask on the demarcation lines, by taping it about 1/8th of an inch off the model. This resulted in a sharp, but somewhat feathered line. Next came the white for the underside of the nose, the tail gun radar, and the spine antenna. All were masked off using the picture, and painting in Sweetman’s book as a reference. I then applied a coat of Testors Semi-gloss. Once this was dry, it was time to decal.
It was at this point that the plainness of Libya’s nation insignia became apparent. I decide to go with Iraq’s more colorful markings. The markings came from Superscale sheet 48-385 "Iraqi Air Force". They were for a MiG-23BN, but with a little number transposing, waa-lah… Blinder markings! All went down well with a little Solva-set. I added 10 bombing mission marks to the forward section to represent markings that may have been applied during the "War of the Cities", in which Iraqi Blinders played an extensive roll. These markings also came from the Superscale sheet. I also used a solid black decal sheet to mark the spine antennas. Once the decals were dry, I removed the Solva-set residue with a damp cloth. A coat of Testors Flat Coat followed. Once this coat was dry, I gave the entire model a light coat of black watercolor as weathering. I used damp cotton swabs, and balls to remove the excess watercolor after it had dried.
|
FINAL ASSEMBLY |
Final assembly was very straight forward. The landing gear, interior gear wheel wells, bomb bay, and their doors, were painted FS 36270 Neutral Gray, with the outside of the doors painted underside blue. The kit instructions call for the door/bay interiors to be white, but after examining color photo’s of Soviet aircraft, it became clear that they were a medium gray, and not white. The landing gear looks fragile, but is actually pretty strong. The wheel hubs were painted Testors zinc green, with black tires. The bomb bay, bay doors, gear doors, wheels, and landing gear got the same weathering as the model before I installed them. The bombs were painted flat black, and installed in the bomb bay before the bay doors were glued on. I used super glue to attach all the gear assemblies, and doors to the model.
For storage purposes, I left off the three sensor probes from each side of the forward fuselage. I had also managed to break off the tail gun during construction, and forgot to glue it back on, and paint it before I took the photo’s (DOH!).
The last thing I did was to add the engines to the model. Fit at the middle of the attachment point is good, but leaves small gaps at either end. Some modelers may want to fill these in, but I left them as is.
|
CONCLUSIONS |
While the markings, and paint scheme are somewhat speculative, I really had a lot of fun with this kit, and would highly recommend it to anyone wanting to model this unusual aircraft. I’ve really got to give credit to ESCI for having the cajones to release models of aircraft that the US, and Japanese makers would never do! They also released an equally nice kit of the TU-22M Backfire in this scale. It will no doubt be a future project of mine!
|
REFERENCES |
Tupolev TU-22 "Blinder" & TU-22M "Backfire" by Yefim Gordon, and Vladimir Rigmant
World Air Power Journal Volume 33
Soviet Military Aircraft by Bill Sweetman
Copyright ModelingMadness.com. All rights reserved. No reproduction in any form without express permission from the editor.
2017