AMT 1/48 ES-3A 'Shadow'
|
KIT # |
8750 |
|
PRICE: |
$20.00 |
|
DECALS: |
One aircraft |
|
REVIEW : |
|
|
NOTES: |
|
|
HISTORY |
With the retirement of Douglas' venerable EA-3 Skywarrior in the late 1980's, the US Navy was left without a carrier deployable Electronic Warfare/ELINT platform. Around the same time Lockheed was awarded a contract to develop a prototype aircraft based on their S-3A Viking sub hunter. In 1977 Lockheed had proposed an EW variant of the Viking, but it was turned down. Ten years later the idea was resurrected.
In 1989 it was decided that 16 early S-3As would be converted into ES-3As. The first ES-3A flew on May 15th 1991. The Shadow made its first appearance in the fleet in 1993 when two units stood up. VQ-5 Sea Shadows were the west coast unit, and were originally based at Agana, Guam, but later moved to NAS North Island. VQ-6 Black Ravens were the east coast unit, and were based at NAS Cecil Field.
After only six years of fleet service, it was decided to replace the Shadow with ELINT equipped P-3s, and by the end of 1999, the Shadow was gone.
|
THE KIT |
 In 1995 AMT/ERTL released their S-3A kit with the
necessary additions to make an ES-3A. The basic kit is the old ESCI S-3A, with
ES-3A parts added. As most of you know, ESCI was real hit or miss with their
kits when it comes to quality, and fit. Their S-3A was definitely a HIT!
In 1995 AMT/ERTL released their S-3A kit with the
necessary additions to make an ES-3A. The basic kit is the old ESCI S-3A, with
ES-3A parts added. As most of you know, ESCI was real hit or miss with their
kits when it comes to quality, and fit. Their S-3A was definitely a HIT!
It is molded in light gray semi-hard plastic. There are 9 trees of parts; 8 gray, and 1 clear. The basic kit has 100 parts. There is an additional tree with 54 parts (mostly antenna's) for the Shadow version. There is also a tree with 21 parts that has everything you need to do a standard S-3A Viking, so if you can't find a Viking kit reasonably priced, the Shadow is an alternative.
The kit features beautifully engraved panel lines, and very good fit. The detail in the cockpit, and landing gear bays is typical ESCI.... pretty sparse. The instrument panels are represented by decals, which is usually unacceptable in this scale, however once the canopy is glued in place, you can hardly see in the cockpit anyway.
The ESCAPAC ejection seats are lacking detail, but again, you can hardly see them once the lid is on. A nice addition to the kit is the inclusion of a "buddy pod" for in-flight refueling duties, and a wing tank. I haven't been around enough buddy pods to tell if every rivet is in place, but it looks like one to me!
Some have suggested that the tinting on the canopy is too dark. I'd have to admit that it is a bit dark, but lacking any options, I went with it.
|
CONSTRUCTION |
As mentioned above, the fit of this kit is really excellent. There are a few equipment bay covers around the nose that can be a little tricky, but some filing, and patience will do the trick. The weapons bay doors are another area that must be assembled with care. This kit just about falls together out of the box, which is how both of mine were built.
For the Shadow version, you must remove a few antenna's along the spine of the aircraft, but for the most part, you're just placing Shadow antenna's on the model, and leaving Viking antenna's off. A supplemental instruction sheet covers antenna placement, and painting.
 Fit of the forward engine nacelle's is the worst
fitting parts in the kit. It seems as if the forward fan section is just a tiny
bit too big. I had to really clamp them down, and use fast drying superglue to
hold them together. The inner walls of the nacelle's had a few ejection pin
marks that were filled, and sanded. I also painted them white, and the fan
fronts titanium, before assembly.
Fit of the forward engine nacelle's is the worst
fitting parts in the kit. It seems as if the forward fan section is just a tiny
bit too big. I had to really clamp them down, and use fast drying superglue to
hold them together. The inner walls of the nacelle's had a few ejection pin
marks that were filled, and sanded. I also painted them white, and the fan
fronts titanium, before assembly.
The canopy was glued into place towards then end of the assembly sequence, and masked off with Scotch Magic clear tape. On the first kit I did (159404), the canopy fit well. However, on the second kit (159405) the fit was poor, and required much filling (Milliput), and sanding. The rectangular cover for the refueling probe in the upper center area of the canopy does not fit too well. An alternative might be to replace it with a piece of sheet styrene.
The instructions have you assemble the two halves of the arresting hook bay, along with the hook, and glue it into the fuselage. I find that it is much easier to leave the hook out for painting purposes. You will have to cut off the small pins on either side of the hook to get it in during final assembly. There is a big seam that runs right down the middle of this bay that would require a lot of work to fill, and sand. Fortunately, once the hook is in place you really have to look to see the seam.
The APU exhaust part for the right side of the rear fuselage may require a little careful bending to get it to conform. Overall the kit goes together very well, and with a little careful fitting in a few a spots, you should have few problems.
|
PAINT & DECALS |
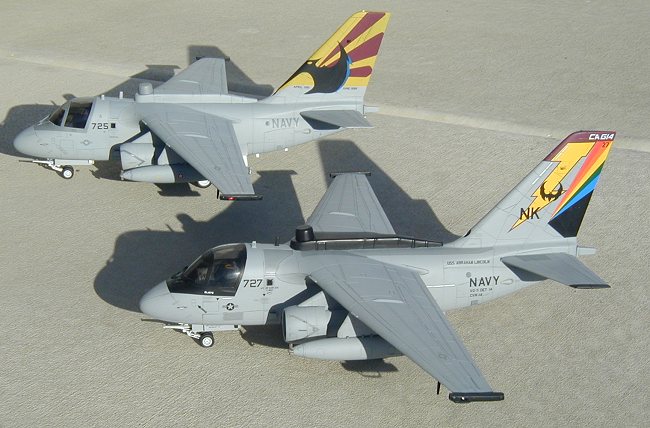
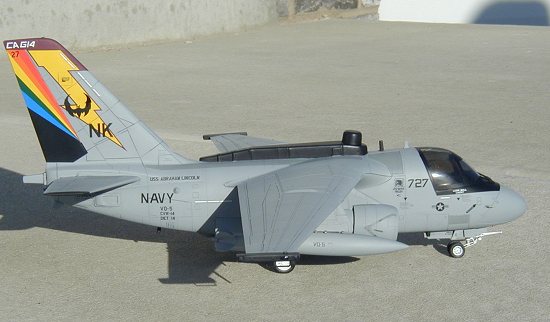
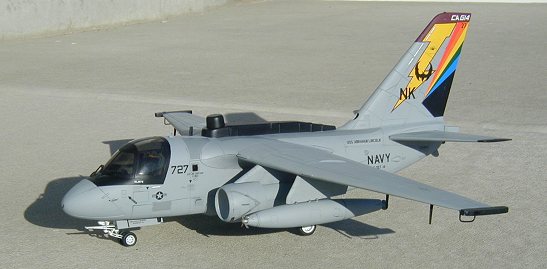
Both aircraft are finished in the standard Shadow paint scheme of overall Light Ghost Gray FS 36375, with white landing gear, and gear wells. The only difference between the two being the color of the spine antenna "canoe", and anti-glare panels. I will cover each aircraft separately.
VQ-5 ES-3A s/n 159404
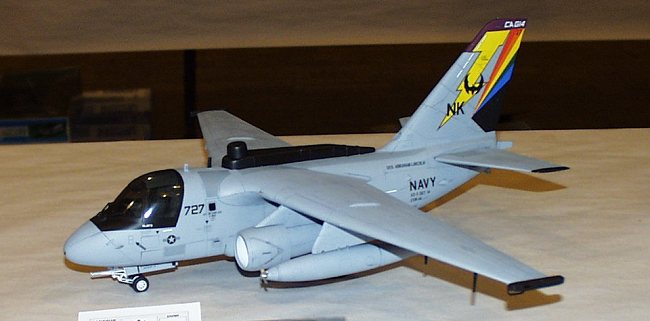
This aircraft served as the Air Group Commanders (CAG) aircraft during the final year of VQ-5s existence. I had photographed this a/c just weeks before it went to "The Boneyard", and knew it would be one I would model once decals became available.
Fortunately, CAM Decals came to my rescue with the very first aftermarket decal sheet specifically for the ES-3A; sheet #48-063. The decals are beautifully done, and according to the detail pictures that I took, very accurate, with one exception; CAM did the intake warning triangles in gray with black lettering, when my photos show them as black with gray lettering. I didn't even realize this until I was putting them on!
However, since these were the only Shadow decals available at the time, I went with them. Since then, Superscale has done this a/c on their sheet 48-690 with the correct black triangles. This is a very nice sheet too, but you will have to match the pale purple of the lightning bolt outline, and paint the tail fin top. CAM supplies this as two decals.
Before decaling, the spine antenna canoe, wing tips, horizontal stabilizer tips, and canopy area were masked off and airbrushed semi-gloss black. Once all the paint was dry, a coat of Testors glosscoat followed. Once that had dried for a day, the decals came next.
The decals went down beautifully with a little Solvaset. I had a few areas that silvered on me, but a few light cuts with a sharp Xacto blade, and more Solvaset solved this problem. CAM thoughtfully supplies the wing walks, and arrestor hook stripes as decals, while Superscale does not.
As a side note; I got the decals for this kit just two weeks before the annual local model show, and a few days later I decided to try to build the kit out of box for the show. I was glueing the landing gear doors on the morning of the show. Time? From start to finish.... 10 days! An absolute record for me that will no doubt never be equaled again ;0)
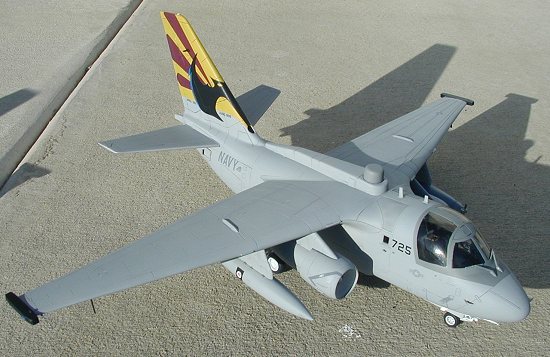
VQ-5 ES-3A s/n 159405
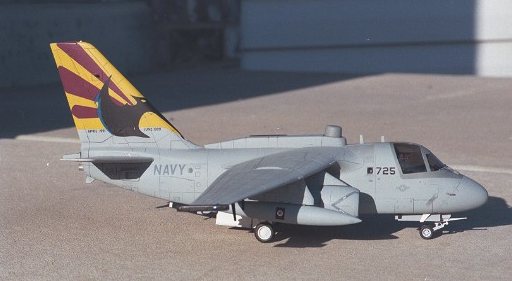
From what I've been able to find out (which isn't much), this a/c served as the "Retirement aircraft" for VQ-5 when they were disestablished. I was unable to find any pictures of this Shadow. The markings came from Superscale Decals sheet 48-689, which also includes markings for VS-35s black tail CAG S-3B.
If you check out Superscale's website, you will note that they offer a correction sheet for this sheet, and sheet 48-690. Somewhere in the process of producing the artwork for this sheet, the "ES-3A" designation got turned into "ES-3B", which of course, there was no such aircraft. They also provide more intake warning triangle's, as the sheet only comes with two, instead of the four needed.
As instructed by Superscale, I mailed the top part of the decal sheet that shows the sheet number to them, and within a few weeks I got not one, but three correction sheets. This turned out to be a real bonus, as I would need them!
I followed the instructions, and painted the canopy framing, and anti-glare panel FS 36237 Medium Gray, and the ALR-81 antenna on top of the canoe housing was painted FS 36251Aggressor Gray. The wingtip ECM pods were painted black, and and the tail was masked off, and painted FS 13538 Chrome Yellow. All paints were from Testors Model Master line. The entire a/c was gloss coated with Testors gloss, and set aside to dry.
 Decaling began with the very large one piece decal for
the tail art. One the left side of the a/c I encountered no problems. However on
this same decal for the right side, I noticed that the retirement dates were
backwards. The decal had it as "June 1999" to "April 1991". Having no pictures
of this a/c to work with, I made a guess that this was incorrect, and swapped
them around.
Decaling began with the very large one piece decal for
the tail art. One the left side of the a/c I encountered no problems. However on
this same decal for the right side, I noticed that the retirement dates were
backwards. The decal had it as "June 1999" to "April 1991". Having no pictures
of this a/c to work with, I made a guess that this was incorrect, and swapped
them around.
The purple rays on the tail decals are a bit transparent. If I would have had another sheet of these markings, I would have placed a second decal over the first, once it had dried.
As noted above, the sheet only came with intake warning triangles for the left inner, and right outer side of the engines. As usual, I managed to trash one of these decals. No problem, I've got the three extra correction sheets, right? Problem; Superscale only gives you two extra gray triangles for the outer right, and inner left engine sides, so all of the intake warning triangles, including those on the correction sheet, are for the same engine sides! There are no intake warning triangles for the outer left, and inner right engine sides. What to do? I ended up applying the triangles from the correction sheet, even though they were upside down. Once dry I cut the "jet" & "intake" words off the extra triangles, and placed them over the upside down "jet" & "intake" words on the model. I also had to cut out the word "danger", and flip it around as well. In the end it was a good thing Superscale sent me three extra corrections sheets, as I ended up using five of the six extra triangles they provided.
The rest of the decals went down fine. Once all the decals were dry, I went over the model with a damp cloth to remove the Solva-set residue. As I was preparing to flat coat the model, I was taking off lint with a small piece of masking tape, and you guessed it... pulled off a pair of decals! I hate when that happens! Okay, to the spare decal box for replacements. Once these were dry, I flat coated the model.
On a side note, Superscale did not supply any walkway, or formation light decals for this a/c, as CAM did with 159404. Not having any pics of this a/c was definitely a hindrance here, as I suspect that the real a/c did have these.
|
CONSTRUCTION CONTINUES |
 One really nice thing about building these kits OOB is
that once they are painted and decaled, there really isn't much left to do. I
kept the weathering to a wash of black water color paint. From the picture I
took of 159404, I knew it was quite clean. Since 159405 was the retirement a/c,
I suspected it was kept clean as well.
One really nice thing about building these kits OOB is
that once they are painted and decaled, there really isn't much left to do. I
kept the weathering to a wash of black water color paint. From the picture I
took of 159404, I knew it was quite clean. Since 159405 was the retirement a/c,
I suspected it was kept clean as well.
Final assembly consisted of adding the landing gear, gear doors, wheels, wing fuel tanks, and buddy pods, all of which had been pre-painted the approiate colors. And that's it!
|
CONCLUSIONS |
AMT/ERTL's 48th Shadow kit is a real treat to build. Great fit, and an interesting subject, combined with some colorful decals, make it fun! Have you been slugging it out with one of those bad fitting Monogram 48th scale jets from the 70's or '80s? Try this kit, or the S-3A kit for your next build, you won't be disappointed!
Copyright ModelingMadness.com. All rights reserved. No reproduction in part or in whole without express permission from the editor.
If you would like your product reviewed fairly and quickly, please contact the editor or see other details in the Note to Contributors.
Back to Reviews Page 2025