Monogram 1/48 TA-4J Skyhawk
Price: about $8 many years ago
Conversion: Missing Link Models OA-4M to TA-4J
Price: $6 at the time
Decals: One option
Review and Photo by: Fred Krause
Having spent the better part of my high school years photographing on Miramar NAS' ramps (instead of being in school!), I've always been a big fan of USN adversary aircraft. Upon getting back into modeling this past May, after a 12 year lapse, the first few subjects I chose to model were adversaries. To my horror, I discovered that a good 48th scale TA-4J STILL did not exist! I remembered doing the Fujimi TA-4F nearly 15 years earlier, and still remembered how bad it was! Fortunately, a fellow modeler I met on the net provided me with an alternative; Missing Link Models TA-4J conversion. The conversion provides the hump behind the canopy, and a new tail tip, in resin, and a new, very thin, vacu-formed canopy. It took me awhile to locate a supplier of MLM stuff, but I found that RollModels, Inc. (www.rollmodels.com). carries the line. Unfortunalty, their service is not good (mostly out of stock), so you may have better luck contacting MLM directly. The address is at the end of this review.
After receiving the conversion, I immediately started on the kit. Following MLM's very good instruction sheet, the nose, and tail ECM blisters were sawed, then sanded off. The oil cooler went as well. Next to be removed was the tail tip ECM pod, which was cut off at the top of the rudder. As MLM advises, this can be saved, and used to model a late A-4E/F. The fuselage was then assembled per kit instructions, and, despite being a Monogram kit, fit well. Once the ECM "camel hump" is removed from the kit, a very large hole appears. To fill it, I sandwiched a few sheets of styrene together, and after some fitting into the hole from the inside, glued it in place. There were still some gaps than needed to filled here, and once the glue was dried, putty was applied. A little filing, and sanding blended the filled hole into the rest of the fuselage nicely.
Next came the attachment of the new tail tip, and "canopy hump", with epoxy. Also added at this time was the fairing for the beginning of the tail. This is the part that is the beginning of the tail as it rises out of the spine. One of the nice things about this kit is that it comes with a multitude of extra parts, one of which is the tail fairing. It also comes with a third, unused cockpit tub for an A-4E/F. Combine this, and a PE cockpit set, with ECSI's otherwise nice A-4E/F kit, and you're in buisness! Before gluing the wings together, I plugged the rectangular holes on the underside with sheet styrene. I'm not sure what these are (shell chutes?), but I've never seen them on a TA-4J. I also plugged the holes for the weapons pylons at this time. Before attaching the wings to the fuselage, I fit two pieces of sprue across the inside of the fuselage, to push the fuselage sides into the sides of the wing joint. A sizable gap between the fuselage, and upper wings results if you don't. Next I added the speed brakes in the closed position. These had to be filed down a bit from the inside to get a good fit. I also chose to close the slats, since I had managed to break off most of the slat actuators by this time. Since this a/c does not have the cannons at the wing roots, these areas were plugged with the tips of MK82 bombs supplied with the kit. Careful filing, fitting, puttying, and sanding results in a smooth contour. Most of the remainder of the kit was assembled per kit instructions.
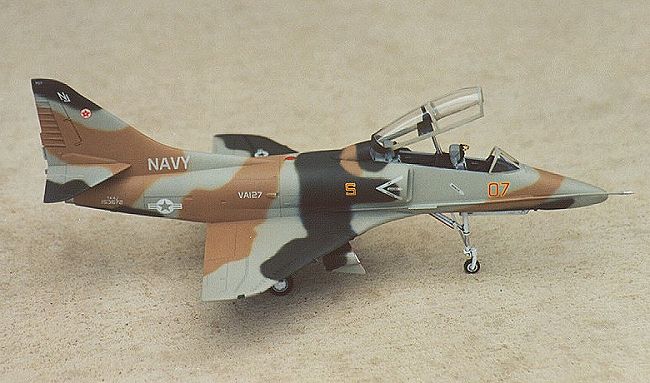
I left off the canopy, and landing gear , and then started to work on the paint scheme. The aircraft I chose to do belonged to VA-127, which, with sister squadron VA-126, provided adversary service at Miramar during the 80's. The decals came from Superscale sheet 48-316. I had photographed this aircraft myself, and have photo's to compare the sheet too, and the decals were right on the money. Unfortunately, Superscales long standing tradition of totally inadequate instructions reared it ugly head. While plan views of the scheme are provided for both sides, and the top, the least visible part, the bottom, was not provided! I have numerous photo albums of prints filled with shots of aircraft departing Miramar's flightline, providing usable bottom shots. Unfortunately, this was one a/c I never nailed. Next step, improvise! Following the provided pattern on the upper wings, along with photos of the aircraft, I was able to wrap the scheme around the plane with reasonable accuracy. Superscales instructions tell you to use FS36307 (light sea gray), 30219 (dark tan), and 34079 (dark green) for the paint scheme. After comparing photos to the paint, I used Model Masters light sea gray, and dark tan. The dark green, however, did not look even close. In every photo I had of this a/c, the green looked almost black, so, using FS34079 as a base, I "eyeballed" black to the mix, and am very please with the resulting "black green". I then masked, and painted the wheel wells white. Next came a coat of Model Master semi-gloss lacquer. The decals went on nicely, but I replaced the fuselage national insignia , which are too small, with larger ones from another Superscale sheet. After the decals dried, a coat of flat lacquer followed. The landing gear was then added.
I chose not to use the vacu-from canopy that came with the conversion, and chose to modify the kit canopy instead. All that consisted of was a little filing at the rear. Be advised, however, that the fit for a closed canopy was not good at all, so I chose to leave the lid open. I replaced the hydraulic canopy actuator from the kit, with one made of brass rod, and Bare-Metal foil. This involved shaving off the kit actuator, and also drilling a hole in the canopy support, but was quite simple, and added quite a bit to the finished product. The canopy was added, and I was done!
This was my first resin conversion, and it went together rather well. Even someone, like myself, still learning the ropes, won't have too much trouble with this conversion. The next time I do this conversion, I will add a few things. First will be the compressor bleed air exhaust duct to the spine of the aircraft. At the time I did this model, I had no references for the top of the a/c. Next would be to correct the rear instrument panel from OA-4M configuration, to a TA-4J's. Again, no references at the time. I will also add the centerline pylon with a sidewinder launch rail from another kit, and an ACMI pod from Hasagawa's F-16N.
Maybe some manufacturer, like Hasagawa, will do a REASONABLY PRICED 48th scale TA-4J, and save us all the trouble!
References:
Detail & Scale Vol. 32; A-4 Skyhawk in Detail & Scale
Detail & Scale C&M Vol. 6; USN Adversary aircraft
Conversion:
Missing Link Models
5716 Brook Dr.
Edina, MN. 55439
Copyright ModelingMadness.com.