|
KIT # |
2191 |
|
PRICE: |
$125.00 |
|
DECALS: |
Three options |
|
REVIEWER: |
Bob Laskodi |
|
NOTES: |
Cutting Edge cockpit and Eagle Strike Decals |
|
HISTORY |
Roger Jackson has already detailed the history of this magnificent aircraft on M2. Like his models, his history section is far more detailed than I can ever hope for, so go read his!
|
THE KIT |
This release from Academy has been one of the most
eagerly anticipated kits for the large scale market and it doesn’t
disappoint! There is simply no better kit of the Hornet available in this
large scale. The kit consists of over 600 injected molded plastic items
that are of the highest quality, and feature nicely done recessed panel
lines and finely engraved detail. The actual part count of this kit is
actually over 800, since the above count represents distinct parts of
which there may be 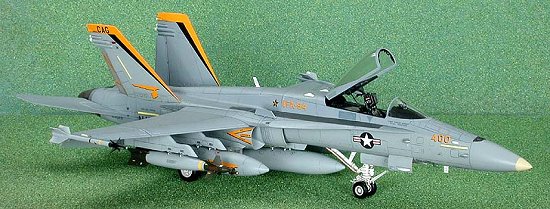 multiple pieces (such as missile wings, etc.). But
don’t fret, as over 200 of these items are for a wide variety of
weapons/sensors/pylons/tanks that make Hasegawa look like a “piker” since
Academy included most of the common load-out items for the Hornet without
forcing you to buy additional weapon sets. In fact, the number of options
available in this kit is simply “mind-boggling” with the modeler having
the ability to have wings folded, and slats, rudder, stabilizers, and
flaps deployed in a variety of configurations. The landing gear are
provided in white metal inserts for strength, which you build around with
plastic parts that feature detail just like the genuine article (that
would not be possible with straight cast struts). The kit decals are
nicely done, but have serious problems (read on), featuring three
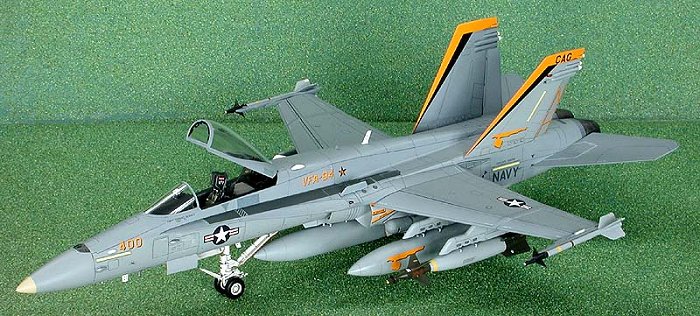
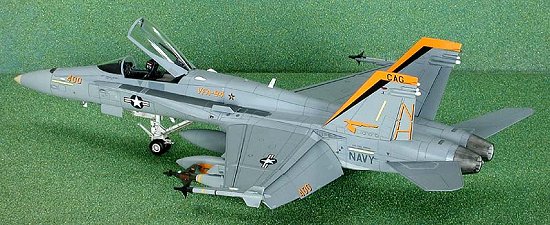
beautiful options; two “Golden Dragons” from VFA-192, and the absolutely
splendid “All American Bug” from VFA-146, that I desperately wanted to
build (read on!). The instruction sheet is a massive 40 page document
consisting of 51 “sub-assembly” steps that are in an “assembly drawing”
format with painting instructions keyed to generic paint colors.
multiple pieces (such as missile wings, etc.). But
don’t fret, as over 200 of these items are for a wide variety of
weapons/sensors/pylons/tanks that make Hasegawa look like a “piker” since
Academy included most of the common load-out items for the Hornet without
forcing you to buy additional weapon sets. In fact, the number of options
available in this kit is simply “mind-boggling” with the modeler having
the ability to have wings folded, and slats, rudder, stabilizers, and
flaps deployed in a variety of configurations. The landing gear are
provided in white metal inserts for strength, which you build around with
plastic parts that feature detail just like the genuine article (that
would not be possible with straight cast struts). The kit decals are
nicely done, but have serious problems (read on), featuring three
beautiful options; two “Golden Dragons” from VFA-192, and the absolutely
splendid “All American Bug” from VFA-146, that I desperately wanted to
build (read on!). The instruction sheet is a massive 40 page document
consisting of 51 “sub-assembly” steps that are in an “assembly drawing”
format with painting instructions keyed to generic paint colors.
|
CONSTRUCTION |
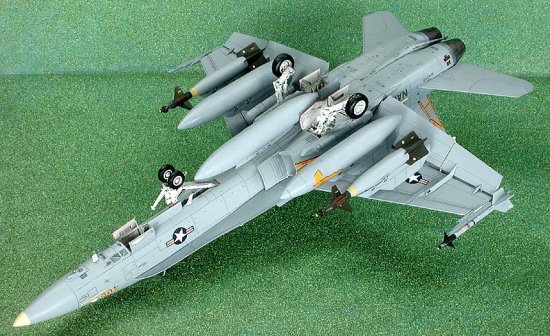
In a significant break from tradition, the first modeling tasks were not related to the cockpit! I actually built all the weapons, pylons, and drop tanks first. My original plan was to build all of them, but then reality reared its ugly head when one week later I was only halfway through the stuff! Realizing, that my plan was flawed (man, there are a lot of parts here!), I then made an executive decision to only do those parts that were going to be loaded onto the model; three drop tanks, two GBU-10 Paveway II, two AIM-9L/M Sidewinders, their associated pylons, and the FLIR and LDT pods.
 I then attacked the main fuselage components and
this went rather smoothly until I got to the intakes. I had heard that
the intakes are the only poor fitting parts on the entire model from a
friend who had just finished his. Heeding his advice very carefully, I
then proceeded to assemble the intakes incorrectly! A tip; when you
assemble parts J21/22 to B36/37, make sure you put them in the right
place! The end of J21/22 should meet the end of B37/37, which would mean
that these parts go to the OUTSIDE of the little “L” shaped aligning
bracket. The instructions are somewhat vague, but seem to indicate that
they go on the inside of the “L”. Be careful here and use the picture
provided! I didn’t and ended up with an intake that wouldn’t fit! Oh
well, time for lots of filler, sanding, and rescribing! To be honest,
this is the only part of the entire kit I had problems with and it was
simply my own fault!
I then attacked the main fuselage components and
this went rather smoothly until I got to the intakes. I had heard that
the intakes are the only poor fitting parts on the entire model from a
friend who had just finished his. Heeding his advice very carefully, I
then proceeded to assemble the intakes incorrectly! A tip; when you
assemble parts J21/22 to B36/37, make sure you put them in the right
place! The end of J21/22 should meet the end of B37/37, which would mean
that these parts go to the OUTSIDE of the little “L” shaped aligning
bracket. The instructions are somewhat vague, but seem to indicate that
they go on the inside of the “L”. Be careful here and use the picture
provided! I didn’t and ended up with an intake that wouldn’t fit! Oh
well, time for lots of filler, sanding, and rescribing! To be honest,
this is the only part of the entire kit I had problems with and it was
simply my own fault!
After assembling the entire rear fuselage section
(minus the flaps and stabilizers), I then started on the front fuselage
section. The first job up was to separate and clean up the resin cockpit
parts. The interior cockpit surfaces were painted
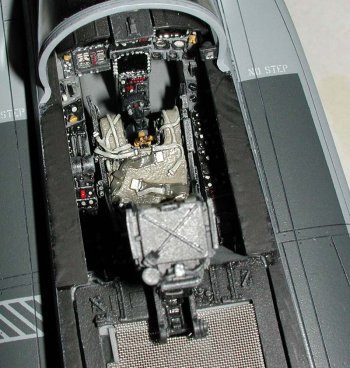 Dark Gull Gray. Testors
MM Flat Black was used for most of the radio and interior boxes, and
individual details were picked out in various colors as seen in the
detail pictures to provide a bit of variety. After all painting was
completed; all pieces were given a light wash of Tamiya Smoke and then
dry brushed lightly with Humbrol Light Gull Gray (#129) to enhance the
nicely done raised detail
Dark Gull Gray. Testors
MM Flat Black was used for most of the radio and interior boxes, and
individual details were picked out in various colors as seen in the
detail pictures to provide a bit of variety. After all painting was
completed; all pieces were given a light wash of Tamiya Smoke and then
dry brushed lightly with Humbrol Light Gull Gray (#129) to enhance the
nicely done raised detail
The Cutting Edge cockpit is a dream, and fits very nicely. The only tough part is cutting an opening from the kit coaming to accommodate the resin HUD panel. Otherwise, a true drop fit with no problems.
To be honest, I first thought the Academy kit was “over-engineered” and anticipated a lot of problems getting all the pieces together. Especially, the front and rear fuselage join. I didn’t use the provided screws, and when I assembled the front fuselage halves I left the rear portion that mates to the rear fuselage half completely unglued since I anticipated a serious fit problem. Well, let me report that there were no problems and this step was completely unnecessary!
I had a minor bit of trouble getting the leading edge extensions (LEX) on, in that they don’t fit cleanly to the model. However, by tack gluing sections in place with accelerated superglue, and then using liquid cement to bond everything firmly in place, this task went rather smoothly as the liquid cement ended up filling the very minor gaps. It really wasn’t as complicated as it sounds!
I now had the model mostly complete, the only exception being the exhaust nozzles and stabilizers which I left off until after painting.
|
COLORS AND MARKINGS |
First up was airbrushing the wheel wells and landing gear components with Testors Model Master (MM) Flat White. After drying overnight I stuffed wet tissue paper into the wheel wells and airbrushed the entire model with MM Light Ghost Gray. I next airbrushed the topsides with MM Dark Ghost Gray. To prepare the surfaces for decaling I airbrushed a heavy coat of Floquil (Railroad) Crystal Cote and let this dry for two days.
 The kit supplied decals feature really cool schemes (such as the “All
American Bug”), are nicely printed, and have good opaque colors. That’s
the good news, now for the bad! I found the decals to be unusable since
they silvered terribly, refused to lay down over curved surfaces, and
worst of all-refused to stay glued to the model. The carrier film is not
that thick, but for some reason the decals will resist your best attempts
to get them to lay down on a curved surface, but Solvaset will solve that
issue for the larger decals. Silvering was also quite a problem and again
Solvaset was the only solution. But disaster struck with the last decal
problem! After applying all the stencils, and the decals for “All
American Bug” (and that’s a lot of decals!), after two days all the
larger decals started lifting off from the surfaces and curling! In
addition the smaller stencil decals that wrapped around the landing gear
legs also became “unstuck” and started lifting. Oh $%^&! I thought
briefly about just soaking the decals on with some brushed on Future, but
since this was a commission build I couldn’t risk the decals lifting at
some future date (not to mention that the way some of the decals were
curling it may not have worked).
The kit supplied decals feature really cool schemes (such as the “All
American Bug”), are nicely printed, and have good opaque colors. That’s
the good news, now for the bad! I found the decals to be unusable since
they silvered terribly, refused to lay down over curved surfaces, and
worst of all-refused to stay glued to the model. The carrier film is not
that thick, but for some reason the decals will resist your best attempts
to get them to lay down on a curved surface, but Solvaset will solve that
issue for the larger decals. Silvering was also quite a problem and again
Solvaset was the only solution. But disaster struck with the last decal
problem! After applying all the stencils, and the decals for “All
American Bug” (and that’s a lot of decals!), after two days all the
larger decals started lifting off from the surfaces and curling! In
addition the smaller stencil decals that wrapped around the landing gear
legs also became “unstuck” and started lifting. Oh $%^&! I thought
briefly about just soaking the decals on with some brushed on Future, but
since this was a commission build I couldn’t risk the decals lifting at
some future date (not to mention that the way some of the decals were
curling it may not have worked).
 The only solution was to strip the decals off and replace them with
aftermarket. I used masking tape to pull off most of the looser pieces
without damaging the paint, but the Solvaset had firmly bonded small
pieces that just wouldn’t budge (go figure, one section lifts off and
other sections refuse to come off!). I thought about using Polly Scale
Easy Lift Off to remove the pieces, but that would have also damaged the
paint and I didn’t really want to repaint large surfaces. I used a Scotch
Brite pad to buff off the remaining decals. This worked out quite well,
but I did end up damaging small areas of paint so I had to re-paint these
sections (fortunately they were quite small and easy to do).
The only solution was to strip the decals off and replace them with
aftermarket. I used masking tape to pull off most of the looser pieces
without damaging the paint, but the Solvaset had firmly bonded small
pieces that just wouldn’t budge (go figure, one section lifts off and
other sections refuse to come off!). I thought about using Polly Scale
Easy Lift Off to remove the pieces, but that would have also damaged the
paint and I didn’t really want to repaint large surfaces. I used a Scotch
Brite pad to buff off the remaining decals. This worked out quite well,
but I did end up damaging small areas of paint so I had to re-paint these
sections (fortunately they were quite small and easy to do).
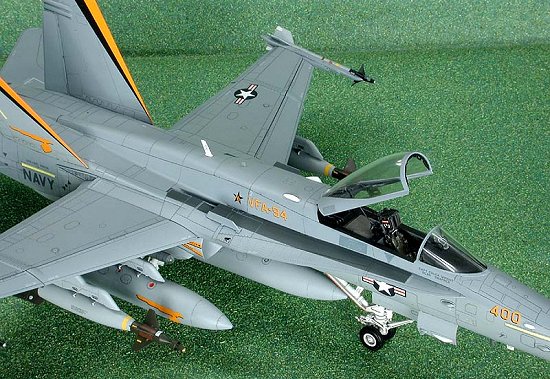
The Eagle Strike decals are very nicely printed, in register, and sufficiently opaque. The decals went on beautifully and snuggled down quite well with a coat of Micro Set and Sol. After drying overnight, I wiped the decals off with Polly’s Plastic Prep to remove any residue. After drying for a few hours, I shot a light coat of Floquil (Railroad) Crystal Cote to seal the decals and prepare for a light wash to highlight the panel lines and engraved detail. After applying a Payne’s Gray lightened with Titanium White watercolor based wash to all the surface details, I cleaned up the overruns and then sealed it with a light coat of Crystal Cote to protect the finish.
|
FINAL CONSTRUCTION |
The only significant issue I had with the Cutting Edge set is that the canopy insert will not fit without removing two small sections from the kit provided clear canopy. I decided to just use the kit parts since I was already frustrated by the decals and also envisioned a tough time getting the canopy to open in the correct position. The landing gear, doors, exhaust nozzles, pylons, weapons, and drop tanks were all installed with absolutely no problems. After a final topcoat of Testors Dullcote to provide the final finish, all masking was removed and the final antennae were mounted in place to finish off the model.
|
CONCLUSIONS |
Bob Laskodi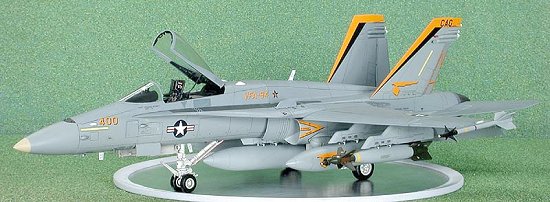 Quite frankly, in my not so humble opinion, the
Academy Hornet has got to be considered as one of the best model kits
ever produced in any scale. If this kit is not the 2003 kit of the year,
I don’t know what else could surpass it (OK, maybe Hasegawa’s magnificent
1/32 FW190D9!). The detail provided in the kit is simply outstanding, the
weapons provided will satisfy most everyone, and the engineering and fit
are among the best I have ever seen. While the sheer number of parts will
likely intimidate a novice modeler, it does build up very nicely without
any significant fit issues (didn’t use a single spot of putty!). I would
characterize the build as long and tedious (due to the large number of
parts) but not technically difficult. A novice modeler can make this
large beast into a showstopper by just carefully following the
instructions. The only negative I can find are the decals. But since I
have seen the kit built as the “All American Bug” I have to wonder if I
just got a bad batch of decals. At any rate, there are so many
aftermarket decal options available that this is not really an issue.
Quite frankly, in my not so humble opinion, the
Academy Hornet has got to be considered as one of the best model kits
ever produced in any scale. If this kit is not the 2003 kit of the year,
I don’t know what else could surpass it (OK, maybe Hasegawa’s magnificent
1/32 FW190D9!). The detail provided in the kit is simply outstanding, the
weapons provided will satisfy most everyone, and the engineering and fit
are among the best I have ever seen. While the sheer number of parts will
likely intimidate a novice modeler, it does build up very nicely without
any significant fit issues (didn’t use a single spot of putty!). I would
characterize the build as long and tedious (due to the large number of
parts) but not technically difficult. A novice modeler can make this
large beast into a showstopper by just carefully following the
instructions. The only negative I can find are the decals. But since I
have seen the kit built as the “All American Bug” I have to wonder if I
just got a bad batch of decals. At any rate, there are so many
aftermarket decal options available that this is not really an issue.
September 2003
Copyright ModelingMadness.com. All rights reserved. No reproduction in part or in whole without express permission. If you would like your product reviewed fairly and fairly quickly, please contact the editor or see other details in the
Note to
Contributors.