Hasegawa 1/48 Saab J.35F/J Draken
| KIT #: | 07241 |
| PRICE: | $59.99 SRP |
| DECALS: | Three options |
| REVIEWER: | Dan Lee |
| NOTES: |
SAC Landing
gear, Aires Cockpit & Exhaust Tube used |
| HISTORY |
 Release the Draken
(briefly)!!
Release the Draken
(briefly)!!
The Saab Draken was
Armed with
Sidewinders and Falcons, it would serve with the Swedish AF for almost 30 years
(1960-98) till it was finally replaced by the Saab Gripen.
The Draken also served with several other Scandinavian AFs and
| THE KIT |
The boxing I bought
was the first boxing of the 1/48 Draken from Hasegawa.
It contains three markings, two for the 1960s/70s OD/Sea Blue camo
pattern and one grey/grey plane from the 80s with dayglo numbers.
For more detail, see Scott’s preview of the kit.
| CONSTRUCTION |
 Every so often I
feel the urge to go all out on a kit.
In this case it is because I took advantage of sales and got a bunch of
aftermarket stuff for the Draken including a cockpit, nozzle and white metal
landing gear.
Every so often I
feel the urge to go all out on a kit.
In this case it is because I took advantage of sales and got a bunch of
aftermarket stuff for the Draken including a cockpit, nozzle and white metal
landing gear.
First thing I did
was remove the unneeded plastic around the cockpit area.
The AIRES cockpit and parts look much better than the Hasegawa version
especially the area behind the seat.
Unlike most of my experience with AIRES cockpits, this one fit without
sanding, removing, anger and swearing that is usually part of that experience...
till later.
I ended up removing
a little more of the plastic than I should have from the cockpit, but
fortunately it isn’t really noticeable thanks to the windscreen.
The top and bottom
fuselage halves were glued together and that was when I started swearing.
I didn’t shave as much of the resin as I should have because the a rea
around the cockpit had noticeable gaps.
This was not one of my more shining moments.
Of course, I might have been able to correct it if I hadn’t glued the
cockpit to the bottom half instead of the top half.
Sigh.
rea
around the cockpit had noticeable gaps.
This was not one of my more shining moments.
Of course, I might have been able to correct it if I hadn’t glued the
cockpit to the bottom half instead of the top half.
Sigh.
Next glued in the
nose cone and the I started more swearing as I noticed a 1 mm step.
The step took a bit of filling with Tamiya Surface Primer and CA glue
with many sanding to fix it. Aside
from the cockpit area, the sanding/filling portion worked out okay.
Thanks to previous
reviews, I knew about the issues with the rear and intakes.
The intakes interiors were painted silver and flat black then adjusted
(many many times) so that all that was required was some sanding to get them to
conform. The engine section was
more of a pain. I tried shaving
down the attachment points to get a better alignment, but it didn’t really work.
I think that the rear portion is just a little off dimension wise.
I ended up sanding down the areas that stick out.
If they didn’t conform perfectly then I wasn’t going to get upset.
The last major piece of assembly was the tail and that went on without a problem.
| COLORS & MARKINGS |
Painting
The entire air
frame was preshaded using flat black, green and other leftover colors from
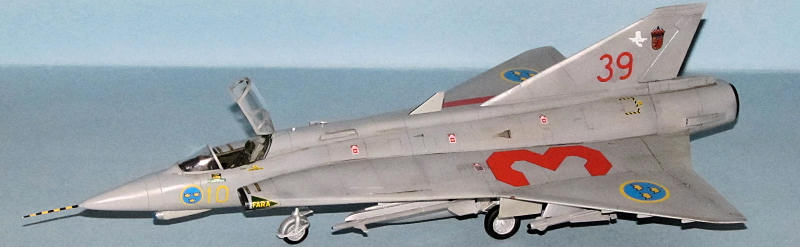
various builds. I selected Dayglo
39 as 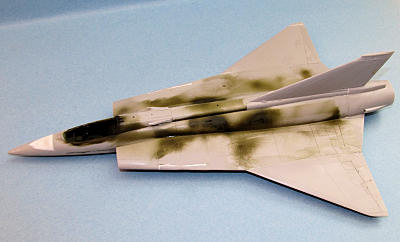 the markings I was going to use.
I started with several light coats of the bottom color, Tamiya XF-80
Royal Light Grey. It’s close enough
to FS36495 which I didn’t have the exact match in my paint drawer.
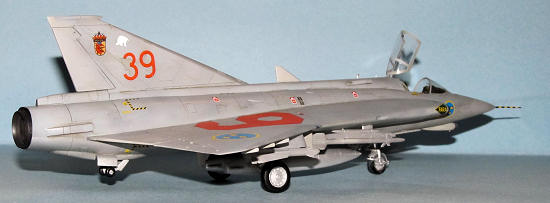
The top color, Compass Grey FS36320 which I had a near full bottle of
Gunze H307, was done in the same fashion.
I kept the airbrush really close to keep the demarcation line tight.
However, the colors are similar and it is hard to find where one begins
and the other ends.
the markings I was going to use.
I started with several light coats of the bottom color, Tamiya XF-80
Royal Light Grey. It’s close enough
to FS36495 which I didn’t have the exact match in my paint drawer.
The top color, Compass Grey FS36320 which I had a near full bottle of
Gunze H307, was done in the same fashion.
I kept the airbrush really close to keep the demarcation line tight.
However, the colors are similar and it is hard to find where one begins
and the other ends.
Next I masked off
the grey underside areas for the aluminum lacquer areas.
I sprayed on Tamiya chrome silver as the base coat and Talon Aluminum for
the top coat.
Lastly, I had to
mask around the intakes and I sprayed the lip of the intakes flat black as per
instructions.
 Once the paint was
all dry, I sprayed on two light coats of Tamiya Clear for the decal gloss coat.
Once the paint was
all dry, I sprayed on two light coats of Tamiya Clear for the decal gloss coat.
Decals
These Hasegawa
decals were the later better ones.
These went on without too much trouble using MicroSet. Thankfully, the Swedes
don’t use many maintenance stencils so putting the decals on wasn’t as tedious
as the typical jet.
Wash
I used a water
color wash mix of raw umber, black and burnt sienna for the wash just enough to
make it look used. The excess was
removed with damp Q-tips.
Two light coats of
Vallejo Flat were used for the final coat.
| FINAL CONSTRUCTION |
I used the SAC
landing gear instead of the Kit landing gear.
The detail on the SAC parts was just as good as what was on the kit
landing gear, but I obtained them a while ago and wanted to use them.
The parts were painted with a base coat of Tamiya Silver and a top coat
of Talon Aluminum then I used cut aluminum foil for the oleo shafts--which was
held on using MicroFoil Adhesive.
The various plastic bits (including the already painted landing gear bay doors
and actuators) were added and then glued in place using CA glue.
The exhaust tube
was a breeze to assemble as I removed the parts from the resin stubs, cleaned
them up, painted them, glued the parts (including the end cap from the kit)
together and slid it right into the opening.
I’ve learned to dislike sanding/filling jet e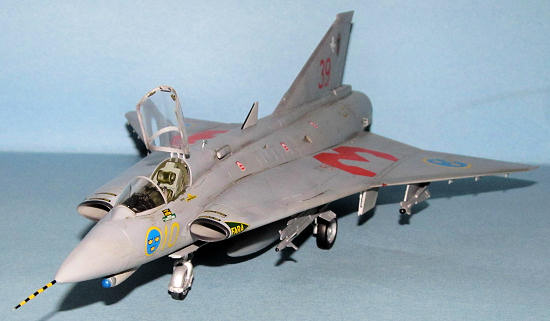 xhausts and intakes so I’ve
become a fan of the one piece resin replacements.
xhausts and intakes so I’ve
become a fan of the one piece resin replacements.
The antenna and
various tiny bits (including the IR sensor) were painted the colors specified
and added to the Draken. Next I
tackled the assembled fuel tanks by sanding/polishing, painting with a
combination of Tamiya Silver and Talon White Aluminum, polish with various
grades of fine grit polishing cloths and glue to the fuselage.
Next up was the
nose pitot tube which needed to be painted silver (the decal needs something to
grab onto as the plastic won’t do) and when dry, the yellow/black striped decal
was added. To make it curl, I had
to use a drop of Solvaset then very quickly wrap the decal around the pitot tube
(held on a clothspin to keep my fingers from ruining the melting decal.)
Once everything was dry, it was glued in place.
The missiles were
next. I managed to scrounge a pair
of
Finally, I had to
add the canopy parts. First I cut
out the acetate HUD piece then glued it in place with white glue.
Second I removed the PE mirrors for the canopy and glued them in place
using white glue. Lastly I glued
the clear bits in; I used white glue for the windscreen and Tamiya extra thin to
hold the actual canopy in the open position.
| CONCLUSIONS |
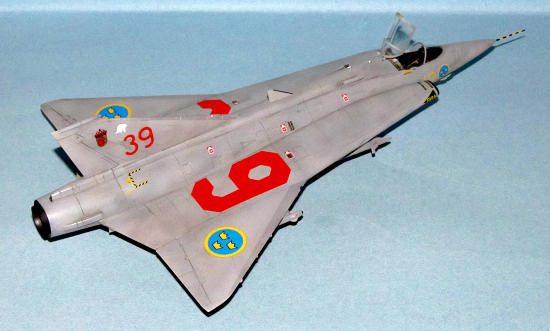
 The Hasegawa Draken
is a very good jet kit without many of the headaches involved with building a
jet kit such as sanding filling intakes.
As I said, I really like the aesthetic look of the Draken and am glad I
built one for my collection. About
the only really negative thing I have to say about it is the lack of weaponry,
but I’ve said that (and will probably continue to) about a lot of Hasegawa Kits.
The Hasegawa Draken
is a very good jet kit without many of the headaches involved with building a
jet kit such as sanding filling intakes.
As I said, I really like the aesthetic look of the Draken and am glad I
built one for my collection. About
the only really negative thing I have to say about it is the lack of weaponry,
but I’ve said that (and will probably continue to) about a lot of Hasegawa Kits.
The aftermarket parts improve on the detail and in the case of the Aires exhaust tube/nozzle, actually eases construction as I’m not a fan of sanding filling exhaust tubes.
February 2011
Copyright ModelingMadness.com. All rights reserved. No reproduction in any form without express permission from the editor. If you would like your product reviewed fairly and quickly, please contact
the editor or see other details in the Note to
Contributors.