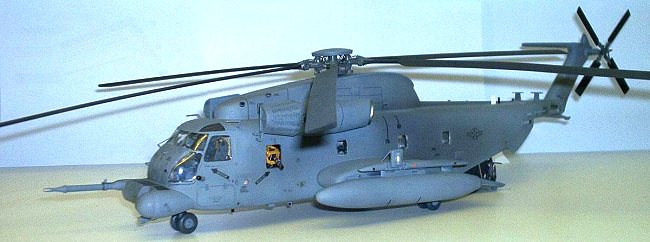
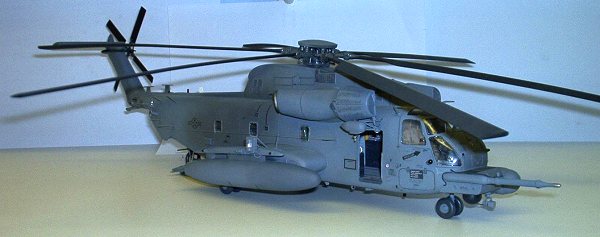
Revell 1/48 CH-53
|
KIT # |
|
|
PRICE: |
£18.50 (currently unavailable?) |
|
DECALS: |
See Review |
|
REVIEWER: |
|
|
NOTES: |
updated to MH-53J |
|
THE KIT |
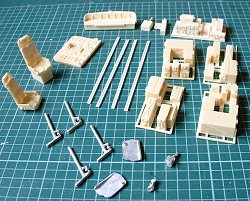
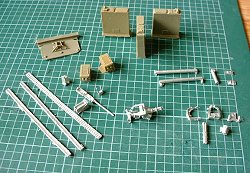
This is the old Revell kit of the CH-53 updated with a few resin and white metal sets and a fair amount of plastic strip and card to represent the MH-53 Pave Low III Special Ops bird. The detail sets used were High Flights Pave Low III conversion set (recently updated and re-released by Landing Zone, who I’ve never heard of before) and Cutting Edges Cockpit Set (which includes the “pizza rack”) and Weapons set (see images). These were all bought many years ago from Meteor but they’re still available (Hannants list them all, be prepared to fork out about £60 if you get all three though!)
 |
 |
 |
 As I said, I bought these sets a long time ago and what with the weapons set
and the avionics rack drawing attention to the inside I felt I had to do
something to spice up the otherwise empty space. This was a bit of a stopper as
while I had a few distance shots into a couple of Pave Lows seen at IATs at
Fairford I didn’t feel it was sufficient to let me put stuff in the right
places. That changed at Cottesmore in 2000 when the USAF had one open for a
walk though so one roll of film later I was psyched enough to get started.
As I said, I bought these sets a long time ago and what with the weapons set
and the avionics rack drawing attention to the inside I felt I had to do
something to spice up the otherwise empty space. This was a bit of a stopper as
while I had a few distance shots into a couple of Pave Lows seen at IATs at
Fairford I didn’t feel it was sufficient to let me put stuff in the right
places. That changed at Cottesmore in 2000 when the USAF had one open for a
walk though so one roll of film later I was psyched enough to get started.
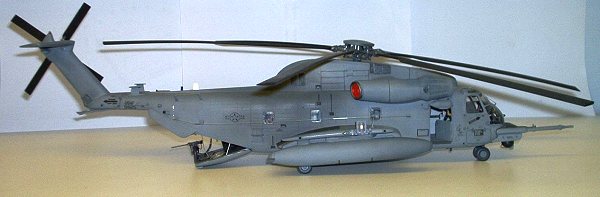
The kit itself is pretty old and there were a few fit problems, mostly with the main cabin floor and the fuselage join under it. But some filler and sanding did the trick, more or less. And it is underneath and inside where you’re not really going to see it. The external rivet detail is a bit heavy but that’s why we’ve all got sandpaper. The shape looks like a CH-53 and I’m not one for comparing to scale drawings anyway
|
CONSTRUCTION |
 I’ve been building it for so long I really can’t remember the order of things
and I won’t pretend this is a detailed build up article, I’ve just attached a
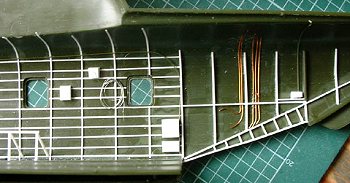
few pictures along the way, as it were. The main scratch building exercise was
the roof. Something was needed to fill the large space where the transmission
would go on the real a/c so I figured I might as well make it as convincing as
possible. Much card and strip later I consoled myself with the fact that while
it’s not perfect, the amount you can see is at least an improvement on nothing.
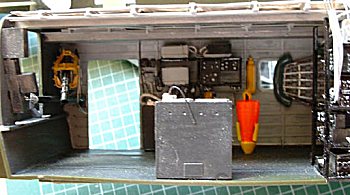
And while on the inside I ran some strip to represent the ribbing, added a small
avionics rack near the front door, converted a soviet rocket pack into the
bright orange jungle penetrating hook, made a few bench seats, soldered a frame
for the stretcher from brass wire, added a fair amount of additional
I’ve been building it for so long I really can’t remember the order of things
and I won’t pretend this is a detailed build up article, I’ve just attached a
few pictures along the way, as it were. The main scratch building exercise was
the roof. Something was needed to fill the large space where the transmission
would go on the real a/c so I figured I might as well make it as convincing as
possible. Much card and strip later I consoled myself with the fact that while
it’s not perfect, the amount you can see is at least an improvement on nothing.
And while on the inside I ran some strip to represent the ribbing, added a small
avionics rack near the front door, converted a soviet rocket pack into the
bright orange jungle penetrating hook, made a few bench seats, soldered a frame
for the stretcher from brass wire, added a fair amount of additional
 ribbing at
the back and beefed up the structure (some substantial framework round the rear
door!), ran some wires to represent electrics and hydraulics etc etc etc. The
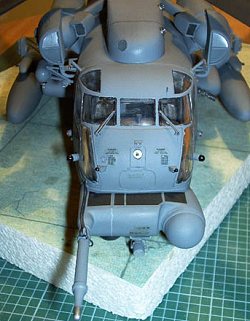
cockpit is an almost complete replacement of the kit part by the Cutting Edge
stuff, seats, instrument and overhead panels, floor (including the centre
console) and a couple of new control levers. The only original bits are the
flight controls (rudder pedals, cyclic and collective). The whole interior was
painted in various shades of grey and “black”, whatever came to hand really.
ribbing at
the back and beefed up the structure (some substantial framework round the rear
door!), ran some wires to represent electrics and hydraulics etc etc etc. The
cockpit is an almost complete replacement of the kit part by the Cutting Edge
stuff, seats, instrument and overhead panels, floor (including the centre
console) and a couple of new control levers. The only original bits are the
flight controls (rudder pedals, cyclic and collective). The whole interior was
painted in various shades of grey and “black”, whatever came to hand really.
On the outside I used all the bits provided by the conversion set, though
sometimes in different places to those suggested by the instruction sheet, the
positions chosen based on several
 years worth of pictures taken at air shows and
web trawling. The trickiest bit was the nose addition, blending the resin to
the plastic took many happy hours. Additional items were fabricated from sheet
plastic, 72nd scale sparrow missiles, plastic tube and rod, brass wire and
solder etc. The usual. I also opened up a number of the “meshed” panels and
replaced them with “real” Tripart mesh having boxed in the area behind and added
some piping from solder and wire. The rivet “detail” was rubbed down a little
though not too far as if you’ve ever seen one of these up close the rivets are
quite noticeable! (In retrospect I should have taken it a bit further as the
decals had a bit of trouble conforming to the surface as I left it.) All the
sticky out bits were attached before painting as I thought that trying to glue
them afterwards would result in messy joins (it normally does with me) though
this did make handling the thing a bit fraught. The hoist came from a Hasegawa
Sea King kit, as I’m making a RAF bird out of that I’ve got a white metal
Flightpath replacement. Handy, that, looks to be just the right one.
years worth of pictures taken at air shows and
web trawling. The trickiest bit was the nose addition, blending the resin to
the plastic took many happy hours. Additional items were fabricated from sheet
plastic, 72nd scale sparrow missiles, plastic tube and rod, brass wire and
solder etc. The usual. I also opened up a number of the “meshed” panels and
replaced them with “real” Tripart mesh having boxed in the area behind and added
some piping from solder and wire. The rivet “detail” was rubbed down a little
though not too far as if you’ve ever seen one of these up close the rivets are
quite noticeable! (In retrospect I should have taken it a bit further as the
decals had a bit of trouble conforming to the surface as I left it.) All the
sticky out bits were attached before painting as I thought that trying to glue
them afterwards would result in messy joins (it normally does with me) though
this did make handling the thing a bit fraught. The hoist came from a Hasegawa
Sea King kit, as I’m making a RAF bird out of that I’ve got a white metal
Flightpath replacement. Handy, that, looks to be just the right one.
|
PAINT & DECALS |
 The bits that needed masking were masked (I hate masking canopies most of
all) and the area round where the the engines were going to go was sprayed with
Xtracolor Gunship Grey, as were the undersides of the engines themselves (the
thought being the spray wouldn’t get in round the engines properly if I painted
it after fitting them). When it had dried the engines were attached and the
whole thing sprayed with the same Xtracolor paint, the area aft of the engines
being given an additional coat of the same slightly darkened with a bit of black
to simulate exhaust staining. The decals were applied, avoiding the old,
yellowed, thick (generally unpleasant) kit decals wherever possible, the serial
being hacked together from an A-10 sheet (only two numbers needing changing, how
lucky is that?) and other marking coming from wherever I could find them. As I
said, I have pictures of several of these a/c and found some more on the web.
All of them have their markings in different places and different styles and so
in the end my kit is a bit of a hybrid, markings wise. I’m not proud of that.
My retentive nature coming to the fore I guess. The worst aspect of this is the
national insignia. I have clear pictures of three different a/c star and bars.
They are ALL different styles. I went through my decal sheets repeatedly and
found at least five different styles. All different to the ones actually on the
a/c. So I went with my favourite. I shouldn’t be telling you this but I need
to get it off my chest. No-one else cares, but I know you will :-) First time
I’ve really felt the need for something like an Alps. Though with everything
being black I guess I could have got away with clear decal sheet and a laser
printer. Next time.
The bits that needed masking were masked (I hate masking canopies most of
all) and the area round where the the engines were going to go was sprayed with
Xtracolor Gunship Grey, as were the undersides of the engines themselves (the
thought being the spray wouldn’t get in round the engines properly if I painted
it after fitting them). When it had dried the engines were attached and the
whole thing sprayed with the same Xtracolor paint, the area aft of the engines
being given an additional coat of the same slightly darkened with a bit of black
to simulate exhaust staining. The decals were applied, avoiding the old,
yellowed, thick (generally unpleasant) kit decals wherever possible, the serial
being hacked together from an A-10 sheet (only two numbers needing changing, how
lucky is that?) and other marking coming from wherever I could find them. As I
said, I have pictures of several of these a/c and found some more on the web.
All of them have their markings in different places and different styles and so
in the end my kit is a bit of a hybrid, markings wise. I’m not proud of that.
My retentive nature coming to the fore I guess. The worst aspect of this is the
national insignia. I have clear pictures of three different a/c star and bars.
They are ALL different styles. I went through my decal sheets repeatedly and
found at least five different styles. All different to the ones actually on the
a/c. So I went with my favourite. I shouldn’t be telling you this but I need
to get it off my chest. No-one else cares, but I know you will :-) First time
I’ve really felt the need for something like an Alps. Though with everything
being black I guess I could have got away with clear decal sheet and a laser
printer. Next time.
|
CONSTRUCTION CONTINUES |
 With all the markings applied a coat of Xtracolor Matt was applied and we’re
on the home straight. Removed the masking, brush painted (!) a few of the
aerials, added a few more fiddly bits (wipers, hoist hook, port minigun, front
door etc), finished off the rear door (built separately with the .5 gun assy)
and attached it (with paperclip hydraulic rams) and several of the lights were
replaced by ones from the Cutting Edge clear set with a bit of colour painted on
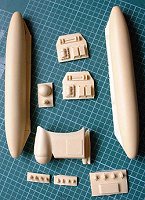
the inside. Made the fins for the tanks and added some masking tape to simulate
the attachments for them, cleaned up the pylon fittings and hung them on the a/c
using more bits of paperclip to pin them on with (these are HEAVY resin tanks).
Finally I ran the HF aerial from some surgical steel (“Monofilament Type B
non-capillary U.S.P”) which I bought some years ago for rigging biplanes. I
kinda like it for aerial runs as I find it easier than stretched sprue or
invisible thread as it almost supports its own weight and therefore sits there
in the right position while the glue does its stuff. Seems to result in a
stronger final result too, though this a/c was now REALLY out of bounds now,
picking up wise. Sooooo many sticky out bits.......
With all the markings applied a coat of Xtracolor Matt was applied and we’re
on the home straight. Removed the masking, brush painted (!) a few of the
aerials, added a few more fiddly bits (wipers, hoist hook, port minigun, front
door etc), finished off the rear door (built separately with the .5 gun assy)
and attached it (with paperclip hydraulic rams) and several of the lights were
replaced by ones from the Cutting Edge clear set with a bit of colour painted on
the inside. Made the fins for the tanks and added some masking tape to simulate
the attachments for them, cleaned up the pylon fittings and hung them on the a/c
using more bits of paperclip to pin them on with (these are HEAVY resin tanks).
Finally I ran the HF aerial from some surgical steel (“Monofilament Type B
non-capillary U.S.P”) which I bought some years ago for rigging biplanes. I
kinda like it for aerial runs as I find it easier than stretched sprue or
invisible thread as it almost supports its own weight and therefore sits there
in the right position while the glue does its stuff. Seems to result in a
stronger final result too, though this a/c was now REALLY out of bounds now,
picking up wise. Sooooo many sticky out bits.......
 The solid tail rotor “spider” was cut off and replaced with something
slightly more realistic and the main rotor head was detailed with better scale
actuators and some wire and solder to represent the plumbing. I also noticed
that the blade shape towards the roots has changed since this kit was molded (a
problem I’m also having with my SeaKing!) so some plastic sheet and filler was
employed to make some concession to progress. I know it’s not accurate, but
it’s closer and I was getting to the stage now where I NEEDED to finish it and
if it was going to be any closer I would have had to rebuild the head completely
as the blade roots are now more cylindrical. I wasn’t up for it. The rotor
heads were sprayed engine grey (glossy and a bit darker than the gunship) and
the blades sprayed black. And dropped in place so the main rotor goes round.
Which is probably the bit my daughter likes best, though she has paid lip
service to the rest of the detailing.
The solid tail rotor “spider” was cut off and replaced with something
slightly more realistic and the main rotor head was detailed with better scale
actuators and some wire and solder to represent the plumbing. I also noticed
that the blade shape towards the roots has changed since this kit was molded (a
problem I’m also having with my SeaKing!) so some plastic sheet and filler was
employed to make some concession to progress. I know it’s not accurate, but
it’s closer and I was getting to the stage now where I NEEDED to finish it and
if it was going to be any closer I would have had to rebuild the head completely
as the blade roots are now more cylindrical. I wasn’t up for it. The rotor
heads were sprayed engine grey (glossy and a bit darker than the gunship) and
the blades sprayed black. And dropped in place so the main rotor goes round.
Which is probably the bit my daughter likes best, though she has paid lip
service to the rest of the detailing.
|
CONCLUSIONS |
And that’s it. I’m almost pleased with the result, it’s certainly an imposing helo and even my wife has expressed (surprised) interest in it. Now all I have to do is stop it EVER being dusted……
July 2002
Copyright ModelingMadness.com. All rights reserved. No reproduction in part or in whole without express permission.
If you would like your product reviewed fairly and fairly quickly, please contact the editor or see other details in the Note to Contributors.
Back to Reviews Page 2022