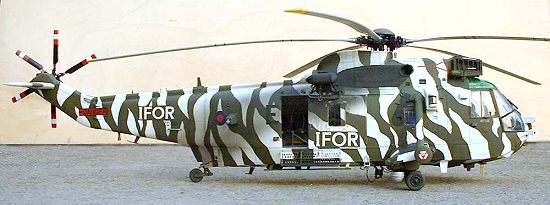
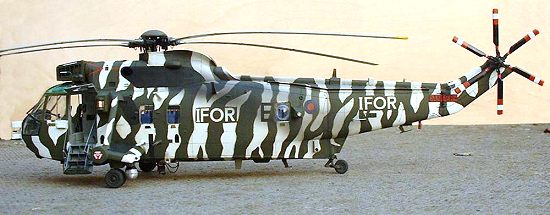
Hasegawa 1/48 Sea King HC.4
|
KIT # |
SP 91 |
|
PRICE: |
£30+ |
|
DECALS: |
See review |
|
REVIEWER: |
|
|
NOTES: |
|
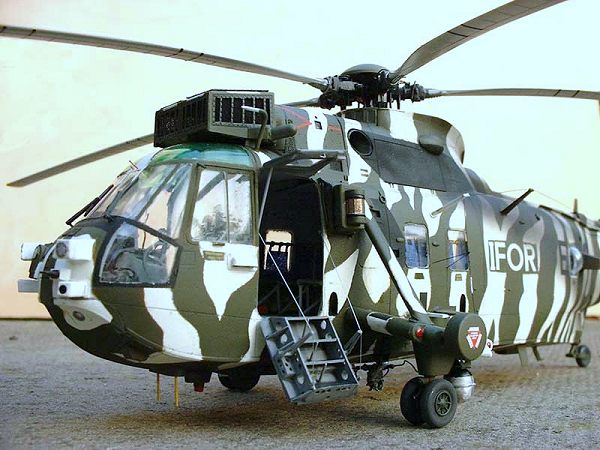
THE KIT |
This is Hasegawas (very nice) Sea King (HASP091) with the Flightpath HC4 Conversion set (FP-48-058). When I saw this a/c for the first time @ IAT in '96 I thought I had to make it, what a colour scheme! But the cost of the Hasegawa kit (@ £30 odd) and the Flightpath set (£17) was a bit rich for me. But they brought another one to IAT the next year. And the year after! So I had all these pictures and in the end I succumbed and gave Hannants more of my money. It's taken a couple of years of on and off building to get it finished (you know what it's like) but I think it's finally done.
|
CONSTRUCTION |
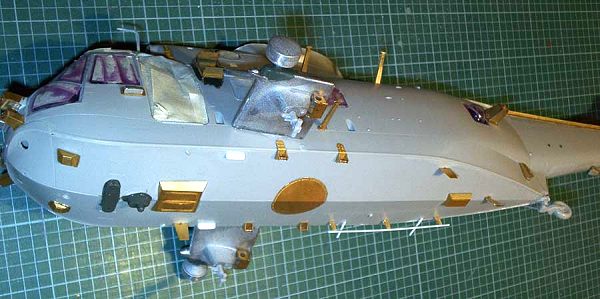
The Flightpath set provides just about everything you need, coming on something like 5 brass frets and 4 little bags of white metal parts, but I do have some comments about it. The multilayer brass construction of some parts is a bit fiddly (at least for ham fisted idiots like me) and some of the bending required really is tricky (I don't know if any of those brass bending tools would help but if you're going to try this set it might be a worthwhile investment). Brass isn't the best medium for some of the parts and plastic rod was substituted where appropriate. My main problem though is that various parts are oversized, most notably the white metal sponsons, flotation gear bottles and the AAR-47 assemblies on the nose.
 Of course, I didn't notice these issues until everything was
together and I was at the masking stage. At this point, while studying my
photos carefully for positional purposes, it became apparent that there were
things where there shouldn't be. To late to do anything about it (and to be
honest I don't know if I would have tackled resizing the white metal sponsons
anyway, big job!) so I left well alone. Finally there were a few things not in
the set I would have liked. The HF run seemed to be missing one mounting aerial
so that was made from plastic card, there was no detail for the crew entry door
(which I understand is included in other Flightpath sets) so that was scratch
built and there was no UK style bubble window (again, provided in some sets) and
I'm sorry to say I used the kit's oval window rather than making my own round
one. What a cop out. None of this is to say it's a bad set, I certainly
wouldn't have attempted this model without it, but I would suggest looking at
the new Airwaves conversion and see what that's like in case it's more
appropriate.
Of course, I didn't notice these issues until everything was
together and I was at the masking stage. At this point, while studying my
photos carefully for positional purposes, it became apparent that there were
things where there shouldn't be. To late to do anything about it (and to be
honest I don't know if I would have tackled resizing the white metal sponsons
anyway, big job!) so I left well alone. Finally there were a few things not in
the set I would have liked. The HF run seemed to be missing one mounting aerial
so that was made from plastic card, there was no detail for the crew entry door
(which I understand is included in other Flightpath sets) so that was scratch
built and there was no UK style bubble window (again, provided in some sets) and
I'm sorry to say I used the kit's oval window rather than making my own round
one. What a cop out. None of this is to say it's a bad set, I certainly
wouldn't have attempted this model without it, but I would suggest looking at
the new Airwaves conversion and see what that's like in case it's more
appropriate.
Apart from the conversion bits a few other things were done. Like opening the
main cabin door a little (why not all the way? I don't know) which also meant
scratch building an interior (a little generic as I struggled to find decent
interior pictures but at least I got to do the black and yellow barber pole
affairs that you can see through the windows).
 On the exterior some things needed filling in, quite a few of
the little bumps needed either removing or repositioning and a few extra details
that the set lacked were added, as was some fairly obvious wiring for the
winch. The main rotor blades on on the Sea King fleet are now composite ones in
place of the original metal ones which meant a bit of a mod job on the blades
roots, some triangular bits of plastic card and some filler and a lot of sanding
later and they looked more the part.
On the exterior some things needed filling in, quite a few of
the little bumps needed either removing or repositioning and a few extra details
that the set lacked were added, as was some fairly obvious wiring for the
winch. The main rotor blades on on the Sea King fleet are now composite ones in
place of the original metal ones which meant a bit of a mod job on the blades
roots, some triangular bits of plastic card and some filler and a lot of sanding
later and they looked more the part.
Again I understand Airwaves have just brought out a set of
blades which I'm sure are more accurate than mine, but they aren't cheap! I
also wired in some plumbing for the hydraulic rotor head (not enough, but it
looks a little busier than the bare kit). The tailplane was shortened to the UK
style, the bulge on the port side of the main rotor structure was added,
whatever I noticed I tried to incorporate. But even having scoured the pictures
for hours I still found some bits were wrong when it came to the masking
process. Damn those photographs.....
|
PAINT & DECALS |
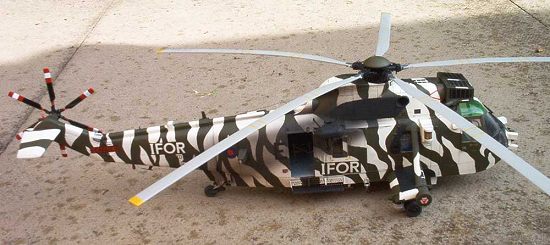
Anything else? The paints were whatever seemed appropriate, the white is
Humbrol (both a matt first coat and a second gloss white coat) the "green" is a
very old tin of matt NATO Green by "Precision authentic military colour" which
seems a very good match as far as I can make out (it should be Olive Drab B.S.
381C:298, find that if you can) and the interior grey is mostly another tin by
"Precision", this time Dark Gull Grey. The markings were taken from wherever I
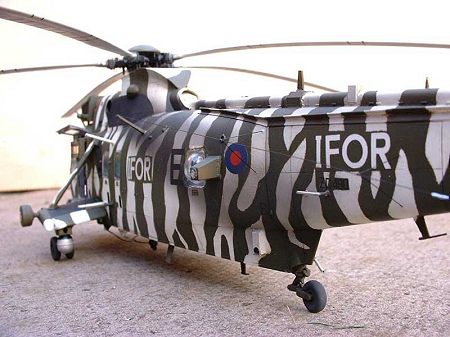
could find them. For
 instance the "DANGER ->" on the tail rotor is made up of a
piece of black decal strip, several bits of red decal strip on top, individual
letters from a RAF codes sheet on top of that and arrows made up of more black
strip. What fun!
instance the "DANGER ->" on the tail rotor is made up of a
piece of black decal strip, several bits of red decal strip on top, individual
letters from a RAF codes sheet on top of that and arrows made up of more black
strip. What fun!
Possibly worthy of mention are the IFOR markings. I was never going to find the right size and font in white (not for all four positions anyway!) so I thought I was going to have to do it all in masking tape and it wasn't going to look good. But while visiting a customer I noticed they had a vinyl cutting machine (for producing stick on graphics) and I realised I could use that. I took a scan of the lettering into Illustrator, traced round the letters and made up a page of lots of different sizes of IFOR and output it on the vinyl cutter. Then I used these letters as part of the masking before shooting the green. Worked fairly well, MUCH better than I would have done with tape. Finally I scanned the Royal Navy emblem, printed it at various sizes on some stick on tattoo material I had and applied that to the crew entrance door. Looks OK but one day I will do it on proper decal sheet I promise.....
|
CONCLUSIONS |
I think that's all. Suffice it to say that the Hasegawa kit is obviously very
nice and the Flightpath conversion makes for something a little different. I
won't tell you all the horrors (and this kit has had more than its fair share)
because they're still too recent and I'll leave you to spot the other mistakes
I'm not telling you about. Its finished. It'll do.
|
REFERENCES |
 Aeroguide 10 - Westland Sea King HAR Mk3 and my photos
from various IATs. If anyone else is tempted by this scheme I'll be happy to
provide scans of the photos I have. Worth pointing out that the different a/c
have fairly different paint jobs and that's why I did "E", it's the one I have
most pics of. Also Hannants were recently selling the Hasegawa Seaking at a
sale price of £19.99, so if that's still on by the time you read this, go for
it.
Aeroguide 10 - Westland Sea King HAR Mk3 and my photos
from various IATs. If anyone else is tempted by this scheme I'll be happy to
provide scans of the photos I have. Worth pointing out that the different a/c
have fairly different paint jobs and that's why I did "E", it's the one I have
most pics of. Also Hannants were recently selling the Hasegawa Seaking at a
sale price of £19.99, so if that's still on by the time you read this, go for
it.
If you would like your product reviewed fairly and quickly, pleasecontact the editor or see other details in the Note to Contributors.
Back to the Reviews Index Page 2025