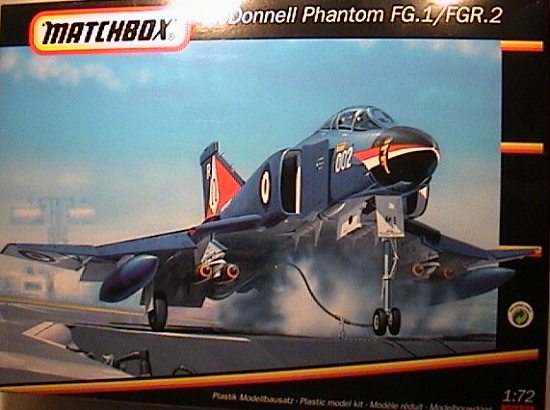
Revell 1/72 Phantom FG.1 / FGR.2
|
KIT # |
40421 |
|
PRICE: |
£8.99 |
|
DECALS: |
Three aircraft |
|
REVIEW : |
Angus McDonald |
|
NOTES: |
Run away, run away! It is the Matchbox kit! |
|
PROLOGUE |
Now why, you might ask, having read a number of bad reviews about Matchbox models would I even consider tackling one? Well, it’s a long story and involves a combination of events. I wanted a British Phantom. The Hasewaga and Fujimi offerings were out of production and not available. I’ve read that some Matchbox kits were quite good, and I hoped the Phantom was one of them. I couldn’t find a review of one, and so I thought I would serve the modelling community by doing one – cripes, what could have come over me! OK, if truth be told I made the mistake of going into the Model shop in Reading, and crumbled under the sight of the dramatic picture of a RN Phantom being launched from Ark Royal, and I wanted a British Phantom. Now, almost a year after starting the kit… well, read on.
|
THE KIT |
My first impression on opening the box was, "Wow! What a lot of plastic". Light grey stuff positively jammed to overflowing. A quick scan revealed fairly crisp detail, virtually no flash, a veritable arsenal of ordnance and, whilst evident, The Matchbox trenchman seemed to exhibit a degree of subdued restraint with his rendition of recessed panel lines. The instructions list a total of separate 64 part numbers, but with elements such as ordnance sharing the same part number, I would estimate there are really approximately 90 parts.
Four sprues were packed in a plastic bag, along with the transparencies. Instructions were typical Revell, six pages, printed on three sheets of what looked like recycled paper, folded in half.
With the initial euphoria over, I began to get worried as I examined the breakdown of the parts. Even if this were a Tamigawa offering I would have been concerned, but it being Matchbox: Concern turned to outright alarm. The fit of the lower wing section to the fuselage halves had to be perfect to avoid trouble. While the same would be true of the featureless intakes and ‘splitter’ plate.
Each featureless splitter plate (which I assume is the large ramp like structure that extends forward from the fuselage side of each intake trunk) had a large rectangular recess on their fuselage side. These would have to be filled as they were quite prominent. The grill structures on top of the intake trunks were not represented at all.
Building this model, I decided, would be one of developing and trying out new techniques. If I trashed the model, then nothing would really be lost.
|
CONSTRUCTION |
You have a choice of RN FG1 or RAF FGR2. Quite honestly I couldn’t work out the differences were, and the kit instructions are rather vague in the matter. I think the main difference appears to be the tailplane. Anyway, I decided on the FGR2 (I think I got the correct tailplane, but I’m not sure). Although striking, the RN version just didn’t look right, and no way was I going to paint yet another aircraft grey to get the Falklands version.
 Keeping with tradition, we start with the cockpit. And keeping with the genre
of the time, it is devoid of detail. Revell could at least have provided some
decals for instrument panels. I painted the tub, that’s the best description for
it, a thinned Tamiya black acrylic. I had over thinned this pot of Tamiya black
acrylic, but found that it did a good job of instantly ‘shading’ whatever part I
painted The paint was so thinned it flowed and pooled in corners, but had
sufficient strength to provide all round colour. A few dabs with silver gave an
‘instrument’ type feel. I figured with the pilot/navigator in place, and the
usual thick, distorted transparencies, nothing much would be visible.
Keeping with tradition, we start with the cockpit. And keeping with the genre
of the time, it is devoid of detail. Revell could at least have provided some
decals for instrument panels. I painted the tub, that’s the best description for
it, a thinned Tamiya black acrylic. I had over thinned this pot of Tamiya black
acrylic, but found that it did a good job of instantly ‘shading’ whatever part I
painted The paint was so thinned it flowed and pooled in corners, but had
sufficient strength to provide all round colour. A few dabs with silver gave an
‘instrument’ type feel. I figured with the pilot/navigator in place, and the
usual thick, distorted transparencies, nothing much would be visible.
Before sandwiching the cockpit tub between the fuselage halves ( I decide to leave the fitting of seats and occupants till later) you have to insert two small transparencies to the side of the fuselage. The location for the transparencies is the area between the pilot’s and the navigator’s office. The transparencies are simply awful; thick and distorted, they are too small for their apertures in the fuselage. I spent ages, loads of low odour super glue and swearing before I got the things to stay in place. In retrospect, I might have been better off discarding the transparencies, and using Crystal Clear instead.
There is a navigator console (part 7) that has to be sandwiched between the fuselage halves, exactly between the two small transparencies. This console is to small for the gap which it has to span. After much futile trying, I eventually gave up and cut a plinth on which to rest the console. Painted black, you can’t see it. It also gives an indication of the blinding stupidity one is afflicted with!
The wings consist of three parts. Two upper wings halves and a lower wing section. The lower wing section is a single piece, with the port and starboard lower wings molded with a section of the under fuselage. You join the wing section with the upper fuselage, which is conventionally split in half along the vertical plane. A quick dry fit of the fuselage halves and lower wing confirmed my worst fears. There was a considerable step, just under the cockpit, where the upper fuselage joins with the lower fuselage/wing section. I was beginning to despair of this model.
This step was dealt with, partly by paring away at some of the plastic of the lower fuselage/wing section, and partly by using gap filling super glue to build up the fuselage just forward of the step. After a vigorous amount of filling and sanding, a reasonably smooth join was achieved.
The intakes are each two piece assemblies. An outer trunk (shell) is glued to the splitter plate. This assembly is then glued to the fuselage side. The splitter plates looked on the fat side and are devoid of detail. I dutifully filled the recess in the fuselage side of the splitter plate with filler and super glue, joined them with their outer trunks, smoothed down the join, and carefully stuck each assembly to the fuselage. The fit wasn’t too bad, but I still lost all engraved detail when sanding down the join line. Also, there is no detail inside the intakes, and they a quite shallow.
The nose cone was not a particularly good fit, resulting in a small step between it and the fuselage. A quick spin with the old wet and dry fixed the step, but with further lose of engraved panels lines.
The upper join between the upper wings and fuselage wasn’t as bad as I had feared. A tiny bit of super glue filler here and there, and a quick sanding was all that was needed. The fuselage halves join required the merest pass over with a sanding stick. Surface detail was scribed back in.
Now the disaster:
The wheel wells were so featureless I decided to have the wheels up. NB This means the crew access ladders would not be used. Gluing the wheel covers in place left some wide join lines. The mating of the upper wing halves to the lower wing also left some quite wide join lines. These occur between the lower wing and both the leading edge slats and flaps. My normal methods of dealing with this is to either ignore it (and hope nobody notices) or to fill in the lines with plastic cement. The problem with the latter is I always end up with bubbles forming in the cement, and spend ages filling, sanding, filling again, and when I come to scribe the lines back in, I encounter those blasted bubbles again. So this time I decided to use super glue (as I had some success with using it on other models) and to then scribe back the lines in the nice hard glue, with no sign of bubbles to mar the line.
 My accelerator at the time was baking powder, which had worked. Unfortunately
something went hideously wrong. I can’t work out if it was the Super glue or the
use of baking powder. Try as I might I never seemed to fill those lines
completely, plus the super glue dried with quite a few bubbles. Consequently,
when I scribed the lines I either went clean through the crust of super glue or
encountered a bubble. After repeating the process of filling, sanding, scribing
and getting bubbles three times, over a period of three months (it was summer,
and the weather was nice), I was all for entering the Phantom in the model
hurling competition.
My accelerator at the time was baking powder, which had worked. Unfortunately
something went hideously wrong. I can’t work out if it was the Super glue or the
use of baking powder. Try as I might I never seemed to fill those lines
completely, plus the super glue dried with quite a few bubbles. Consequently,
when I scribed the lines I either went clean through the crust of super glue or
encountered a bubble. After repeating the process of filling, sanding, scribing
and getting bubbles three times, over a period of three months (it was summer,
and the weather was nice), I was all for entering the Phantom in the model
hurling competition.
I left the model well alone for a couple of months. During that time of peace and reflection, I had purchased some medium super glue and a proper, spray accelerator. First thing I noticed was that the new super glue flowed better than the old. The other thing I noticed was that the accelerator worked fast and didn’t appear to make the super glue bumpy. Was this coincidence?
However, I found that the accelerator worked too well, and within seconds the super glue was setting rock hard, I kid you not. Anyway, I resurrected the Phantom, did a bit more filling, sanding, and scribing, and my faith in this so called hobby was returned. While not at all perfect (well, to be honest, not brilliant either) I was prepared to put up with the results. The scribed lines around the wheel covers, wing/slat and wing flap would bear up to inspection from a range of about a metre.
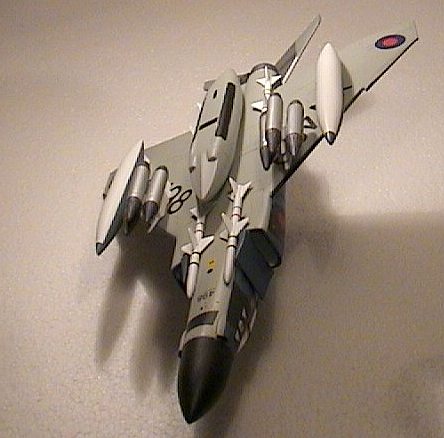
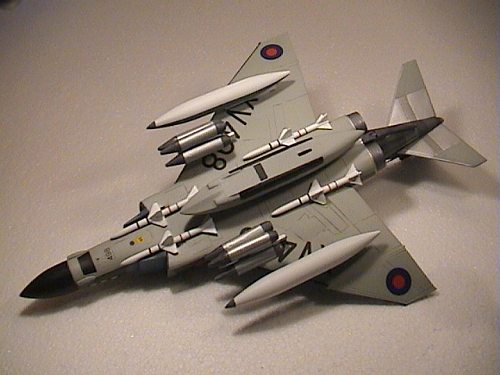
By this time, some eight months had elapsed since starting the model, autumn was fast approaching, I had other models I wanted to build, and so it was I decided to make an all out effort to get the thing finished. During my wing join fill/sand slog, I had tackled, on and off, the various under store accessories. In an attempt to hide as much as possible of the under wing mess I was making, I went for maximum stores. This include the four Sparrow missiles, the mid-wing drop tanks (nicely molded), the belly ECM pack (reasonably molded) and the triple mount rocket launchers (absolutely appalling fit and detail). Sanding the ECM pack removed most of the side detail, which I only partially scribed back on. After a lot of sanding, I decided to live with the rocket launchers, partly ‘cause I’d put so much effort into them.
The other ordnance provided were: twin mount bombs, a vulcan gun and what appeared to be twin mounted Sidewinder missiles – one of which was badly warped.
The crew members really are quite respectable. I gave each a visor made out of blobs of super glue, then painted them various shades of grey, black and white.
I did nothing with the ejector seats. They resembled Macintosh, high back dining chairs. Normally I make an effort to spruce them up, but by now I was so fed up with the beast I just wanted to hurry things along. I painted them black, stuck the crew members in them ( didn’t even bother making up seat belts or ejector handle), then glued the whole lot into the cockpit.
Attention now turned to the cockpit transparencies. Fairly thick and awful, I cleaned them up as best I could. I do use Future, but what I’ve also been using is a plastic polish called Auto Glym Super Resin Polish, which I bought in Halfords. The process I use these days is to
I found that not only did Auto Glym impart a wonderful shine to transparencies, it also gave a lot of protection against the fogging actions of super glue; or so I thought. I masked the transparencies with Sellotape brand stencil masking tape, and glued in the transparencies with low odour super glue.
|
PAINT & DECALS |
First off, after a good wash (the model, not me), I primed the model with the quite excellent Halford’s grey acrylic primer. This stuff is amazing, producing a superb smooth finish, which accepts all acrylics and enamel paints I’ve used. Interesting smell though.
The main paint I use these days is Gunze Sangyo. I’ve tried to fly the flag and use Humbrol acrylics, but have encountered so much inconsistency I dare not use them. The worst offenders I’ve found are their light grey and olive. They’re full of tiny particles. Conversely, it must be said, I’ve sprayed their Ocean Grey and Dark Sea grey with success. I tend, now, to use Humbrol Acrylics for brushing only.
In a similar vein, I’ve had problems using Tamiya acrylics. Possibly this is due to the batches I’ve been using (tad on the old side), possibly its due to the fact I don’t have a regulator on my compressor and so the air pressure may be too high. In any case, I have generally got a lumpy, bitty, orange peel finish; oh the number of times I’ve stripped a model or had to give it a light sanding!
 I’ve just had a lot of success with Gunze acrylics; though I’m about to try
LifeColor acrylics. Its possible that this is due to the finely ground pigments
in Gunze paints. Its also possible that I’ve begun to learn how to use my Badger
200 properly. One of the things I noticed was if I opened it up too much (i.e.
increased the flow rate beyond a certain point), I would tend to get the lumpy,
bitty, orange peel finish.
I’ve just had a lot of success with Gunze acrylics; though I’m about to try
LifeColor acrylics. Its possible that this is due to the finely ground pigments
in Gunze paints. Its also possible that I’ve begun to learn how to use my Badger
200 properly. One of the things I noticed was if I opened it up too much (i.e.
increased the flow rate beyond a certain point), I would tend to get the lumpy,
bitty, orange peel finish.
As usual, Revell quote their own paint range. Where possible I used mappings to Gunze paints, from a guide I found on the web. But in the end I just had a look at what I had on my bench and matched it up as best I could with pictures in the Warpaint’s F4 Phantom publication; I’m lazy and cheap. The aircraft underside was sprayed Light Grey (yes, American aircraft grey, though the results look the same.
I had noticed in the Warpaint publication, that some pylons and drop tanks appeared to be painted white and some grey. So I the drop tanks, Sparrow missiles and rocket launcher pylons were spray Halfords appliance white, for a bit of extra interest in the model.
A good weekend elapsed to allow the paint to cure, and I turned to the top surfaces of the aircraft and drop tanks. Masking was done with Sellotape’s stencil masking tape; cheap, readily available from B&Q, Homebase, etc, I’ve found this low tack tape most acceptable; thin strips follow curvatures most excellently, with just the right amount of adhesion.
The first colour I applied was ‘dark blue grey’. I made this out of Intermediate blue mixed with a bit of Ocean grey. After spraying I have to admit it looked rather too blue, but very pretty. Sorry chaps, but a contest modeller never shall I be.
After a good couple of days to let the paint cure, and it was time to mask off for the green camouflage pattern. Here I hit yet another problem. The panel lines drawn on the painting diagram in the kit instructions did not match the panel lines on the aircraft model. It was a case of eyeball the thing as best I could, and once the masking was completed I shot the model with Gunze olive drab.
Two more days elapsed, and it was time for the nose cone. I masked off the nose cone, and sprayed it with Halfords matt black. Disaster again! There was something wrong with the brand new, never been used before, can of matt black: There was no black! It was almost pure solvent. Stupidly I sprayed in the hope of ‘building’ up the black, but no joy. So I gave up, and when the solvent was dry I hand painted with Humbrol matt black acrylic.
Then moment of truth arrived and I carefully removed the masking tape. Not a speck of paint lifted, and no where did I have any creep under the masking tape. I figured this had to be one of the best spray jobs I’ve ever done. But wait! What was wrong with the nose area? Damn and blast it! The solvent from the Halfords matt black had leaked under (or through) the masking tape and had crazed the Gunze paint!!! Worse still, the matt black I had applied had also crept under the tape!!!
When calmness eventually returned, I decided I couldn’t be bothered to even try and match the mixture I had devised, so I simply hand painted Intermediate blue (neat) on to the affected area, taking it, more or less, right up to the green pattern. You can’t really see the differences in the shades. And if anyone does, I shall claim it represents fading under operational conditions!
Now came the time to paint the metal areas of the kit. I used the following Humbrol metal cote paints: polished steel, polished aluminium and aluminium. The former two were given to me by my brother some two years ago, and he had had them for ten years prior to that. A little stirring, and they went on really well. The polished aluminium giving the best and smoothest finish, the polished steel produced streaks as it was a little on the thick side. Ho, hum: More operational wear and tear. Actually, if you look at pictures of the rear area of Phantoms, they do appear to get quite scruffy and, well, you know, gungy.
I hand painted the metallic paints round the exhaust nozzles, masking off sections as I went, and mixing the paints together to produce various shades. I seem to have trouble with the aluminium paint. It appeared to be grainy and I never could get a straight edge with it.
The exhaust nozzles had some curious internal structures. I didn’t need them, so I removed them, and painted the external surfaces polished steel.
The rocket launchers were painted a mixture of polished aluminium and polished steel, as per pictures in the Warpaint publication.
Can’t say I’m happy with the results, especially the streaky polished steel, but I’ll put up with it.
Other small bits of the model were masked off and hand painted black, without too much creep. I think from now on, when I hand paint a masked area, I will apply a couple of coats of Future to seal the edges of the masking tape.
A coat of Future floor polish, applied with a brush, prepared the matt surfaces for decaling.
If the plastic side of the kit was disappointing, the decals more than made up for it. A choice of three schemes: FG1, No 892 Squadron, FAA, H.M.S. Ark Royal, June 1977; FGR2, No 2 Squadron, Laarbruch, RAF Germany, Aug 1976; FGR2, No 1435 Flight, RAF, Mount Pleasant, Falklands, Nov 1990. With a reasonable amount of stencilling, the colours were bright, the printing clear and on register, with very little excess carrier film showing. They were thick enough to put up with my rough handling, but thin enough to snuggle down into contours and panel lines with Micro Set. Just to be on the safe side, I applied Micro Sol. It took half an evening to apply all the decals. Really smart and lovely stencils, with no silvering.
There are no decals for the Sparrow missiles. They looked so bare, I made some up from some spare bits lying around, and sort of guessed at the colours. It made them look infinitely better.
|
FINISHING OFF |
After cleaning the model in water to remove any Micro Sol and Set, I sprayed the model and underwing stores a flat acrylic varnish. I have been using Windsor and Newton matt varnish, cut with Liquitex, Low Viscosity Acrylic Airbrush Medium to make it spray properly. This stuff is very easy to apply. Dries to a nice, smooth flat finish, though sometimes I get a quite acceptable, ever so slight sheen. Its main attribute, however, is its cheap. One bottle (£4.25) has so far covered, with a couple of coats each, a 1/48 Airfix Lightning, 1/48 Airfix Mosquito, I/72 Matchbox Corsair, I/35 Tamiya Tiger I, 1/72 Frog Spitfire, 1/72 Frog Canberra, I/72 Revell Harrier, this Phantom, and there’s still lots left in the bottle. NB: Do not use the Medium with Gunze paints. It turns them into just that, a thick, gooey, Gunge!
 Now my next disaster. I didn’t let the varnish dry and cure for long enough.
Barely one day passed before I was man-handling the model with my hot, sweaty
little hands. You see, the pylons for the under wing stores just wouldn’t fit
properly. They required a fair amount of jiggling and brute force to fit into
the slots. The upshot of this, was the matt varnish lost its wonderful finish. "Tsk,
tsk, tsk," I said to myself, " Silly me, I should have left it for a couple more
days."
Now my next disaster. I didn’t let the varnish dry and cure for long enough.
Barely one day passed before I was man-handling the model with my hot, sweaty
little hands. You see, the pylons for the under wing stores just wouldn’t fit
properly. They required a fair amount of jiggling and brute force to fit into
the slots. The upshot of this, was the matt varnish lost its wonderful finish. "Tsk,
tsk, tsk," I said to myself, " Silly me, I should have left it for a couple more
days."
With the under wing store in place, I took off the canopy masking, running a scalpel blade round the edge of the masking tape to get a sharp edge. Wonderful mask and paint job. But wait! No, it can’t be. Yes, the canopy looked as if it had fogged. Ever so slightly, it looked as if the crew members had been breathing heavily on a cold, winter’s day.
Well, piddle! I couldn’t be bothered to fixed it. I might get around to drilling a hole in an unobtrusive place and pouring Future into the cockpit, but currently, after ten months of effort, I don’t think I shall.
On calmer reflection, a closer inspection of the ‘fogging’ revealed an odd pattern. I just wonder, in my haste to get this creation finished, if I didn’t polish off properly the Auto Glym.
Also, in retrospect, I should have sprayed on another coat of varnish, before removing the cockpit mask. This should have returned the super finish, and protected the canopy. Now, if I get the gumption to do a re-spray, I’d have to mask off the canopy: More handling, more scope for breakage. See what I mean by the blind stupidity one is afflicted with!
|
CONCLUSIONS |
Well, it all depends on what you want. If you want a competition standard model British Phantom, then there are far easier ways to achieve this, either by using the Hasewaga or Fujimi kits. They may take a bit of hunting around to find, but it is possible to find them.
If, like me, you want something that looks like a British Phantom, then on balance Revell's offering, although requiring work, will deliver a reasonable model.
If its for a beginner or child cutting their modelling teeth and throwing the kit together, then go for it. There aren’t to many fiddly bits. The fit of parts isn’t too bad. And they might learn some modelling skills which they wouldn’t get from these modern shake-n-bake kits.
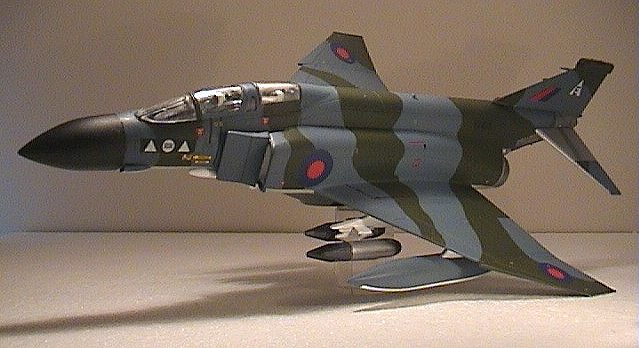
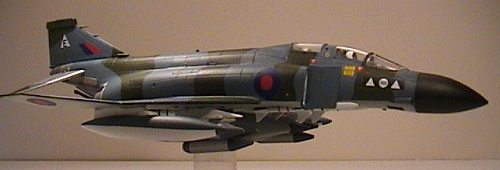
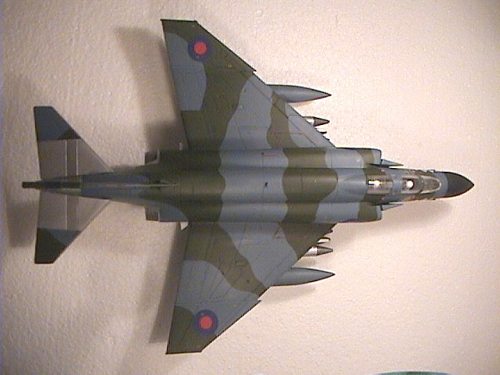
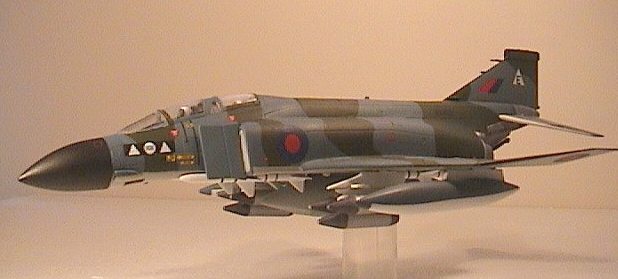
As to what I built, well I can’t say I’m overly pleased. The construction and scribing is a fair effort on my part. The paint job is one of my best to-date. The kit, although looking like a British Phantom has, at the last gasp, been a disappointment. Looking at it in profile, that lovely sweeping cockpit of the real thing, is marred by the kit’s canopies. They don’t fit at all well, giving a disjointed, stepped profile. Definitely one for looking at from above. However, I am pleased that I have learnt quite a few techniques, particularly in the air brush department.
At the end of the day, it is a kit of its time and, on balance, not at all bad. Revell could re-work the molds to make the fit of parts and the detail better, but they have no incentive to do so as I understand they only lease the molds from Matchbox. A decent set of transparencies would help immensely.
Since starting it, I have tracked down a Fujimi F-4K and Hasegawa F4-K/M. Unfortunately, I bought the latter via mail order, and didn’t realise it was the older offering, complete with golf ball rivets. Oh, well. I may build that and provide another oldie kit report.
|
REFERENCES |
Warpaint # 31: Phantom F-4K/M by Steve Hazell, 2001
Editor's note: As horrible a kit as Angus has described, it used to be even worse. Back some time around the mid-1980s or so, Matchbox Phantoms were being unbought by the thousands. Much of it had to do with the caricature that the kit was of the British F-4. Attempts were made to fix some of the more glaring screw-ups, but it remains a kit that most will avoid. If you do somehow get this kit, Aeroclub makes an update set for it that includes, among other things, new landing gear, exhaust, and canopy. Since it is close to Halloween, below is a photo of the original kit built by your editor back when it was the only F-4K/M kit around. Not even Modeldecals super scheme could make it right!
Copyright ModelingMadness.com. All rights reserved. No reproduction without express permission
If you would like your product reviewed fairly and fairly quickly by a site that has thousands of visits a day, pleasecontact the editor or see other details in the Note to Contributors.