
Hobbycraft 1/72 Su-22 Fitter F
| KIT #: | HC 1387 |
| PRICE: | $39.95 MSRP |
| DECALS: | One option |
| REVIEWER: | Graham Mison |
| NOTES: |
| HISTORY |
The Sukhoi SU-17/20/22 swing-wing series was developed from the fixed wing SU-7 aircraft. The SU-22 designation was given to export versions of the SU-17. Main external differences between this version and its predecessor, the SU-17M Fitter D, are a straighter line between the fuselage spine and the fin, a lengthened nose, a bulged rear fuselage to accommodate the Tumansky R-29B engine and an under nose sensor fairing. The name Fitter is not a Soviet one but a reporting name from NATO. The F designation identifies the 5th major sub-type identified.
| THE KIT |
 Hobby
Craft released their SU-22F kit in mid 1989. The box top shows a Fitter against
a stormy sky. First problem is it depicts a Fitter H despite the kit being
labelled an F. On the box the aircraft is called a ‘Suchoi SU-22 Fitter F’ and
on the instructions sheet the aircraft is called ‘Suachoi SU-22 Fitter F’.
Contents are 2 sprues containing 45 parts in mid Grey with a sprue for the
canopy in clear, plus a small decal sheet for 1 Libyan aircraft and an A4 sized
instruction sheet. Parts have engraved surface detail, which is mostly on the
heavy side and suffers from over runs in corners and where panels intersect each
other.
Hobby
Craft released their SU-22F kit in mid 1989. The box top shows a Fitter against
a stormy sky. First problem is it depicts a Fitter H despite the kit being
labelled an F. On the box the aircraft is called a ‘Suchoi SU-22 Fitter F’ and
on the instructions sheet the aircraft is called ‘Suachoi SU-22 Fitter F’.
Contents are 2 sprues containing 45 parts in mid Grey with a sprue for the
canopy in clear, plus a small decal sheet for 1 Libyan aircraft and an A4 sized
instruction sheet. Parts have engraved surface detail, which is mostly on the
heavy side and suffers from over runs in corners and where panels intersect each
other.
First I must say that I built this model in 1989. I was a keen modeller in those days, since then leaving the fold in the mid ‘90s but I now have returned. Part of that return has involved digging out all sorts of stuff from days gone that I kept in my garage. This model is one I kept, as the effort to finish it was high despite my hating the kit once I discovered all its faults. As was my way at the time I kept construction notes.
| CONSTRUCTION |
I began by comparing the parts to the best reference I had at the time – Aircraft in Action No. 90 from Squadron Signal. This showed up several problem areas, including the front fuselage, the fixed section of the wings and worst of all, the undercarriage. This last area is just a fantasy as depicted by Hobby Craft, including its location, which has the legs mounted dead smack in the middle of the bays. They also direct you to position the U/C doors up against the fuselage instead of on the outboard side of the legs.
Having decided to proceed I began working
on the cockpit. Kit parts are confined to a chunky seat and a basic instrument
panel. I improved the seat by sanding the sides down and adding leg and arm
restraints, a harness from painted masking tape and an oxygen line from
stretched sprue. These items were painted various shades of Grey and Black. The
instrument panel was enhanced with additional dials and switches to make one
that resembled that of a swing-wing Fitter. A gun sight was built up using
pieces of card. Side consoles we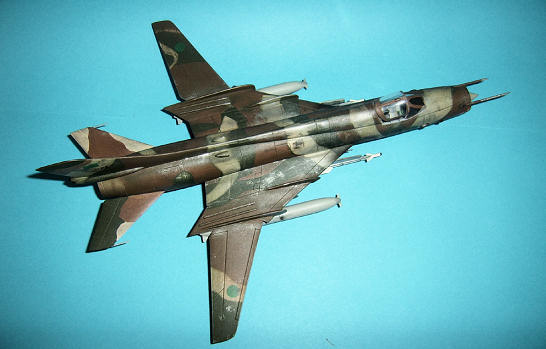 re
constructed from sheet plastic and a throttle quadrant built up from pieces of
plastic and sprue. A new rear bulkhead was added as the kit part was a very poor
fit.
re
constructed from sheet plastic and a throttle quadrant built up from pieces of
plastic and sprue. A new rear bulkhead was added as the kit part was a very poor
fit.
Several fishing sinkers were Super Glued into the front fuselage to head off any tail-sitting tendency. Before the fuselage halves were joined the gaping hole at the rear needed to be filled and, after a look through the spares box, a main wheel half from a 1/48th Revell Phantom was found to be a perfect fit. Some effort was put into reducing the thickness of the plastic of the engine intake but this had little effect.
With the fuselage joined attention turned to the wings. These are provided in 4 parts each side, upper and lower halves to both the fixed inner sections and the moving outer sections. The tops of the inner sections are very chunky moldings with the wing fences very thick and inaccurate in outline. After some thought I decided on leaving these alone. The locating holes for the main undercarriage were filled and new holes drilled in the correct positions. The large and over scale gun barrels were removed to be replaced later and the assembled wings set aside.
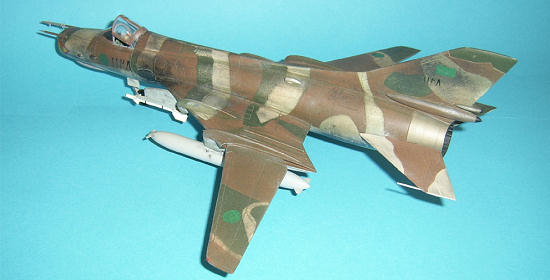
A pair of underwing tanks are provided, these needed front and rear horizontal fins added from plastic card, small at the front and larger to the rear.
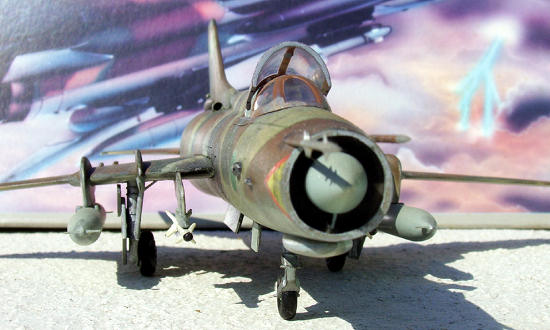
After sanding the fuselage join down, panel lines were rescribed with an Olfa P cutter. The upper pair of speed brakes on the rear fuselage were filled and rescibed in the correct position. The nose intake area was painted black and the intake cone was painted grey and small triangles of plastic cemented at the top and bottom to represent the beginnings of the splitters. The interior of the exhaust was painted matt black and highlighted with Testors Model Master Metalizer Burnt Iron.
The wings were now attached, with some effort in getting the dihedral right. At this time holes were also drilled to take new gun barrels. The tail planes had large mass balances added to their leading edges.
Now for the undercarriage. All the linkages and struts were cut off with these replaced by sheet and plastic rod, these were difficult to craft as a clear close up of the originals was not available (remember this was 1989 and all the walk-arounds and detailed info to be found today wasn’t available then) and I remember I removed the parts at least once to start again. After much frustration I settled on what I had done, although I was not fully satisfied with it, and gave all joints a drop of Super Glue for strength. The kit supplied front U/C was also a disaster and I found a replacement in my horde of spares, this was modified with knife and sanding paper.
On the F model of the Fitter the front U/C doors are in 4 parts with the front pair closed on the ground. Hobby Craft provide the 2 rear doors, which straddle the front leg but show no sign of the others so I scribed these on.
A pair of small intakes is to be attached to the rear fuselage, these were very thick and too high, so were sanded down and then drilled out and then cemented in place.
The model was almost ready for painting now so I gave it a light overall sanding with very worn wet and dry paper and attached the 2 under fuselage pylons and the inner wing missile rails.
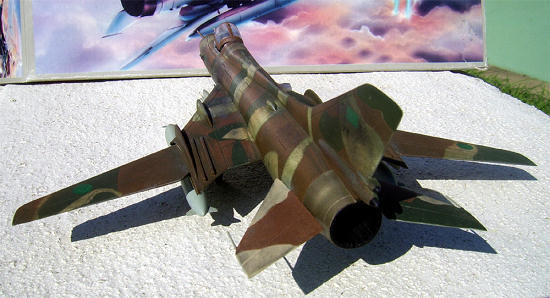
| COLORS & MARKINGS |
I had chosen to model an
aircraft of the Libyan air force based on the image on page 30 of the Squadron
book. This showed a very worn looking aircraft with a pair of Atolls and
underwing tanks. Apparently these aircraft had been used by Gadaffi’s forces in
 would be
the lower fuselage and under wing colour. When dry these areas were masked and
the upper surfaces sprayed with Humbrol #63 Sand. Areas to remain Sand were then
masked off with a combination of Frisk-lac and masking tape and the Dark Brown
applied. Same operation was applied to the Dark Green areas. Unfortunately I
kept no record of which specific Humbrol numbers for the last two.
would be
the lower fuselage and under wing colour. When dry these areas were masked and
the upper surfaces sprayed with Humbrol #63 Sand. Areas to remain Sand were then
masked off with a combination of Frisk-lac and masking tape and the Dark Brown
applied. Same operation was applied to the Dark Green areas. Unfortunately I
kept no record of which specific Humbrol numbers for the last two.
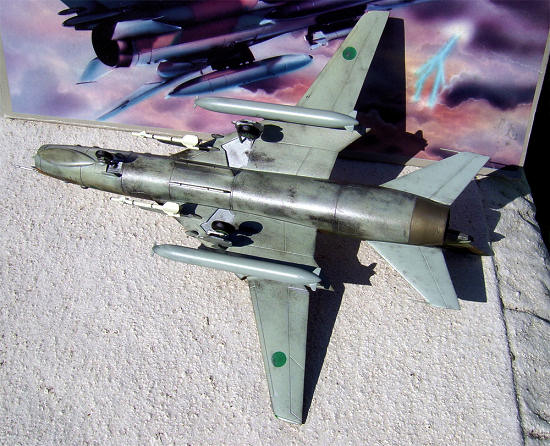
When all this had dried the masking was removed and weathering began. Worn sanding paper was rubbed over the wing leading edges, wing fences and areas were ground crew would walk and work on the aircraft, this was done until a hint of the Grey showed through. Testors Model Master Aluminium was then dry brushed over these areas to give a sand blasted look. The rear fuselage was painted with Model Master Exhaust and the area around the guns blackened. The undersides were dirtied up using Black and Dark Grey. At this stage I added the 2 pitot tube/sensor probes to the nose, these are very sturdy items on the real aircraft but not as thick as Hobby Craft provide, I attempted to thin them down but they still look way over scale.
The model was then given an all over coat of Micro Gloss and then the kit decals were applied. I was prepared for these to be useless but was surprised at how well they went onto the gloss surface, I gave each a couple of drops of Micro Set and they settled right down into the surface. After cleaning up I sprayed a topcoat of Micro Flat and also gave the wing tanks and undercarriage a coat of this.
| FINAL CONSTRUCTION |
The thick one piece kit canopy was separated and painted. Canopy jacks made from sprue were added as well as a clear gun sight cut from an Airfix blister pack. The undercarriage was added as well as the underwing tanks. The Atolls were sourced from, I think, a Hasegawa Mig 27 and their exhausts were drilled out and a couple of black strips added before these were cemented to their pylons. Last items added were new gun barrels.
| CONCLUSIONS |
 I was
never happy with this model, just satisfied at completing it and with some of
the areas I had enhanced. This was, at the time, the only injection molded kit
of a swing-wing Fitter and was undoubtedly based on the limited information then
available. Hobby Craft also released a kit of the 2 seater, Fitter E (Hobby
Craft HC1385), using many of the parts in this kit including that ridiculous
excuse for the undercarriage. I have not seen these kit anywhere for many years.
I was
never happy with this model, just satisfied at completing it and with some of
the areas I had enhanced. This was, at the time, the only injection molded kit
of a swing-wing Fitter and was undoubtedly based on the limited information then
available. Hobby Craft also released a kit of the 2 seater, Fitter E (Hobby
Craft HC1385), using many of the parts in this kit including that ridiculous
excuse for the undercarriage. I have not seen these kit anywhere for many years.
June 2008
Copyright ModelingMadness.com
If you would like your product reviewed fairly and fairly quickly, please contact the editor or see other details in the Note to Contributors.