Matchbox 1/72 F-5B/CF-116D Freedom Fighter
|
KIT #: |
PK-39 (1989) |
|
PRICE: |
Currently Out of Production |
|
DECALS: |
Two options |
|
REVIEWER: |
Victor Scheuerman |
|
NOTES: |
OOP Mike Grant Decals used. |
While the American
aggressors are well known, their Canadian counterparts were not. Until the
premature retirement of this diminutive fighter, one of its roles in the
Canadian Forces was that of aggressor. As per their southern cousins, these
aircraft supported some interesting camouflage finishes. While the colour
gauntlet ran from sprayed aluminum to ‘Lizard’, it was the ‘Ghost Scheme’
(Final) that was to become standard.
 See
the preview for
more information. While the kit decals look good, this kit was built to use some
ALPS
printed decals that were available at one time from Mike Grant Decals. The
decals look flawless and the paint guide was supplied in full colour.
See
the preview for
more information. While the kit decals look good, this kit was built to use some
ALPS
printed decals that were available at one time from Mike Grant Decals. The
decals look flawless and the paint guide was supplied in full colour.
In addition to the
‘Ghost’ scheme dual modelled, the sheet offers three others. A ‘Ghost’ single
seater that lacks the white in the national insignia. A single seater, with wrap
around dark grey and green camouflage. This CF-5 belongs to 434 ‘Bluenose’
Squadron, and the latter’s schooner is featured in a dark blue tail band. The
last option is another CF-5D, but this is in sprayed aluminum with high
visibility red wing tips. There is a sheet of serial numbers in three sizes that
will allow you to model any CF-5, except for the ‘Bort’ aggressor number. Also
included were the canopy silhouettes in black for the fuselage bottom, for both
the single and dual aircraft. (Editor's Note: I believe that Leading Edge
also does a CF-116 sheet)
As stated, the basic
cockpit was upgraded slightly. First off, remove the interior lettering and
ejector pin stubs from the fuselage walls. Since the center console was
short-shot on the one side, both sides were removed. Missing crewmembers were
found in the spares box, and appropriately they came from the Matchbox
Strikemaster kit. Improvements were made from .010” card and comprised; floor to
the aft section, the back of the kit seats, new center console and instrument
panel, main instrument panel and gunsight.
The interior and figures were painted, with bla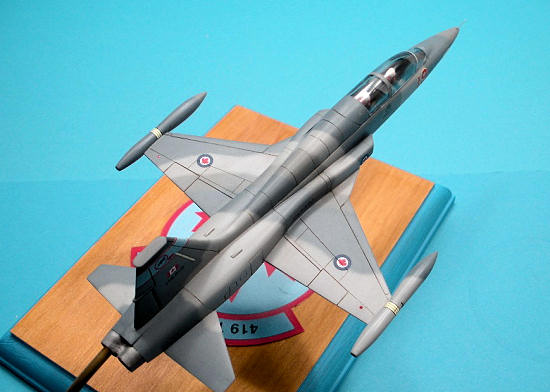 ck dots made from a
drafting pen fronting as instrument faces. One note here is the location of the
rear seat. If you attach it to its locating lug; the seat sits so far aft, that
the closed canopy will hide it. To correct this, mark on the sill where the aft
framing starts, and mounted the seat so that it is slightly ahead of this.
ck dots made from a
drafting pen fronting as instrument faces. One note here is the location of the
rear seat. If you attach it to its locating lug; the seat sits so far aft, that
the closed canopy will hide it. To correct this, mark on the sill where the aft
framing starts, and mounted the seat so that it is slightly ahead of this.
The fuselage and main
wings were glued together, while the unused wing pylon locating holes were
filled in. The rear tailplanes come attached to a wide bar that fits into a
separate lower rear fuselage. This would have resulted in a tuff joint to fill
and sand. This bar was cut off and glued into place and then this whole lower
section, minus the tailplanes, was attached to the fuselage halves. The
tailplanes would be attached later. All the gear doors were glued in the up
position and fitted very well. Filler was only required on the bottom were the
wing and fuselage met, along the upper wing fillet, and the modified rear
fuselage. As this was to be a CF-5D, the missing intakes on the upper aft
fuselage were made from strip.
The cockpit opening
was covered with a foam mask, and the model was sanded smooth and given a coat
of primer. I decided to replace the removed raised panel lines with engraved
ones. To this end, Testors Masking Tape was used as a guide for the OPHA
P-Cutter blade. With engraving complete, the model was re-shot in primer. The
masked canopy was attached, first with white glue, then five-minute epoxy; but
only after repeated sandings to get a decent fit.
Mike Grants Decals
includes full colour side and top profile guides, along with FS numbers. Using
this information, Floquil Primer was used as the base colour.
Testors Model Master (MM) Neutral Gray, and MM Intermediate Blue did duty
for the other two camouflage colours. These were all sprayed free hand, using a
Badger 100 double-action, interior-mix, with a fine tip. When dry, the model was
given a gloss coat of Micro Gloss.
The decals are covered
with a solid cover film; therefore they must be cut out individually. This was
done, and as recommended,
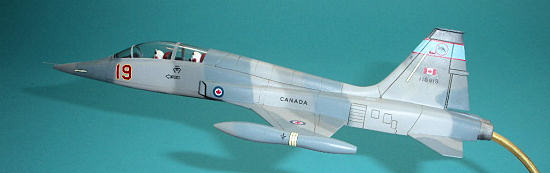 decals were applied using Micro Set/Sol. In my case
not all decals fully settled into the Matchbox trenches; but then some regular
decals will not either. Another thing that was noticed was the pattern in the
blue tail stripe – see photo. Over all the decals worked well.
decals were applied using Micro Set/Sol. In my case
not all decals fully settled into the Matchbox trenches; but then some regular
decals will not either. Another thing that was noticed was the pattern in the
blue tail stripe – see photo. Over all the decals worked well.
With the decals in
place, the model was given a Raw Umber wash. Micro Flat was then misted on,
until the desired finish was achieved. The masking was removed from the canopy,
which was then polished. Next, the pre-bent brass tube was epoxied into the
opened port exhaust. When this attachment had fully cured, the model was then
attached to the base in the same method. Final additions like the nose Pitot
tube and clearance lights were added after the model was in place.
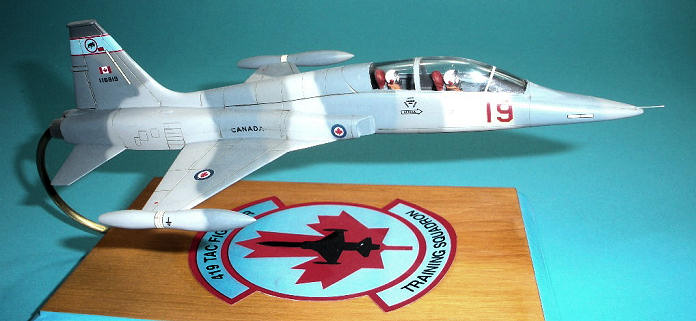
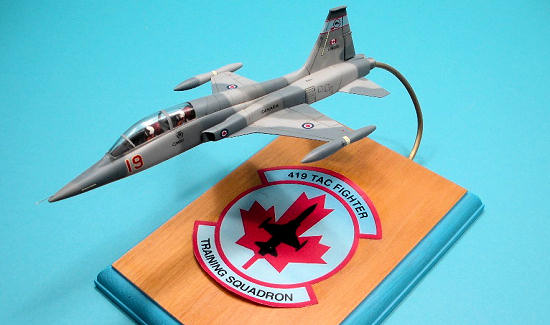
For this base I was
fortunate to have purchased a 419 (Moose) Squadron stick-on crest at an airshow.
This is done in a clean blue/red finish that also shows the silhouette of a
CF-5. I would normally use the main colour of the model for the base trim colour,
but in this case, the blue in the sticker was the guide. A ‘standard’ Wal-Mart
pine base was used. The wood was well sealed, with three applications of wood
sealer, with a light sanding being done between each coat. The top was then
stained Oak, while the sides were painted Testors Pla 1162 Mat Skyblue, as it
was close to the blue in the crest and squadron tail bar. The crest was colour
photo copied, as this was the only one I had. The cut paper copy was then glued
to the base with rubber cement. A hole was drilled in one end of the wood base
to accept the brass tube that the model would be mounted on. Final step before
the model was mounted was to spray a couple of coats of clear satin finish to
seal the colours and paper together and to give a uniform finish.
If you want an
accurate F-5, then build the superior ESCI/Italeri kit. However, if you, or your
child, want something that clearly looks like an F-5 and is an easy build; then
I heartily recommend this Matchbox version of this popular jet. As to the title
‘The Moose is Loose’, this is a phrase that was sometimes used when a 419
(Moose) Squadron aircraft was in the air.October 2008
If you would like your product reviewed fairly and fairly quickly, please
contact
the editor or see other details in the
Note to
Contributors.
Back to the Main Page
Back to the Review
Index Page