
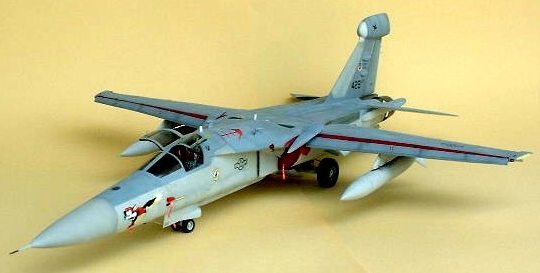
Academy 1/48 EF-111A 'Raven'
|
KIT # |
1676 |
|
PRICE: |
$25.00 |
|
DECALS: |
one aircraft |
|
REVIEWER: |
|
|
NOTES: |
|
HISTORY |
This plane was also known as the “SparkVark” and/ or “Sparky”, “ Pigs that fly” etc., due to it’s close family ties to the F-111A Arrdvark, which was a concept developed in late 1959 and was operational and used during, and years after, the Viet Nam War.
The idea of the variable sweep wing began back in 1911 by France and later by Germany in 1942 on studies by a Dr. Albert Betz and then Messerschmitt began work on an aircraft which was designated the P-1101 which never flew but was used as a basis for, and led to, the Bell X-5 which did fly and later Grumman built and flew their variable wing XF-10F Jaguar.
 With the variable-sweep wing
now feasible, in 1959, the U.S. Air Force issued system development requirement
number 17 for weapon system WS 324A. This was followed by specific operational
requirements 183 which called for a Mach 2.5, 60,000 foot altitude, all
weather, day-night, STOL fighter. It was to be able to operate on sod fields of
less than 3000 feet, and have an 800 mile low-level combat radius and have a
3,300 mile ferry range. It should be able to carry loads up to 30,000 lbs.,
1,000 lbs of which was to be carried internally.
With the variable-sweep wing
now feasible, in 1959, the U.S. Air Force issued system development requirement
number 17 for weapon system WS 324A. This was followed by specific operational
requirements 183 which called for a Mach 2.5, 60,000 foot altitude, all
weather, day-night, STOL fighter. It was to be able to operate on sod fields of
less than 3000 feet, and have an 800 mile low-level combat radius and have a
3,300 mile ferry range. It should be able to carry loads up to 30,000 lbs.,
1,000 lbs of which was to be carried internally.
In 1960, the then Secretary of the Air Force, asked that the project be delayed. After John Kennedy became president, his new secretary of Defense, Robert McNamara, who came from the Ford auto industry, basically, wanted to know why the Air Force and the Navy could not develop and use the same type airplane and so the TFX project was started again with the Air Force to use the designated version of XF-111A and the Navy to develop a navy version of the same plane that was designated, XF-111B, this happened in December of 1961 and the contractor and the configuration of the aircraft had not been decided. After cries of “foul” by Boeing, the contract was awarded to General Dynamics and so the long run was begun that produced the long running F-111A with various versions including the “EF”. The Navy version never played out for carrier use and never went into production.
After the Viet Nam War, the Air Force realized a need for a dedicated airborne tactical Radar jamming system. The use of the Navy/ Marine Corp EA-6B, was ruled out because of it’s subsonic speed nor the range required but, the Air Force was very impressed with the AQL-99 jamming system. The solution was to mate the AQL-99 with the current F-111A, the aircraft selected for modification averaged about 2000 hours on the airframe and 42 aircraft were selected and given to the Grumman Corp since they had all the prior experience with the EA-6B. The first operational aircraft was put into service in November of 1982 and the initial capability was started at Mountain Home AFB, UT in November of 1983. After a long run and use, in units all over the world, as of this date (2002) all are now sealed at Davis-Monthan, AFB, or used as gate guards on a stick, the air frames were just used up.
|
THE KIT |
This big goofy looking S.O.B. has set on my “to build shelf” for years, I remember when Academy/ Minicraft , came out with all their versions of the quarter scale F-111 and we all ran to the hobby shops, (or whatever) to get a version we might like to build, I bought the “F” but after a couple of years, I traded it off for the “EF” to a friend of mine because I had some decals etc. for the EF and I seen those many times and thought they looked cool as well as all the other versions. ( I will do an “E” version next). I will also tell you that the cheap Chinese Copies, (ZHENGDEFU) ( try to say that with a mouth full of cookies) are the same thing only the panel lines are bigger and deeper and the fit is not as good but can be built pretty good with skill and a little time and the same parts that I used with this kit.. They make the F-111E, FB-111A, and the EF-111A. They can be found at the Hobby Lobby stores cheap on half price day.
The big box is full of plastic
and the actual size of the completed model would put the Braille scale (1/32)
stuff to shame. The throw away parts include; the cockpit parts, parts of the
engines, the tires, and all the working wing retracting mechanisms (toy stuff)
and most of all, the canopy, yes, it is not very good and will not fit and must
be cut up and then it is very, very thick. No one makes a vacufrom canopy so I
had to make my own with a vacuum machine I borrowed from a modeling friend.
Note: I did use the kit canopy as a pattern and it was fair, but, the best
results was using the old monogram F-111A canopy as a
 pattern it was much
better.
pattern it was much
better.
It (the model), would be still setting on the shelve if no one made some detail parts that could turn it into what it is really supposed to look like. Academy has made some really good stuff over the years that no one else would put out but they always left you holding the bag on cockpit and other main details and all the after market people has made stuff for everything Academy makes with the exception of the Arrdvark line. Verlinden makes a detail set for the F-111 but it is mediocre at best.
Finally !! Black Box released their two nice sets for the cockpits of the F-111F and the EF-111A and I got both (future plans) and the time had come to start the “sparkvark”. But, along with that, I needed some more help in the way to pose the wings extended so I needed to either cut and try to do the posture for the Slats and Flaps, vanes open and wings extended myself, or go to the after market again for help . Paragon has had a set of resin slats and flaps for some time but they still required the modeler to cut and modify the wings etc with mixed results. I had used the Paragon set for the 1/48 Tornado kit (ref. ARC Gallery), while ok, it was not what I wanted to do with the EF-111A Now, I understand that Paragon is out of business and that the torch has not been picked up and this happens to so many small companies. Sooo! , what to do? Well, I went to a company called “ScaleDown”( www. F-111.net/scaledown), in Australia run by a young man named Steven Thrum, who is making several resin detail parts for all the Academy F-111 family which include the complete Wings, slats, flaps, wheels, engines, and lots of other parts, I knew then I had to have those things to make my model the way I wanted it. ( I understand Steven is now trying to get a U.S. outlet in the form of Victorymodels.com, that would be great.). After I got all that stuff and some very nice decals from cutting Edge, I got the kit down and blew the dust off of it and started what has been a rewarding journey and adventure in kit bash/ building that I actually enjoyed.
|
CONSTRUCTION |
 Nothing fancy here, same as any other kit, methods of construction vary with
each of us and there are no expert methods and only ideas that we all share if
anyone wants that information most of us try to help. I started with the forward
section(s) nose area, and fitted the resin cockpit tub, which fit very well with
the usual trimming, (most all resin cockpits take some fitting time) after the
fitting was complete, I removed the cockpit and started the painting, That
procedure was, dark gull gray for the basic cockpit color, ( all MM enamels)
,(note: the actual aircraft shows a lighter color gray but the darker color was
used so that I
Nothing fancy here, same as any other kit, methods of construction vary with
each of us and there are no expert methods and only ideas that we all share if
anyone wants that information most of us try to help. I started with the forward
section(s) nose area, and fitted the resin cockpit tub, which fit very well with
the usual trimming, (most all resin cockpits take some fitting time) after the
fitting was complete, I removed the cockpit and started the painting, That
procedure was, dark gull gray for the basic cockpit color, ( all MM enamels)
,(note: the actual aircraft shows a lighter color gray but the darker color was
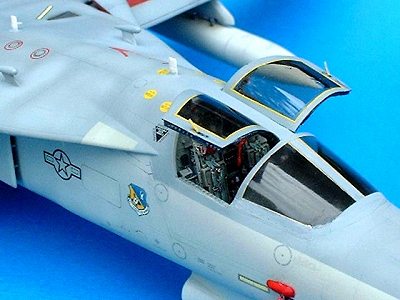
used so that I 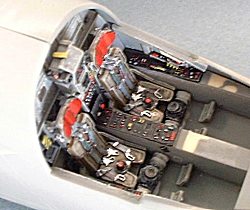 could dry brush with a combination of lighter grays to bring out
more detail), black consoles, instruments and I used reference pictures for the
switches and knobs, instruments/ CRTs with different colors. The seats are
separate and painted as per BB instructions with kaki/ tan seat covers (note,
seat covers can also be painted red or shades of OD green, as some aircraft had
that feature) and everything was dry brushed with lighter colors etc after a
light Raw Umber (MM) wash.
could dry brush with a combination of lighter grays to bring out
more detail), black consoles, instruments and I used reference pictures for the
switches and knobs, instruments/ CRTs with different colors. The seats are
separate and painted as per BB instructions with kaki/ tan seat covers (note,
seat covers can also be painted red or shades of OD green, as some aircraft had
that feature) and everything was dry brushed with lighter colors etc after a
light Raw Umber (MM) wash.
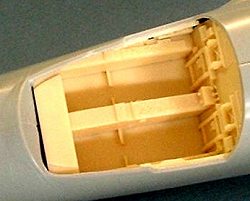
The nose wheel well is in two
pieces and is very shallow so I added detail inside with Plastic strips etc to
cover the seam and add some detail to use later. The main wheel well is very
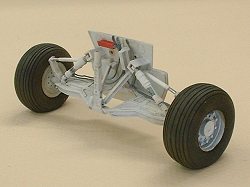 shallow also and is not right for the most part but without major surgery, it
was left alone and some detail added and it cannot be seen very well anyway with
all the doors and gear in place .
shallow also and is not right for the most part but without major surgery, it
was left alone and some detail added and it cannot be seen very well anyway with
all the doors and gear in place .
After reading and checking with some of my fellow modelers, and at looking at the nice article that Granville Davies did on his adventure with his “G” model, I knew I needed to add lots of weight to the nose before assembly and I did, I don’t know how much but I wanted enough. After the nose assembly was completed with the Painted and BB cockpit installed, the next step was to install the bottom rear section and tail assembly.
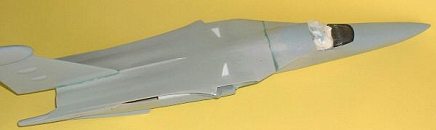
 The model has engine turbine
faces but no ducting so I installed them anyway but decided to build some FOD
covers because the duct could never be made to look right by me
The model has engine turbine
faces but no ducting so I installed them anyway but decided to build some FOD
covers because the duct could never be made to look right by me
I took Granville’s word as gospel as to his troubles he had on mating the two halves of the model, so, I decided to first glue the bottom rear part to the nose section and then, reinforce it with plastic strips inside, across the seam(s). the top section was added and lined up as best as I could but the dreaded “dip” at the top was / is, a major repair problem as everyone knows, so I just began by putting layers of putty to build it up and then “block” sanded about three times to get it as good as I could and then re-scribe all lost detail. While I was at it, the louvered vent doors on top are not molded correct so I cut those out and fitted some Evergreen styrene .040 clapboard replacements.
 Prior to any assembly, the cuts
were made to accommodate the wing glove resin vanes and doors. After the clean
up work was done on the resin parts (wings, flaps, slats, and inter flaps) they
were primed. I also modified Steven Thrum’s mounting instructions by cutting off
the inter wing ends and cutting a slot similar to the Hasegawa Tomcat wings, so
that the wings could be inserted after the model was painted and decaled. The
engines were detailed,
Prior to any assembly, the cuts
were made to accommodate the wing glove resin vanes and doors. After the clean
up work was done on the resin parts (wings, flaps, slats, and inter flaps) they
were primed. I also modified Steven Thrum’s mounting instructions by cutting off
the inter wing ends and cutting a slot similar to the Hasegawa Tomcat wings, so
that the wings could be inserted after the model was painted and decaled. The
engines were detailed, 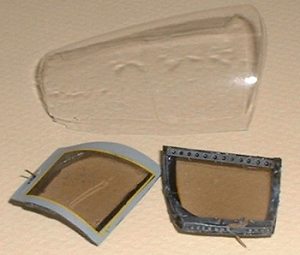 painted with various shades of MM metalizers and
enhanced with SNJ Powder (aluminum and Bronze). I use the “one open and one
closed” (engines) as suggested by the reference material. The rubber part of the
tires was painted with a mix of MM interior black and gunship gray and
dry-brushed with tan (most any shade works well).
painted with various shades of MM metalizers and
enhanced with SNJ Powder (aluminum and Bronze). I use the “one open and one
closed” (engines) as suggested by the reference material. The rubber part of the
tires was painted with a mix of MM interior black and gunship gray and
dry-brushed with tan (most any shade works well).
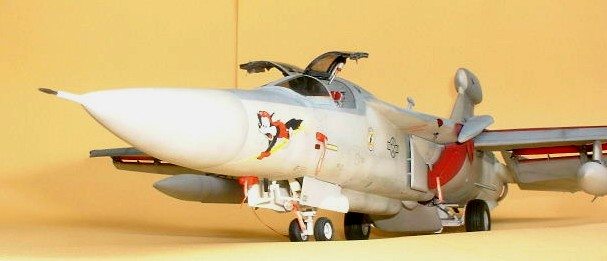
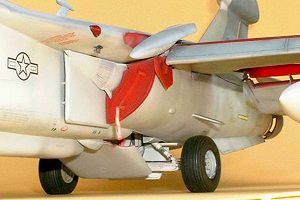
The wing seal material was replicated by making a covering seal with .005 Evergreen plastic card to match photos and then covering that with plain ribbed surgical tape and painted to match pictures (Dark Slate Gray, a wash of Raw Umber) and dry brushed with lighter tan colors. The canopy parts were masked with scotch tape and painted first with Interior black and then with Tamiya Smoke on the inside, polished with liquid car wax and then dipped a few times in future floor wax.. (they are a little dark, but not as dark as the pictures indicate but are ok for this project.
|
PAINT & DECALS |
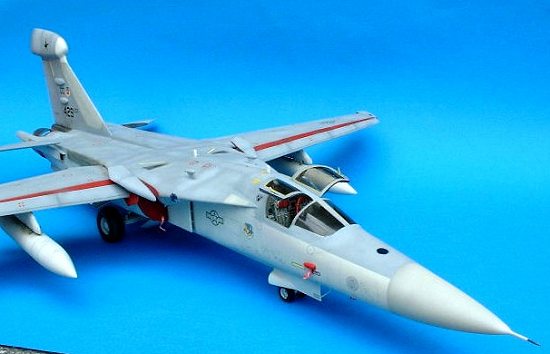
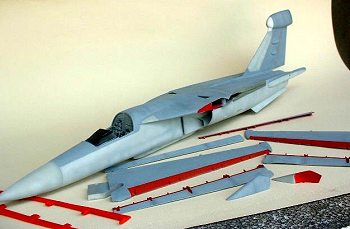 After all the major and primary work was accomplished and all the bad spots and
seams were filled and primed, I was ready to tackle the whole process of the
major paint scheme for the EF-111A which is a god awful looking two tone paint
scheme of two grays and what they call “radome gray”. The top color is listed
as Dark ghost gray FS 36320 and the bottom is listed as light gray FS 36492
(both Model Masters) I had to match the radome color(s) myself by looking at
several photos and asking questions and checking my own pictures,/ literature
and the best I can tell, and decided, the match that best suited me was to use
some light gull gray and lighten with a few drops of white in the cup to suit me
and that is what I ended up with. To keep this thing from looking so much like a
clean plastic toy airplane, (note: total correctness does not win contest,
craftsmanship and presentation is the thing). I did mix some FS 36375 light
ghost gray with the dark gray to get a little lighter color and the light fading
of some panels on top with pre-shading on top and bottom color as well. And, of
course, the red (your choice, I used MM) on all the exposed inter wing surfaces.
After all the major and primary work was accomplished and all the bad spots and
seams were filled and primed, I was ready to tackle the whole process of the
major paint scheme for the EF-111A which is a god awful looking two tone paint
scheme of two grays and what they call “radome gray”. The top color is listed
as Dark ghost gray FS 36320 and the bottom is listed as light gray FS 36492
(both Model Masters) I had to match the radome color(s) myself by looking at
several photos and asking questions and checking my own pictures,/ literature
and the best I can tell, and decided, the match that best suited me was to use
some light gull gray and lighten with a few drops of white in the cup to suit me
and that is what I ended up with. To keep this thing from looking so much like a
clean plastic toy airplane, (note: total correctness does not win contest,
craftsmanship and presentation is the thing). I did mix some FS 36375 light
ghost gray with the dark gray to get a little lighter color and the light fading
of some panels on top with pre-shading on top and bottom color as well. And, of
course, the red (your choice, I used MM) on all the exposed inter wing surfaces.
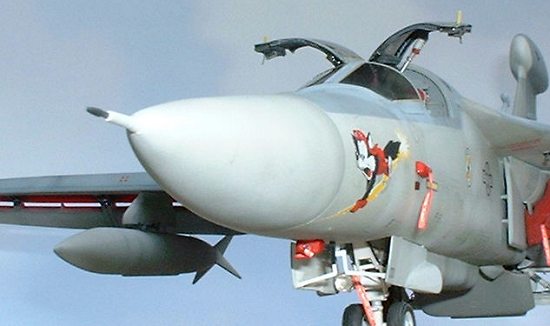
After gloss coating with Floquil
High Gloss, (two coats)( wet sanding between coats with 2000 grit) this big
goose was about ready to put on some decals ( stickers, for all the experts out
there) I had two sheets, the old Super scale stencil sheet # 48-396 and the
newer Cutting Edge sheet 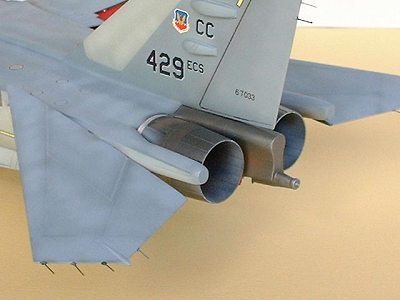 # CED-48048 Limited edition EF-111A for the 429th
Electronic Combat Squadron, 27th Fighter Wing, Cannon AFB that was
TDY in the southern no –fly zone in Iraq in 1995, where they could use nose art
until the trip back home. Of course, the one I selected was for the Squadron
Commander, Lt. Col. Bruce Nelson’s designated aircraft # 67033 to help out this
dull looking machine.
# CED-48048 Limited edition EF-111A for the 429th
Electronic Combat Squadron, 27th Fighter Wing, Cannon AFB that was
TDY in the southern no –fly zone in Iraq in 1995, where they could use nose art
until the trip back home. Of course, the one I selected was for the Squadron
Commander, Lt. Col. Bruce Nelson’s designated aircraft # 67033 to help out this
dull looking machine.
A great deal of the low- vis stenciling cannot be see on the pictures or with the naked eye but that is the way it is on the real machine but I did take the time to put it all on there anyway. After a good 24 hour curing time I sprayed some Walthers Decal dulling varnish on the decals ( this is a good product, makes most decal film vanish) and let set another 24 hours. Next I sprayed another coat of High gloss to seal it all and let dry for a couple of days while I did some more work on the detail stuff before the assembly of all the major components. But, before I glued any parts on, I put the first coat of Testors Dull coat lacquer (light coat only). Now the vac-formed windscreen could be installed with very small amounts of CA and masked off and fared- in with putty mixed with nail polish remover. (use very small amount with small spatula) The next day it was smoothed and painted.
 All landing gear, doors, air
brake, engines, tail hook, and tail bumper was installed first before the wings,
slats, glove vanes/ doors and then inter flaps and main flaps. The rest of the
cockpit was completed ( seats and other switch panels etc.) and then the Hatches
were completed and installed and the large stabilizers with static dispensers
made from fine brass wire were in stalled as well. The pitot tube, and the rest
of the external antennas were completed and installed .
All landing gear, doors, air
brake, engines, tail hook, and tail bumper was installed first before the wings,
slats, glove vanes/ doors and then inter flaps and main flaps. The rest of the
cockpit was completed ( seats and other switch panels etc.) and then the Hatches
were completed and installed and the large stabilizers with static dispensers
made from fine brass wire were in stalled as well. The pitot tube, and the rest
of the external antennas were completed and installed .
A note on installing the resin wings: since the wings had no dihedral, the wings wanted to droop because of the weight, so first of all I wanted some strong bond to hold them in place so I made a jig to hold the wings straight. I mixed some epoxy and applied at the attachment points and inserted the wings and let them set for 24 hours.
The kit ferrying tanks are ok but actually small, Scaledown makes some that are the right size but I decided to use the kit products. The EF-111A was not noted for weapon carrying loads (maybe some sidewinders, not even sure about that). Also, this version was fitted with the GPS on the top of the nose and I had to scratch build that. After the pitot tube was installed, I sprayed one more coat of dull coat and then we went to the picture taking table and proceeded taking and retaking pictures to try to get some that might be presentable I am not completely satisfied but my camera, and / or the picture taker, is not that good but I hope you get the idea. .
|
CONCLUSIONS |
 It can truly be said that this
was not one of the nice shake and bake projects the we have all come to like and
spend all our hobby money and brag about how sweet it is and that it has all the
correctness and fit. However, it can be said that over all, it went smoother
than I thought it would even after all the horror stories of some folks that
built it in the past. I had some luck too and some really nice after market
parts to help the process.
It can truly be said that this
was not one of the nice shake and bake projects the we have all come to like and
spend all our hobby money and brag about how sweet it is and that it has all the
correctness and fit. However, it can be said that over all, it went smoother
than I thought it would even after all the horror stories of some folks that
built it in the past. I had some luck too and some really nice after market
parts to help the process.
I would highly recommend Steven Thurm’s detail parts, and he makes both the short and the long wing versions if you want that. Also, the Black Box cockpit sets are super fine as always, and you can see inside very well and you can detail until you drop. The canopy is different, that is still a very weak point of the kit, and not everyone is equipped to vacform a new one and there is no after market company that I am aware of, that makes one either. The kit canopy can be used very well as seen in some of the fine renditions of the named artist above.
|
REFERENCES |
You know, references are not only just about where we get the information and all this technical crap that we may include in these plastic model airplanes that a lot of us dearly love to brag about. There is always a lot of people that give you the ideas and the impetus to even want to start and complete a building project of a certain subject. With that, I want to mention some of the best modelers that I know that had some input and suggestions and ideas to help this thing along so that it did not migrate into all my the semi-finished pile.
Grenville Davies- whose nice rendition of a “G” model inspired a try from me.
Myself - for having over 30 years of working for the USAF and seeing just about everything that flew a 1000 times over. Note: and yes, Planes do sit around with things/ panels/ brakes/ wings/ flaps etc. open or closed and hanging down etc. if it was made to open or retracted, it can be displayed that way however you like and be “correct” .
DETAIL & SCALE – F-111 Arrdvark – Bert Kinzey – Vol. 4
LOCK ON N# 5 – F-111 E/F AARDVARK - Verlinden Publications – Willy Peeters.
Several Internet On-line sites including Steven Thrum and his Scaledown Company
And of course, Elvis, who is still the King… although he did leave the building! ROCK ON !!! “Thank’ye very much”. cws
Copyright ModelingMadness.com. All rights reserved. No reproduction in part or in whole without express permission.
f you would like your product reviewed fairly and quickly, please contact the editor or see other details in the Note to Contributors.