|
KIT # |
4932 |
|
PRICE: |
$17.00 MSRP |
|
DECALS: |
Two planes (VF-31 and VF-2) |
|
REVIEWER: |
|
|
NOTES: |
Kit built OOB: Boxed in US by R-M with book. |
|
HISTORY |
With the demise of F-111B, US Navy started looking for a fighter to meet its requirements for neutralizing the Soviet long range bomber threat and the threat of Soviet Navy’s new guided missile submarines. They found their answer in Grumman’s F-14.
F-14A had an AWG-9 radar and was capable of tracking 24 targets simultaneously and launching six Phoenix missiles at six of those targets from distances of over 100 miles. Although F-14 was the best long range interceptor in the world, it was no slouch when it came to dog fighting. Even though F-14A was as big as a WW II B-17, its variable geometry wing made it quite a nimble aircraft, allowing it to match turn for turn with smaller aircraft such as A-4 and F-5.
All in all, F-14A was a great fighter except for its engines. The Pratt and Whitney TF30-414 engines were simply too finicky and subject to compressor stalls. This meant that the pilot had to fly the plane to the limits of the engine and not the air frame. Originally, it was planned to upgrade all F-14A with better and more powerful engines a la F-15 and F-16. Unfortunately, due to budget limitations and rapid expansion of the US military during the Reagan years this engine upgrade was postponed.
 It was not until the late 1980’s
that General Electric F-110 engines were fitted to the F-14A airframes. The new
airplane dubbed F-14A+ (and later F-14B) was by all accounts a dream to fly.
The new engine provided so much thrust that the aircraft did not need the
afterburners to be launched from a carrier. In addition, the new engines were
much more fuel efficient than the old TF30’s.
It was not until the late 1980’s
that General Electric F-110 engines were fitted to the F-14A airframes. The new
airplane dubbed F-14A+ (and later F-14B) was by all accounts a dream to fly.
The new engine provided so much thrust that the aircraft did not need the
afterburners to be launched from a carrier. In addition, the new engines were
much more fuel efficient than the old TF30’s.
As the F-14s in the USN were being upgraded to the A+ standard, Grumman was planning a much more thorough upgrade to F-14. The new F-14, version D, in addition to the new engines was to have newer ejection seats and an all-digital radar based on F-15’s radar. This allowed the F-14’s radar to track targets from more than 200 miles away. It was also equipped with a digital data link capable of transferring all the information gathered by the aircraft’s sensors to carrier battle group’s air defense command and control centers such as an E-2C Hawkeye or an Aegis cruiser. Furthermore, F-14D was to have ground attack capabilities with the ability to launch Harm and Harpoon missiles as well as guided and unguided bombs. In short, F-14D was everything F-14’s original designers envisioned it to be.
The plan was to upgrade all existing F-14 airframes to the F-14D standards and all new F-14’s were to have been F-14D’s. However, with the end of the Cold War, the Bush administration decided to stop production of F-14, and cancel A-12 Avenger II which was to have been the replacement for A-6 Intruder and move towards an all F/A-18 fleet. F-14’s were to be phased out and replaced by the “Super Hornet” some time during the first decade of the 21st Century. Meanwhile, as the US got involved in the civil wars in Bosnia and Kosovo, the USN realized that F/A-18 was not going to cut it as the long arm of the fleet due to its very short legs. It was left to F-14’s to be the USN’s main mud-mover during those two conflicts. F-14 was also used to great effect in operation Enduring Freedom with VF-213, VF-41 and (I think) VF-14 taking part in destroying Taliban and Al Qaeda forces in Afghanistan. It is a sad irony that the ‘cats of VF-41 and VF-14 were rewarded for their service in Afghanistan by being replaced by F/A-18E/F.
|
THE KIT |
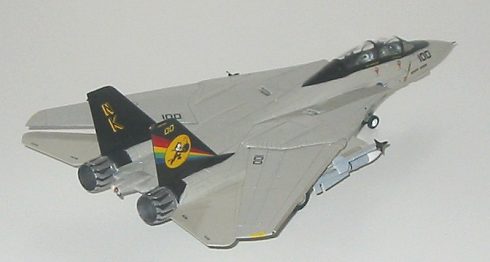
 Revell Germany’s F-14D 1/72 kit
certainly looks good in the box. Attention has been paid to such things as the
correct consoles for the pilot and the RIO, the newer ejection seats and the
correct vents for the M-61 canon. The panel lines are engraved although the
engraving is closer to Matchbox than to Tamigawa. The kit is very modular
indicating that it was designed to produce all the different variants of F-14
from the same basic mold. One thing that is curiously missing from this kit is
the mechanism for opening the canopy. This is something that all the F-14 models
that I have built to date have had and given how good the cockpit detail looks
it is odd to close the canopy on it.
Revell Germany’s F-14D 1/72 kit
certainly looks good in the box. Attention has been paid to such things as the
correct consoles for the pilot and the RIO, the newer ejection seats and the
correct vents for the M-61 canon. The panel lines are engraved although the
engraving is closer to Matchbox than to Tamigawa. The kit is very modular
indicating that it was designed to produce all the different variants of F-14
from the same basic mold. One thing that is curiously missing from this kit is
the mechanism for opening the canopy. This is something that all the F-14 models
that I have built to date have had and given how good the cockpit detail looks
it is odd to close the canopy on it.
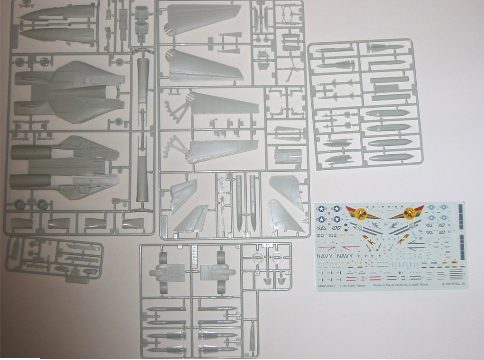
The plastic is very soft with a pebbly texture which means it sands well and thanks to the deeply engraved panel lines you are not going to lose much detail. There were sink marks on the fuselage where the pivots for the swing wings are located. In addition there were sink marks on the smaller front landing gear doors. Nothing that a little putty or super glue can’t fix. There are also a lot of ejector pin marks in some nasty places (such as landing gear doors and landing gears) that are harder to fix as some of them are quite pronounced due to the soft nature of the plastic. In addition, the landing gear doors and the intake trunks seem a little too thick for the scale.
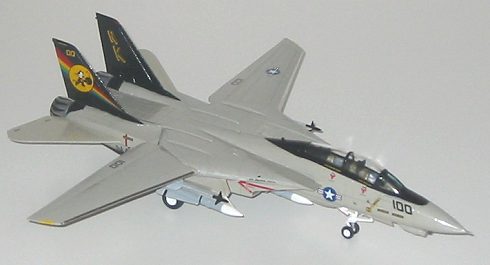
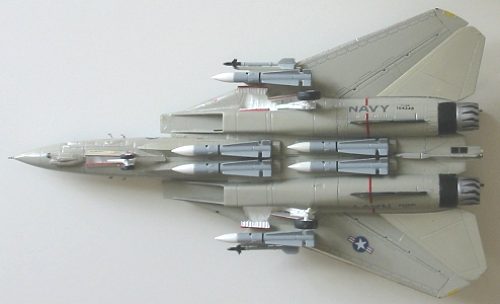
 The kit comes with two fuel
tanks, two Sidewinders (of AIM-9L/M variety), two Sparrows and to my complete
surprise, SIX Phoenix missiles. This is the only F-14 kit asides from the
Airfix/Heller offering that has six of them big bullets. The shape of the all
the missiles look right and they should look great hanging from the correctly
shaped Phoenix launch rails. The glove vain pylons have the option of using
either the Phoenix or the Sparrow attachments. The only qualm that I have with
these pylons are the Sidewinder launch rails. They are not the new types and are
rather simplified.
The kit comes with two fuel
tanks, two Sidewinders (of AIM-9L/M variety), two Sparrows and to my complete
surprise, SIX Phoenix missiles. This is the only F-14 kit asides from the
Airfix/Heller offering that has six of them big bullets. The shape of the all
the missiles look right and they should look great hanging from the correctly
shaped Phoenix launch rails. The glove vain pylons have the option of using
either the Phoenix or the Sparrow attachments. The only qualm that I have with
these pylons are the Sidewinder launch rails. They are not the new types and are
rather simplified.
The decal sheet is a bit on the thick side, not too glossy and in register. The decal sheet has the markings for the an F-14D of VF-2 “Bounty Hunters” with TPS colors and a much nicer hi-vis CAG bird of VF-31 from Roving Sands maneuvers. The decal sheet also includes some of the markings for the missiles although I don’t think it is a complete set.
The instruction is typical of Revell-Germany: Printed on coarse recycled stock with pictures of multiple steps; color call-outs in the indecipherable Revell-Germany paint numbers (fortunately the main paint scheme has FS color numbers) and, the part that I like the most, warnings in a zillion languages.
|
CONSTRUCTION |
I have built more F-14’s than any other aircraft. Therefore, I tend to know were all the major screw-ups in its construction occur. In general, F-14’s kits that I have built suffer from the following problems:
 Revell’s
offering is no different. The joint between the cockpit and the rear fuselage is
awful. There is a step at the joint on the bottom of the fuselage that is pretty
bad and I don’t know of anyway to fix it other than to cover it up with the
Phoenix launch rails, others may want to cut the bottom of the rear fuselage a
little, parallel to the ground so it would match the level of the bottom of the
front fuselage and then use putty to fill in the gap on the rear fuselage but
that is beyond me at this time. Maybe next time.
Revell’s
offering is no different. The joint between the cockpit and the rear fuselage is
awful. There is a step at the joint on the bottom of the fuselage that is pretty
bad and I don’t know of anyway to fix it other than to cover it up with the
Phoenix launch rails, others may want to cut the bottom of the rear fuselage a
little, parallel to the ground so it would match the level of the bottom of the
front fuselage and then use putty to fill in the gap on the rear fuselage but
that is beyond me at this time. Maybe next time.
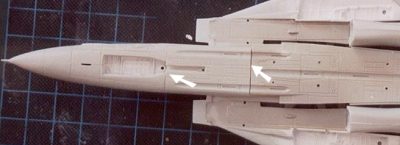
 The joint
between the top and the bottom fuselage has its problems too. Asides from having
the standard gap in the rear, there is a noticeable gap in front of the intakes
where the top and the bottom fuselage meet. This section on the real aircraft
shows no panel-lines; therefore, I used CA gap-filling glue on this section as
much as I could to cover the gap. The rear of the fuselage was also given the
same treatment. Another thing that was annoying is a very noticeable gap in the
bottom fuselage between in the inner-upper intake trunks. Mind you, this is not
a gap in a joint but rather part of the molding. I don’t know why Revell-Germany
engineered it this way but it is ugly and next time I will use sheet styrene to
fill this gap.
The joint
between the top and the bottom fuselage has its problems too. Asides from having
the standard gap in the rear, there is a noticeable gap in front of the intakes
where the top and the bottom fuselage meet. This section on the real aircraft
shows no panel-lines; therefore, I used CA gap-filling glue on this section as
much as I could to cover the gap. The rear of the fuselage was also given the
same treatment. Another thing that was annoying is a very noticeable gap in the
bottom fuselage between in the inner-upper intake trunks. Mind you, this is not
a gap in a joint but rather part of the molding. I don’t know why Revell-Germany
engineered it this way but it is ugly and next time I will use sheet styrene to
fill this gap.
The intake trunks did not fit well although they fitted better than the most because Revell decided to put the joint at a panel line. This made the job of filling the gap at the rear of the trunk easy. The fit between forward of the intake trunk and the fuselage was also excellent. The one problem that I had and that I could not solve it properly was a gap between the right intake trunk and the inner fuselage. This gap is pretty nasty and I tried to fill it and sand it but it is hard to get at. I use CA and hand pressure to close the gap which I managed to do... for a while. During airbrushing, the joint came apart and I was left with a gap. Fortunately with the Phoenix missiles and their launch rails the gap is not that noticeable.
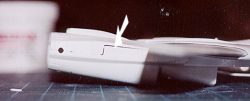
 The
vertical stabilizers had a tiny gap between them and the part of them that is on
the upper fuselage which I filled with CA and sanded. It is a hard joint to get
at but I managed and the gap was small anyway. (By the way, so far the only F-14
kit that has managed to engineer the joint between the vertical stabilizers and
the fuselage right has been Airfix. The rest of that kit is perhaps crap but
that part of the kit is well-engineered as it puts the bulbous part of the
stabilizers with the rest of the stabilizer and not on the fuselage.)
The
vertical stabilizers had a tiny gap between them and the part of them that is on
the upper fuselage which I filled with CA and sanded. It is a hard joint to get
at but I managed and the gap was small anyway. (By the way, so far the only F-14
kit that has managed to engineer the joint between the vertical stabilizers and
the fuselage right has been Airfix. The rest of that kit is perhaps crap but
that part of the kit is well-engineered as it puts the bulbous part of the
stabilizers with the rest of the stabilizer and not on the fuselage.)
The other things to look out for in the construction of this kit are as follows:
The front fuselage itself has a bottom section that does not fit well. I used hand pressure to make sure that there is as little a gap as possible; then I filled the gap with CA and sanded it.
The beaver tail fits well although you got to be a little careful. The joint is done on a panel line but in order to get the panel line to have the same width across the joint, I used a little CA. Paint the engine plug on the beaver tail and then mask the painted portion before adding vertical stabilizers. I did so using Humbrol’s 85, satin black.
Do not add the ventral fins until the painting is done or do so before painting with some heavy bonding agent. These fins are connected to the bottom of the fuselage with two tiny pins. One of mine broke off during paint and I made a mess of it trying to put it back on.
There are four ECM bumps on the bottom fuselage that need to be cut off. Be careful as the plastic is pretty soft.
The pitot tube is built as an integral part of the front fuselage and it will break off. Mine did and I saved it and put it on last after everything was done. There is also a small gap between the two halves of the front fuselage at the nose of the aircraft which needs to be filled. In addition, the panel lines in front of the windscreen do not quite match from one half to the other and need to be re-inscribed.
 The
cockpit goes together rather nicely. However, the painting guide for the
internal paintings of the aircraft is wrong. I used the instructions from a
new-mold Hasegawa F-14 kit to paint it correctly. The floor and side walls of
are to be painted Dark Gull Gray, 36231 (I used Testor’s Acryl line). The seat
cushions are Khaki (I used Tamiya’s brown Khaki) as well as the front portion of
both the pilot’s and the RIO’s instrument panel shroud. The seats were painted
Testor Acryl’s Interior Black and were dry brushed with Humbrol’s Silver.
The
cockpit goes together rather nicely. However, the painting guide for the
internal paintings of the aircraft is wrong. I used the instructions from a
new-mold Hasegawa F-14 kit to paint it correctly. The floor and side walls of
are to be painted Dark Gull Gray, 36231 (I used Testor’s Acryl line). The seat
cushions are Khaki (I used Tamiya’s brown Khaki) as well as the front portion of
both the pilot’s and the RIO’s instrument panel shroud. The seats were painted
Testor Acryl’s Interior Black and were dry brushed with Humbrol’s Silver.
There are decals for the instrument panel CRTs. However, I did not use them. Instead, I painted the CRTs silver and then painted them over with Gunze clear green. This works very well and in my opinion, it is better than decals.
The Phoenix missile halves don’t quite match and require a bit of filling and sanding.
|
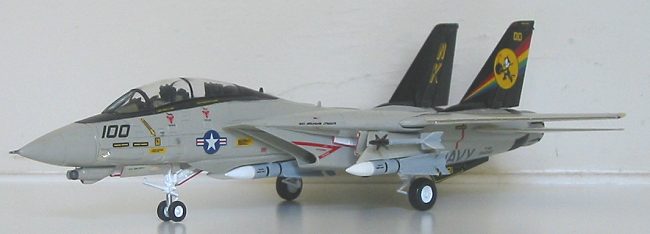
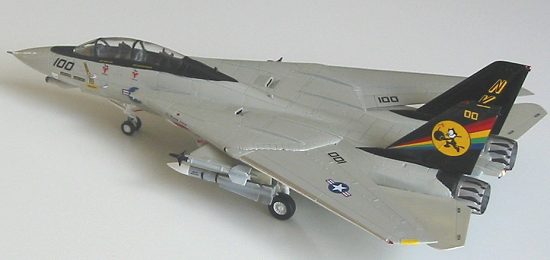
CAMOUFLAGE & MARKINGS |
I first painted the inside of air intakes, the wheels, the wheel wells, the landing gears and the gear doors Gloss White using Tamiya paint early in the construction. After I put most of the plane together, I masked the wheel wells with Tamiya tape and the canopy with Parafilm-M and went to work on the rest of the plane.
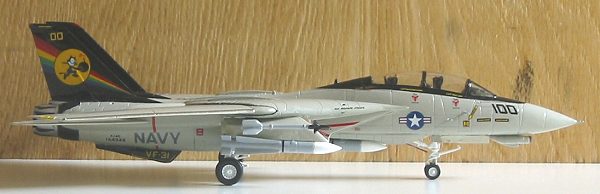
As I was
doing the CAG bird from VF-31 Roving Sands Exercise, I first airbrushed the
tails, the ventral fins and the anti-glare panel Gloss Black using Humbrol 21. I
like Humbrol enamels as they seem to work well with standard paint thinner and
cover extremely well. Furthermore, their Gloss Paint does not seem to orange
peel as much as other enamels. After a couple of days, I masked these areas and
painted the rest of the plane and the outer gear doors FS 26440 Humbrol 129
Semi-Gloss Light Gull Gray. Note that the tail hook is not striped on this plane
and needs to be paint FS16440 as well. Also
 the pictures I have seen of this
aircraft show that air cushion behind the swing wings are painted FS16440 and
not the usual FS36118. After the gray was dried I removed the masks (except for
the Parafilm-M on the clear parts of the canopy) and shot the whole plane with
Future to prepare for decaling. I painted the inner exhausts with Model Master’s
Graphite (not metalizer) and the outer exhausts with a mixture of Buffing Burnt
Metal and Buffing Aluminum Plate from the Model Master’s Metalizer line. I made
a mask from Post-it in order to simulate the black marks left on the outer
exhaust turkey feathers due to their movement. I painted the tires Gunzo
Sangyo’s Tire Black. I hand painted the body of the missile with Testor Acryl’s
FS 36375 Light Ghost Grey and painted the tips of the Sidewinders Gloss Black
and the tips of the Phoenixes Gloss White. I then shot them with future to
prepare for decaling.
the pictures I have seen of this
aircraft show that air cushion behind the swing wings are painted FS16440 and
not the usual FS36118. After the gray was dried I removed the masks (except for
the Parafilm-M on the clear parts of the canopy) and shot the whole plane with
Future to prepare for decaling. I painted the inner exhausts with Model Master’s
Graphite (not metalizer) and the outer exhausts with a mixture of Buffing Burnt
Metal and Buffing Aluminum Plate from the Model Master’s Metalizer line. I made
a mask from Post-it in order to simulate the black marks left on the outer
exhaust turkey feathers due to their movement. I painted the tires Gunzo
Sangyo’s Tire Black. I hand painted the body of the missile with Testor Acryl’s
FS 36375 Light Ghost Grey and painted the tips of the Sidewinders Gloss Black
and the tips of the Phoenixes Gloss White. I then shot them with future to
prepare for decaling.
The decals certainly looked good on the sheet but putting them on was a different story. The decals were too thick and required a ton of Micro Sol to get them into the deep panel lines. The decals also did not have the typical texture of most decals I have worked with before. They are more rubber like and seem to stick to the surface like they had suction cups. Next time I think I will either use Two Bobs decals for VF-213 or CAM decals for the same markings as this kit’s.
Anyway, after I had put all the decals on I shot the whole thing with Future again. As the pictures I had seen of the plane showed it with gloss paint, this shot of Future was the final coat. In retrospect, it is too glossy for the scale and next time I will probably coat with semi-gloss clear using future and Tamiya flat base. After the Future coat, I hand painted the front anti-glare panel with Humbrol’s satin black. The head of the IR detector on the chin pod was painted with Humbrol’s metallic black which simulates the glossy tip of the detector rather well. I painted the navigation light by first painting them silver and the covered them with the appropriate clear color. I painted the fuel dump on the tail and the landing gear door edges red. The tip of the ECM bump on the tail was painted radome and the windscreen was painted with Tamiya’s clear blue. The wing slime lights (formation light panels that is) were painted yellow. The metal on the leading edges of the wings and the blast plate in front of M-61 canon were simulated using Bare Metal Foil chrome.
|
FINAL ASSEMBLY |
The final assembly consisted of adding the landing gears, the landing gear doors, the vane glove pylons and putting on the ordinance.
 The holes
to attach the pylons, give the pylons at toe-in look so I cut the rear alignment
pin on each of the pylons and adjusted the pylons until they looked right to my
eye.
The holes
to attach the pylons, give the pylons at toe-in look so I cut the rear alignment
pin on each of the pylons and adjusted the pylons until they looked right to my
eye.
The landing gears and the landing gear doors have positive lock onto the fuselage. This is a nice feature that takes the guesswork out of positioning the landing gear doors.
The main landing gears have a problem as they may be attached to the fuselage at an angle. I made this mistake and then I removed and reattached them in their correct position.
|
CONCLUSIONS |
This kit definitely looks much better in the box than it builds. The heavy-handed detailing, the poor fit and the fact that the decals are too thick makes the overall grade of this kit a B.
|
REFERENCES |
Tomcat In Action, Squadron Publications.
January 2003
Copyright ModelingMadness.com. All rights reserved. No reproduction in part or in whole without express permission.
If you would like your product reviewed fairly and fairly quickly, please contact the editor or see other details in the Note to Contributors.