Hasegawa 1/48 F-18A Hornet
|
KIT # |
P 24 |
|
PRICE: |
$85.00 CDN |
|
DECALS: |
See review |
|
REVIEWER: |
Ray Snazel |
|
NOTES: |
Verlinden update set, Leading Edge decals |
|
HISTORY |
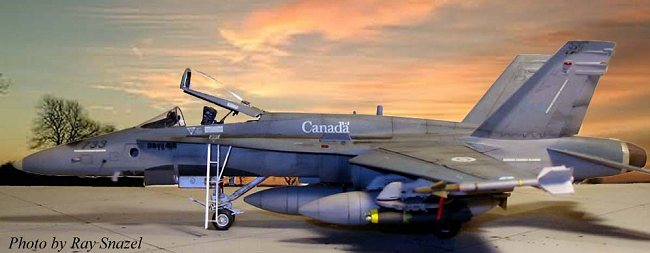
The pride and joy of Canada’s Air Command fighter pilots, the CF-18 provides air-to-air interception and air-to ground support to the army. The CF-18 was acquired in 1982 to replace the CF-104, CF-101 and CF-5. With the addition of precision-guided munitions capability, the CF-18 will serve into the next century. The first CF-18 was rolled out on 28 July 1982 and has proven to be ideal for the Canadian Forces. The Aircraft is a dream to fly, according to its pilots, and it has proven up to its task in performing its demanding dual role as an interceptor and ground attack fighter. 138 CF-18s were bought for the Air Force with the first one arriving at CFB Cold Lake in the fall of 1982. With its combination of advanced flight controls and powerful and reliable engines, the Hornet is equally comfortable at high or low altitudes. The Hornet is a classic "turn and burn" weapons delivery platform. McDonnell Douglas designed the Aircraft as a multi-role fighter, which means it excels at attacking both ground and air threats. A CF-18 Hornet gets all the take-off power it needs from two General Electric F404-GE-400 engines, each producing 7,299 kg of thrust. The CF-18 Hornet can carry Sidewinder and Sparrow missiles as an air defence fighter or, 17,000 pounds of ordnance as a strike Aircraft. (Editor's note: the Hornet is actually designated CF-188, but almost no one uses that term and it is mostly called either the CF-18 or the Hornet.)
 The
F/A-18 is in service with the U.S. Navy. U.S Marine Corp and the air forces of
Canada, Australia, Spain, Kuwait, Finland, Switzerland, and Malaysia. As of May
1999 Hornet pilots have accumulated more than 3.7 million flight hours and, in
the process, are establishing new records daily in safety, reliability,
maintainability and mission performance.
The
F/A-18 is in service with the U.S. Navy. U.S Marine Corp and the air forces of
Canada, Australia, Spain, Kuwait, Finland, Switzerland, and Malaysia. As of May
1999 Hornet pilots have accumulated more than 3.7 million flight hours and, in
the process, are establishing new records daily in safety, reliability,
maintainability and mission performance.
Canada was the first international customer for the F/A-18, and its fleet of 138 Hornets is the largest outside the United States. Deliveries to Canada were completed in 1988. Canadian CF-18s operate out of Canadian Forces Base Cold Lake, Alberta; and Canadian Forces Base Bagotville. The Canadian Forces are currently planning an aircraft modernization program, which would significantly upgrade the avionics of their CF-18s.
|
THE KIT |
 I must confess
that I am not a big modern jet modeller; my passion is 48th scale
Luftwaffe material. But, being a good old Canadian boy I knew that eventually I
would have to build a CF18. Being a WWII modeller, most kits I open have 40 ish
parts and slam together pretty fast allowing me a lot of time to weather and
tinker. Imagine my surprise when I opened this kit revelling 220 beautiful
pieces of moulded plastic coupled with a Photo etch sheet and a book for
instructions, YIKES !! Well it took me almost 10 years of quietly placing this
kit back on the shelf in fear to get busy and build this bird. Add on the
Verlinden update and the project quickly reaches the 300 parts threshold. Well
all we really require is a few cases of brew and some time. Away we go……
I must confess
that I am not a big modern jet modeller; my passion is 48th scale
Luftwaffe material. But, being a good old Canadian boy I knew that eventually I
would have to build a CF18. Being a WWII modeller, most kits I open have 40 ish
parts and slam together pretty fast allowing me a lot of time to weather and
tinker. Imagine my surprise when I opened this kit revelling 220 beautiful
pieces of moulded plastic coupled with a Photo etch sheet and a book for
instructions, YIKES !! Well it took me almost 10 years of quietly placing this
kit back on the shelf in fear to get busy and build this bird. Add on the
Verlinden update and the project quickly reaches the 300 parts threshold. Well
all we really require is a few cases of brew and some time. Away we go……
|
VERLINDEN SET |
The update set is another very nice offering comprising of resin and photo etch. It provides full canopy rails and cockpit side walls, a very nice ejection seat, sparrow missiles, ladder, wing fold kits, and a few more odds and ends. I choose to use the folding wings on another project as well as the nose radar array.
|
CONSTRUCTION |
Cockpit
 The cockpit, which happens to be my favourite part of the whole kit, went
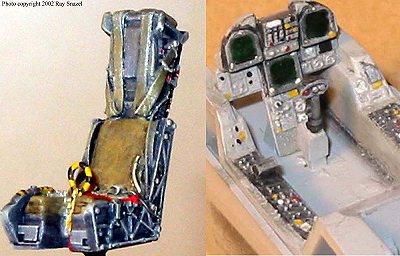
together with the update set fairly painlessly. First up was the ejection seat,
the resin block was carved off and the whole seat sprayed a very darkened Gull
Grey. The actual seats are black but personally I have found black almost
impossible to highlight realistically and the washes never show up. After a
base coat of dark gull grey I blasted future to seal the base and once dry
applied a black oil wash thinned in turpentine. Once that was dry the whole
seat was dry brushed with different shades of grey until the desired effect was
reached. The seat cushion and belts were painted 2 different colors of khaki
followed by some red for warning placards and some silver and yellow were
appropriate. Once all the dry brushing of the cushions and parachute pack was
completed the whole seat was blasted with Poly S flat and set aside.
The cockpit, which happens to be my favourite part of the whole kit, went
together with the update set fairly painlessly. First up was the ejection seat,
the resin block was carved off and the whole seat sprayed a very darkened Gull
Grey. The actual seats are black but personally I have found black almost
impossible to highlight realistically and the washes never show up. After a
base coat of dark gull grey I blasted future to seal the base and once dry
applied a black oil wash thinned in turpentine. Once that was dry the whole
seat was dry brushed with different shades of grey until the desired effect was
reached. The seat cushion and belts were painted 2 different colors of khaki
followed by some red for warning placards and some silver and yellow were
appropriate. Once all the dry brushing of the cushions and parachute pack was
completed the whole seat was blasted with Poly S flat and set aside.
Next were the guts of the cockpit and canopy rails from
Verlinden. The whole cockpit tub was painted light
ghost grey and then the CRT’s painted black along with the removable panels on
the side consoles. Another sealing with Future, followed by a black wash set
the tub and front panel up for detailing. The side consoles were dry brushed a
medium grey while anything light grey was dry brushed with an extremely light
grey just a tad off of white. The CRT’s were painted with clear green. The tub
was then blasted with flat and as a final touch, the green CRT screen were
touched with a spot of Future to give them a glass
look. 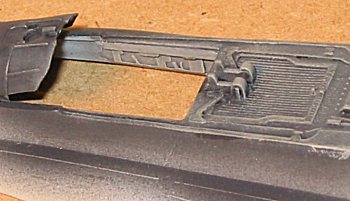
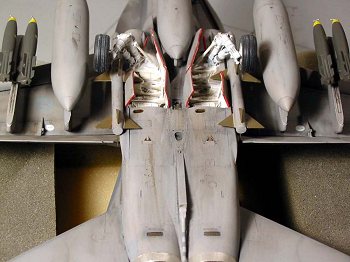
The cockpit rails and area behind the pilots seat was painted the same dark grey I used for the seat, again according to references this area is black but same reasoning was applied to this area. I personally believe to “duplicate not replicate”. This picture actually shows the side panel of the cockpit tub as well as the rails. The Verlinden kit supplies a large piece of etch that goes from the bottom of the glare shield all the way back to the canopy hinge. Well, if you can bend this to look right I salute you. I chose a few select cuts on the etch and it settled into place nicely. Same format here with the washed and dry brushing to get the desired “depth” look to the rails and rear cockpit.
Fuselage and Wings
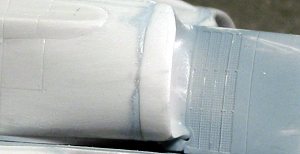
Once the cockpit was installed, the fuselage halves were glued together. The underside of the Leading Edge Extensions (LEX), in particular I had trouble mating up. Eventually they came together with a bit of putty and all worked out nicely. The nose cone I had to modify for the Canadian forces version with the search light on the left side forward of the LEX. Attaching the nose to the fuselage halves was probably the most difficult part of the constructions process. Take some time with this point and it will save you a lot of grief later.
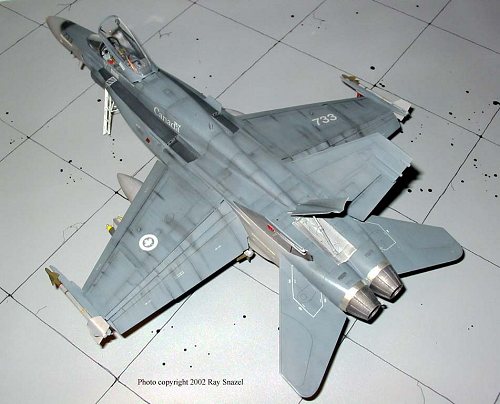
The wings allow for flap and slats in two
positions, most of the static F18’s I had pictures of had the slats out and the
flaps in the extended position. The slats are two pieces and drop into place
easily; the flaps are 6 main parts with rails and a extension on the top of the
wing, no problems at all here. Now we were cooking, I chose to jump ahead on
the instructions and place the horizontal and vertical stabilizers so get a feel
for the overall look of the kit. I love the lines on this plane, really
 shows a lot of the
aerodynamics used to get the performance required of this project. The
engines were sprayed and built separately and placed to the side for attachment
at a later date.
shows a lot of the
aerodynamics used to get the performance required of this project. The
engines were sprayed and built separately and placed to the side for attachment
at a later date.
Step 5 is the attachment of the engine intakes
and fuselage sides. There is a distinct ridge on the seam between the intakes
and the fuselage sides, this took a lot of fidgeting to get the fuselage looking
right while trying to reduce the sanding needed later. To make a long story
longer, be careful, I had to do a lot of sanding to get the fit just right.
Putty to the rescue. 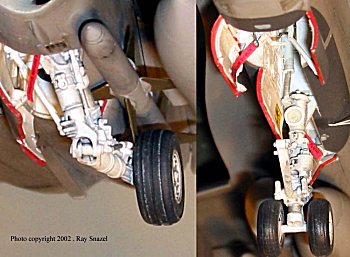
Landing Gear
The Landing gear is a thing of beauty, its just to bad that you have to paint it white, makes it kind of hard to weather but more on that later. The main gear and the nose gear are metal and clean up extremely easily leaving a highly detailed addition to your kit. The gear doors have a lot of ejector pin marks but they clean up very easily. All I added to the wheel wells was some home made “Remove Before Flight” ribbons and dry-brushed in some dirt for the final touch. The gear was painted white first then pre shaded dark grey followed by another coat of white to get the shadow effects.
|
PAINT & DECALS |
 The decals come from Leading
Edge
out of Calgary. This is a massive sheet giving you 2 full aircraft stencil
sheets and enough numbers to do any aircraft in CAF’s inventory. There are
decals for many different squadrons and options for Balkans operations. I chose
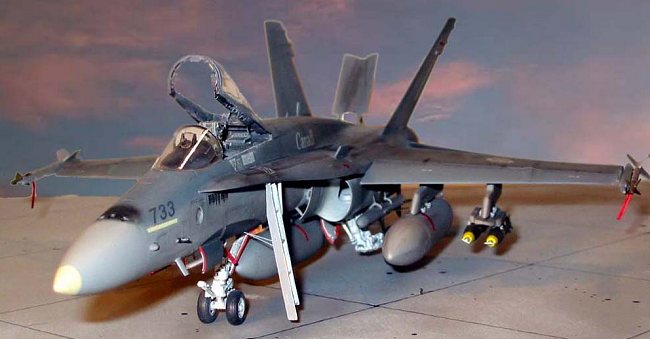
Aircraft 733 which flew in the Balkans campaign. Being fully impressed with the
sheet of decals I pressed on with the painting. My only disappointment with the
decals would come later, This is my first set of Leading Edge decals and I found
them very thick and hard to settle down. It took a lot of work with Micro set
and Micro sol to get the detail under the decal to come through. They also
tended to silver very easily. Again a great set of decals but not thin like the
Aeromaster
decals I am accustomed to.
The decals come from Leading
Edge
out of Calgary. This is a massive sheet giving you 2 full aircraft stencil
sheets and enough numbers to do any aircraft in CAF’s inventory. There are
decals for many different squadrons and options for Balkans operations. I chose
Aircraft 733 which flew in the Balkans campaign. Being fully impressed with the
sheet of decals I pressed on with the painting. My only disappointment with the
decals would come later, This is my first set of Leading Edge decals and I found
them very thick and hard to settle down. It took a lot of work with Micro set
and Micro sol to get the detail under the decal to come through. They also
tended to silver very easily. Again a great set of decals but not thin like the
Aeromaster
decals I am accustomed to.
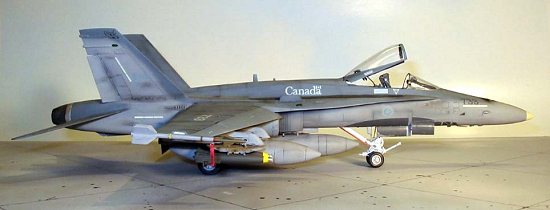
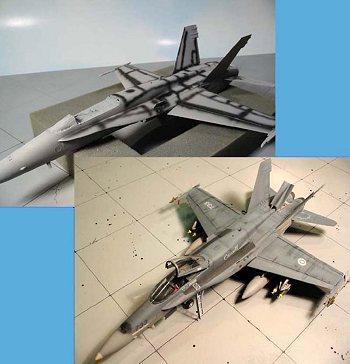
Painting started with a primer light grey and then continued with the pre-shade. Once this was completed I proceeded to apply the camouflage colors. The underside was painted Light Grey FS 36375 and the top painted Medium Grey FS 35237. Once dry I proceeded to further shade the topside to simulate weather due to the sun. This was accomplished by spraying increasingly lighter shades of the original color.
Once dry the whole model was painted with a few coats of future for decal prep. The decals were applied and another coat of future sealed them for weathering. I really experimented with the weather at this stage, having seen many F18s up close they are very simply FILTHY! First order of business was a oil / turpentine wash of black in all the panel lines. Before this dried I took a small sponge and wiped with the direction of airflow to get some streaks. These all originated from a hinge point of something that could generate this streaking. After this was dry (2 days) I applied a Raw umber wash in places to give a bit more definition in the places that the black missed, most of the umber went on the belly and selectively on the top surfaces. At this point the first coat of Poly S flat was applied. With the flat coat I was now able to start with the pastels for the cannon areas and some streaking on the vertical stab’s and some weathering in the speed brake area.
|
FINAL ASSEMBLY |
3 drop tanks, 2 sparrows, 2 sidewinders and 4 Snakeye’s from my research was a realistic weapons load for a Balkans mission so there were placed in their respective positions. The snakeye’s came from a Hasegawa weapons kit.
Another flat coat was applied after some more red flags were positioned and it was time for the canopy and ladder. The ladder provided from the kit is plastic and photo etch. I choose to use this over theVerlinden ladder purely because had trouble getting the Verlinden ladder to look right.
|
REFERENCES |
Leading Edge decal sheet #48-24
F/A-18A/C & CF-188A Hornet. Verlinden Publications Lock On #15, book # 692
Vic Holland, CAF CF-188 pilot / Instructor – Retired
Jason Kendal, CAF CF-188 pilot - Retired
If you would like your product reviewed fairly and quickly, please contact
me or see other details in the Note to
Contributors.